Every time you paste the same instructions into a new ChatGPT chat, you're doing work ChatGPT could remember for you. The same goes for the four rounds of "shorter," "use bullets," and "put the owners first" it takes to get output in the format you actually want.
A skill fixes that. It teaches ChatGPT how to do one job your way, so you explain it once and the result comes back right on the first try from then on.
Below, we'll build a skill from scratch in the browser version of ChatGPT, run it on a real meeting transcript, and share the tips that made the biggest difference. At the end, we'll show you how to move a skill between the browser and the desktop app, because the two don't share skills with each other.
Our skill turns a long meeting transcript into a short summary of the highlights.
Summaries are a perfect job for a skill. ChatGPT can write one on the first try, but getting the exact format we want always takes a few prompts and a few revisions. With a skill, we do that work once, and every summary after that comes out the way we want it.
If you'd like this exact skill, you can download Meeting Highlights here. Or follow along and build one for any job you find yourself repeating.
1. Open ChatGPT in your browser and click Plugins in the left sidebar.
2. Switch to the Skills tab.
3. Click Add in the top corner, then choose Create with chat.

You'll also see an option to upload a skill from your computer. We'll come back to that later.
ChatGPT opens a new chat with the prompt already filled in. It calls skill-creator, a built-in skill whose whole job is building other skills, and asks it to keep things conversational and start by asking what the skill should do.

Send the prompt, and ChatGPT comes back with one question. What should the skill do, and what does a good result look like?
This is where the skill gets its quality. We told ChatGPT the skill should review long meeting transcripts and pull out the key information. Then we attached two files: a sample all-hands transcript, and an example summary written exactly the way we want it.
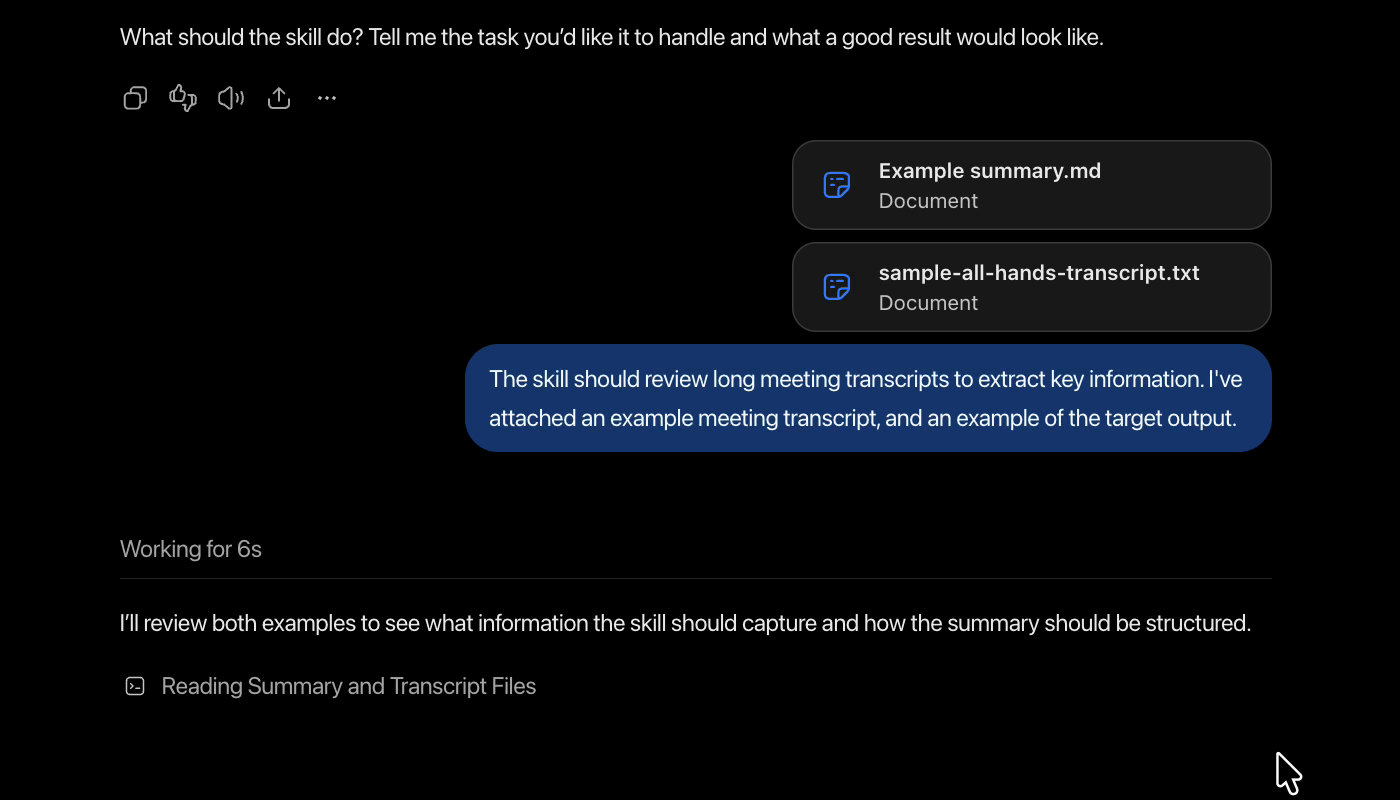
That example does the heavy lifting. Describing a format in words leaves room for guesswork, and showing ChatGPT the finished product leaves none.
ChatGPT read both files and worked out the format on its own. It found four sections: Most Important Decisions, Most Urgent Action Items with owners and deadlines, Key Accomplishments, and Other Issues to Watch.
It also suggested a few rules we never spelled out. It wanted to flag blockers with a ⚠️ warning sign, keep uncertainty wherever the meeting was uncertain, never invent an owner, and never treat proposed work as finished.
Then it asked a follow-up. Should the summary stay selective and brief like our example, or capture every decision and action item, even if that makes it longer? We wanted highlights, so we told it to stay selective and brief and focus on the most important information.

Expect questions like this when you build a skill. Each answer gives the skill the detail it needs to handle situations your example doesn't cover.
ChatGPT worked for just under two minutes. It wrote the skill, then tested it on our sample transcript before saving anything.

The test got right the details we care about most. Contracts still in draft weren't reported as signed, and two conflicting reports about a payment stayed marked as unresolved.
When it finished, ChatGPT confirmed it had created and installed a skill called Meeting Highlights.

Click the skill's name on the Skills page, and you can see every file it's made of.

• SKILL.md: the main file. The name and description sit at the top, and the description is written as a trigger that tells ChatGPT when to use the skill, like "use when asked to summarize meeting transcripts." Below that are the instructions: read the whole meeting, combine repeated discussion, keep only the highest-value items, and match the example.
• references: a copy of our example summary. The instructions tell ChatGPT to read it before drafting, which is how the format stays consistent every time.
• assets: the skill's icon.
• agents: a small settings file.
To change anything, click Edit. To test it, click Try in chat.
1. Start a new chat. Type @, start typing "meeting," and pick Meeting Highlights from the list.
2. Write a short prompt. Ours was "Use Meeting Highlights to summarize this transcript."
3. Click the + button, choose Add photos & files, and attach the transcript.
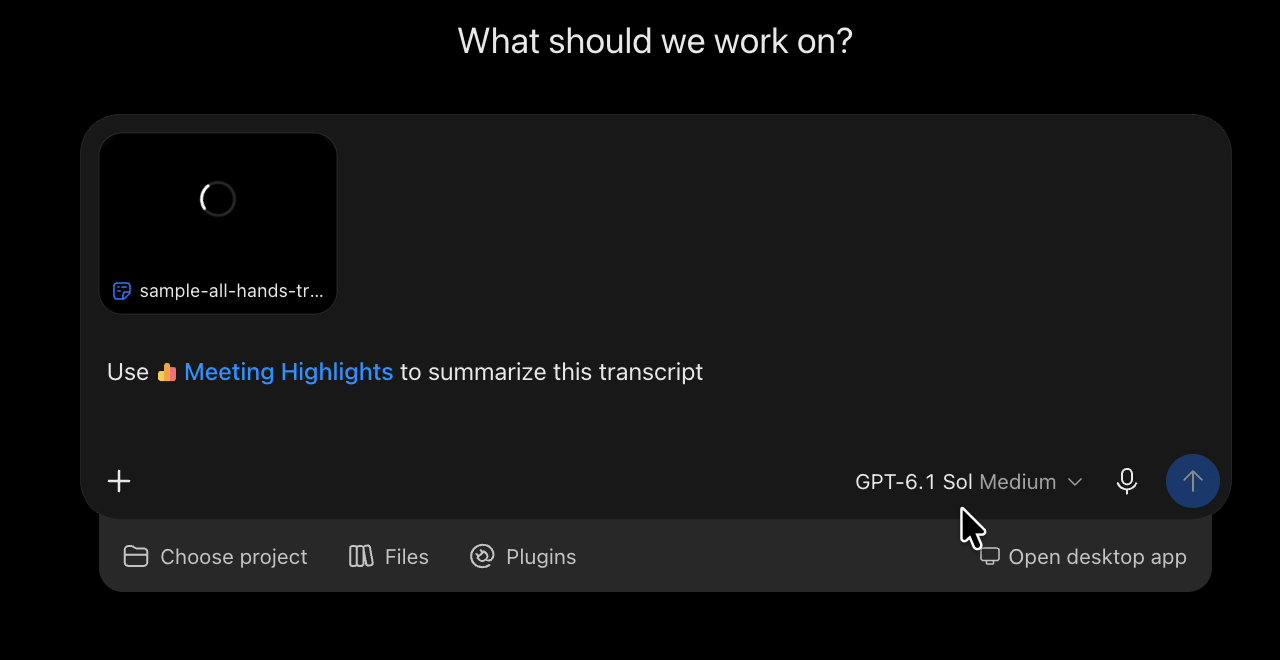
We used a different meeting than the one we built the skill with, so ChatGPT couldn't just repeat its earlier test.
Twelve seconds later, the summary was ready. All four sections were there, in the same order as our example. Each urgent action item led with an owner, like the Larkspur renewal assigned to Sam, with the next step written underneath.
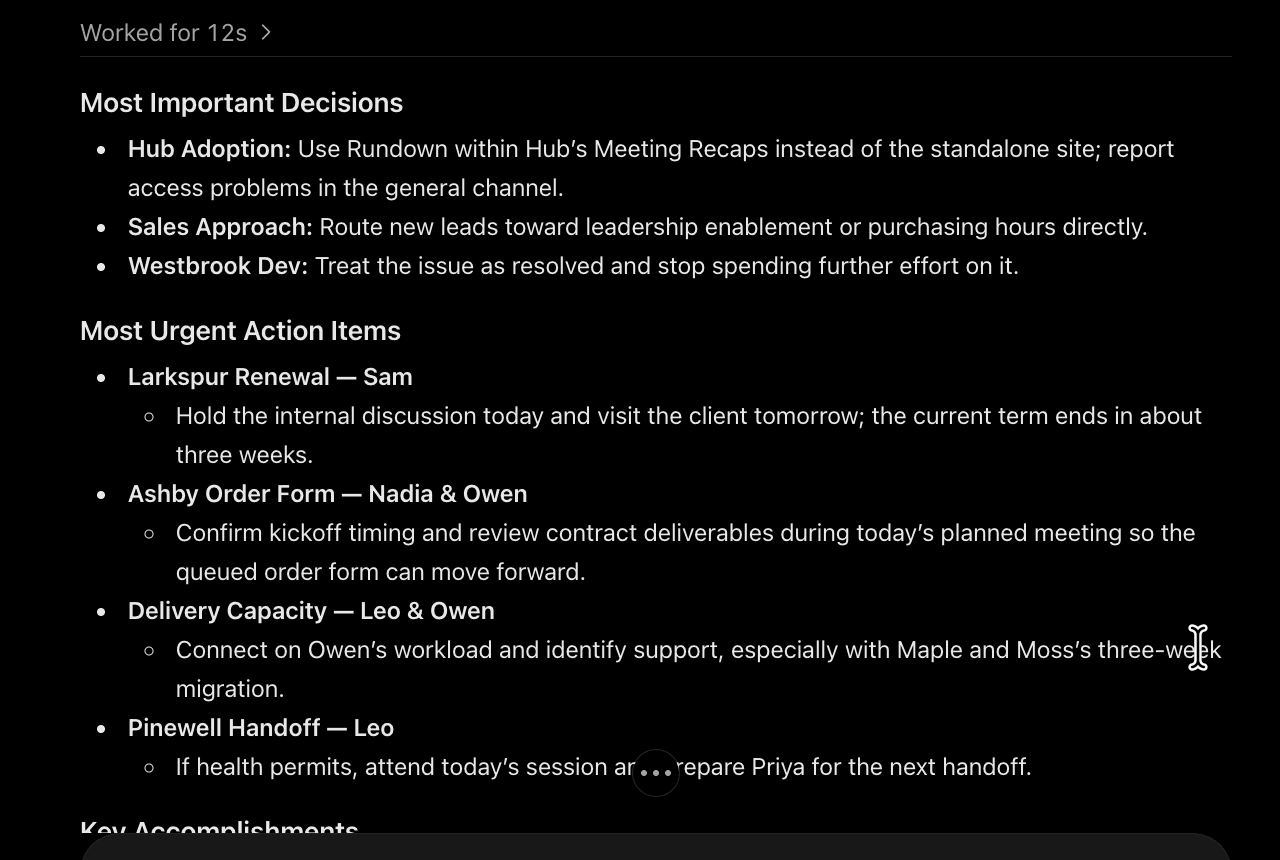
An unconfirmed checkout workflow got the ⚠️ flag under Other Issues to Watch. At the very bottom, the summary even noted that deadlines are relative to the date of the meeting.

That took one short sentence and one file, with zero revisions.
1. Always give the skill builder reference material. That means an example of the material the skill will work with, and an example of what you want it to produce. Our example summary shaped this skill more than anything we typed.
2. Ask ChatGPT to interview you. The skill builder wasn't very consistent in our tests, and sometimes it asked almost nothing before it started building. The starter prompt tells it to begin with questions, and it still only asked us two. If you want more back and forth, tell ChatGPT to interview you until it has everything it needs to build a great skill. Every question you answer up front is one less revision later.
3. Plan for skills that don't sync. A skill you build in the browser won't show up in the ChatGPT desktop app, and a skill you build on desktop won't show up in the browser. You have to move it yourself, and here's how.
1. In the browser, go to Plugins, then Skills. Click the three-dot menu next to the skill you want to move and choose Download. You'll get a zip file with every file from the skill inside it.

2. Switch to the desktop app and start a new chat in Work mode.
3. Attach the zip file and type "Add the attached skill."

ChatGPT uses its built-in Skill Installer to unpack the zip and install the skill, and it tells you the skill will be available on your next turn. Head back to the Skills page, and you'll find it listed under Installed.

Going this direction takes one extra step, because the desktop app stores each skill as a folder on your computer. These steps are shown on a Mac.
1. In the desktop app, click the Plugins icon in the left rail, then Skills.
2. Open the skill, click the three-dot menu, and choose Reveal in Finder.

3. Finder opens straight to the skill's folder. Right-click the folder and choose Compress to turn it into a zip file.

4. In the browser, go to Plugins, then Skills. Click Add, then Upload from your computer.
5. Drag in the zip file. ChatGPT also accepts a .skill file or a single SKILL.md file, up to 780 MB.
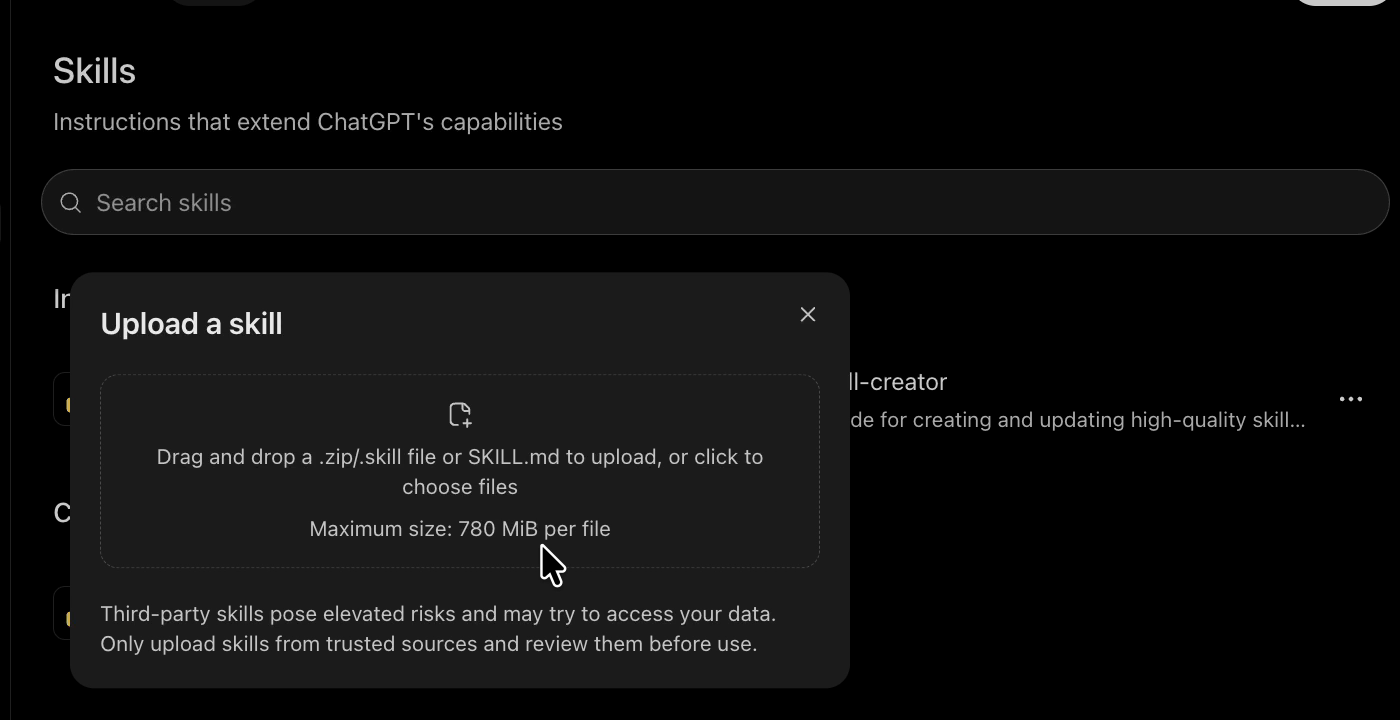
Take the warning on that screen seriously. An uploaded skill can try to access your data, so only upload skills from sources you trust, and read through them before you use them. That goes for any skill you download, including ours.
Once you move a skill, you have two separate copies. If you edit the skill in the browser, the desktop version stays exactly the same, and the reverse is true too. Every update means moving it again.
If you plan to lean on skills across your work, Claude handles this better. Skills live on your Claude account, so the same skill is there wherever you sign in. We cover skills in Claude here.
One skill saves you a few revisions. A set of skills built around your team's real processes changes how the whole team works, and that's the work we do at XRAY. We build the AI workflows, skills, and automations that take repetitive work off your plate, and we keep people in the loop where judgment matters.
Reserve time with an XRAY expert to work through your own project one on one. There's no retainer, so you book the time you need.
Want to start with something ready-made? Our free skills library [ADD LINK] has skills you can download and import yourself. Just read them first, like you would any skill from the internet.
• Create: go to Plugins, then Skills, click Add, and choose Create with chat.
• Teach: attach one example of the input and one example of the output you want, and answer every follow-up question.
• Review: open the skill to check SKILL.md, then click Try in chat.
• Use: type @, pick the skill, write a one-line prompt, and attach your file.
• Move: download the zip in the browser and tell the desktop app to "Add the attached skill," or reveal the folder in Finder, compress it, and upload it on the web.
• Update: move the skill again after every edit, since the two copies never sync.
Now pick one task you've asked ChatGPT to do more than twice this month. Grab one example of the input and one example of the output you want, and turn it into a skill today. Show ChatGPT what good looks like one time, and stop doing the rest by hand.