"What's due this week?" sounds like a simple question. Getting Notion to answer it usually means opening the app, hunting down the right database, and building a filter or two until the list looks right.
Connect Notion to Claude and you can just ask. Claude searches your workspace, reads your databases, and creates or updates pages for you, all from a plain-language request in the chat.
The connector is built into Claude, it works on the free plan, and setup takes about two minutes. The step that deserves more of your attention comes right after: tool permissions, which decide what Claude can read on its own, what it has to ask you about first, and what it can never do at all.
To use the Notion connector, you only need a Claude account (the free plan works) and a Notion workspace.
1. Open Claude and click Customize in the left sidebar.
2. Switch to the Connectors tab and search for "Notion."
3. Find the official connector made by Notion, marked with a verified check mark. The search also returns community plugins, so check the label before you click.
4. Click the + button on the Notion connector.

5. Claude opens a page in your browser asking you to confirm that you started this connection. Click Continue connecting.
6. You land on Notion's own authorization page. Stop here for a second, because the next choice matters more than it looks.
Notion's authorization page shows a Select workspace dropdown at the top. Claude can read whatever lives in the workspace you choose here.
That makes this your first and simplest access control. If there's a workspace you don't want Claude reading, don't connect it.
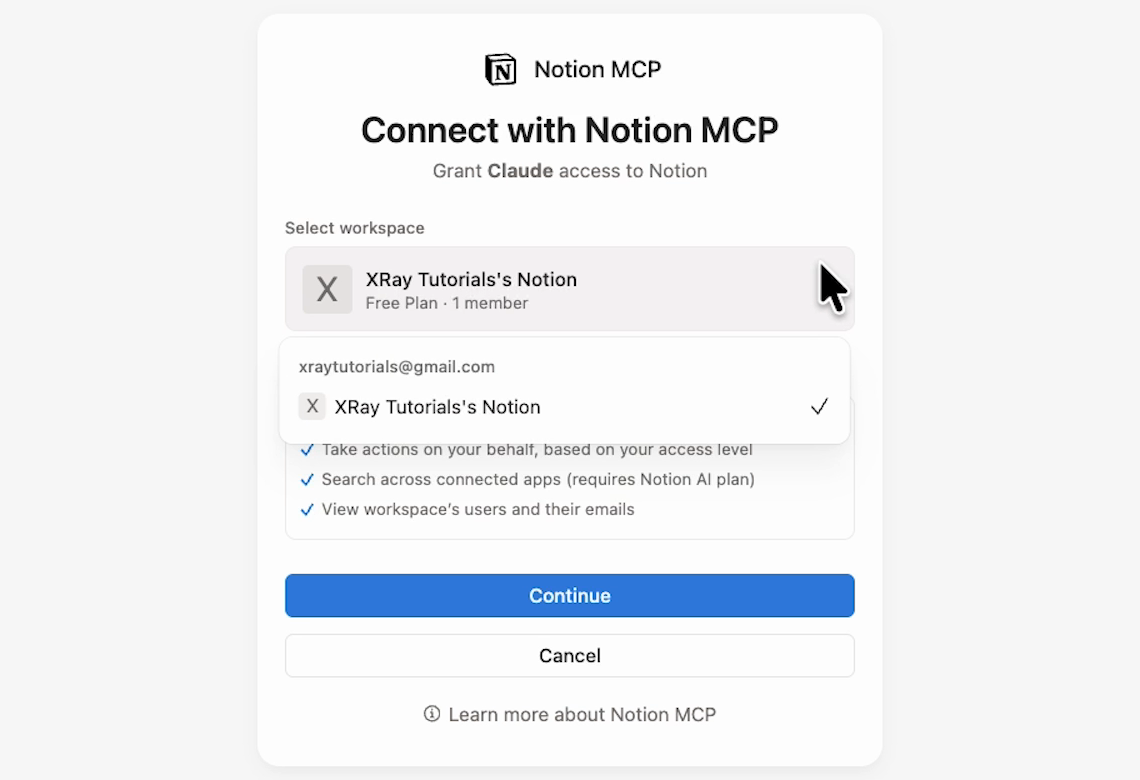
Below the dropdown, Notion lists what Claude will be able to do in that workspace. Read it, then click Continue. Notion confirms the connection and sends you back to Claude, and the setup is done.
Connecting Notion gives Claude a set of tools for executing each action: one to search, one to update a page, one to create a database, and so on.
Tool permissions set a rule for each one. You'll find them on the Notion connector's page under Customize > Connectors.
The tools are sorted into three groups: Interactive tools, Read-only tools, and Write/delete tools. Every tool has three settings.
• Always allow (the check mark): Claude uses the tool without asking you first.
• Needs approval (the hand): Claude stops and asks you to confirm every time.
• Blocked (the circle with a line through it): Claude can't use the tool at all.

You can set a whole group at once from the dropdown on the right, or set each tool one by one. Out of the box, read-only tools are set to Always allow and write and delete tools are set to Needs approval. That's a solid starting point, but it needs one very important change.
Open the Write/delete group and find every tool that starts with "Delete," including Delete comment, Delete databases, and Delete pages. Set each one to Blocked.
Needs approval isn't enough here. One accidental click on Allow during a delete request can trash data you can't get back, and nothing you'll ask Claude to do day to day requires deleting anything.
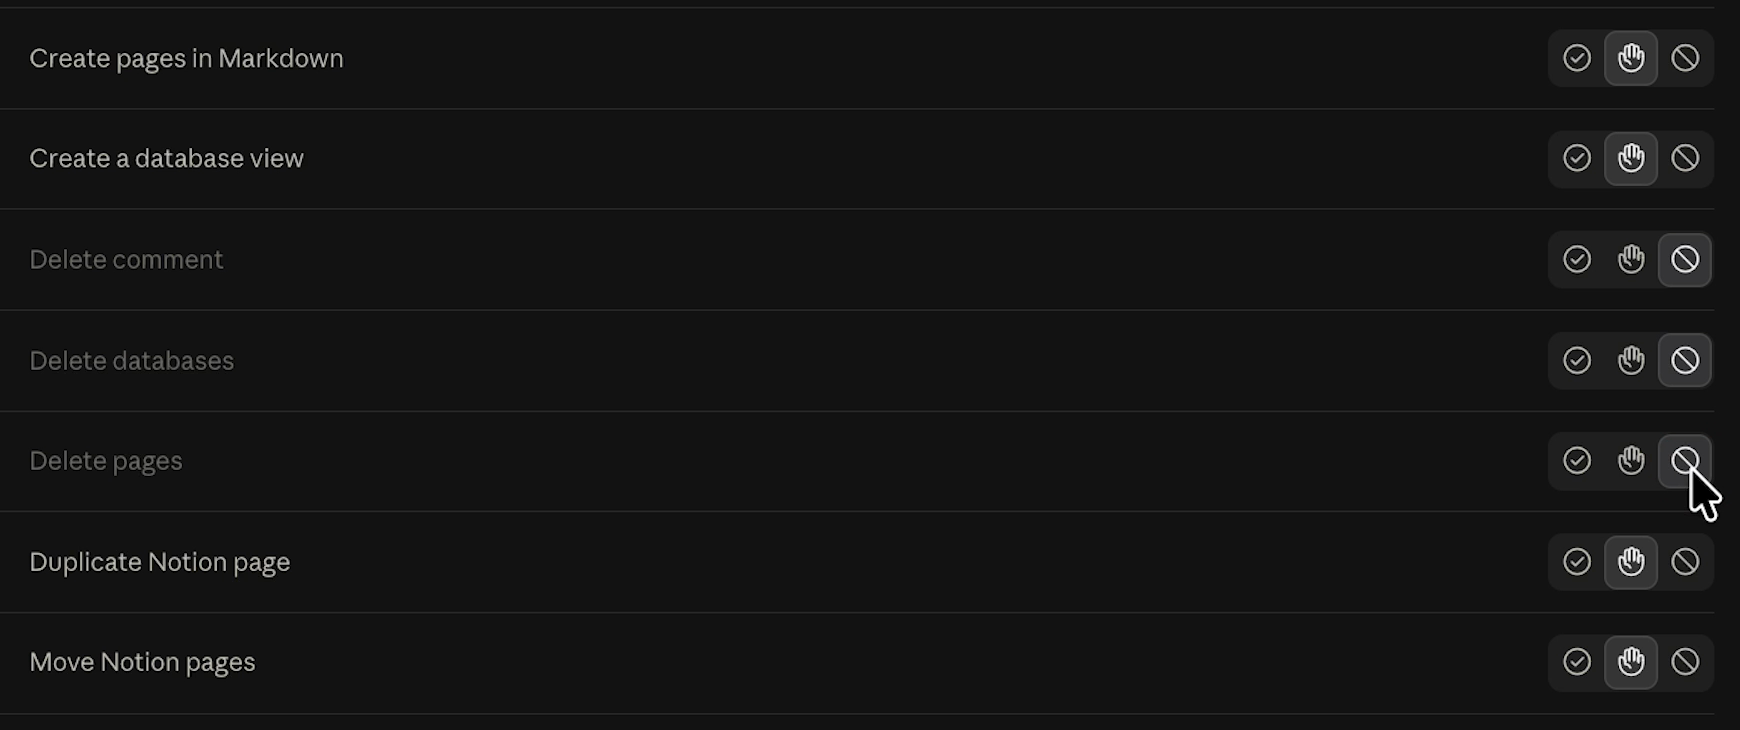
When something does need to go, have Claude flag it instead, for example by setting its status to Archive. Then a person can review it and delete it by hand.
The two interactive tools at the top of the list don't read or change your content. They show Notion's own info cards in your chat, like next steps for getting more out of the connector.
We've set both to Needs approval so nothing pops into a conversation without our say, but you can set this however you'd like.
Leave the read-only tools on Always allow, since the workspace you picked already decides what Claude can see.
With permissions set, you can now use Notion in any Claude chat.
To see it in action, we ran a couple quick tests, starting with the read side.
We asked Claude to check our Task Management database and summarize every task assigned to us that's due in the next seven days.
We didn't tell Claude where that database lives or how it's set up. It worked that out on its own, starting with a quick plan: find the database, pull the tasks due between October 20 and 27, then double-check the results.

Reads are set to Always allow, so there was no permission prompt. In under half a minute, Claude reported four tasks due in the next week, none finished, two in progress, and nothing overdue. It added a table with each task's due date, priority, status, and notes.
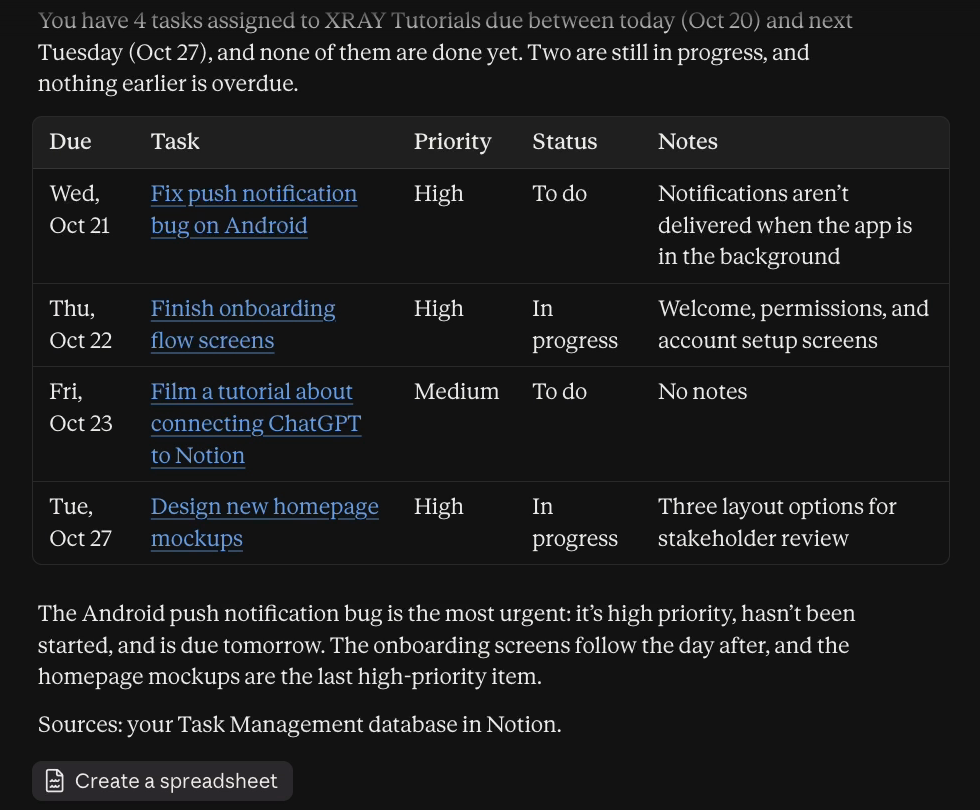
Then it told us where to start. The Android push notification bug was high priority, hadn't been started, and was due the next day. A filter can give you a list, but Claude gives you the list and a recommendation for what to tackle first.
Next, the write side. In the same chat, we told Claude the Android bug was already fixed. We asked it to mark the task complete and create a new task for our colleague Matt to review the copy in the updated notifications.
That's two changes, so Claude asked for approval twice. The first card was for the Update Notion page tool. It showed exactly what Claude was about to send to Notion, including which page it was changing and the new status, Done.

The change matched the request, so we clicked Allow once. Always allow would stop Claude from asking before it uses that tool again, which quietly undoes the rule you just set. Allow once approves this change and keeps the rule in place.
The second card was for the Create pages tool. It showed the new task's name, the note Claude wrote for it, its status, and who it's assigned to. Allow once again.

Claude confirmed both changes. The bug was marked Done, and the review task was assigned to Matt with a status of To do.
It also told us what it didn't do. We never gave a due date, a priority, or a project, so Claude left those fields blank and offered to fill them in.

We took it up on that and replied with a due date one week out, high priority, and the same project as the bug. One more approval card appeared, this time with the project link, a priority of High, and a due date of October 27. Allow once, and it was done.

Over in Notion, the Android bug now shows Done. The new task sits at the top of the database: assigned to Matt, due October 27, linked to the Mobile App Launch project, set to high priority, and carrying a note that explains what to review.

Two short messages got both updates in with every field filled. Nobody opened a single page to do it.
Getting Claude into Notion takes a few clicks. Figuring out which jobs it can run on its own, and which ones still need a person to approve them, takes a lot more thought.
That's the work we do at XRAY. Reserve time with an XRAY expert for one-on-one help setting up connectors and permissions around the way your team already works. There's no retainer, so you book the time you need and nothing more.
• Connect: Customize > Connectors, search for Notion, and click + on the official connector made by Notion.
• Scope: pick only the workspace you're comfortable with Claude reading.
• Block: every delete tool, and have Claude flag items for removal instead.
• Needs approval: every create and update tool, plus the two interactive tools if you'd like (optional).
• Always allow: the read-only tools, so questions get answered without a prompt.
• Approve: click Allow once on each approval card so your rules stay in place.
Now think of the last time you opened Notion just to look something up or log the same kind of update. Next time, ask Claude to handle it.
Your job was never to keep the database tidy by hand. It's to tell Claude what needs to change and approve the result.