
Make has been around for years. It started life as Integromat, went through a full rebrand, and has spent the last decade quietly becoming one of the most powerful tools in no-code automation.
We've used it for almost ten years to build workflows for ourselves, our team, and our clients here at XRAY.
A lot has changed in that time.
Hundreds of new integrations. Dozens of new features. And of course, AI opened up a whole new set of possibilities for builders.
But the core idea has not changed. Move data from one place to another, and stop doing that tedious work yourself.
Here's what most people get wrong in 2026. They jump straight into AI and skip the fundamentals. The reality is that AI works best when it's built on top of solid automations. Make is one of the best tools out there for building with both, if you know how to use it.
This guide walks you through three levels of Make automation: a simple scenario, an AI-enhanced workflow, and an AI agent. To show how each one works, we'll build the same workflow three times. We'll start simple, then make it progressively smarter. Start at the beginning, even if you're tempted to skip ahead. The basics make everything else easier to build and maintain.
A scenario is Make's name for a workflow automation. If you've used other automation tools, the logic will feel familiar. Each scenario has two key parts:
• A trigger — the event that starts the automation
• One or more actions — what happens after the trigger fires
Triggers and actions are pulled from Make's library of more than 3,400 app integrations, including software like Gmail, Slack, Google Drive, Notion, and many more. If you use it for work, it's almost certainly in there.
We'll get to the fancier AI agent stuff later. But it's important to understand the fundamentals first. Your workflows will be much easier to build, maintain, and update when you add AI steps if you actually understand the basics. So let's start there.
For our example, we'll build a scenario that watches a Gmail inbox and sends a Slack message for every new email. Simple, but it shows you everything you need to know about how scenarios work.
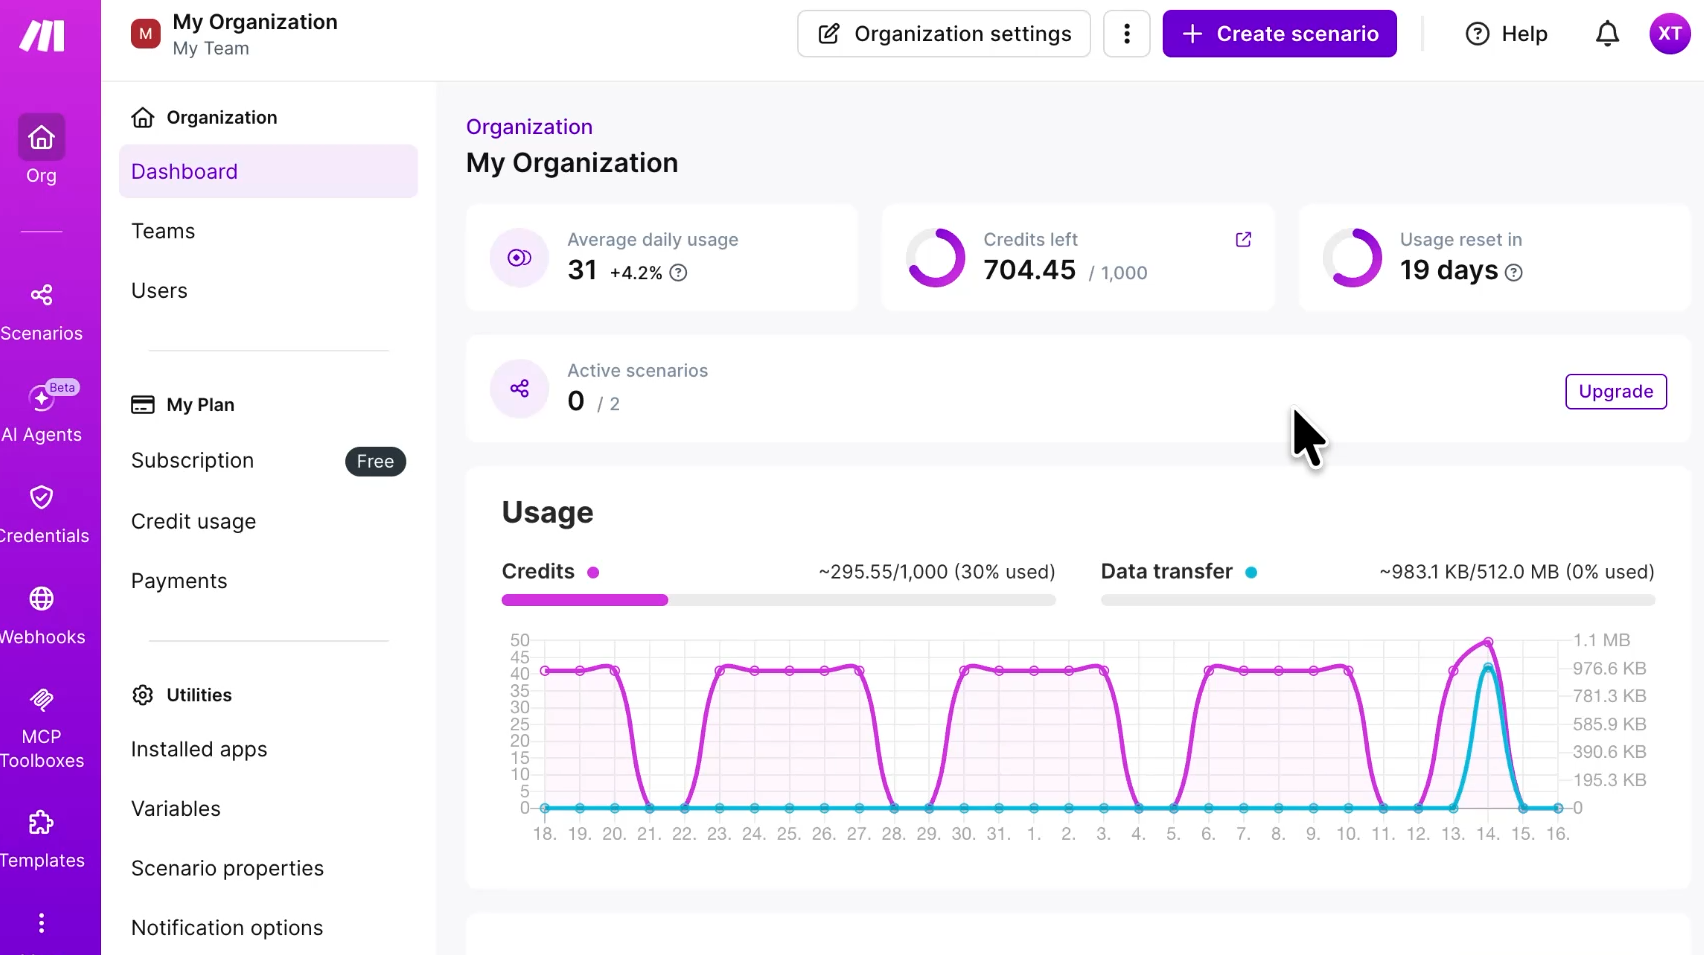
From the dashboard, click to create a new scenario. This opens the scenario builder, where you'll do all of your work.
Every automation starts with a trigger. That's the event that prompts your automation to run. When you pick your trigger, you want to be as specific as possible.
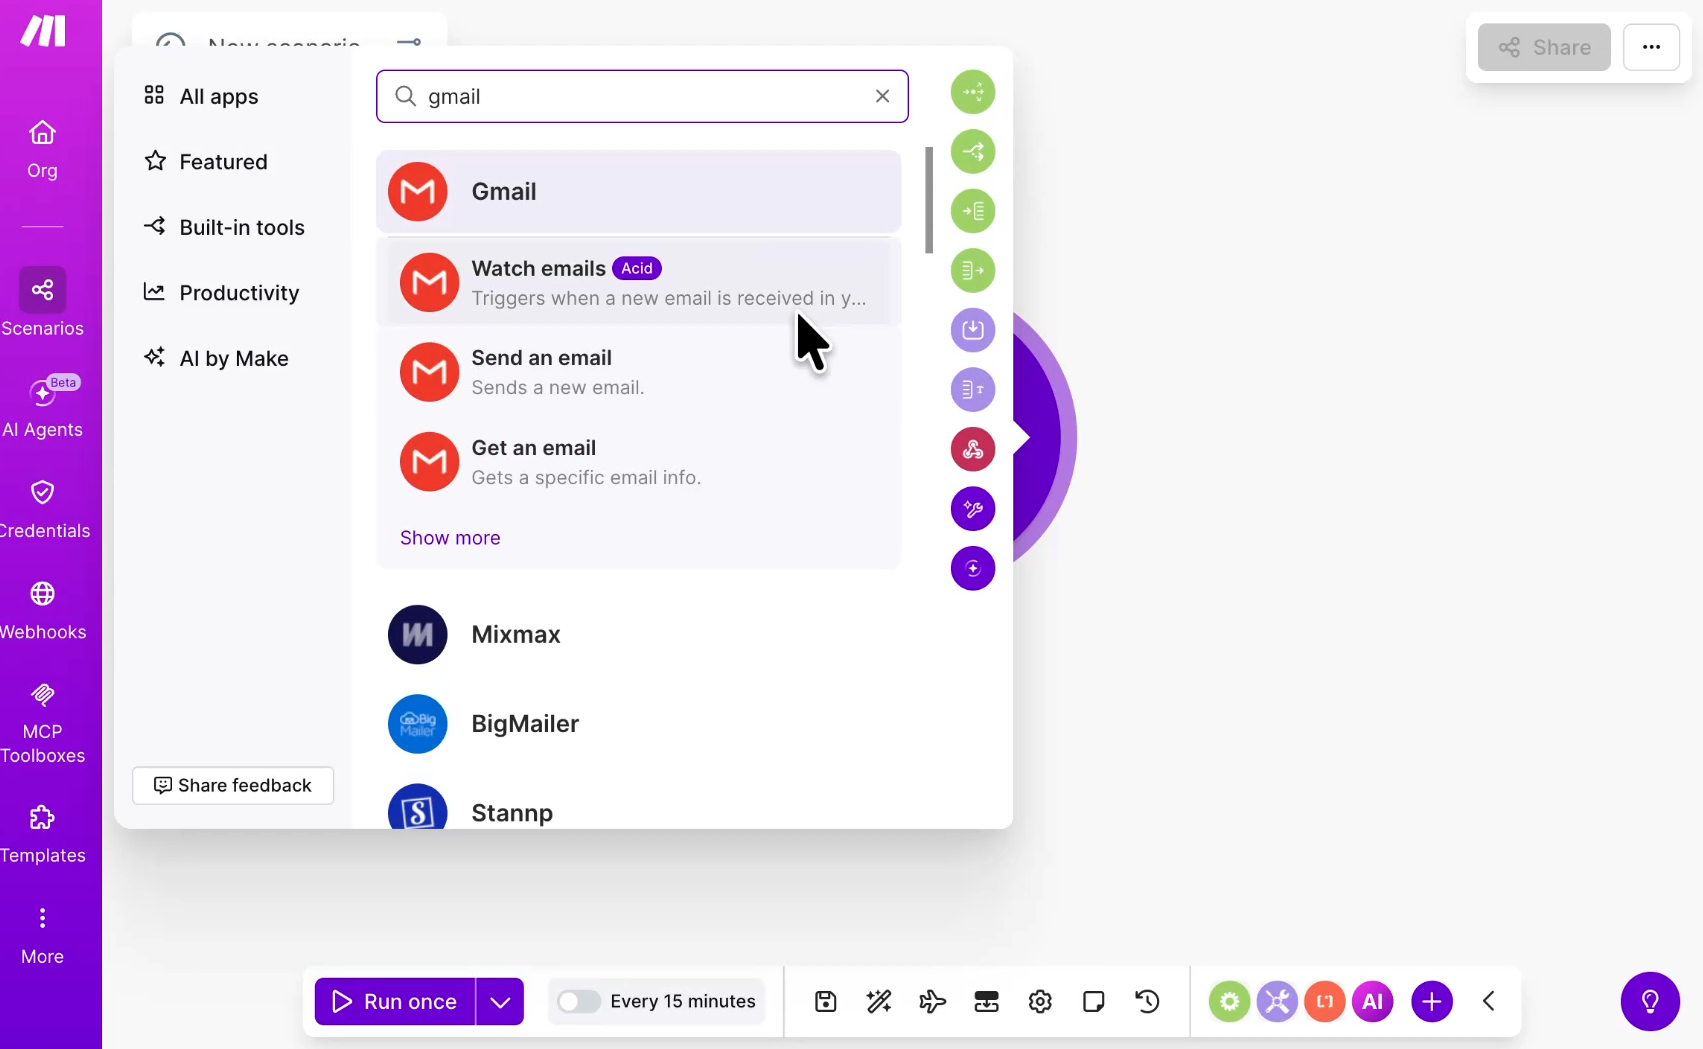
Click the big plus button and search for the app you want to watch. For our example, type Gmail and select the "Watch emails" event. Now, anytime a new email lands in our inbox, this scenario will begin.
If you haven't connected Gmail yet, click the “Add” button and sign in with Google. It's the same OAuth login you've used with any other Google service.
One thing to know about Make: You'll need to do this for every app you use. Whenever you add a trigger or an action for a specific app, you have to authorize Make to access that app, either by logging in directly or providing credentials like an API key.
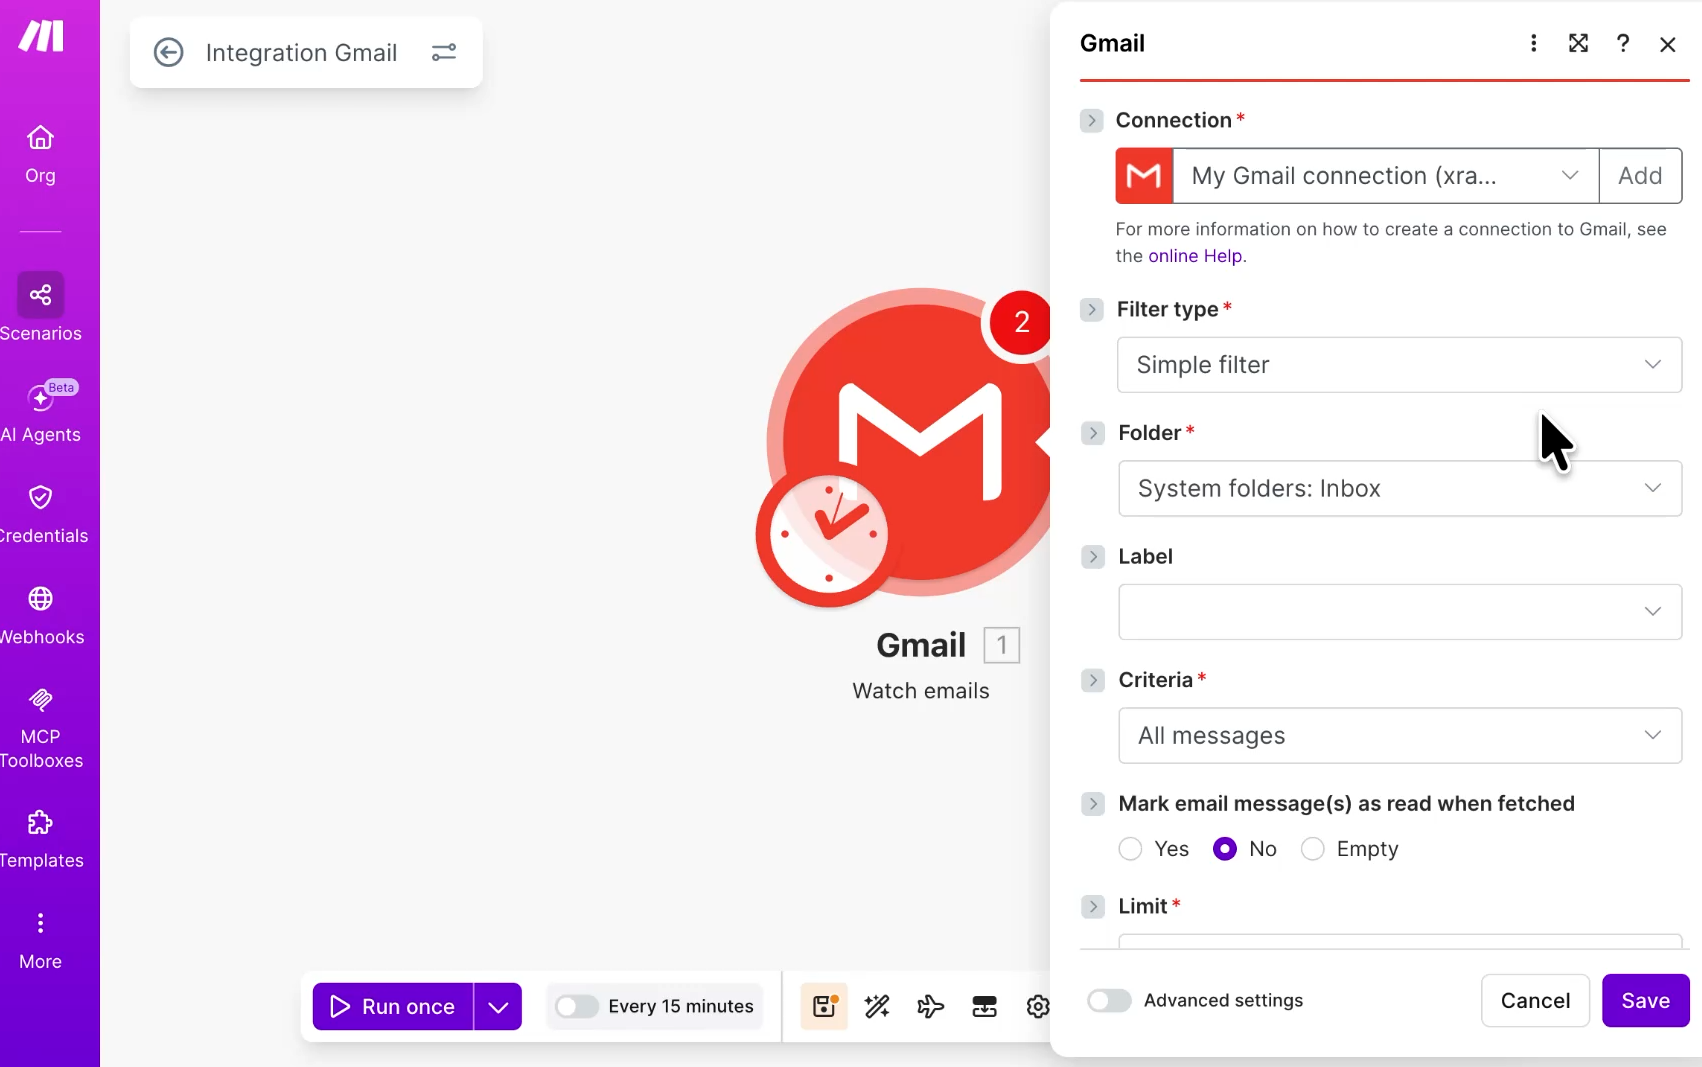
After you connect, you'll see a set of filters and folder options. For now, leave them blank and click save.
Next, Make asks where you want to start processing data from. Select "Choose manually" so you can pick the exact test data you want to build with.
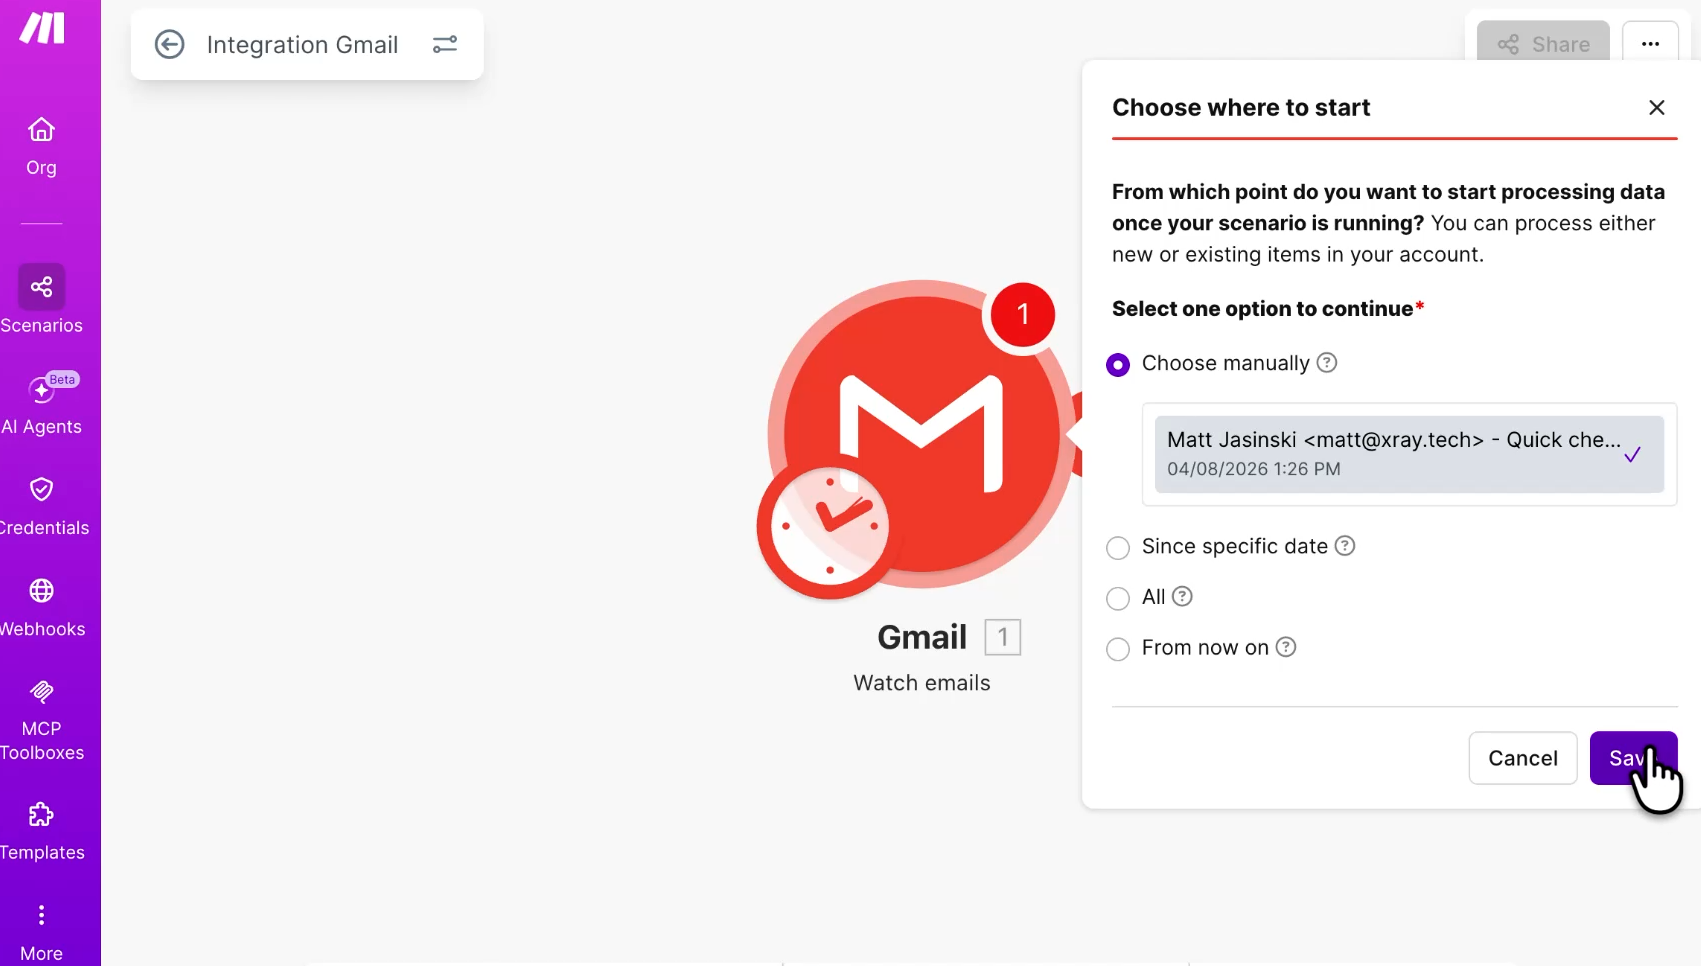
In our test, we can see an email from a colleague in our inbox. Select it and click save.
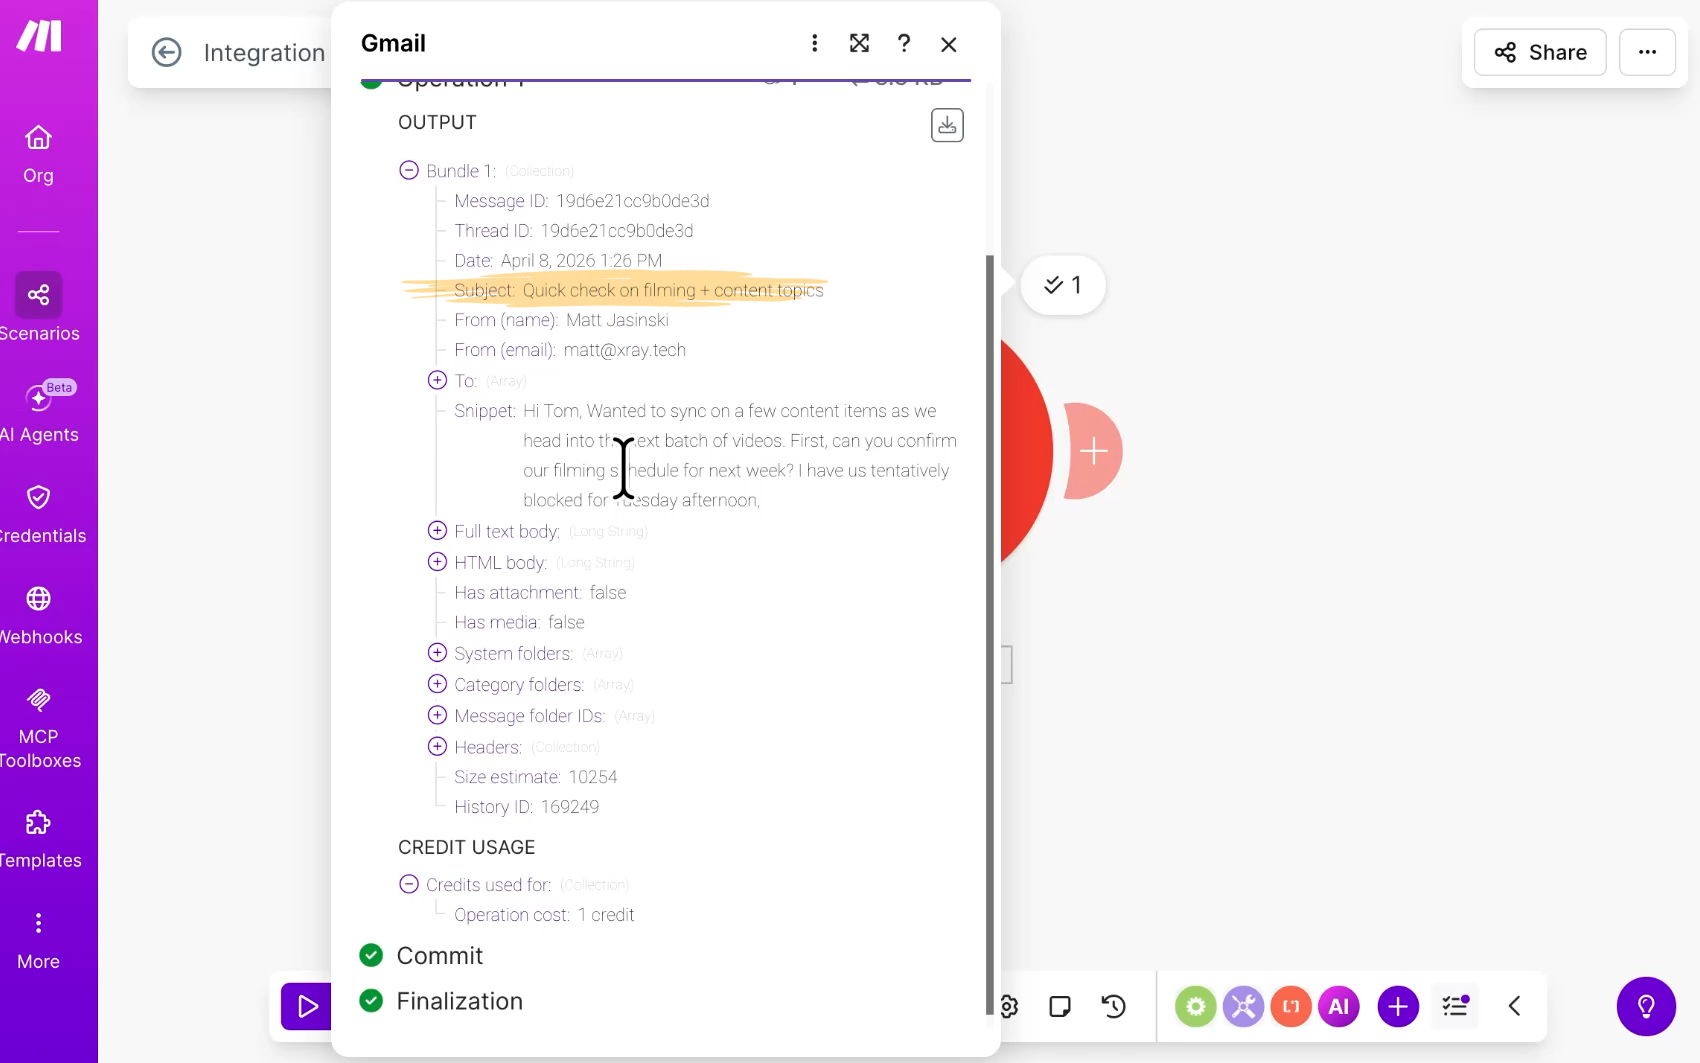
Now come down to the bottom left and click "Run once." Make fetches that email and returns all of the data attached to it. You'll see data like the From name, the From email, the subject, the body, and more, like the raw HTML, that you may or may not use.
These items are variables—the date, the subject, the body, and the rest. You'll drop these variables into your action steps to move data between apps.
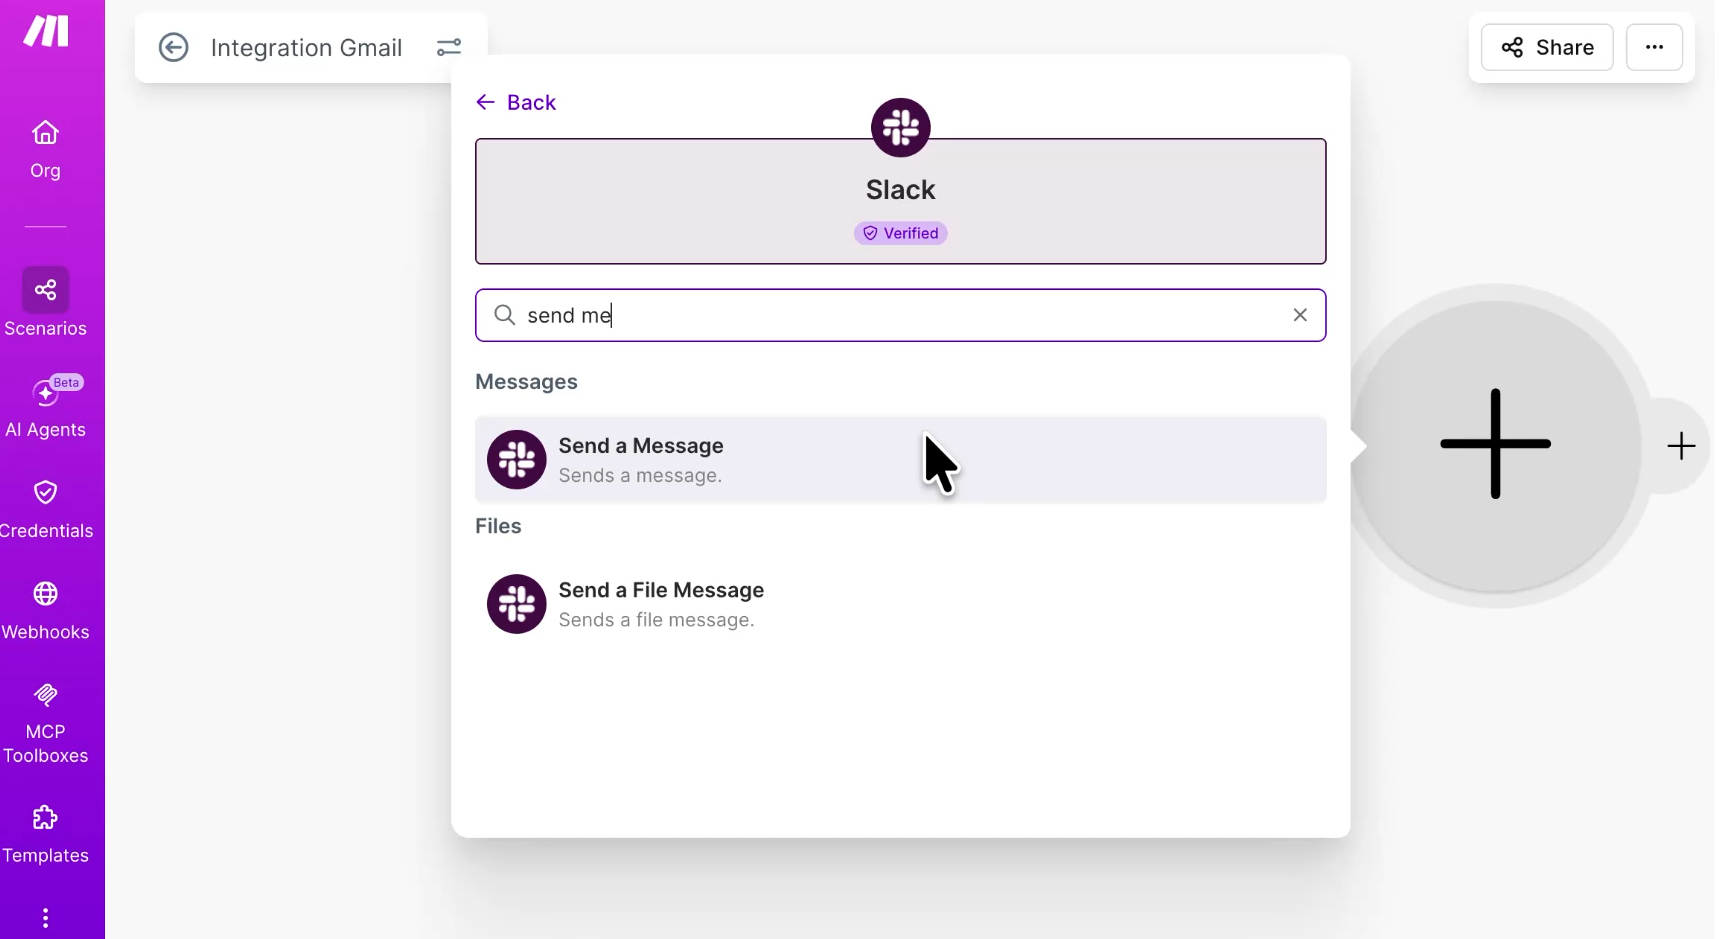
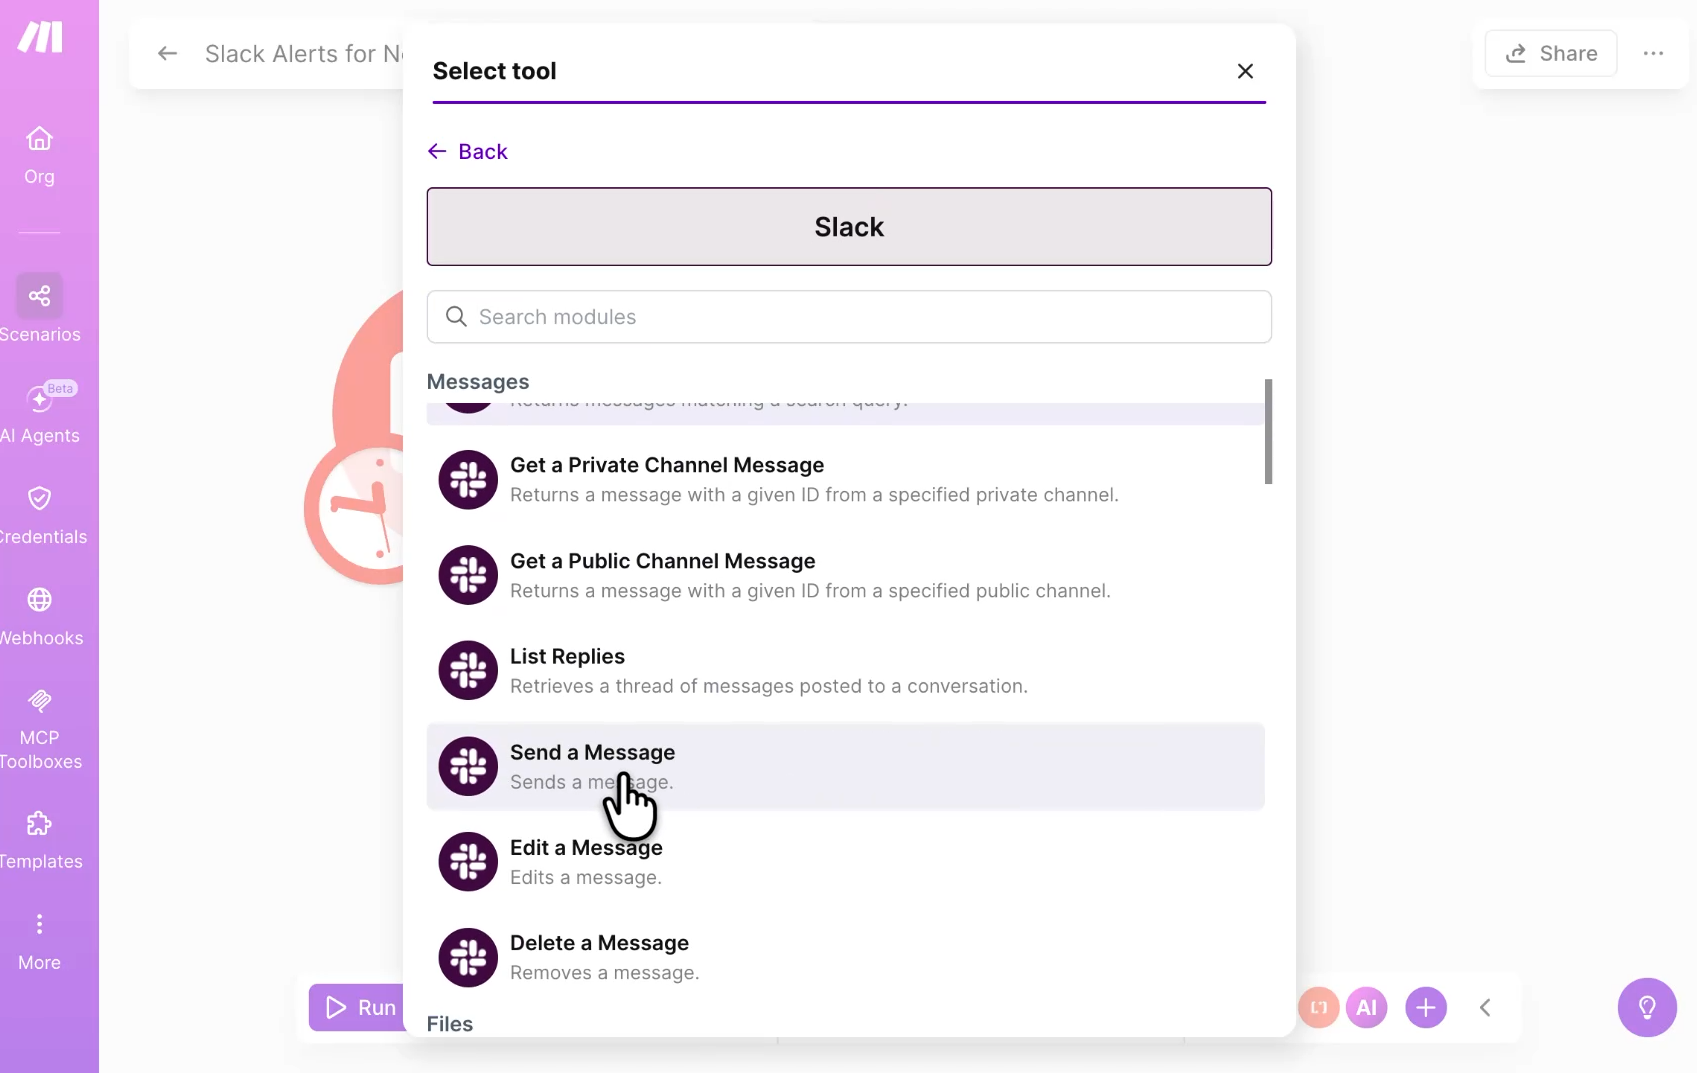
Now we'll add a second module to send this email to Slack. Click the plus button on the right side of the trigger to add a module, search for Slack, and select "Send a message."
If you haven't authenticated Slack yet, you'll connect it just like you did with Gmail. You can connect as a user or a bot.
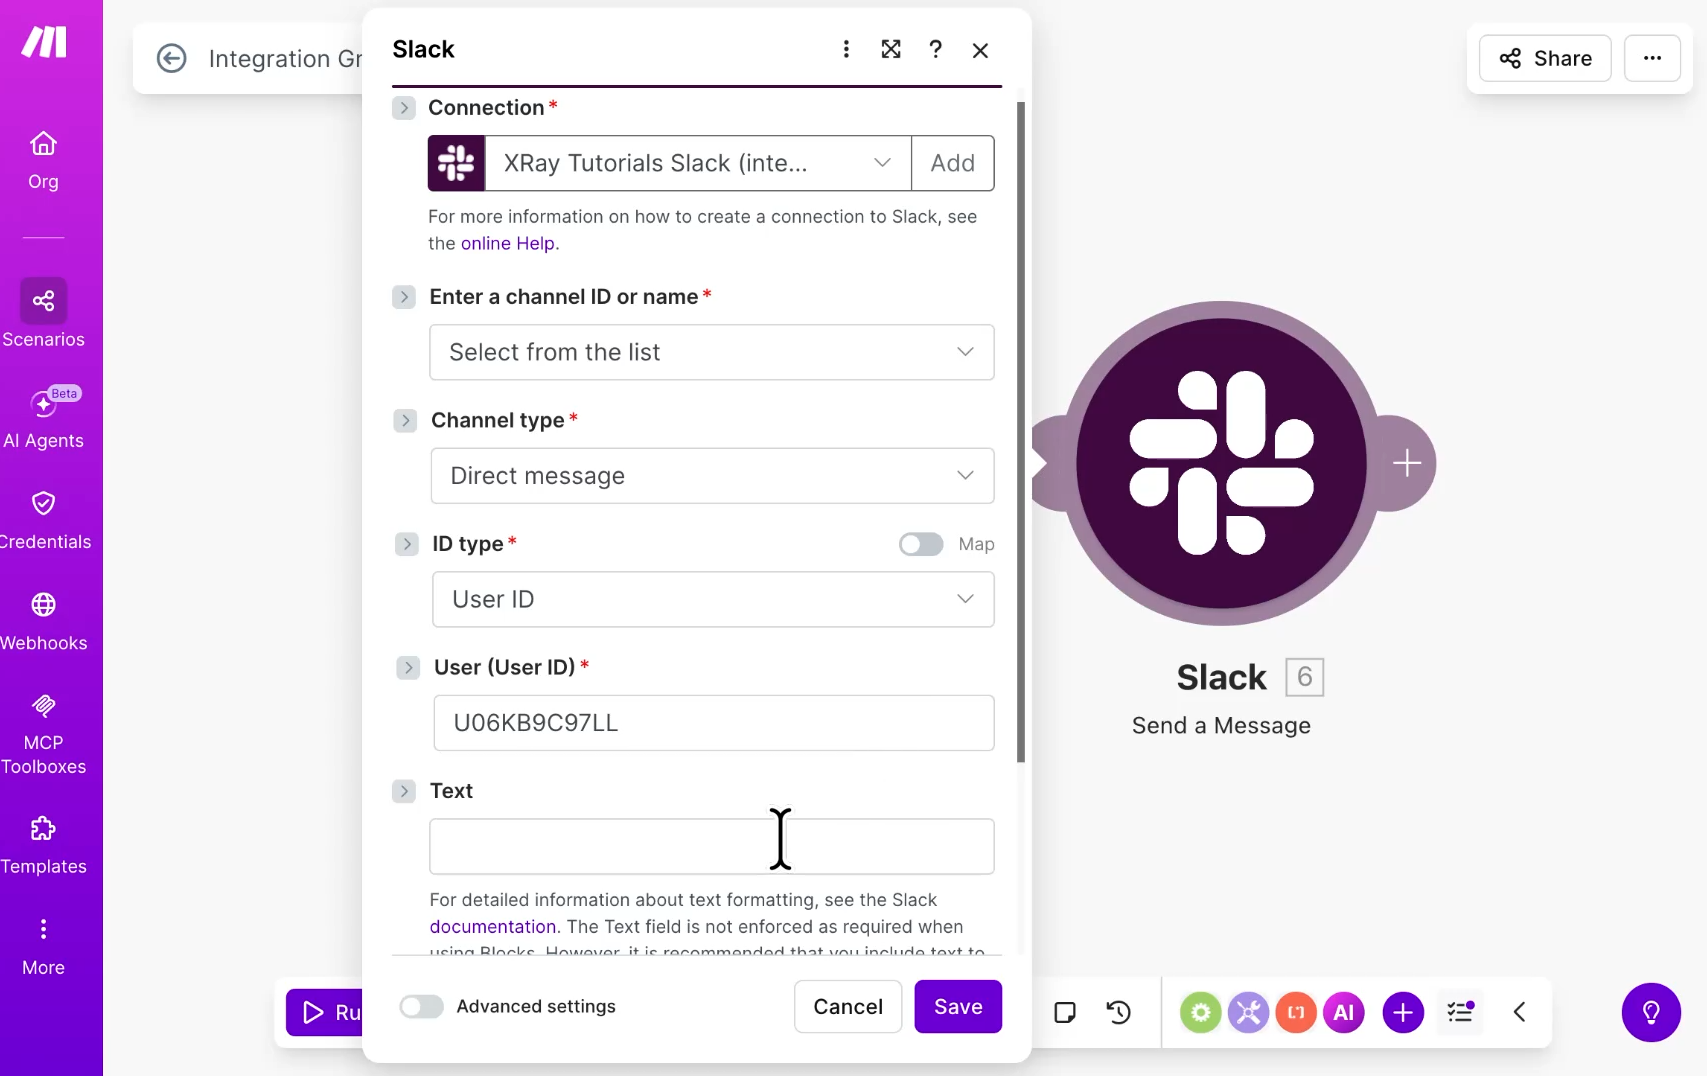
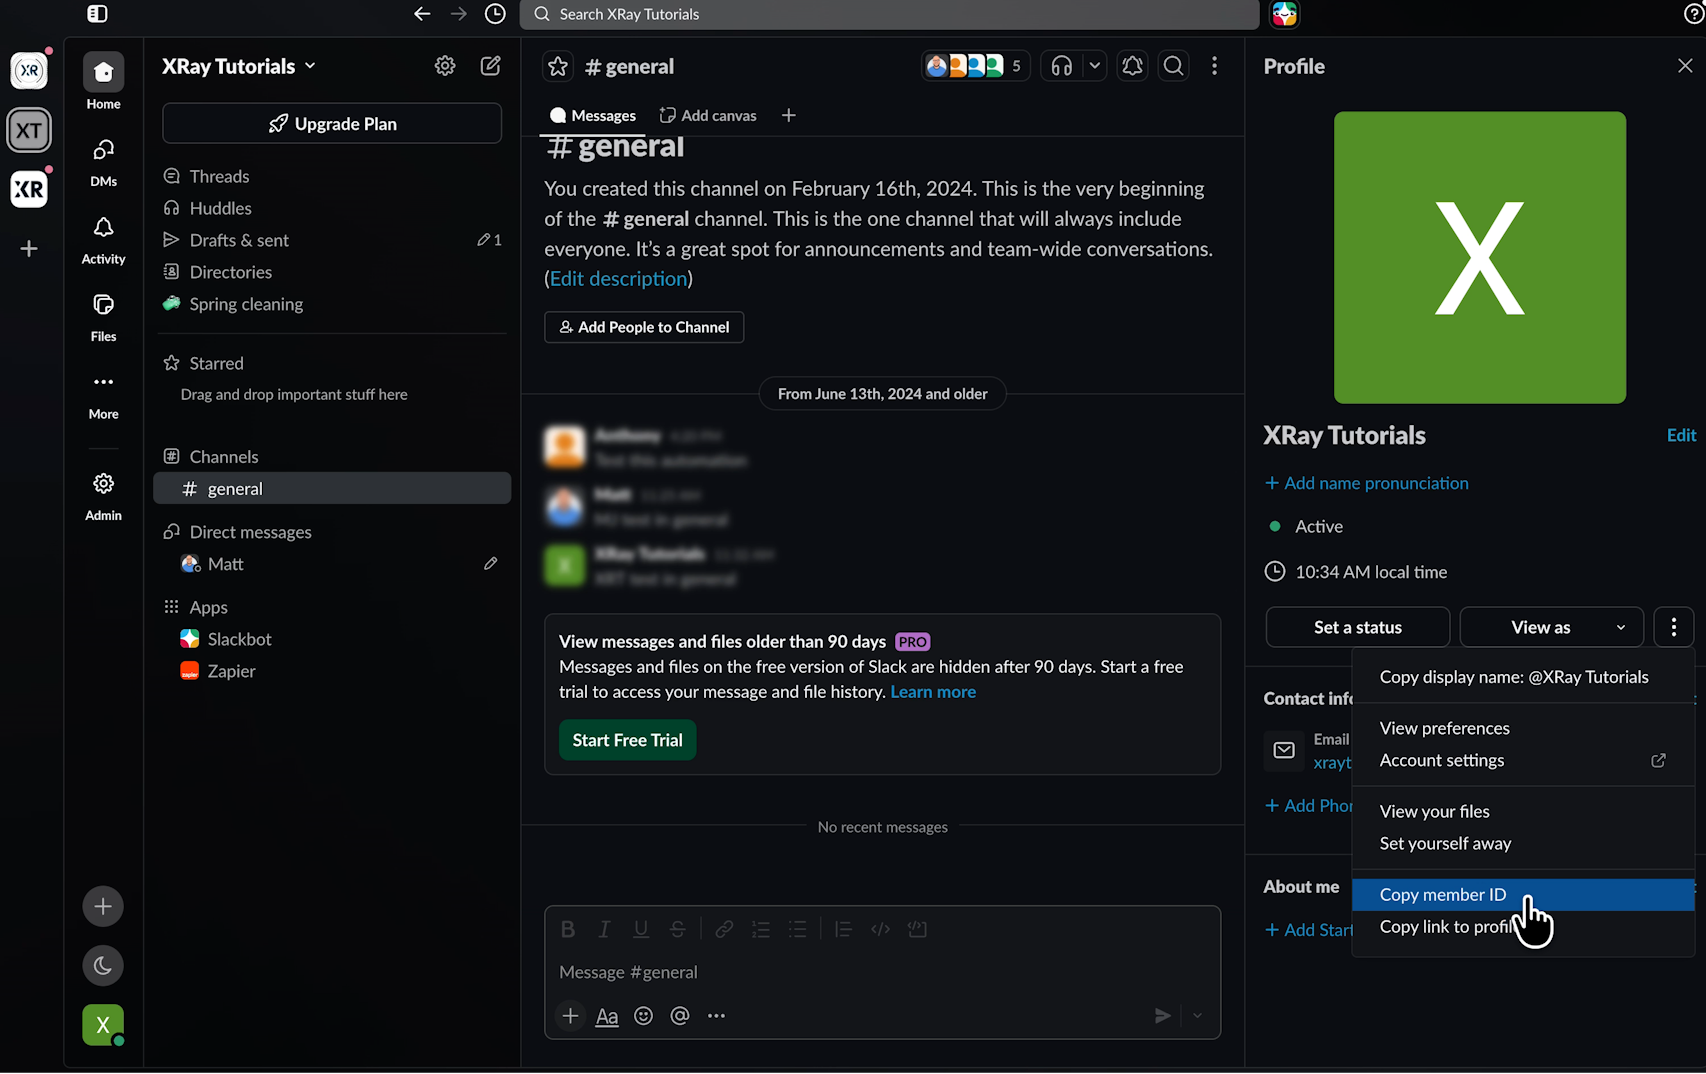
For the channel type, select "Direct message." Then switch the ID type field to "User ID" and paste in your Slack user ID. You can grab this from the three-dot menu in your Slack profile if you don't have it handy.
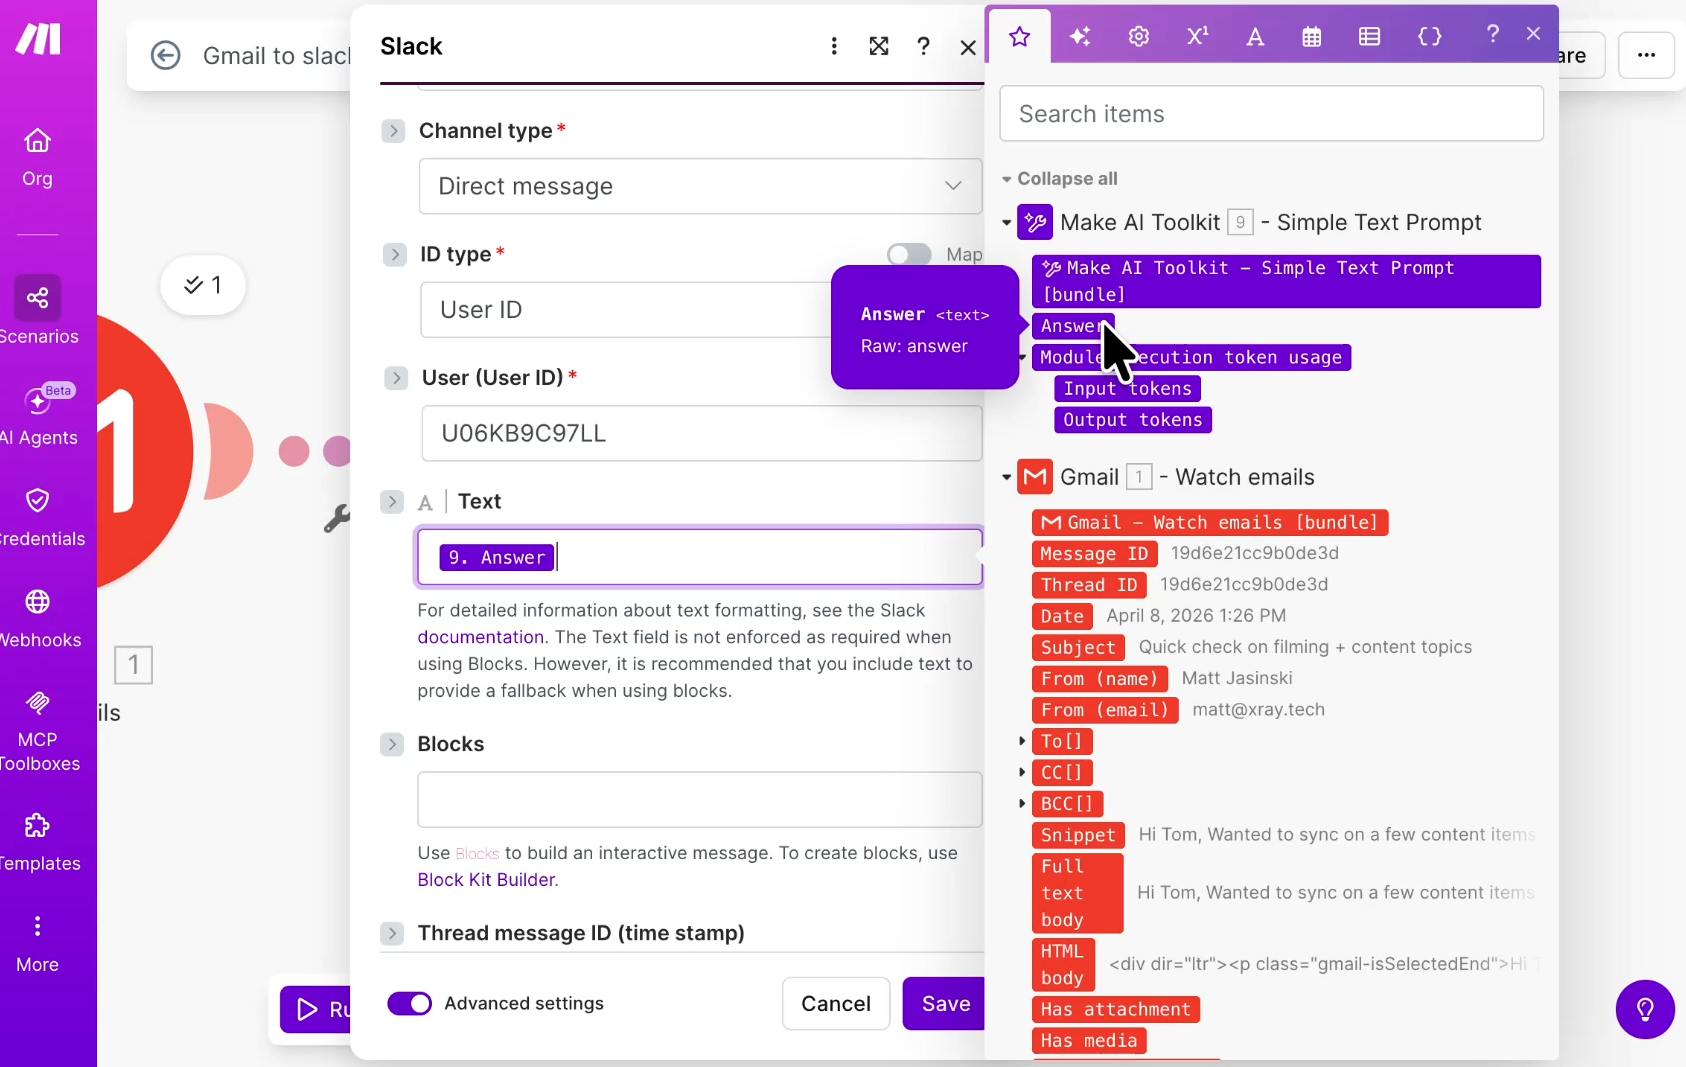
Now let's build the message text. When you click into the text box, Make shows you all the variables from previous steps. Every time the automation runs, the value of the variable changes, but the variable itself stays the same.
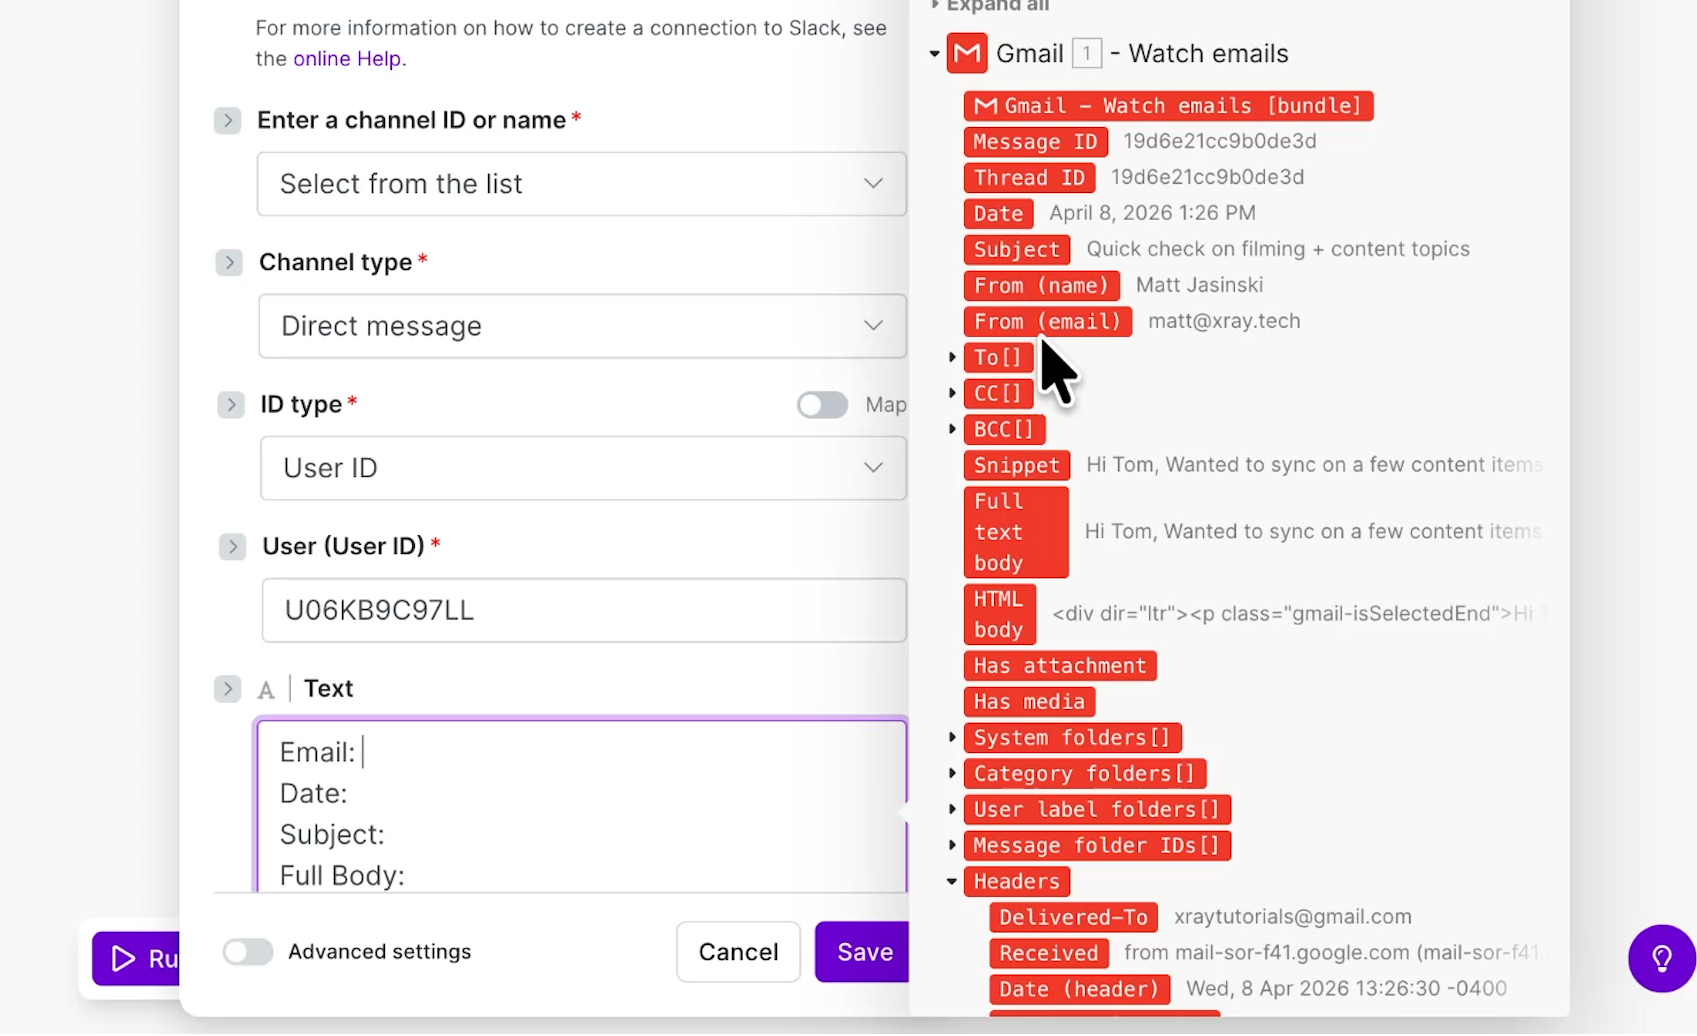
We want our Slack message to include the email address it came from, the date it was sent, the subject, and the full body.
Adding the variables is easy. Click the ones you want, then drag them into place inside the text box.
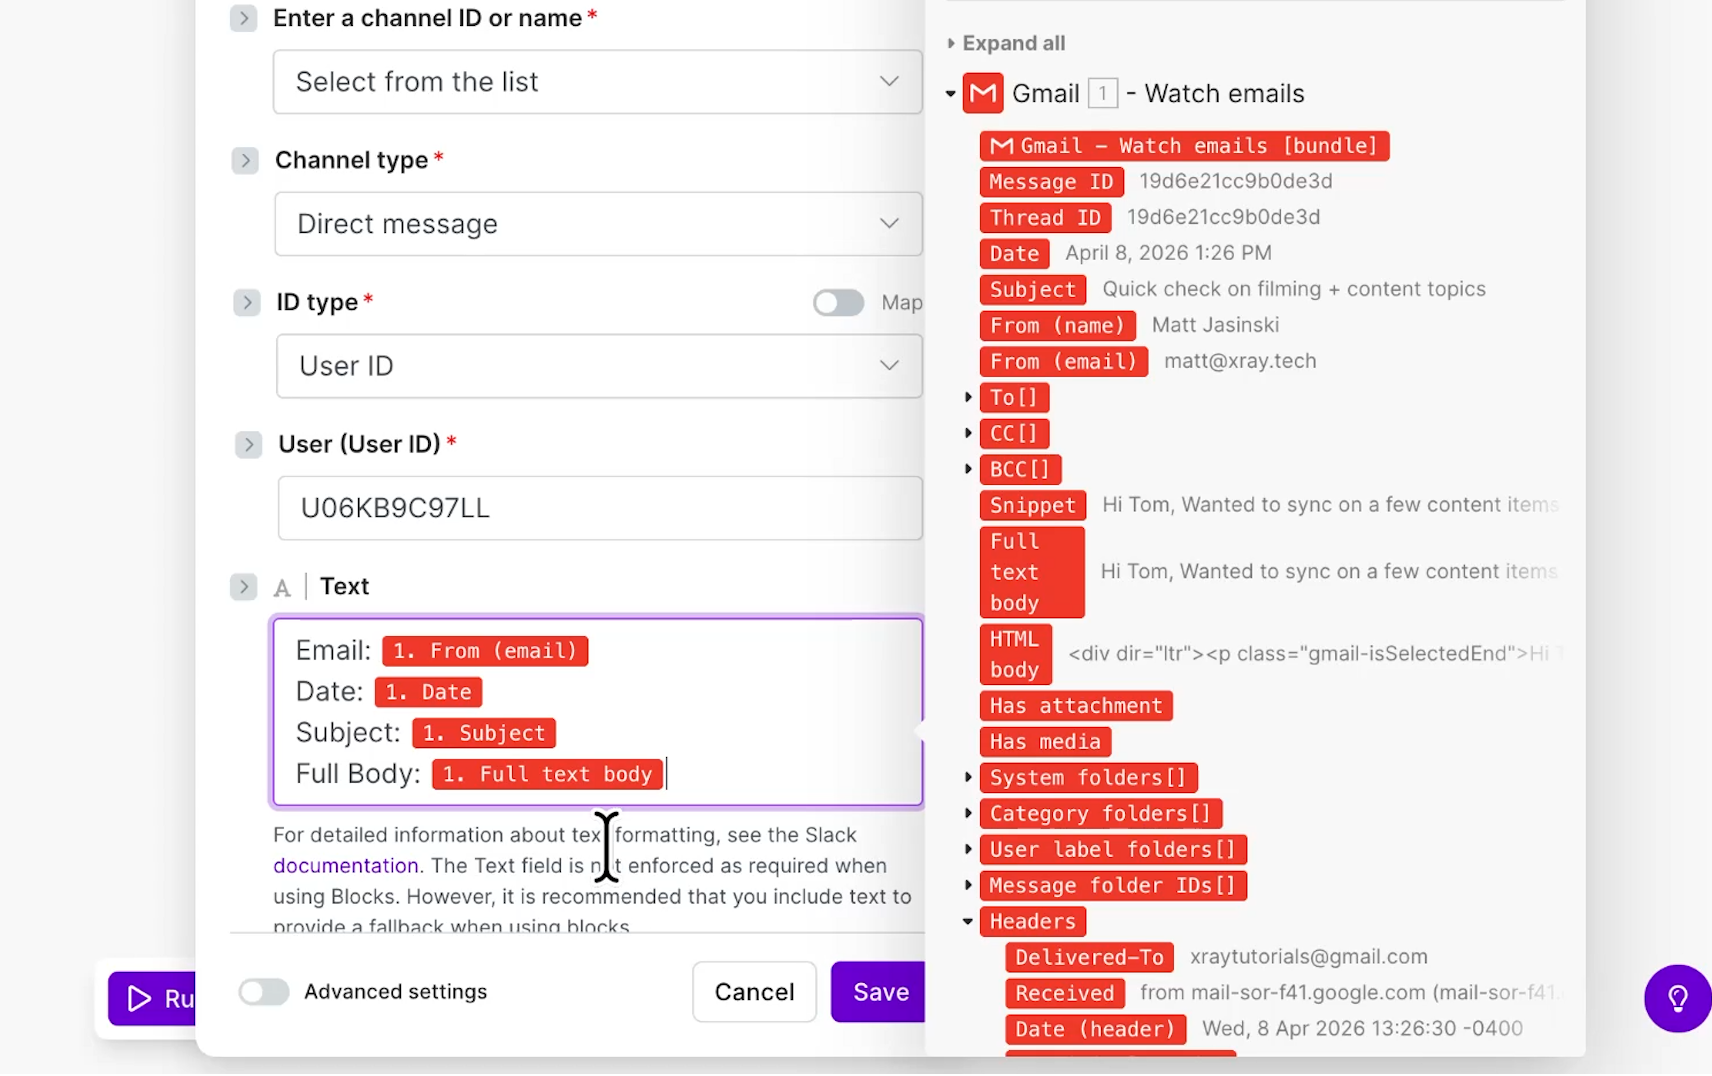
With your message configured, click save.
Now we'll test both steps together. Right-click the Gmail module and choose "Where to start," select "Choose manually" again, pick the email you want to use, and click save. Then, hit "Run once" in the bottom-left corner.
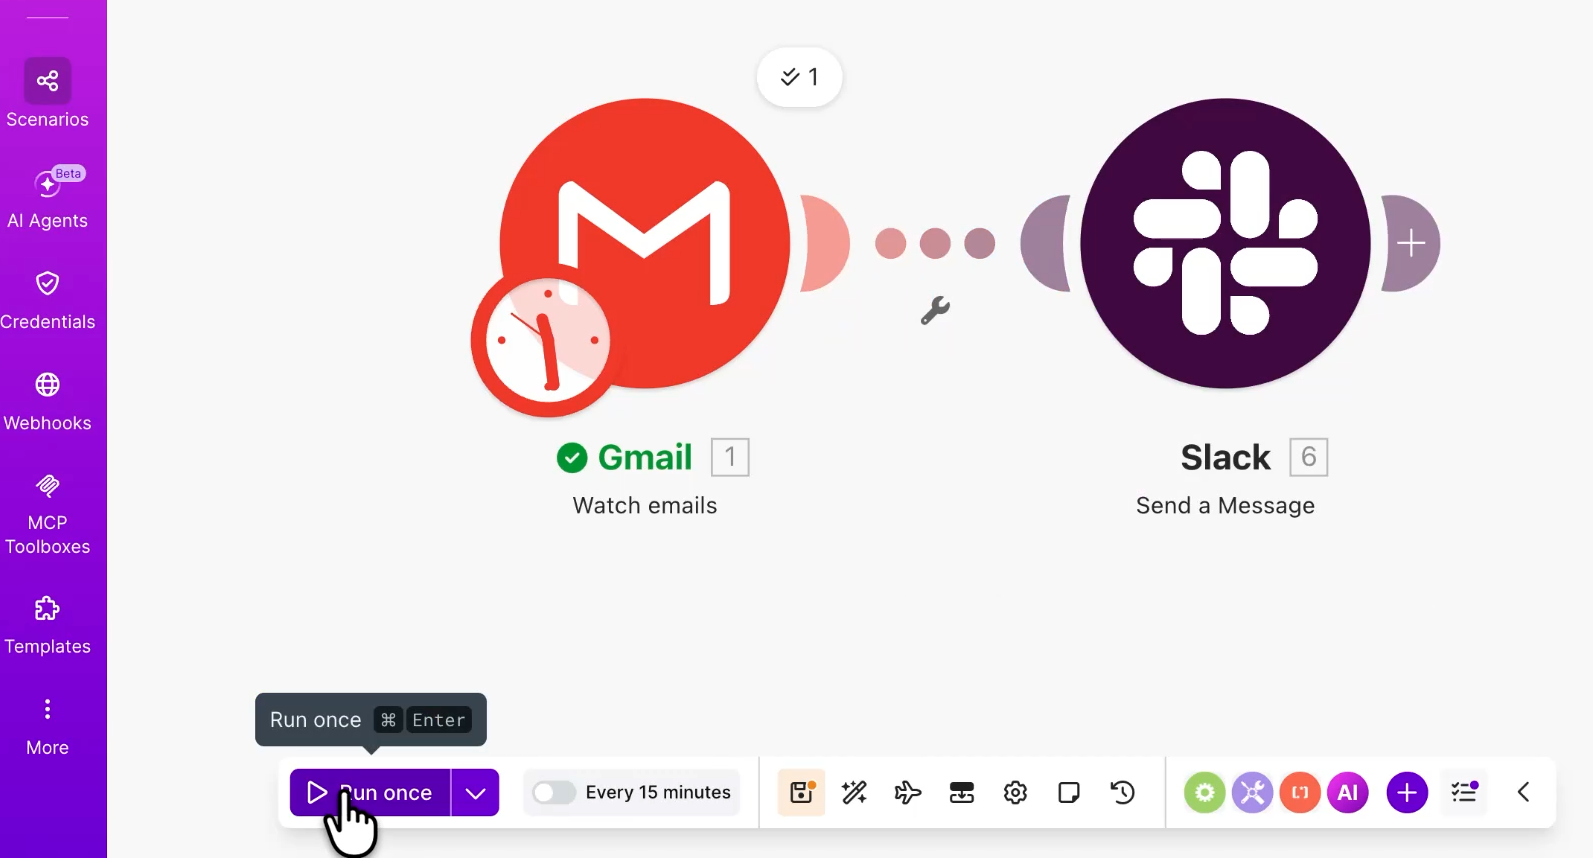
Both modules run in sequence. The checkmarks above the Slack module confirm the message was sent, but it’s always good to check the app itself to see the final product.
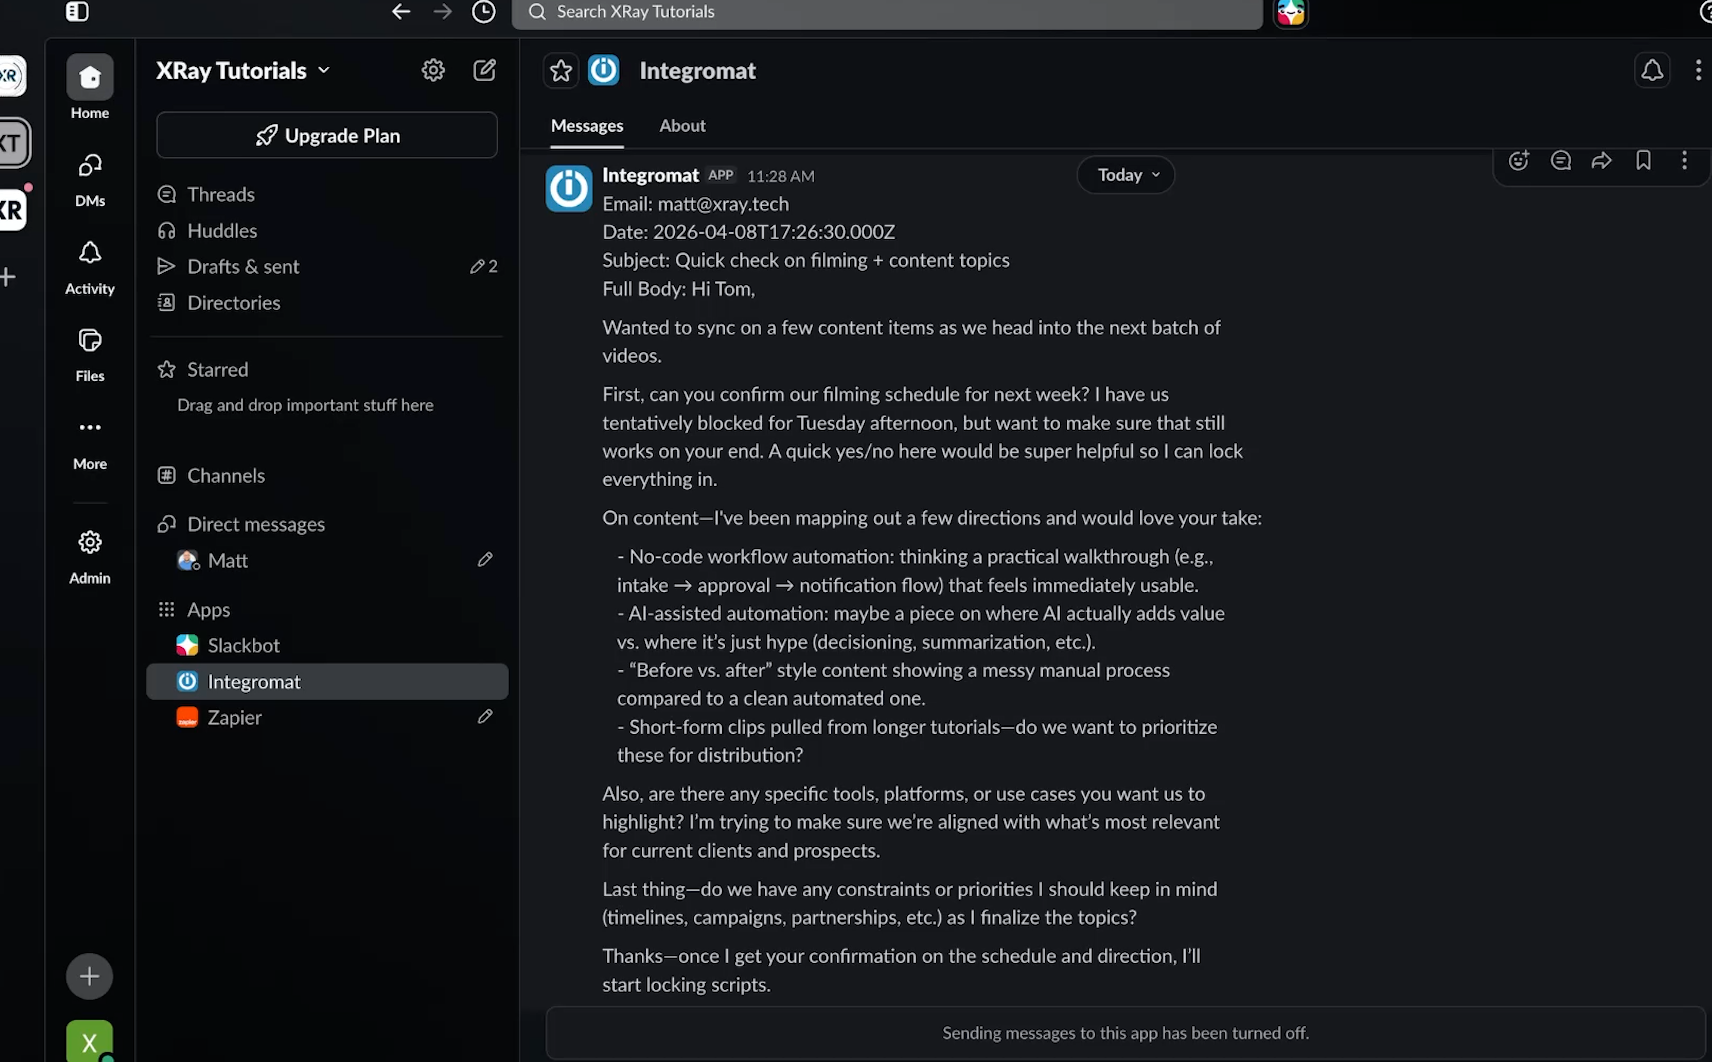
When we pull up Slack, we can see our message arrived. Note that ours is sent from our old Integromat connection, which you may see as well.
Now name the scenario something clear, like "Gmail to Slack notification."
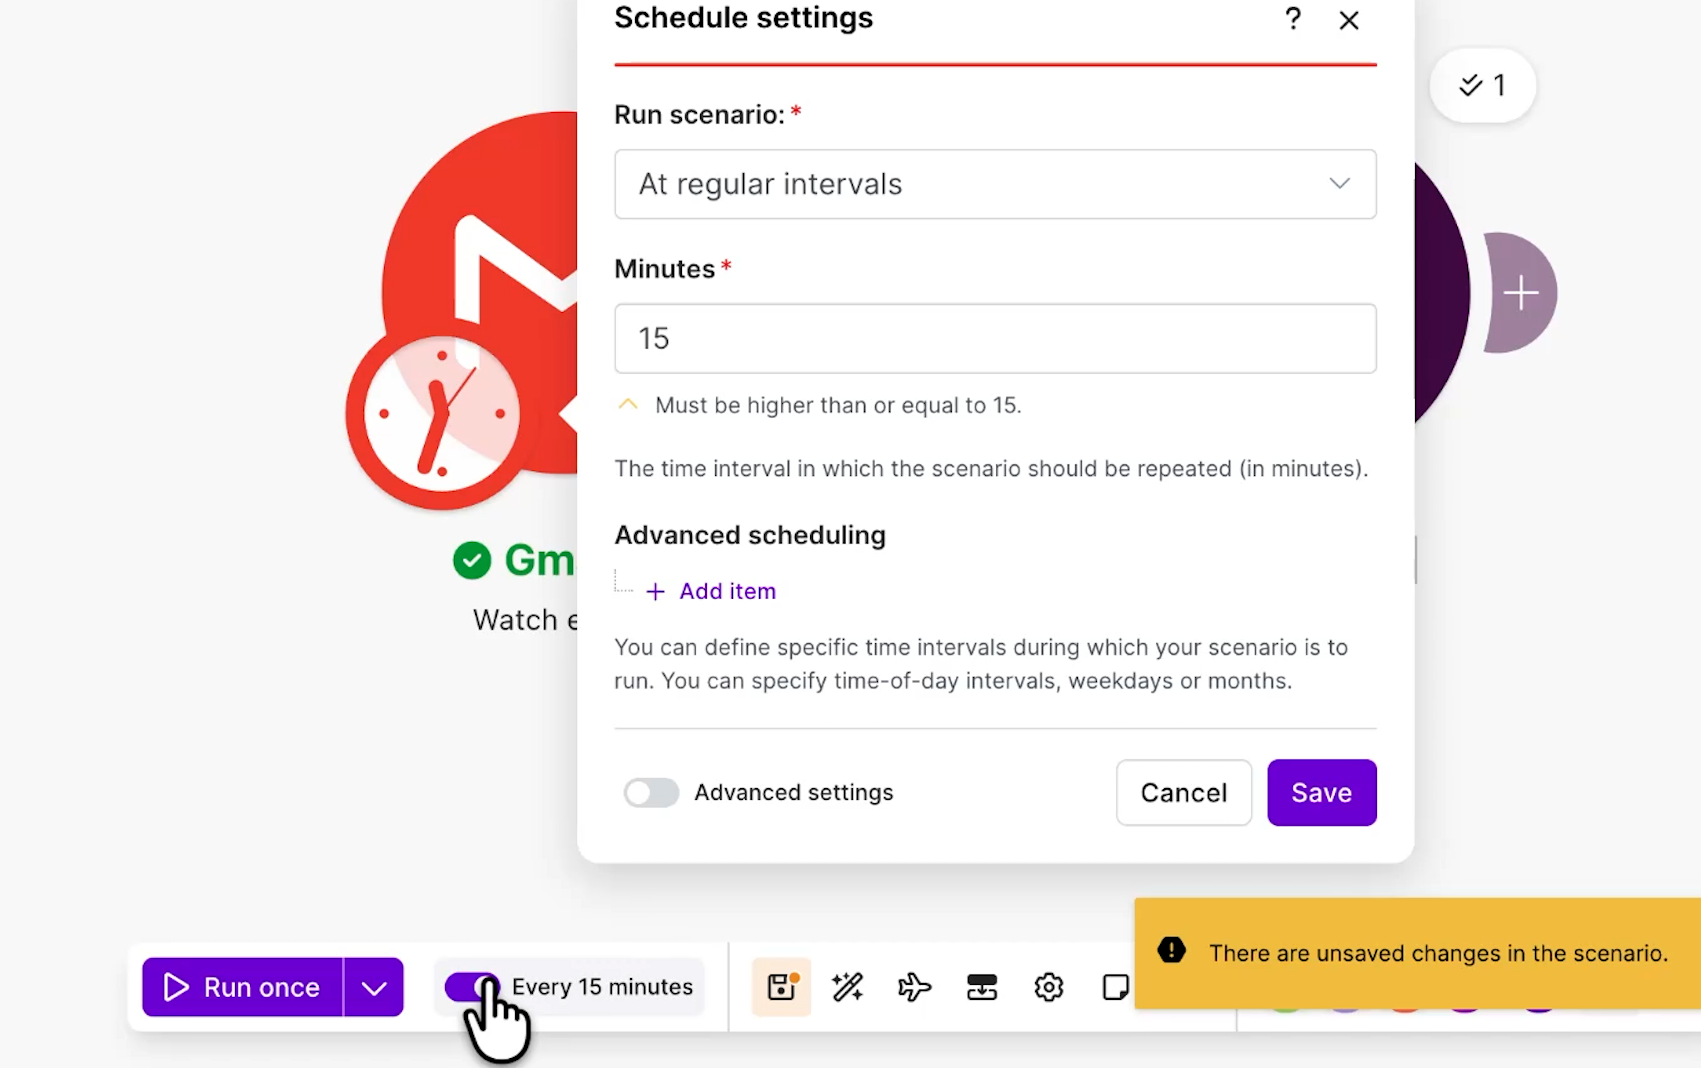
Then configure your intervals by clicking the clock icon on your trigger module.
This part matters for your wallet. Every time the scenario checks for a new email, it consumes one task. If you want it checking every minute, you'll need a higher plan – but you’ll likely want to avoid consuming a task every single minute.
The easiest way to save tasks – and consequently save money – is advanced scheduling. Toggle the “advanced scheduling” option on to set the scenario to run only during the hours and days you actually care about, like working hours Mon-Fri.
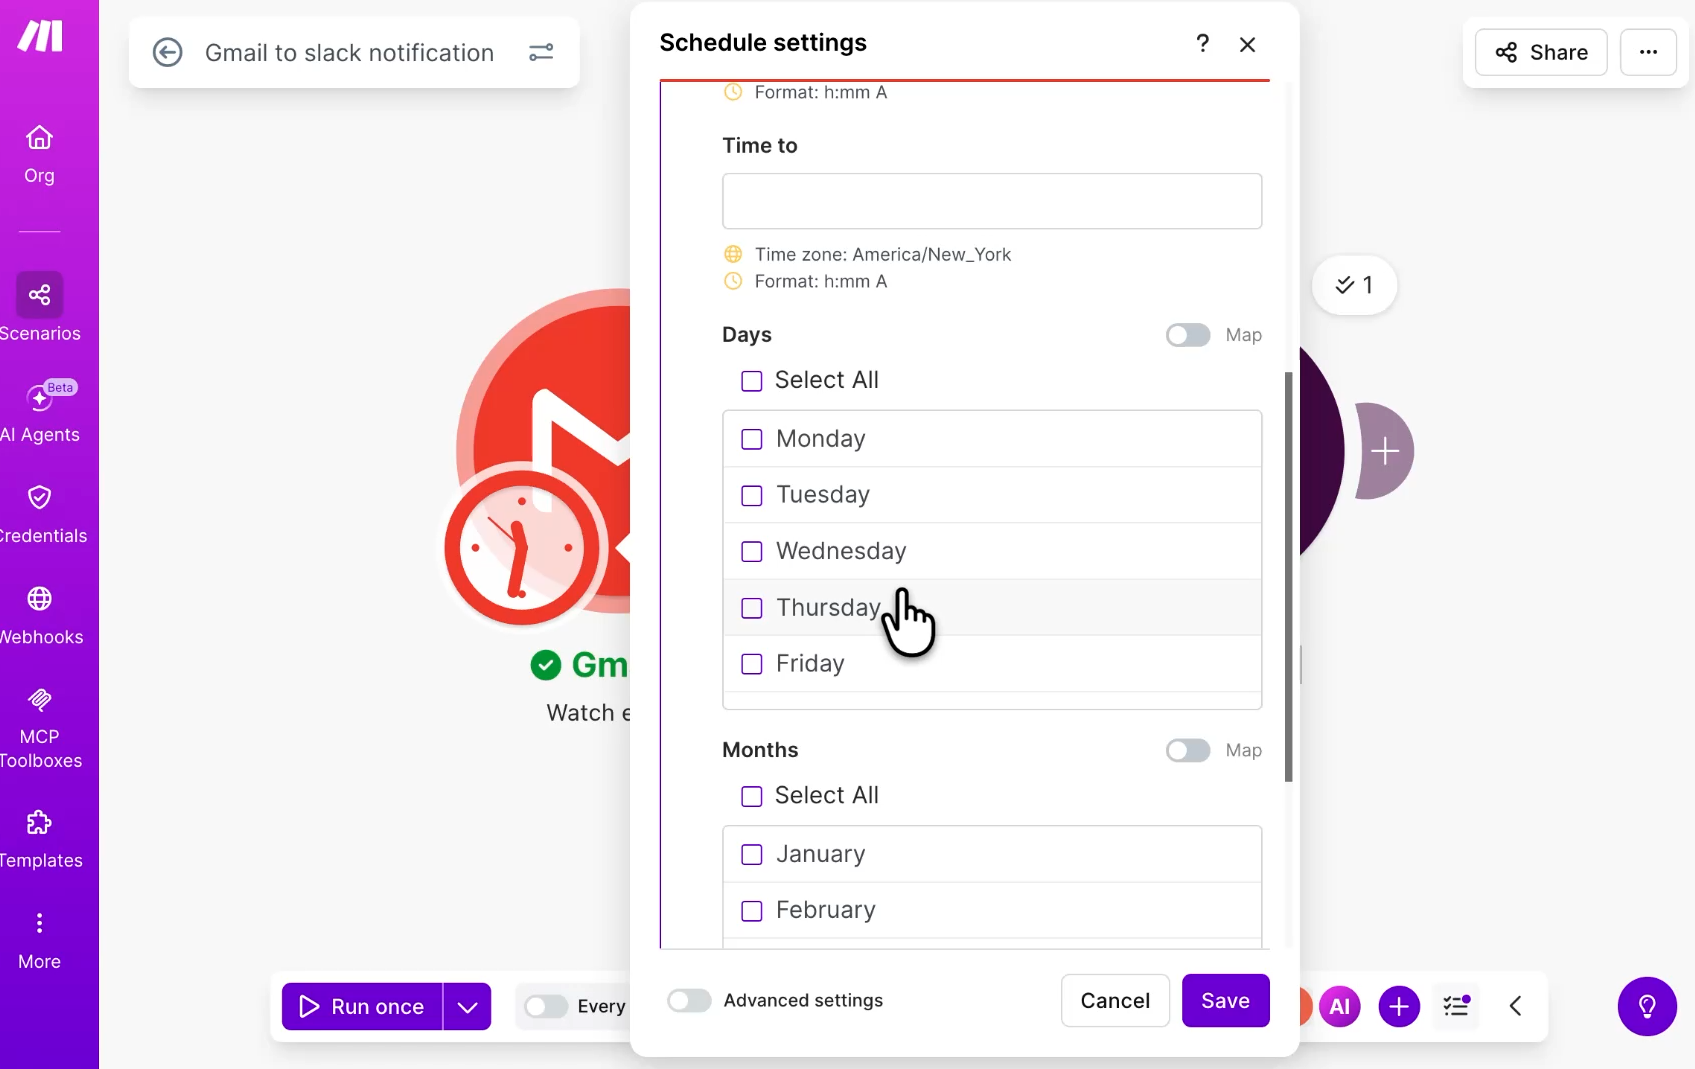
Restricting how often the Gmail step looks for new email saves you real money over time.
Once you're configured, click the toggle switch next to "Run once" to turn the scenario on. And don't forget to click the save icon — the floppy disk for those of you who remember them. Make does not save changes automatically, so saving regularly is important.
This automation is simple, but the foundation of everything you build in Make rests on this exact concept. Move data from one place to another. It's an easy pattern, and you can apply it to every tool you use daily. It gets really powerful once you add AI.
The scenario above is useful, but it's rigid. It sends a nearly identical Slack message for every email, no matter what's inside.
This is where an AI step changes things. Instead of routing the full email to Slack, we'll have Make summarize it first and assess how urgent it is. The summary goes into the Slack message instead of the full body, so you get a much better sense of what actually needs your attention.
There are two ways to add AI prompts to a Make scenario
• Connect directly to an AI provider like Claude or Gemini. This means setting up your own API key and billing.
• Use Make's AI toolkit, which runs on the credits already in your Make account.
We'll use the AI toolkit. It's quicker and easier to set up, and there's no separate provider bill to manage.
Right-click the alignment dots/wrench icon between the Gmail trigger and the Slack action, then select "Add a module." Search for and choose "Make AI toolkit" as the app, and select the "Simple Text Prompt" action.
From here, pick your model and write your prompt. The model selector offers a full range of options from providers like OpenAI and Anthropic, including their frontier models. At the top, you'll find three recommended models labeled Small, Medium, and Large.
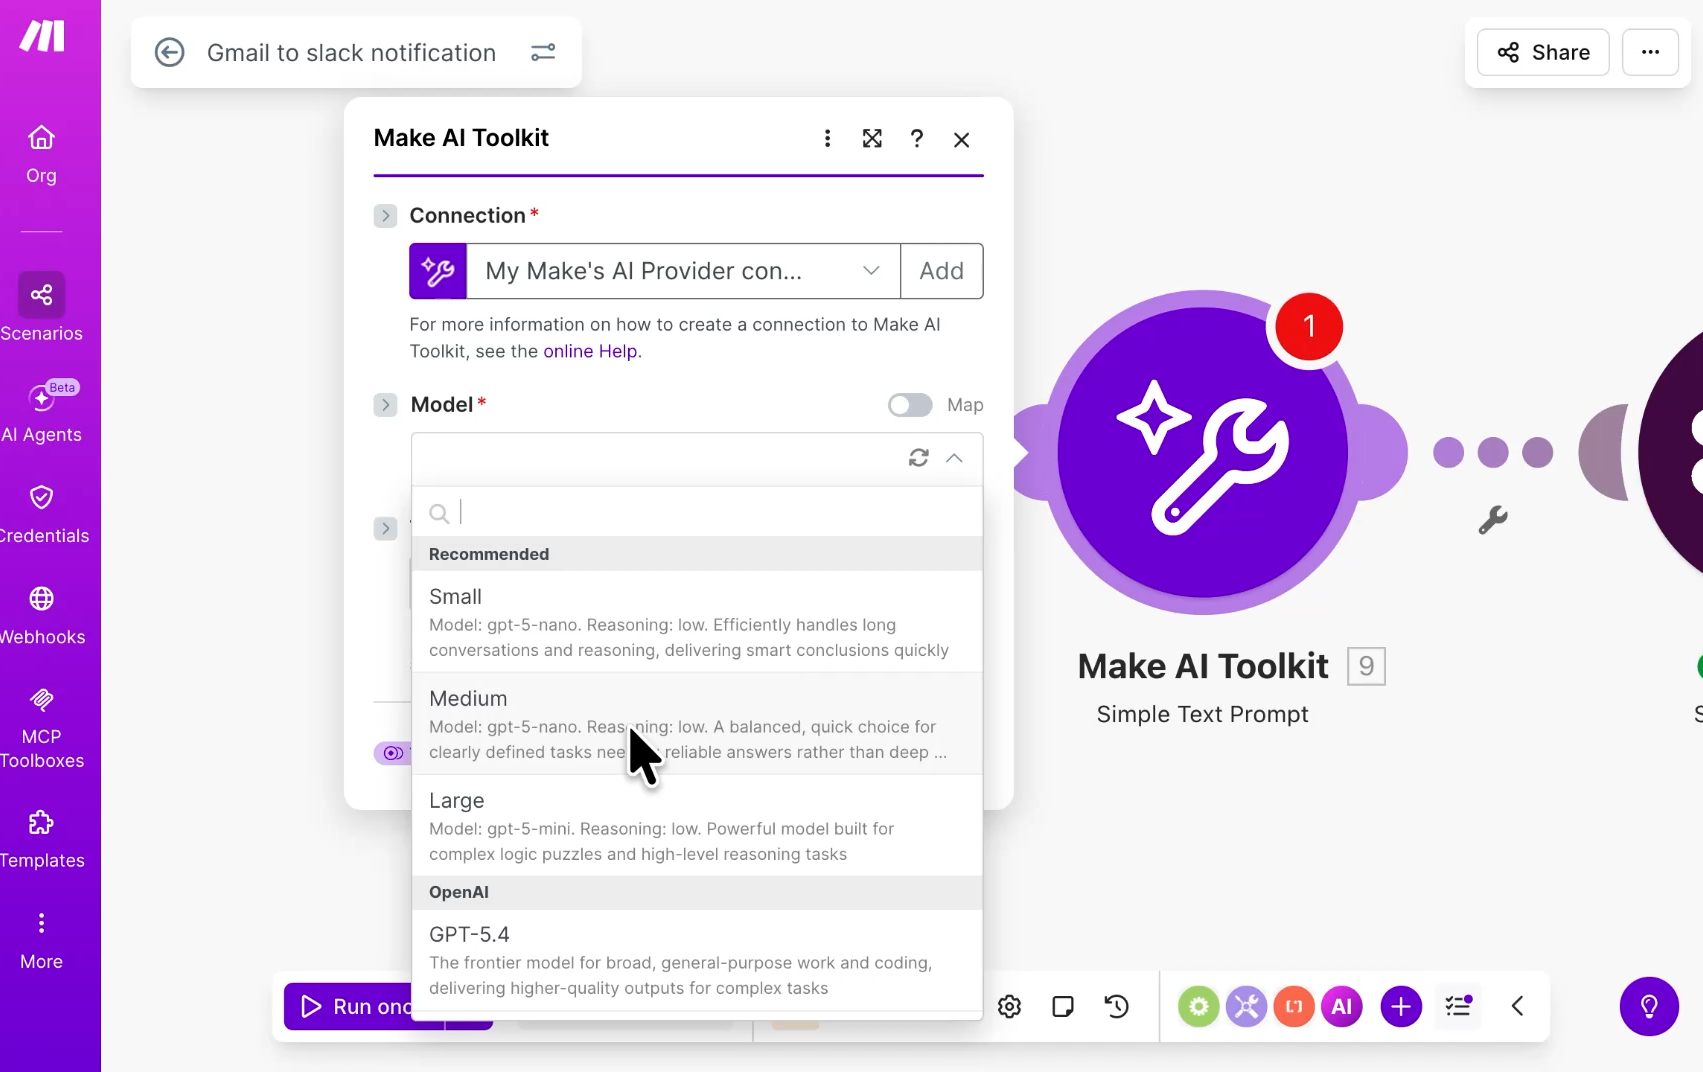
These are all OpenAI models, chosen to keep your costs low. For this job, the "Recommended: Medium" model is plenty.
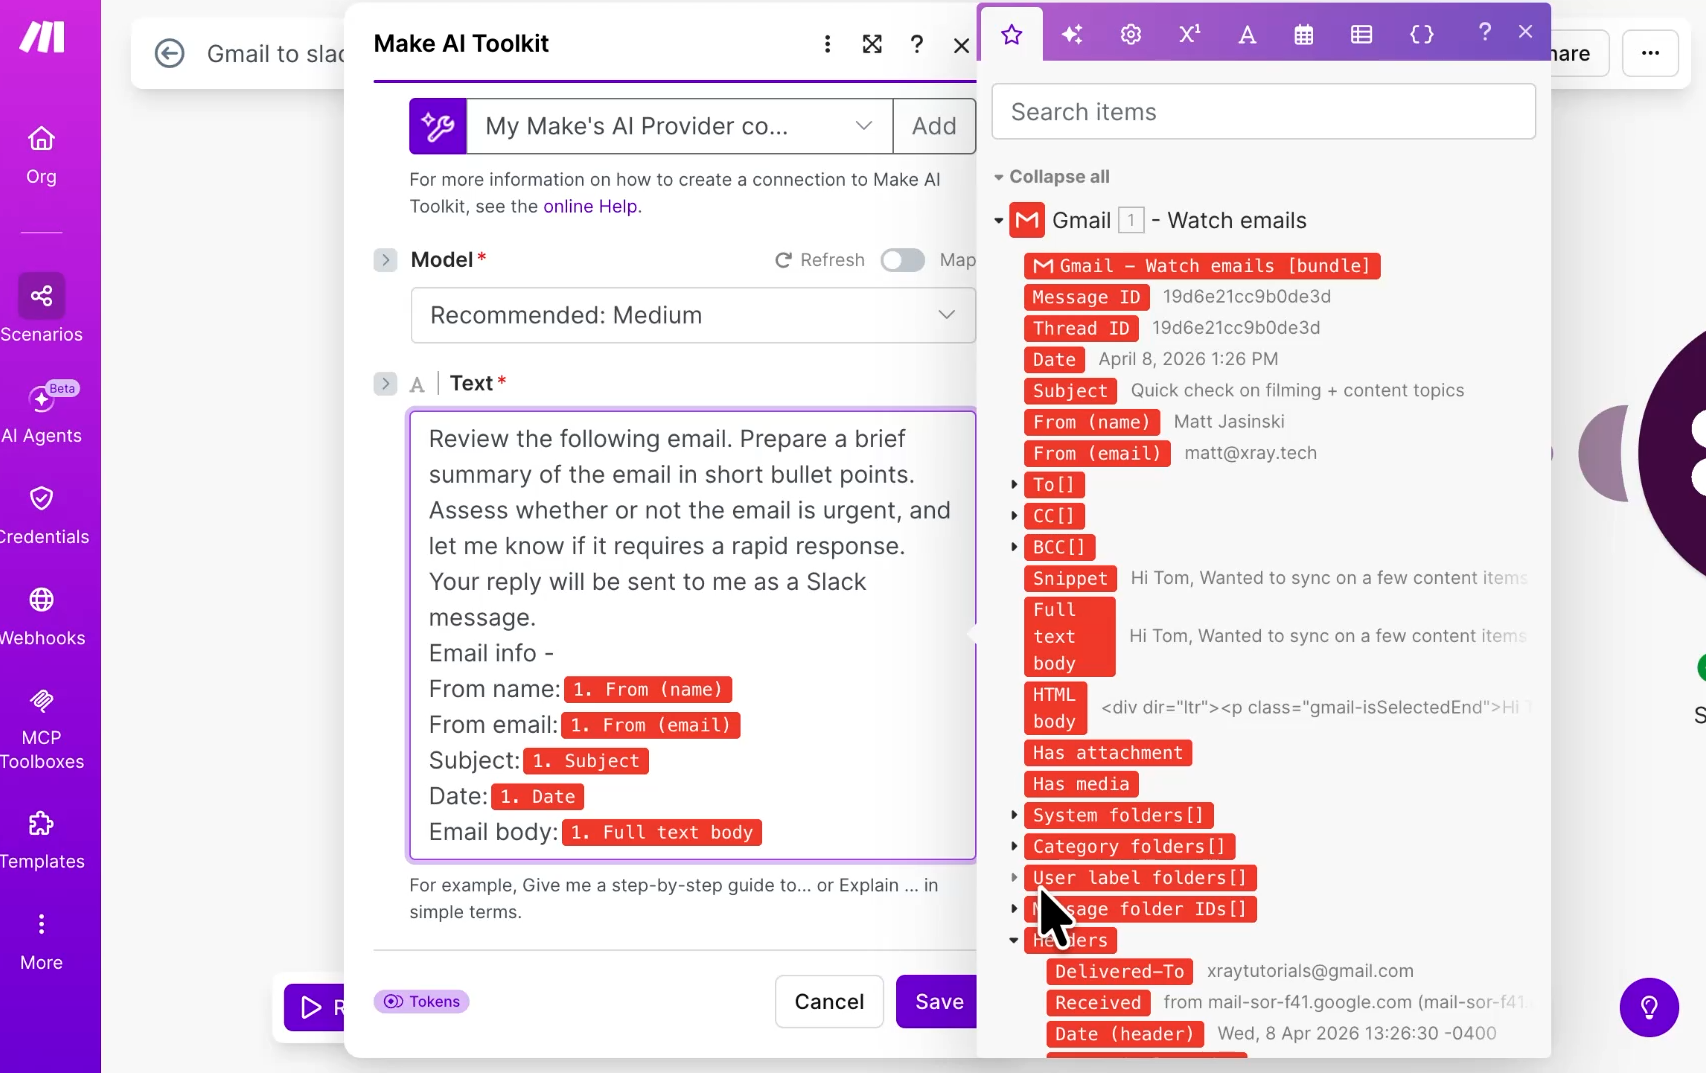
In the prompt text area, enter your instructions and insert the trigger variables directly. We'll feed it the From Name, From Email, Subject, Date, and Email body, then ask it for a short summary and an urgency rating. Click save once your prompt is all set.
Now go back to the Slack message module and delete the static text and variables we added earlier. In their place, map the "Answer" variable coming out of the Make AI toolkit module. Click save.
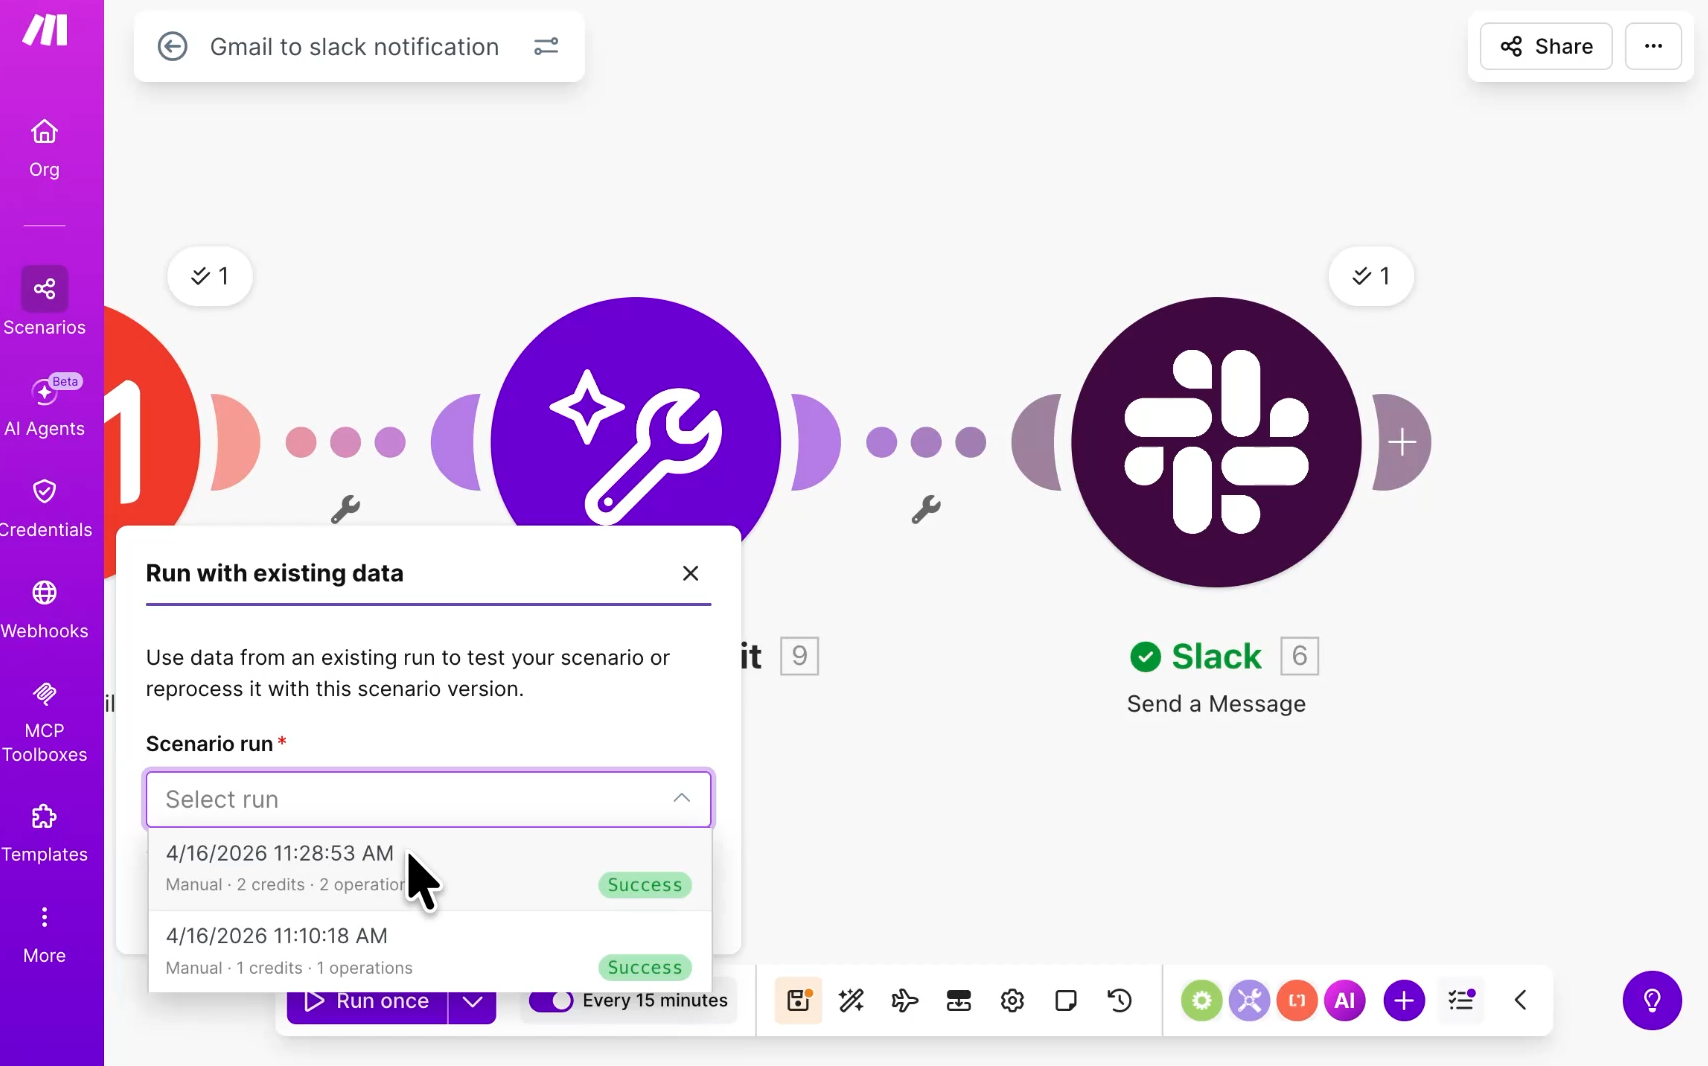
To test it, you can click "Run once" again. Because you've run this data before, Make will pop up a window asking if you want to use existing data. Select a previous run, then click "Run once" again.
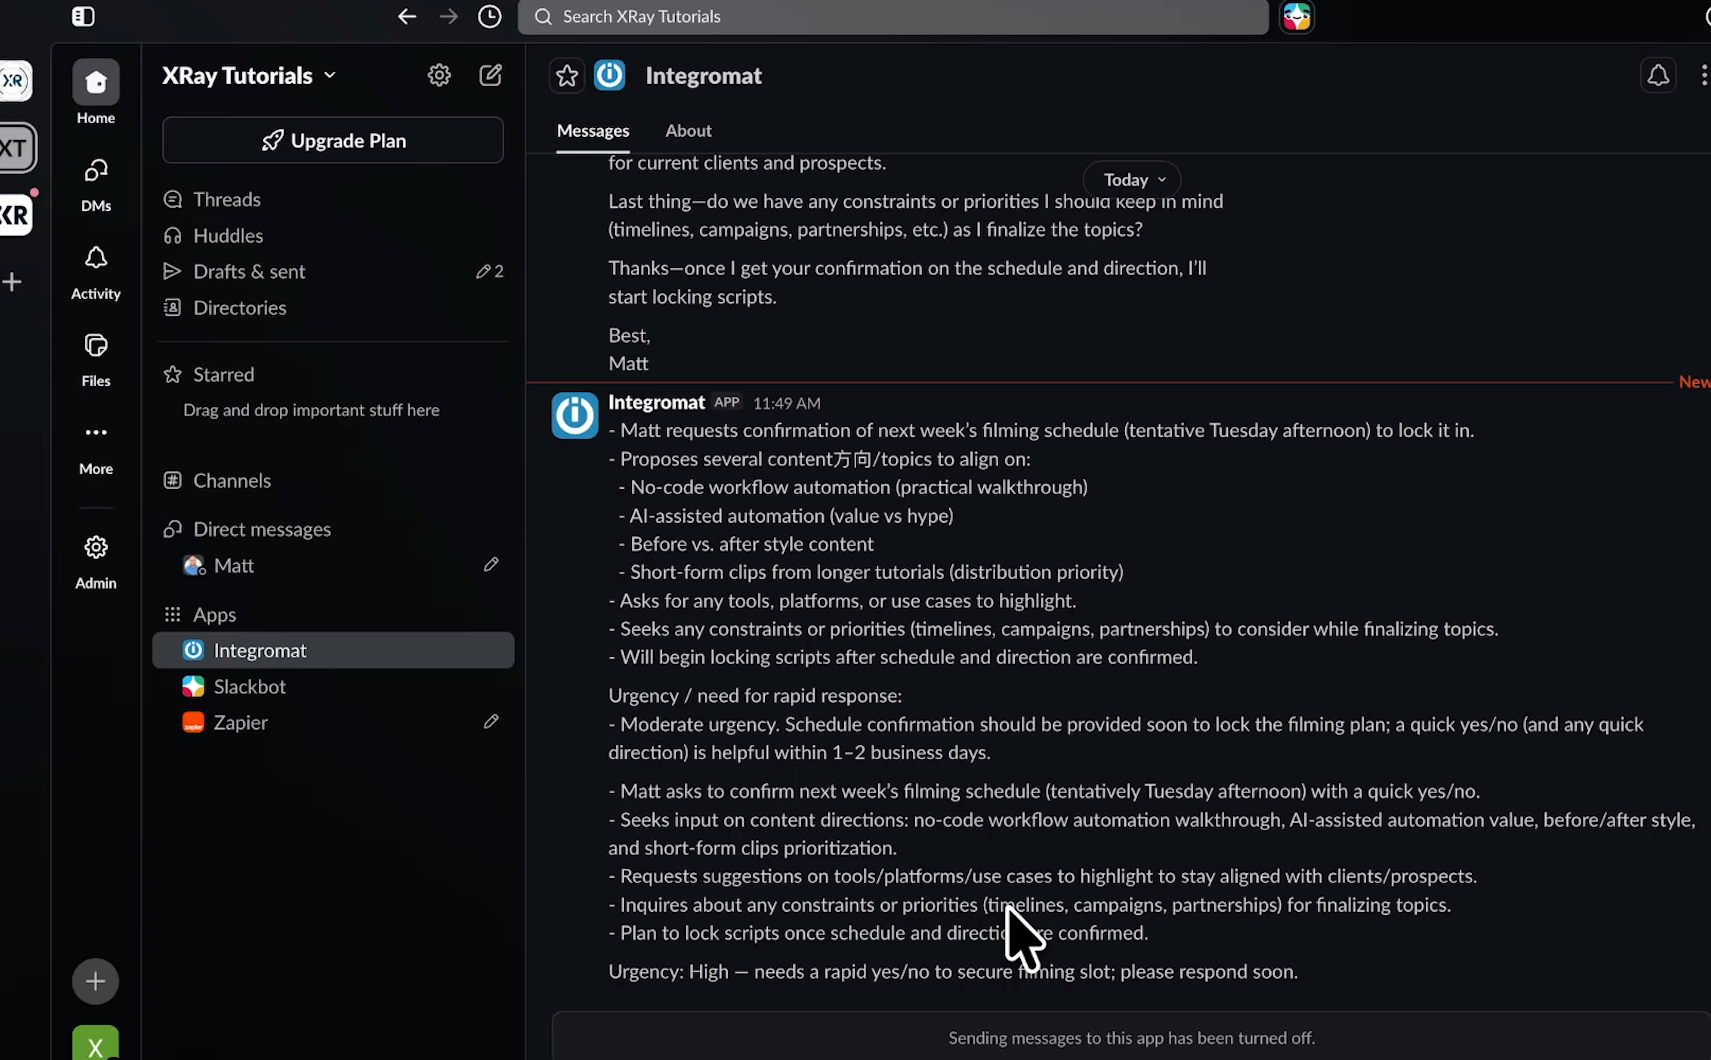
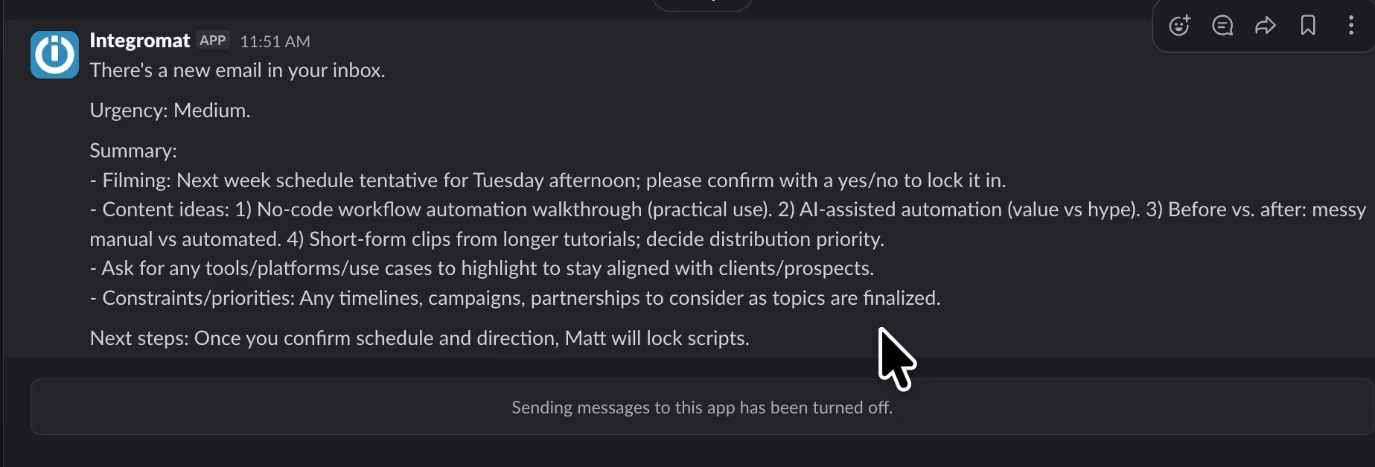
The AI toolkit summarizes the message, and a fresh Slack notification arrives. This one tells us the email is high urgency, gives a bullet-point summary, and makes it clear we should respond.
Adding an AI prompt gives your scenarios the ability to generate, transform, and interpret data. You're no longer just moving information from one place to another. You're creating new information in this step.
But it still runs in a straight line. Every email gets summarized. Every email generates a Slack message. The workflow has no ability to decide whether a message is worth sending in the first place. For real flexibility and judgment inside your automations, you want an AI agent.
AI agents let you build assistants that can use any of the 3,400 apps Make connects to. Make handles the authorization, so you get a quick, secure way to put an agent to work across all of those apps.
Instead of following a fixed script, an agent uses judgment. You give it tools and instructions, and it decides what to do based on what it encounters. For our email workflow, that means the agent can read each message and choose whether it actually warrants a Slack alert, or do nothing if it doesn't.
Agents are included on all Make plans, even the free one. Just like AI prompts, agent tokens count against your credit limit. If you need more, you can upgrade your tier or add credits to your existing plan.
You can create an agent right inside the scenario builder, which is genuinely convenient. Create a new scenario with the
Click the plus icon on the side of your trigger, and select "Add AI module" from the pop-up menu instead of the standard "Add module."
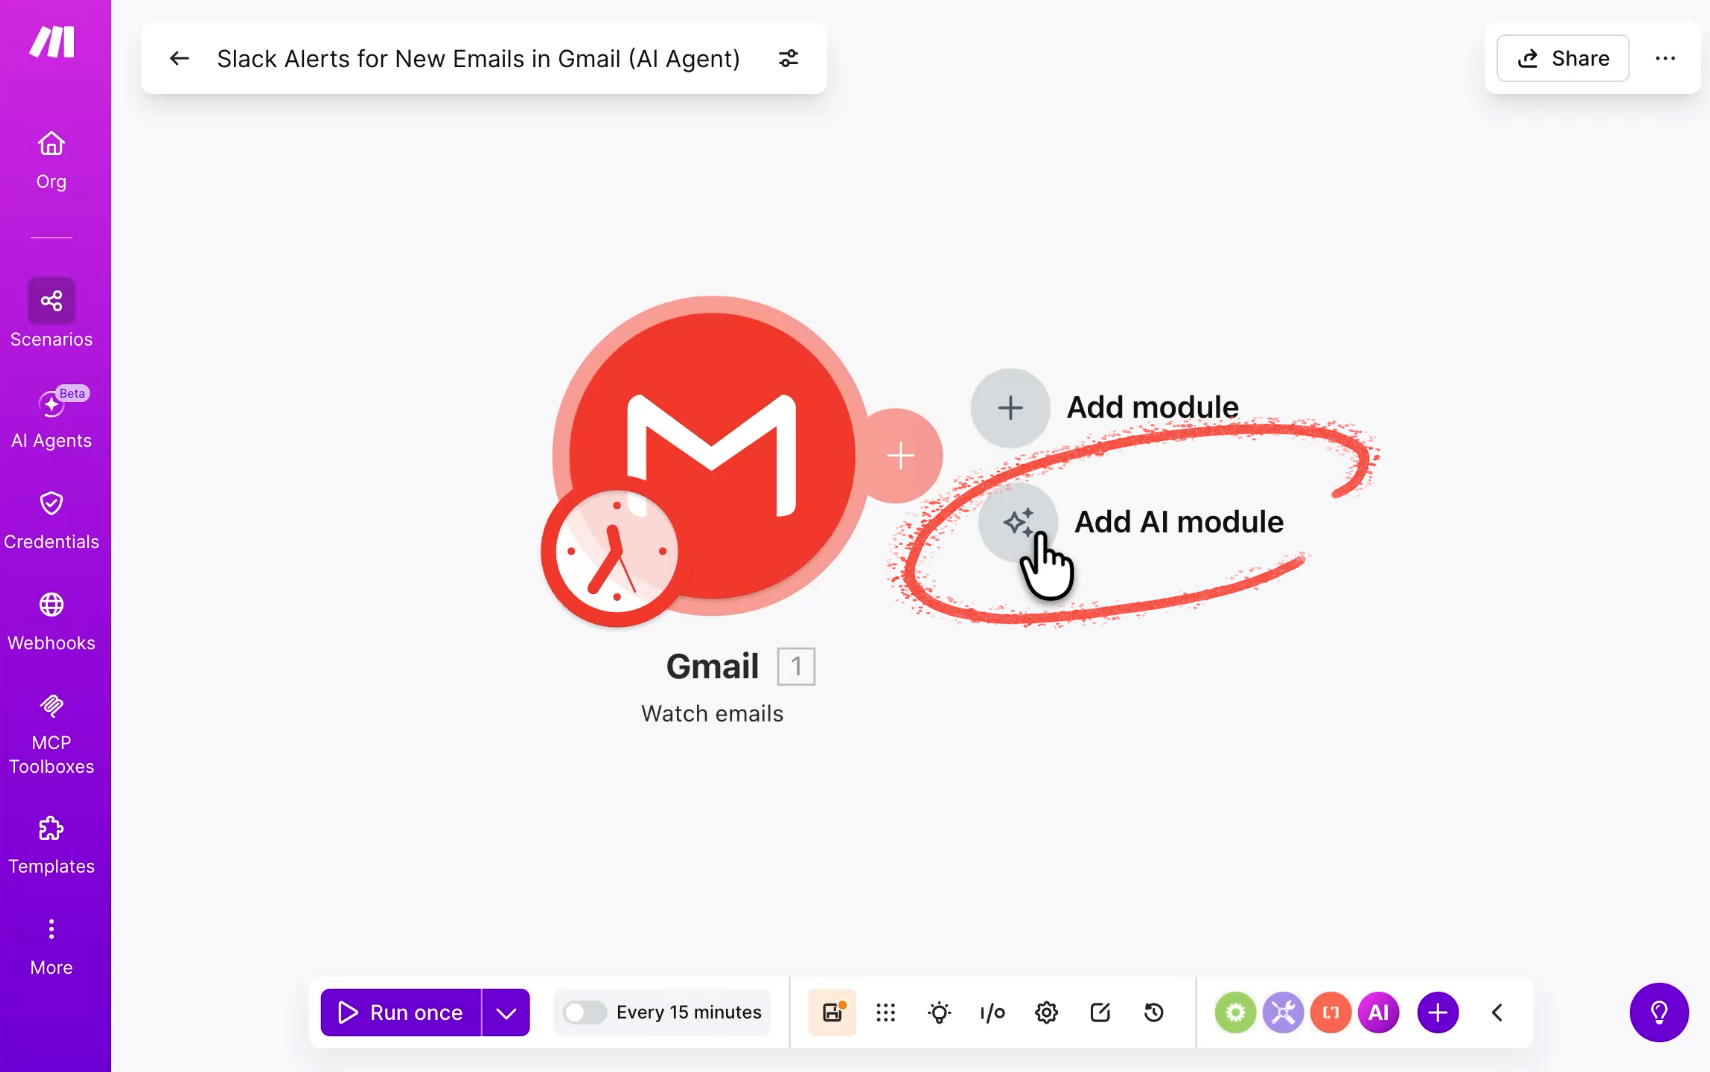
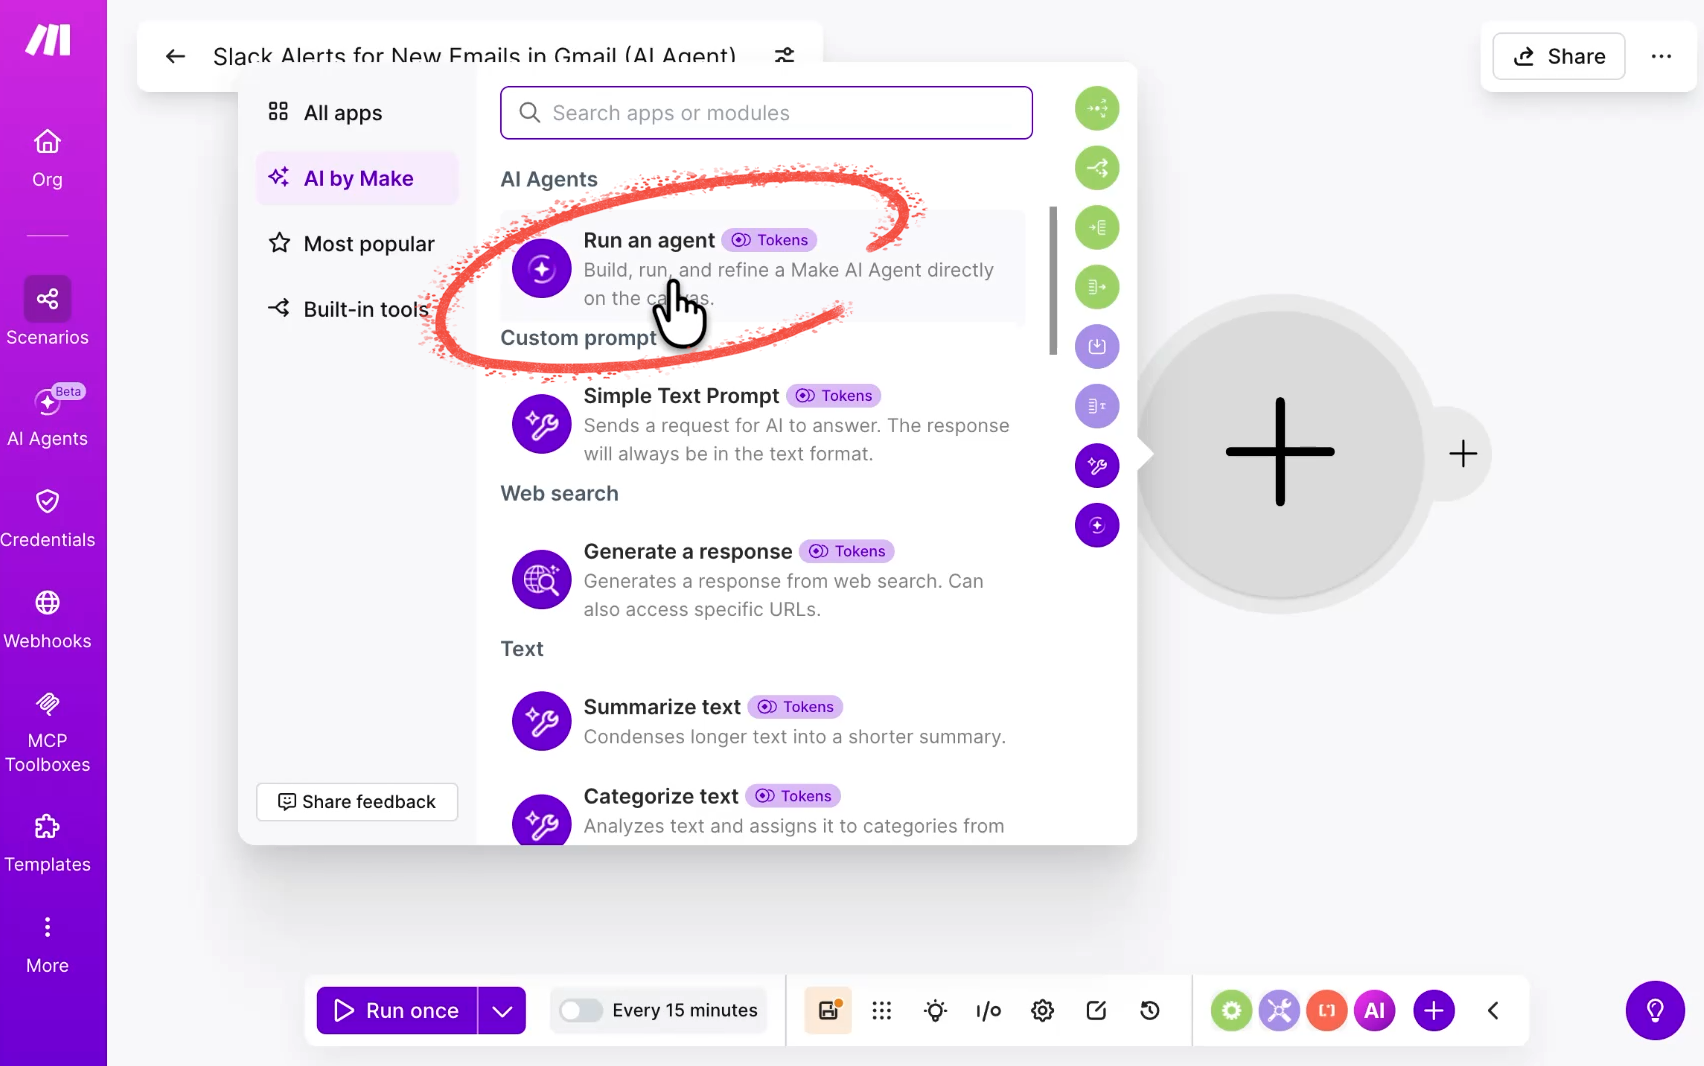
Then, select "Run an agent." We'll use a streamlined setup here just to get started.
First, the basic setup. If you don't have an AI provider connection yet, click add. You can use Make's default connection so you don't have to set up your own API keys.
Next, select your model. We'll use the "Recommended: Small" model because it's the cheapest, and we don't need anything heavier for this.
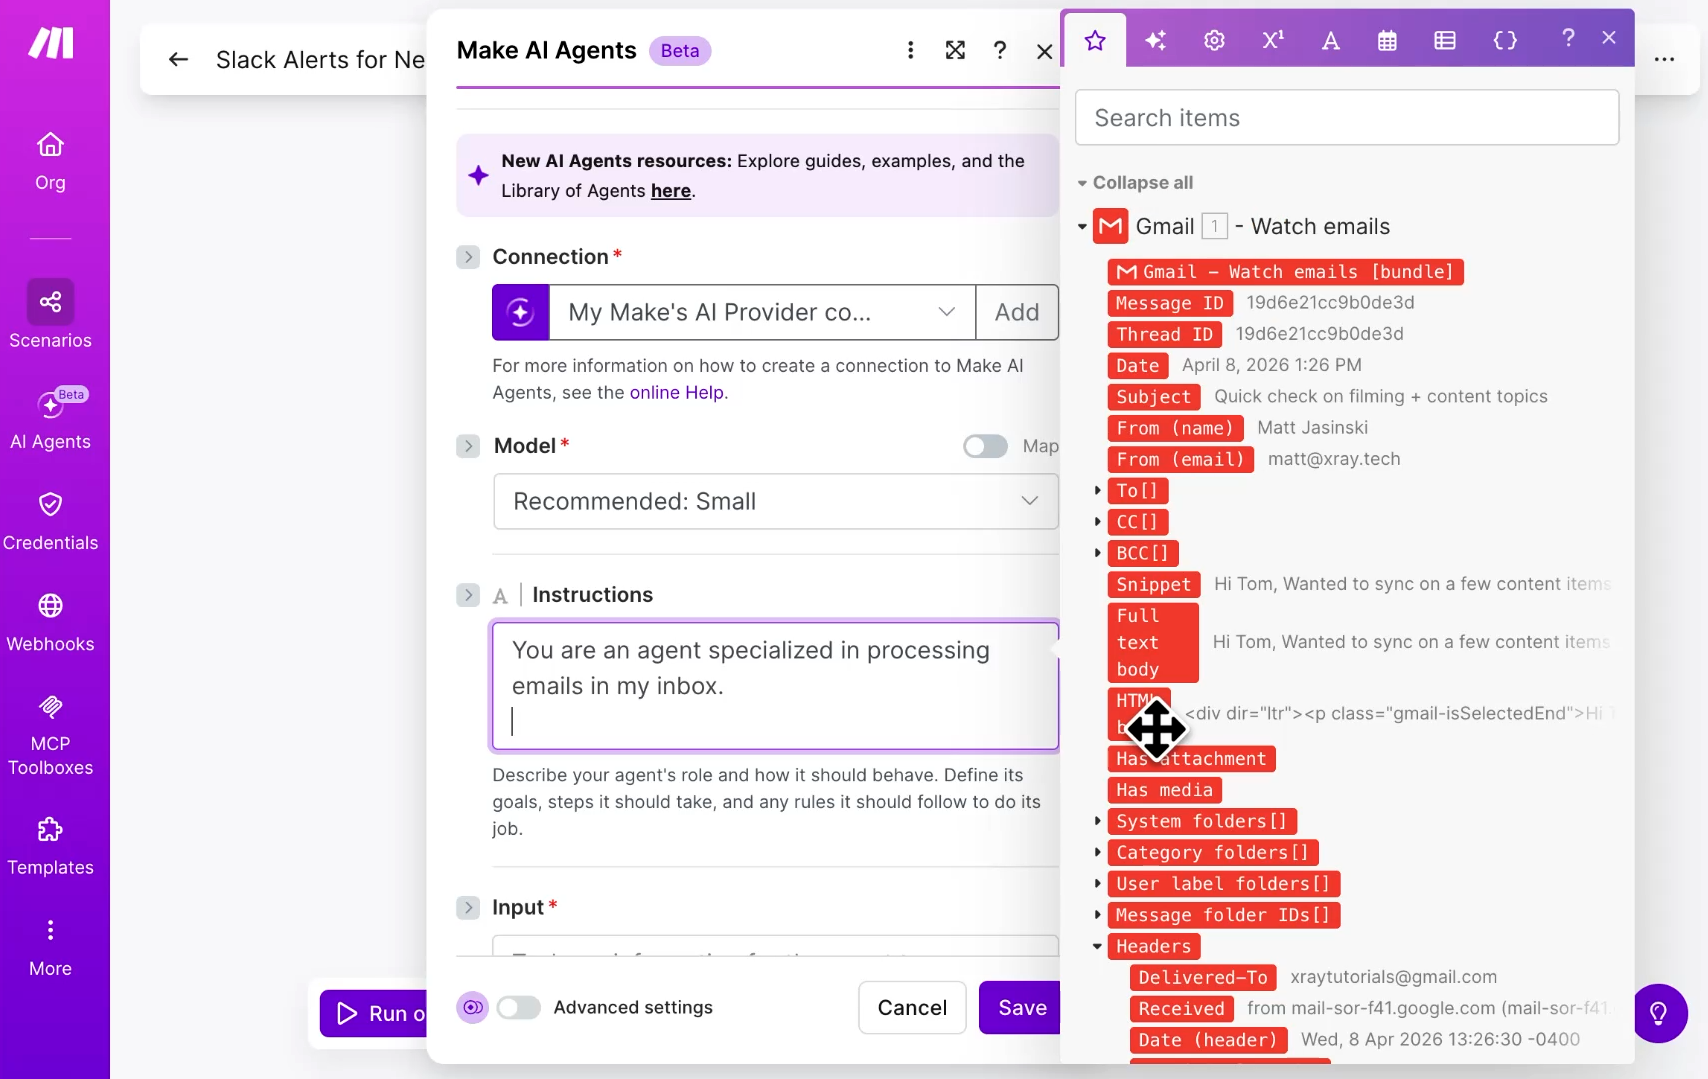
In the “Instructions” field, you can identify the general purpose of the agent and add some simple guidance.
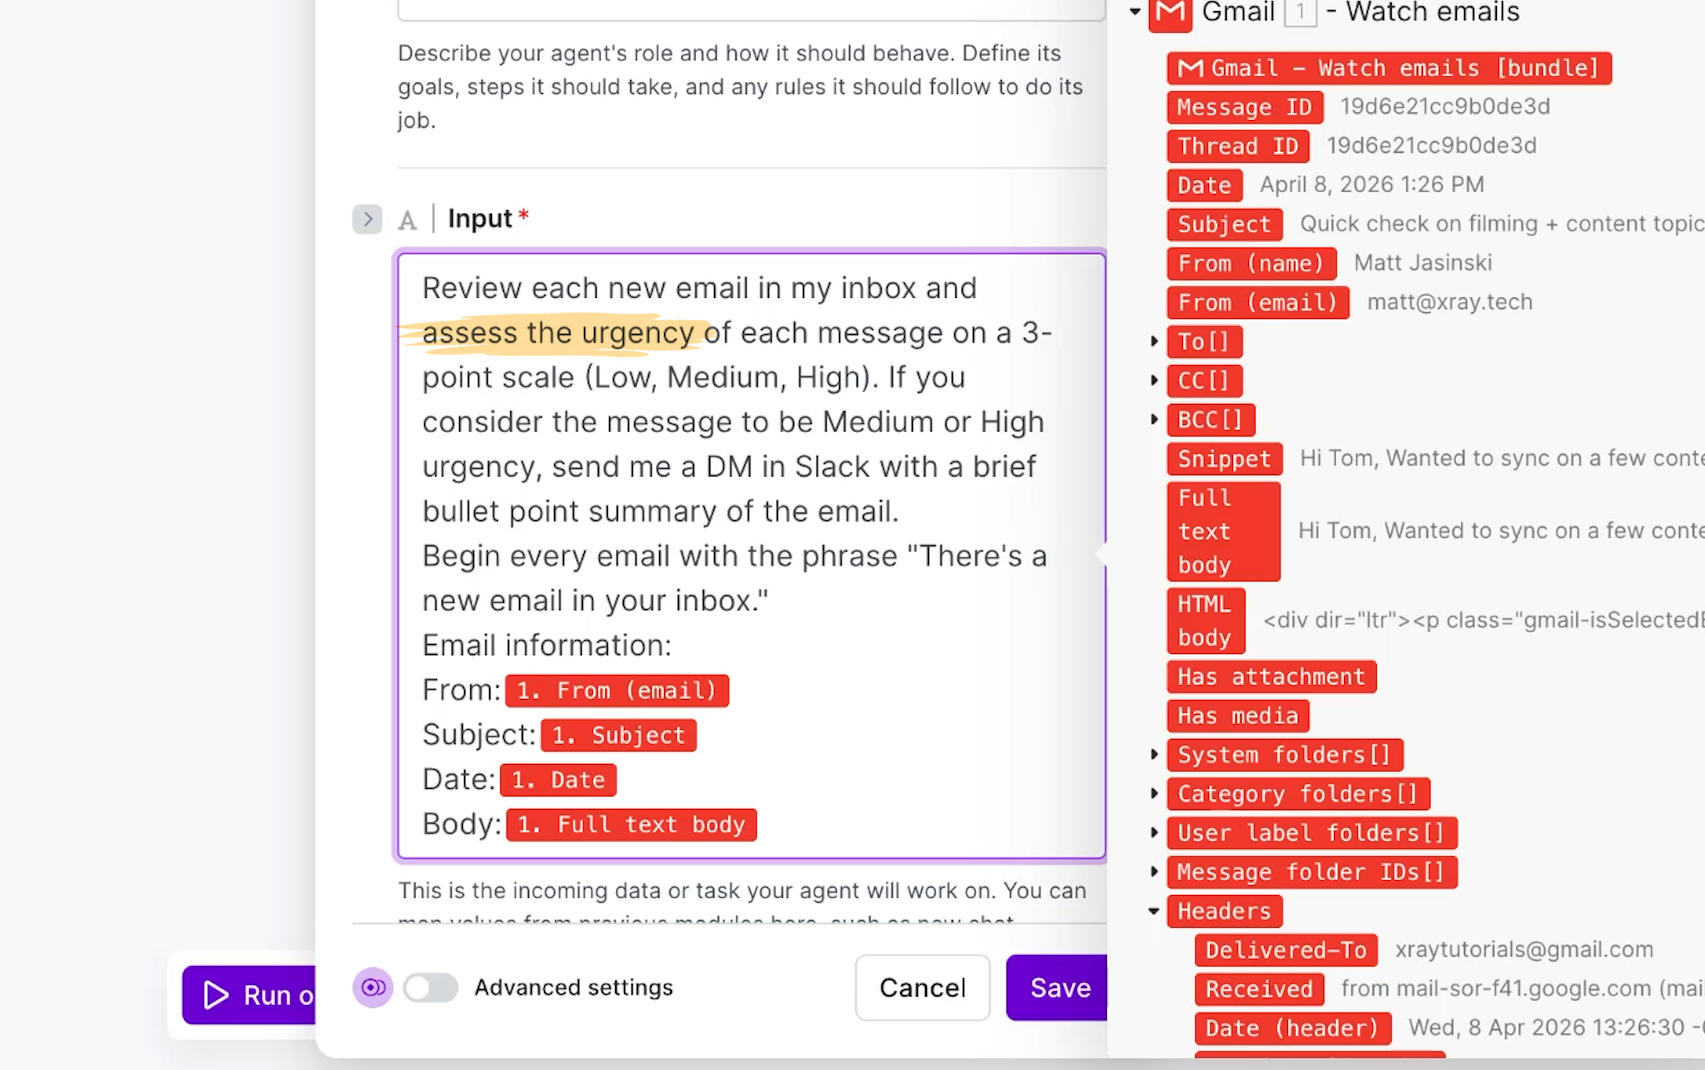
For the input field, enter your prompt instructions alongside your data variables. We'll give it something similar to our earlier prompt and wire up the variables from the trigger.
There's one key difference from the prompt we used before: This time we're including judgment. We explicitly ask the agent to only send a Slack message if the urgency is medium or high. The agent gets to decide whether that bar is met.
There are also options for input files, conversation IDs, and a set of advanced settings. We don't need those here, so leave them blank and click save.
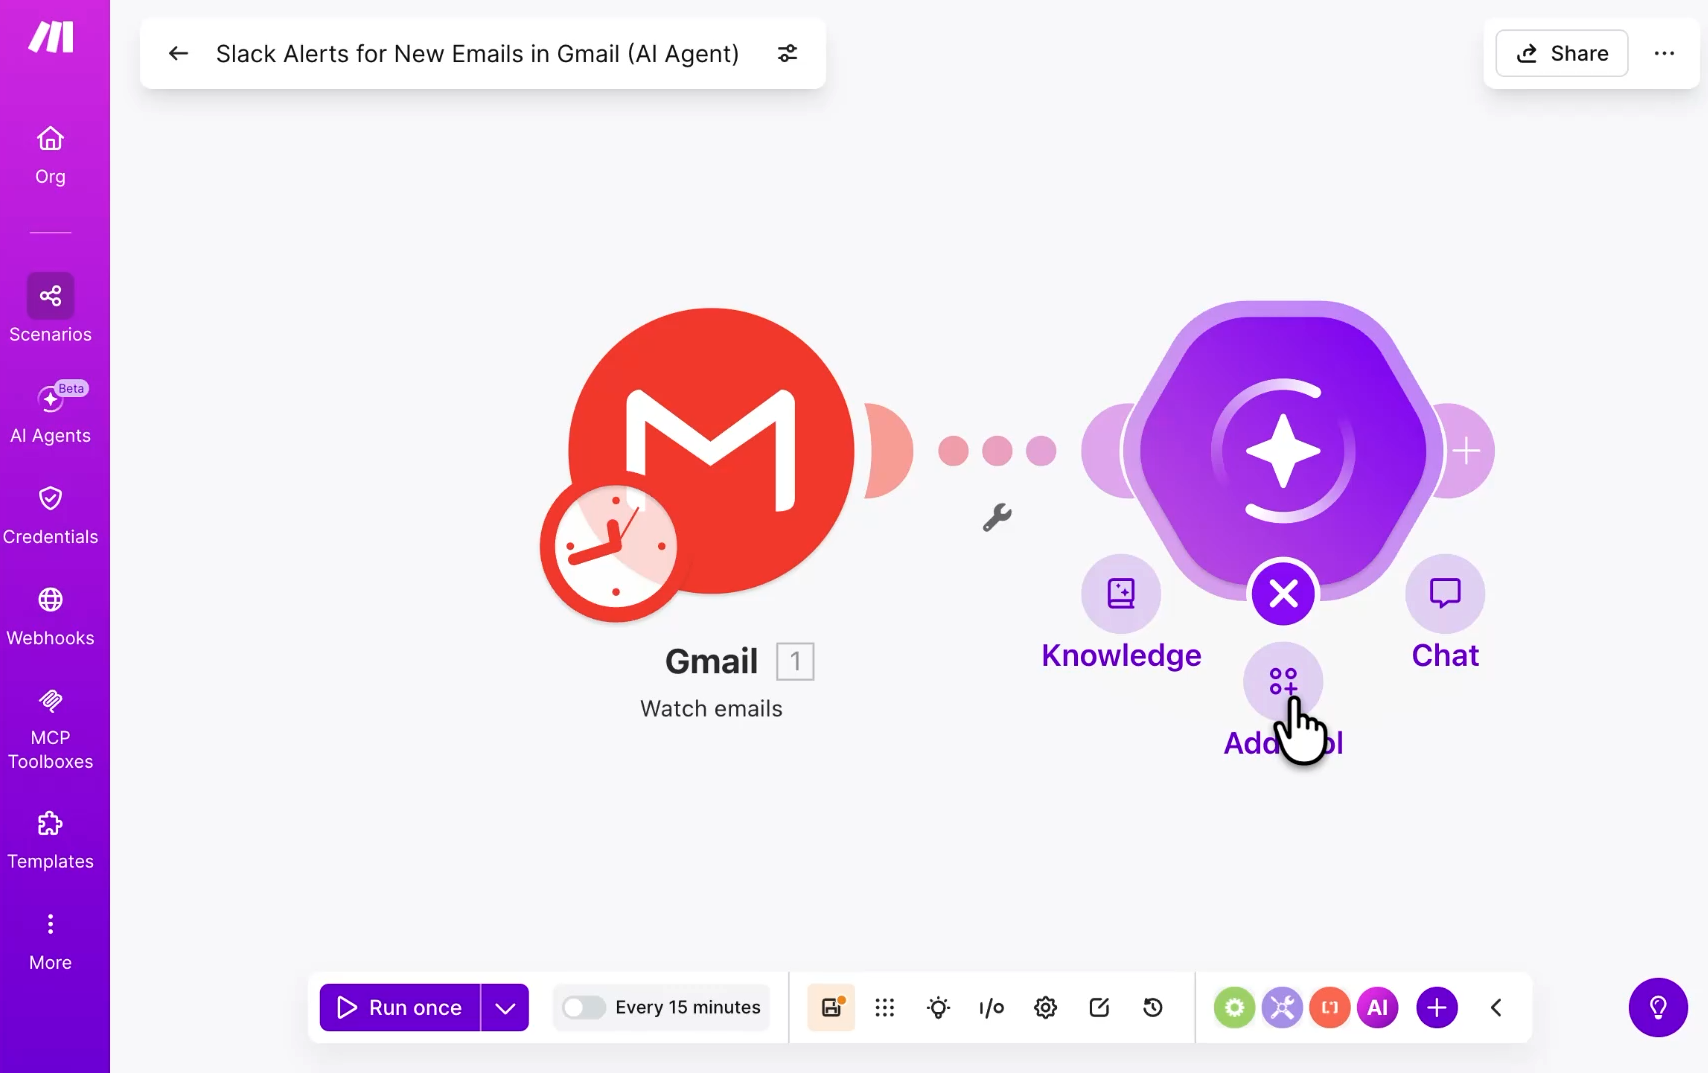
Now we add a tool to the agent. Think of a tool as a specific ability you grant a specific agent. We're going to give this one the ability to send a Slack message.
Hover over your agent module and click the “Add tool" button.
Search for Slack and add the "Send a message" tool. Confirm the right connection is selected.
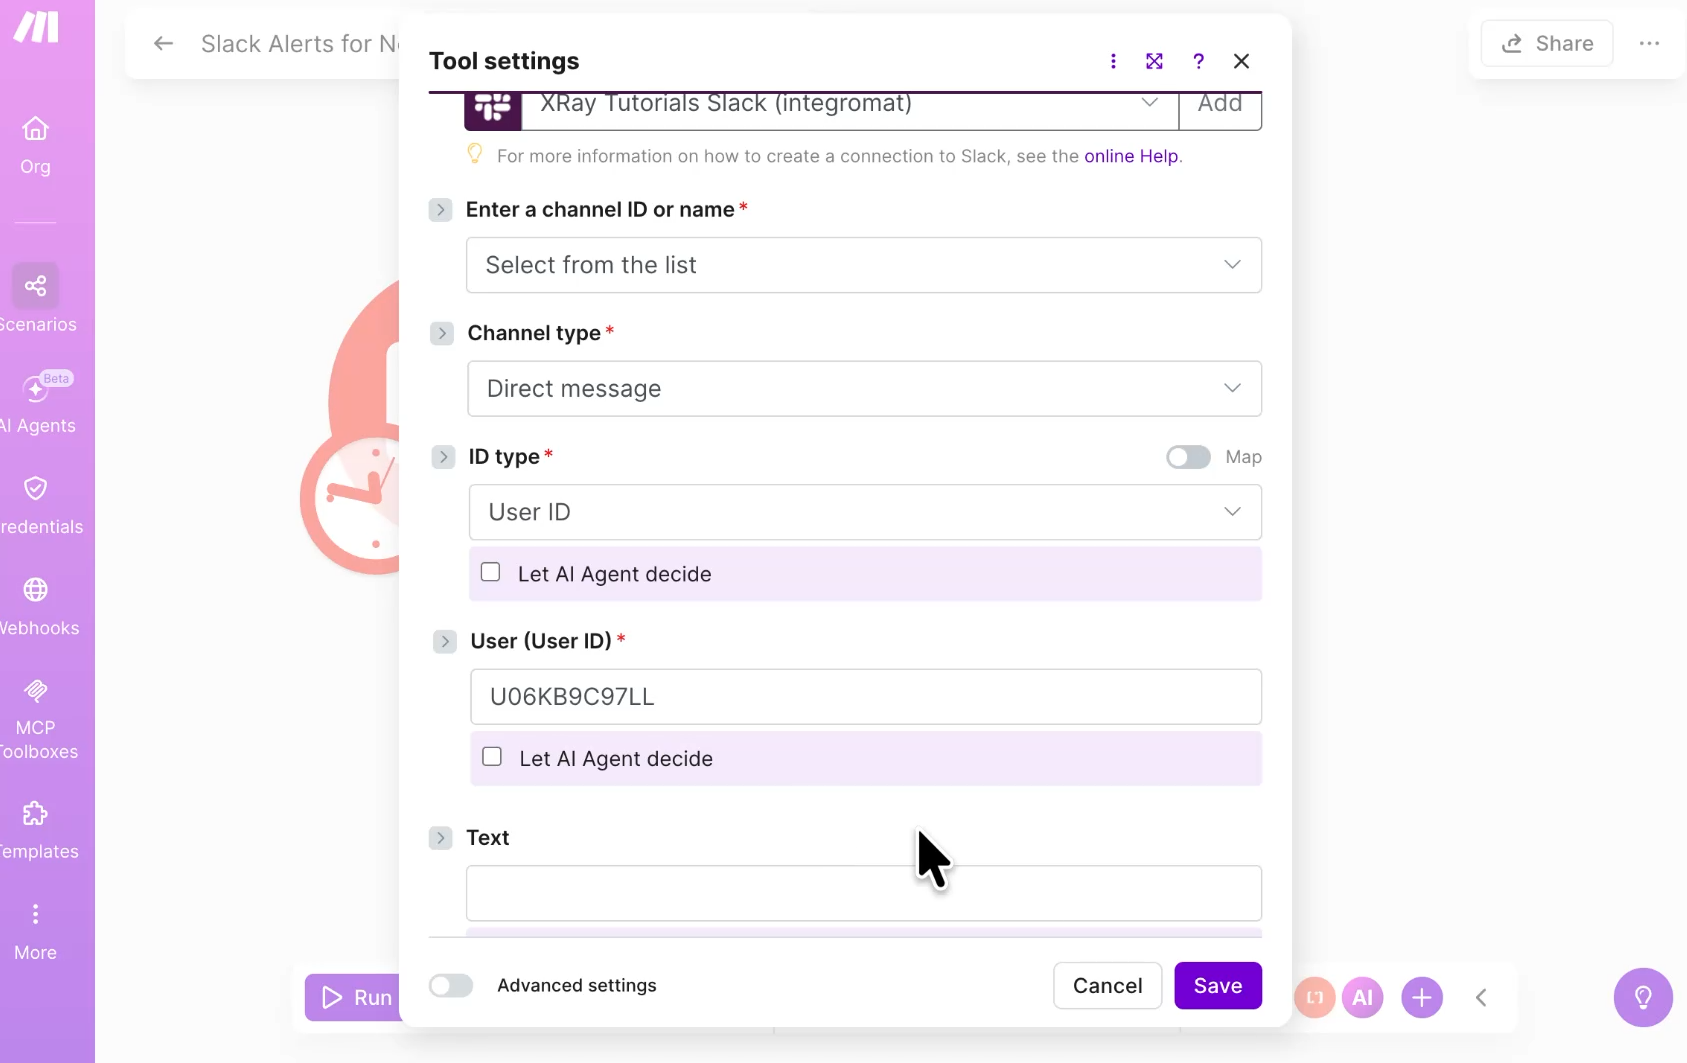
For each field within the tool settings, you can either set the value yourself or let the agent decide. We only care that it sends us a DM, so we'll select from the list, change “Public Channel” to "Direct message," and change the ID type to "User ID." Uncheck "Let AI Agent decide" next to the User field and paste in your Slack user ID.
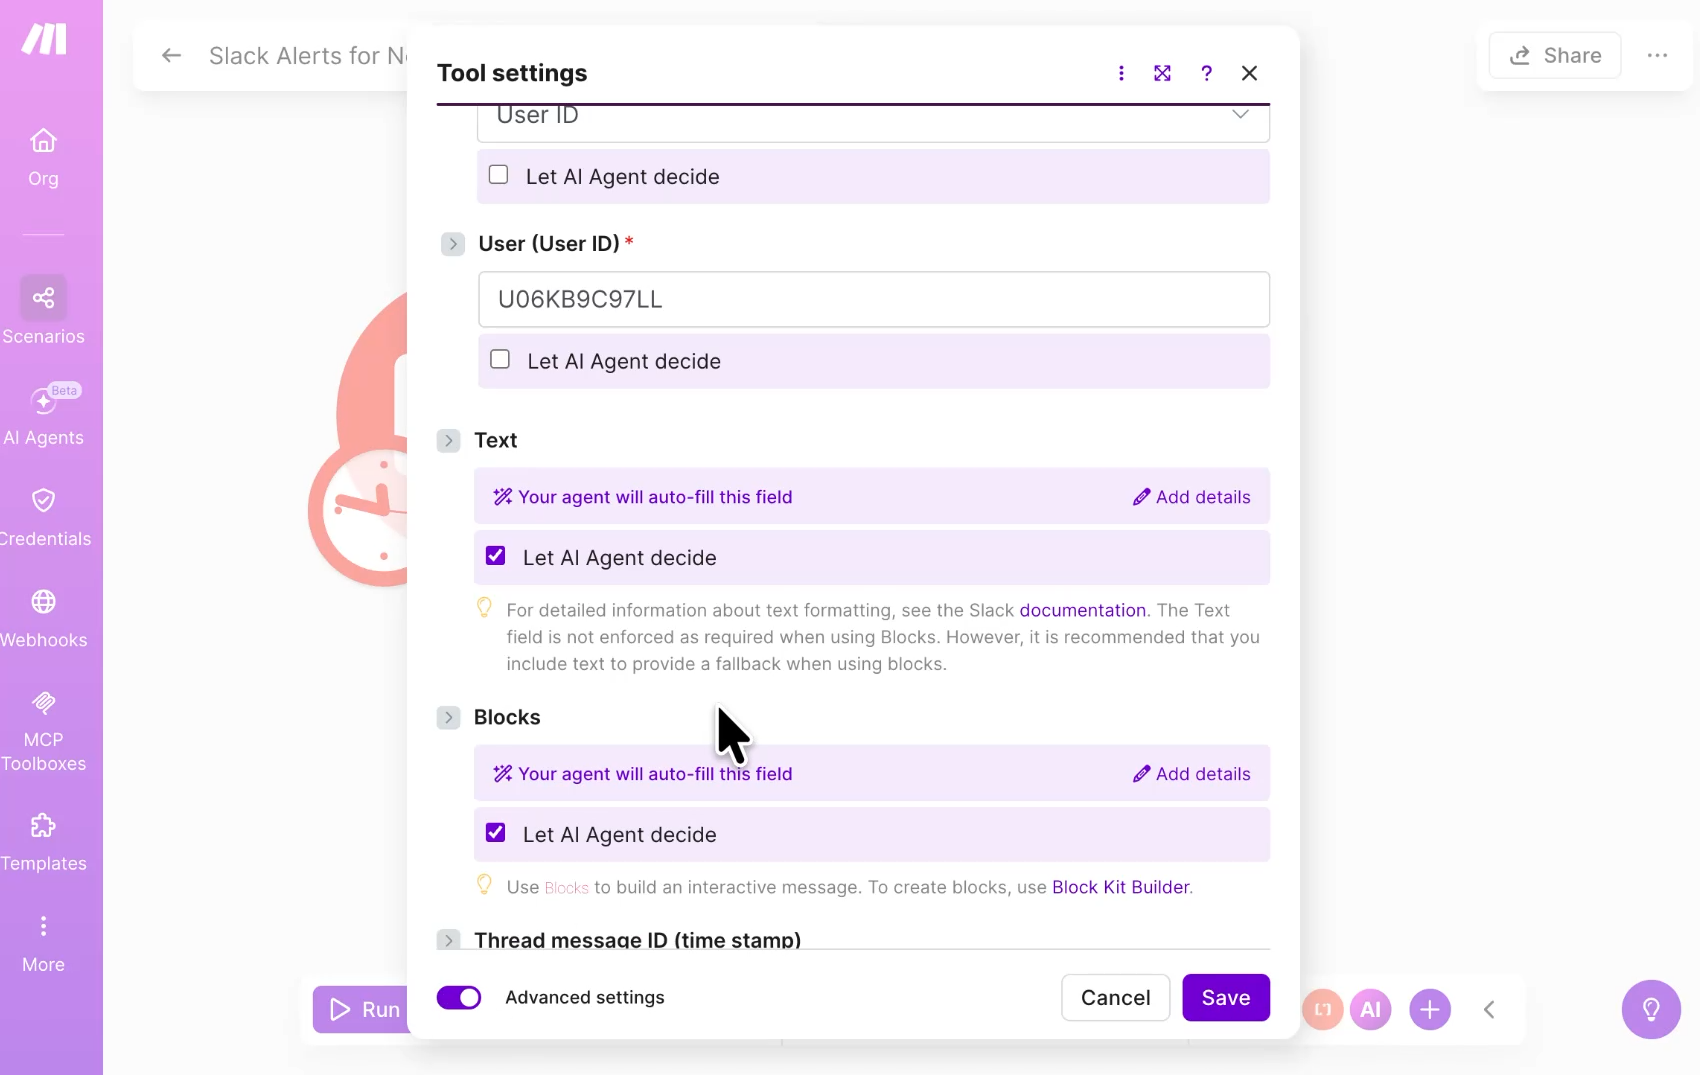
For the message text box, leave "Let AI Agent decide" checked. That's where we want it to use its judgment in writing and summarizing the email. We'll uncheck and turn off the advanced settings like threading and broadcasting since we don't need them.
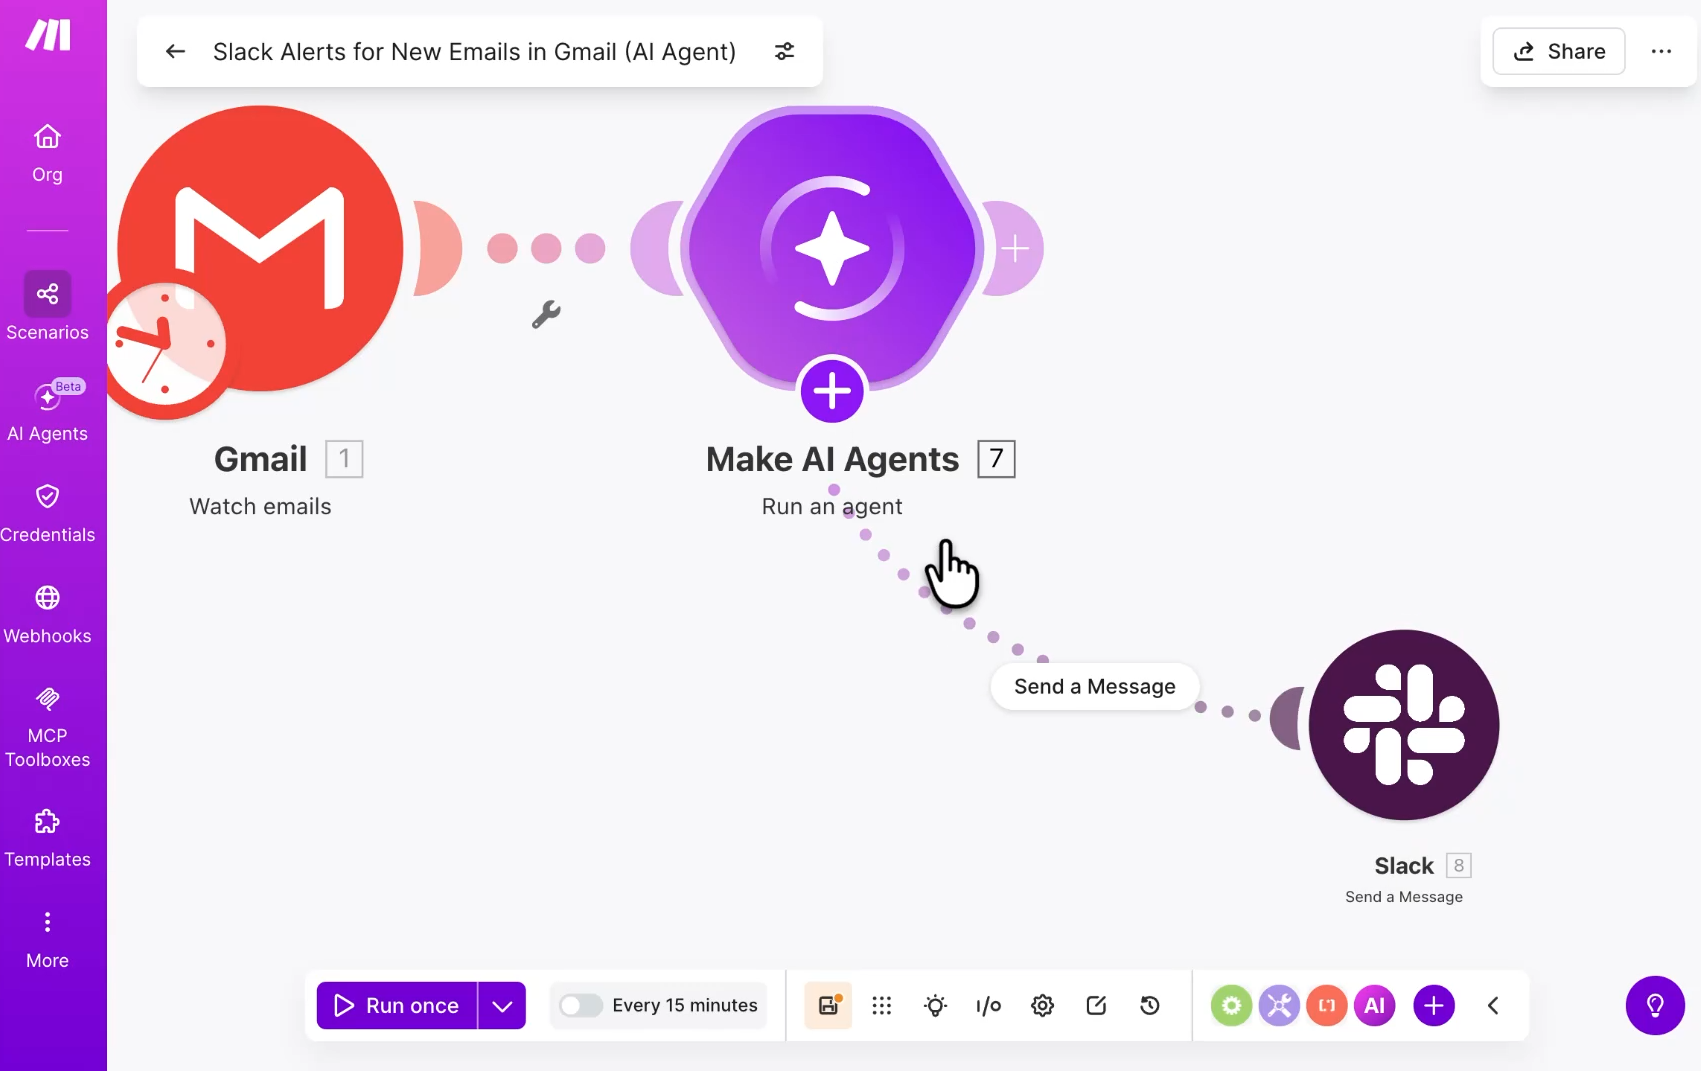
Click save, and you will see a new node appear branching directly out of the agent. As you add more tools, the agent gains more abilities. A tool isn't another step in a straight line; it's an option the agent can choose to deploy.
You'll also see options to add knowledge sources and chat. Knowledge sources are files the agent can reference under certain conditions. Chat is how you'd activate an agent through a direct conversation interface. We don't need either since our agent is triggered automatically by Gmail, but your future use case might call for them.
Now we're ready to test. Right-click the Gmail trigger, choose "Where to start," and select "Choose manually."
Ideally, you should test the agent with multiple emails – some urgent ones and some that don’t require a response. When you select a record while testing in Make, the scenario will also process every other record in the list that was created later.
By selecting the earlier email in our test data, Make will actually process both.
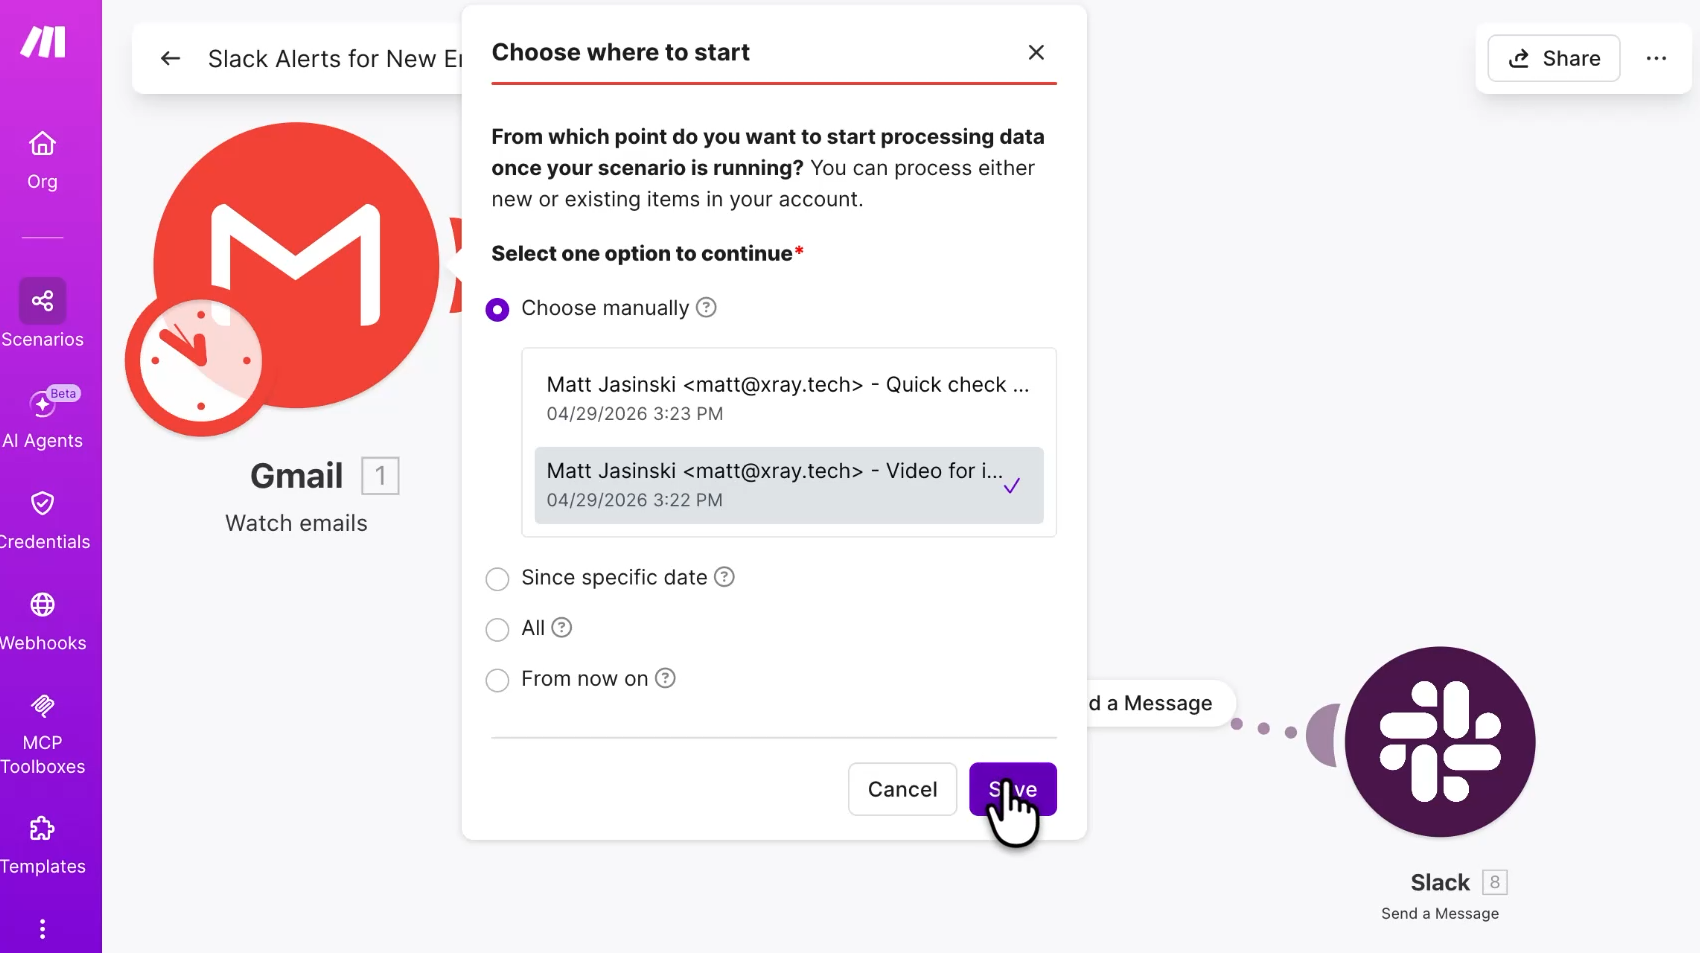
After selecting your test data, click save, then click "Run once."
The agent will take a moment to think. This is completely normal. Agents are slower and more computationally expensive than a regular automation because they are actively processing logic, so expect a small wait.
Once the execution finishes, look at the bubble that appears above the Make AI Agents module. It will have a number representing the total number of operations it ran – for our example, that’s 2 operations for the 2 emails we tested.
Click the bubble to open the execution inspection panel.
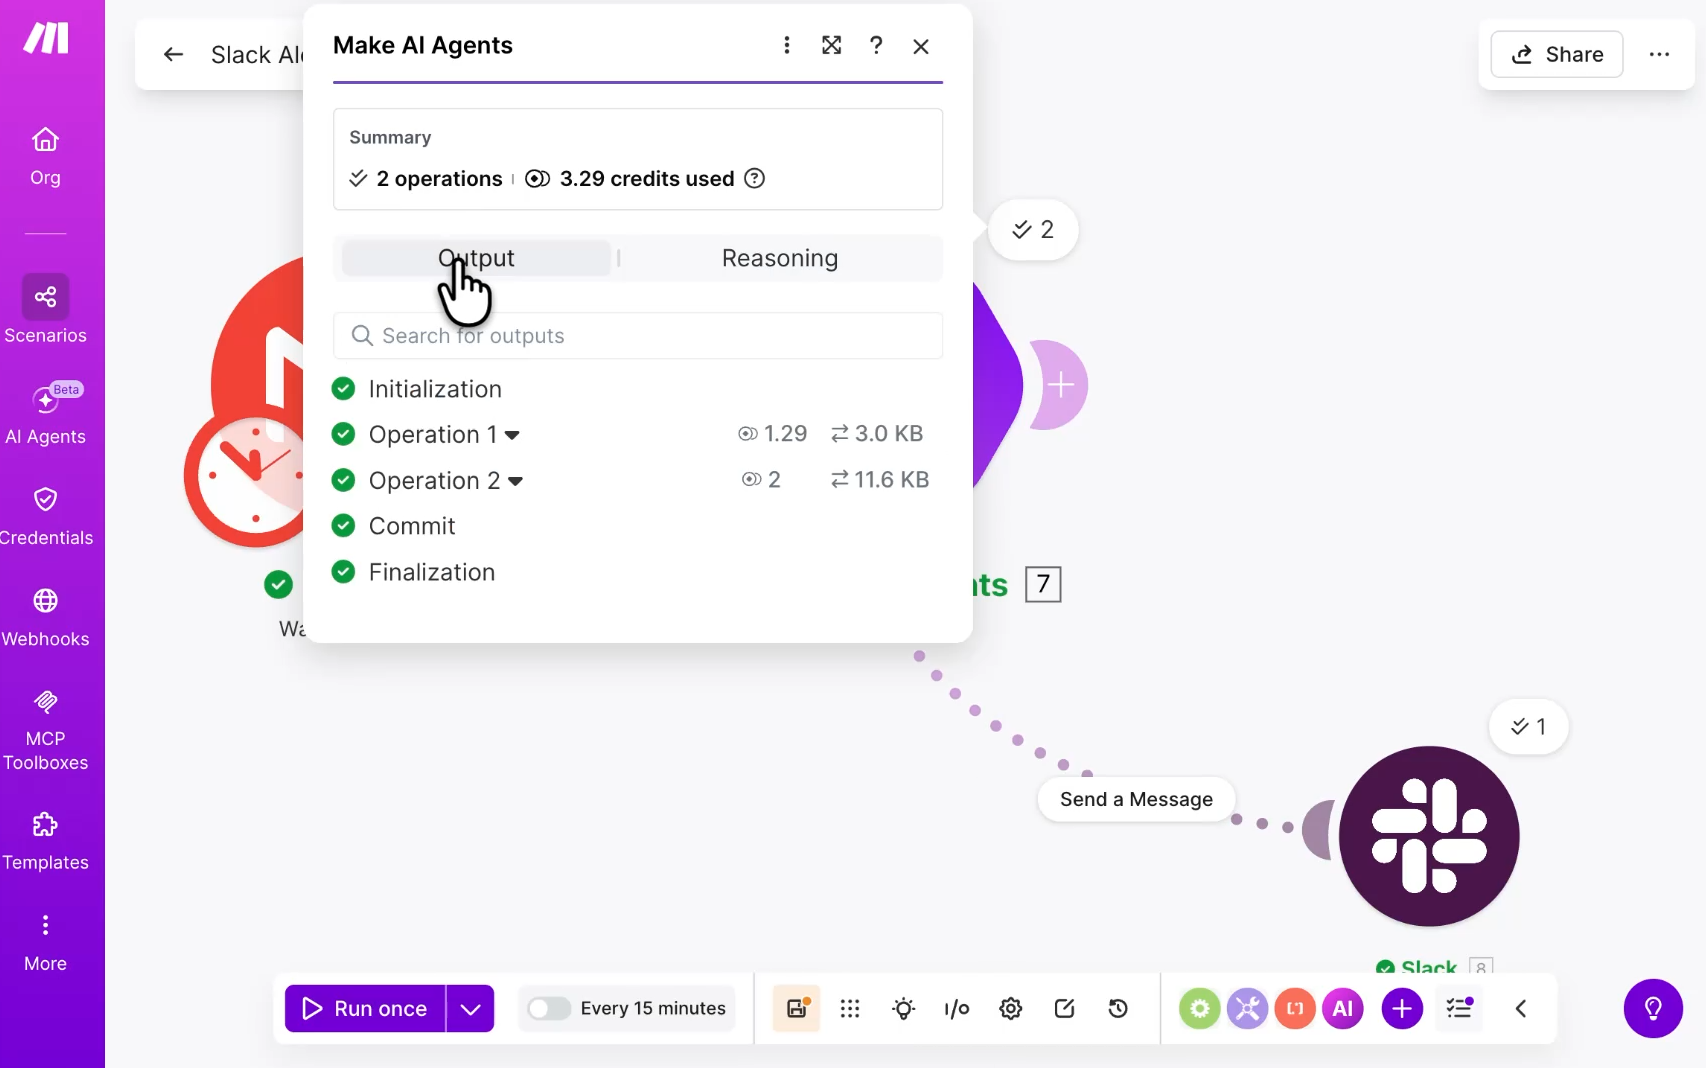
Right at the top, you'll see exactly how many operations occurred and the total credits used (e.g., 3.29 credits). You can click on "Operation 1" and "Operation 2" to see the logic.
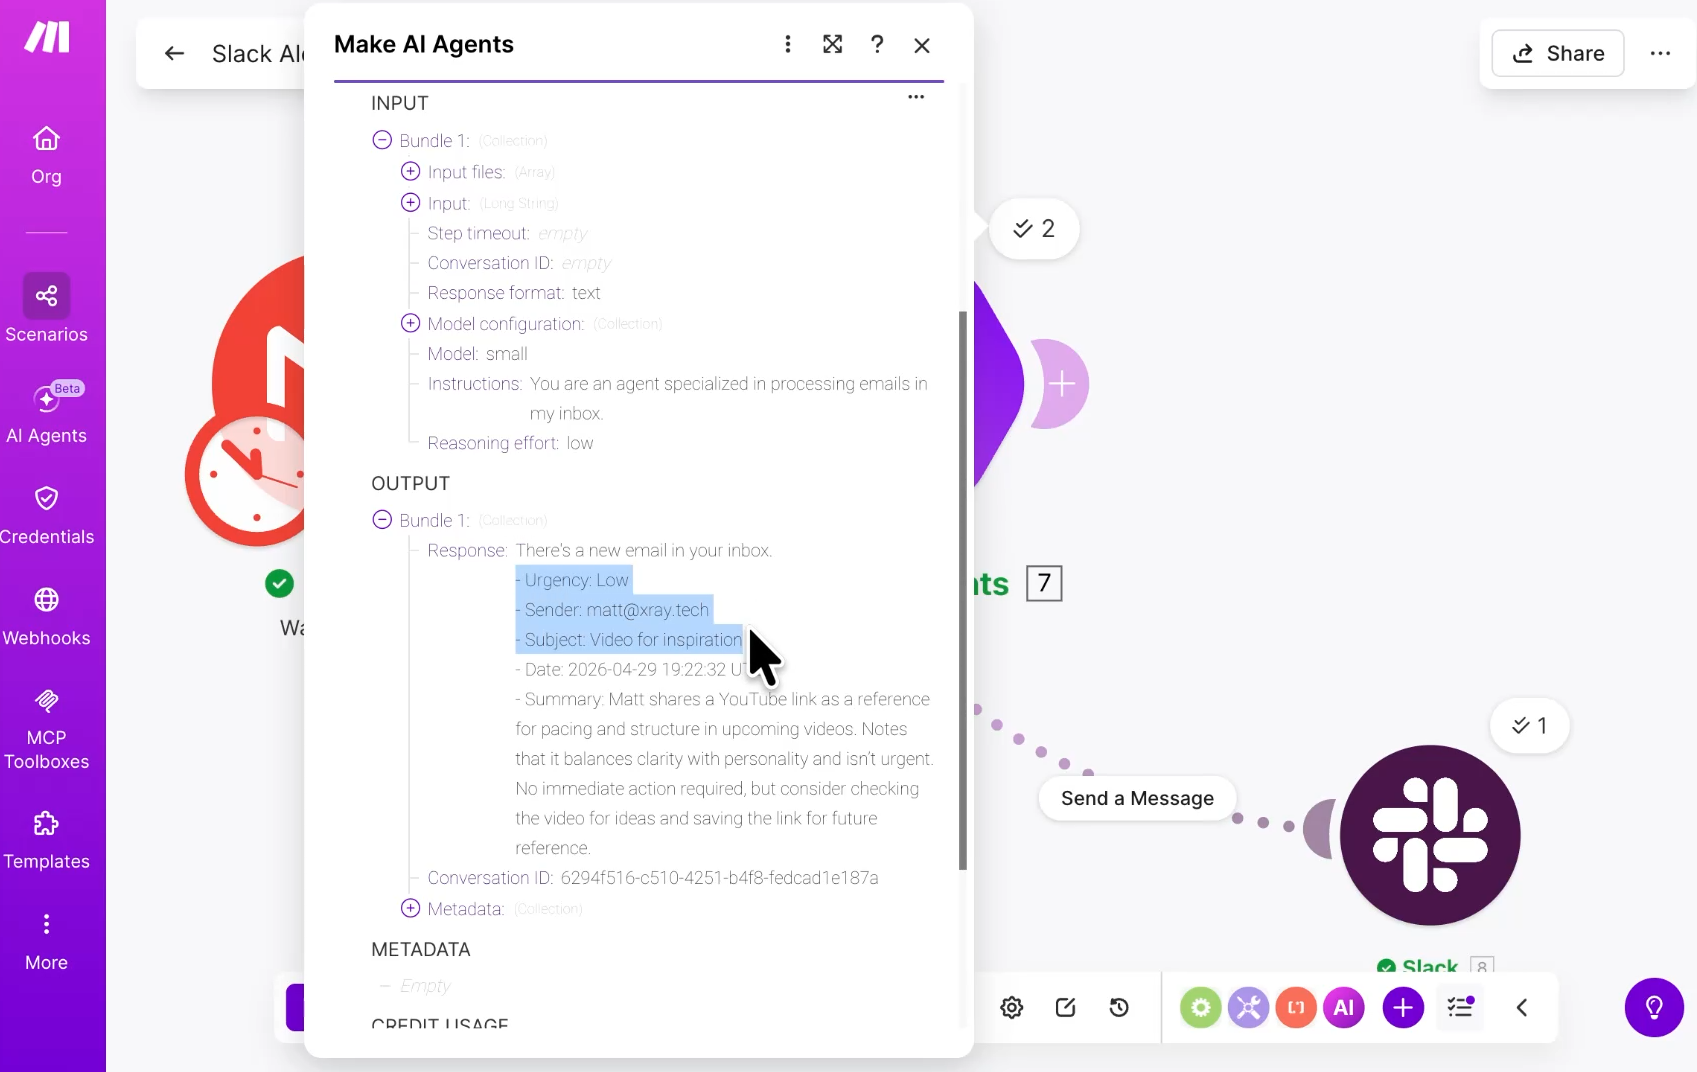
In Operation 1, the agent determined the email urgency was Low, so it didn't call the Slack tool.
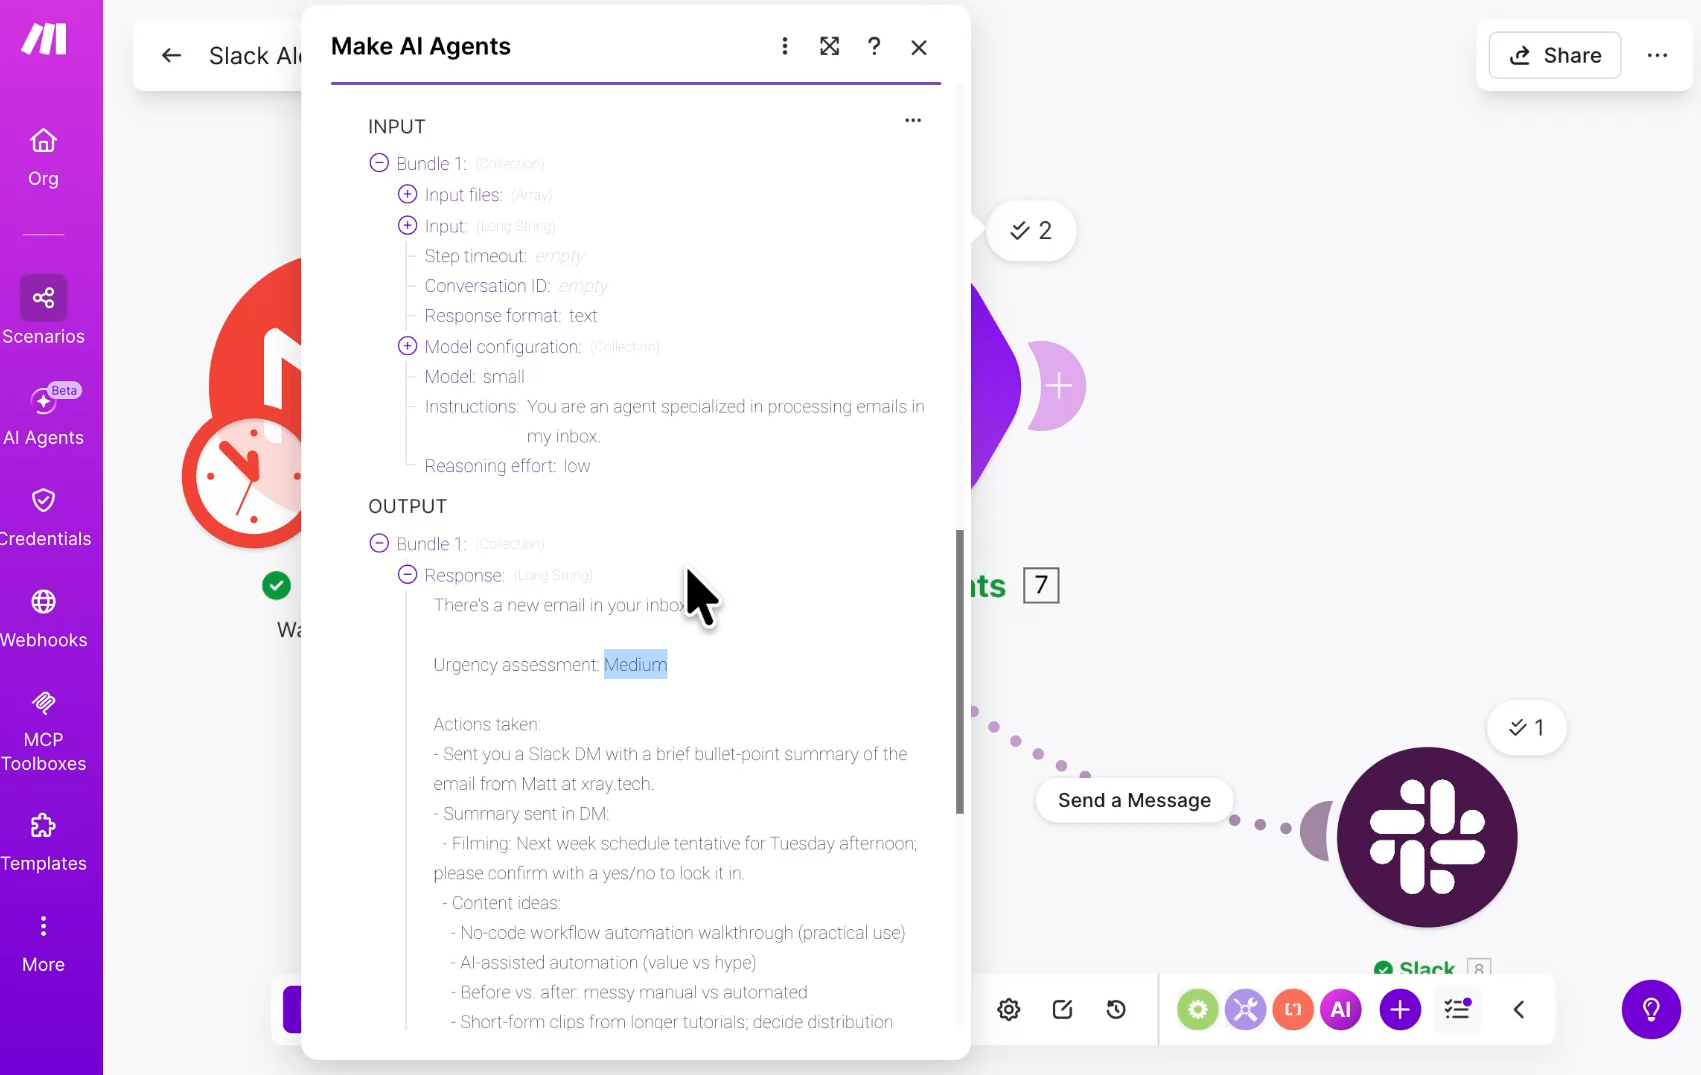
In Operation 2, it flagged an email as Medium urgency, which cleared our bar, so it actively called the tool and deployed the message.
In Slack, we can see the message that was sent.
Click save on the bottom toolbar. To finish up, adjust your scheduling settings however you’d like, give your scenario a descriptive name, and click the Save icon.
Remember, if you change tabs before clicking that floppy disk save icon, your scenario modifications are gone!
Don't reach for the most complex option by default. Match the tool to the job:
• Simple scenario — Use this when you need something to happen the same way every time. Reliability is the point.
• AI workflow — Use this when you need to summarize, classify, or transform data before it moves on.
• AI agent — Use this when the right action depends on context and judgment. You want the system to think, not just execute.
Most real automation stacks use a combination of all three.
Make's power isn't in any single scenario. It's in the compounding effect of handing off task after task to automated systems. The more you automate, the less time your team spends executing and the more time they spend deciding.
Start with one workflow. Build it, test it, and turn it on. Then look at the next thing on your to-do list and ask the same question: Does a human actually need to do this?
Most of the time, the answer is no.
If you want ideas for what to automate next, head to xray.tech and check out the blog. We're constantly sharing new tutorials and use cases. And if you'd rather build alongside an expert, that's what XRAY is here for. We help teams take the busy work off their plate using AI, automation, and the tools they already pay for. Schedule a free call at the top of this page to get started.


.pptx.png)
