
With automation providers like Zapier, anyone can start automating their tedious tasks without needing to write a single line of code.
All it takes is a few minutes of learning the basics, and you’ll have more time every day for the work that matters.
In this post, we’re going to show you everything you need to know to get started with Zapier and begin automating your work.
We’ll quickly explain what Zapier is, and how it works. Then, we’ll guide you through the process of building your first Zap step by step so you can learn the basics firsthand.
First, let’s quickly address an important question that many beginners will likely have:
What is Zapier, and what does it do?
Zapier is an app that automates actions in the software you already use. By connecting your existing web apps together, it allows you to automate the work you’re currently doing manually, or build entirely new automated systems and even prototype your new ideas.
For instance, you could build an automation – or a “Zap” – that runs whenever a Zoom event ends. Then, the automation could download a list of every attendee and find or create matching leads in Hubspot for your team to follow up with.

You could also set up a Zap that watches Reddit for comments matching your specified terms, and add the information to a Google Sheet or Airtable base so you can quickly answer.

You can even use Zapier to automatically send prompts to AI, making it easy to add AI-generated content to any app in your workflows.

These examples are just scratching the surface. With thousands of apps supported, the possibilities are basically endless.
Zapier also includes several other features that go beyond automation, which you can explore in another post on the XRAY blog. But first and foremost, Zapier is an automation provider, so that’s what we’ll focus on in this beginner’s guide.
Now, let’s take a look at building your first Zap. Here’s the automation that we’ll be building today:
Whenever a file is added to a specified folder in Google Drive, send an alert in Slack containing a link to the file.

This is a very simple automation, and its practical uses are, we admit, quite limited. However, it’s a great starting point to learn how Zapier works. It creates a playground where you can easily edit the automation, then run a test and instantly see the output in Slack.
These kinds of simple automations are great for trying new ideas and seeing how the data connects, and that’s what we really want you to get from this beginner’s guide.
Note that you could also use similar alternatives for these apps if you’d like. For instance, you could swap out Google Drive for Microsoft OneDrive, or Dropbox in the first part of the automation. The same general principles will apply, but some specific settings and terms used will be different.
Once you’ve got your free accounts set up in Zapier, Slack, and Google Drive, or the other apps of your choice, we can get started.
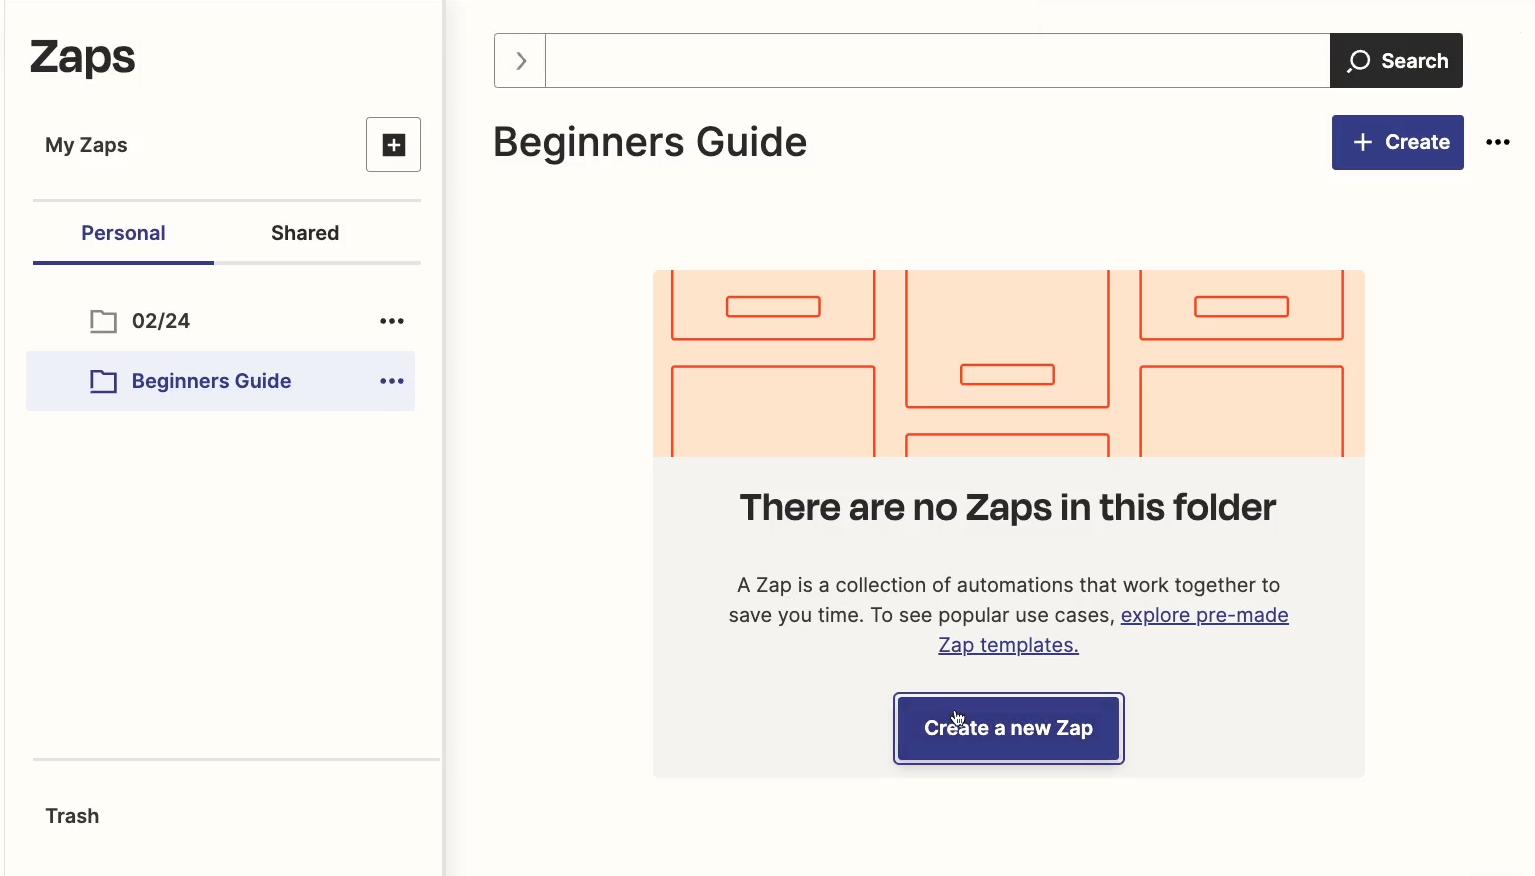
Before you create your first Zap, it’s always a good idea to stay organized, so make a folder for your Zap first.
Select “Zaps”, click on the “Create” button, and add a new folder.

Give your folder a name like “Beginner’s Guide”.

Then, select your new folder, and click “Create a new Zap” to make a new automation within your folder.
The text box at the top of the automation builder will allow you to create a Zap by sending a prompt to AI, but we’d recommend skipping this if you’re a beginner.

The AI output is usually pretty good, particularly when it comes to building short 2-step Zaps, and it can be a great timesaver once you’re more experienced. However, the AI often gives you an incomplete or slightly incorrect automation.
Once you know how to build a Zap manually, fixing these issues will be easy. But when you’re just getting started, it might be more confusing than it is helpful to start off with an AI’s half-finished work.
So, instead of typing anything into this window, we’d recommend starting by filling out your Trigger manually.
The trigger is what starts your automation. Whenever this condition is fulfilled, your Zap will run.
That’s the basic setup of every automated workflow: 1 trigger that kicks it all off, and one or more automated actions that follow.

Click on “Trigger” to start setting up your trigger.

In the window that pops up, you’ll need to pick the app that you want to use to start the automation.
You’ll see a small list of apps in the panel, but you can search the full library of about 7,000 integrations by just entering your app’s name up in the search bar.
You can also set your automation to run based on a schedule, or to launch on demand with webhooks.
If you’re running a software company, and you’d like to add your app to Zapier, just reach out to us to explore your options for building a custom integration. This will allow your users to automate your app with Zapier completely on their own.
For now, just pick “Google Drive” as your trigger app.

Then, you’ll see this panel open up on the right where you can configure your trigger.

In Zapier’s visual editor, you can add and reorder steps in the flowchart-like area to the left, then edit each step in the panel on the right.
Next, you’ll need to specify the “Event” in your trigger.
This is the specific condition that will prompt the automation to run. You’ll often see several options, so just pick the one that’s the best match for what you want to automate.

In our case, that will be “New File in Folder”, since we want this automation to run whenever a file is added to a specific folder.
Once you’ve chosen your event, click “Continue” to move on to the “Account” section. Then, you’ll be prompted to sign in to your trigger app - in this case, Google Drive.

Click on ‘Sign in’, and grant Zapier the permissions it needs. You’ll always need to sign into your apps and authorize them the first time you connect them to Zapier.

In order for Zapier to work, it needs to be able to act automatically on your behalf through your accounts. If you’d like to learn more about Zapier’s security practices, you can check out our article exploring the topic in depth.
Once you’ve signed in with Google Drive, click on continue.

Under this “trigger” section, you can specify the data that your trigger should watch.

For Google Drive, that means specifying the Drive and Folder to monitor. Zapier will typically provide help text under each field to give you more context.
For “Drive”, they explain that if this field is left empty, it will default to just using your personal Drive - the one listed as “My Drive” in Google Drive. So in our example, we’ll just leave it blank to use that.
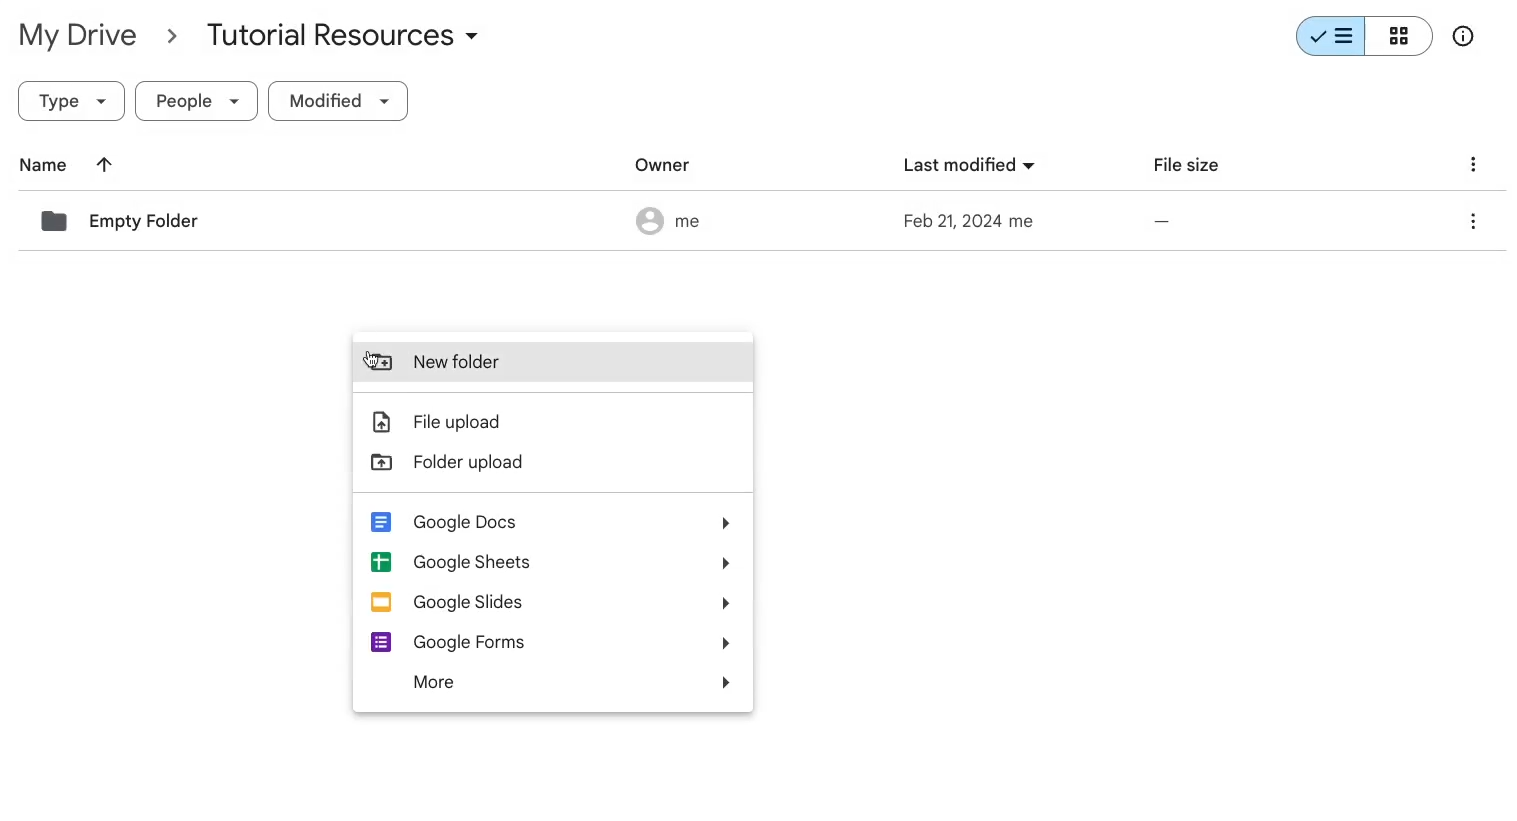
In “Folder”, you’ll need to specify the folder that Zapier should watch. If you don’t have a folder to use, open up Google Drive in a new tab and make one now.
Back in Zapier, you can navigate through your folders and select one based on its name.

However, whenever possible, we’d recommend avoiding identifying items by their name in automations. When you can, it’s best to use an ID, since IDs remain constant, while file and folder names could change.
Most objects in web apps, such as folders in Google Drive, have some kind of ID associated with them. In many cases, it’s also very easy to find this ID by simply looking at the URL bar.
Go back to Drive, and open the folder you want to use.

If you look at the URL bar for your folder, you’ll see this string of characters after ‘Folders’. That’s your folder’s ID. Copy it to your clipboard.
Then, go back to Zapier, select the “Folder” field, and choose “Custom”.

Now, you can paste your folder’s ID into the field.

For this tutorial, it’s fine to either use the ID or select the folder from the list. But we’d recommend trying to use the ID first. Techniques like this that create more stable, maintainable automations are a key step to becoming a Zapier expert.
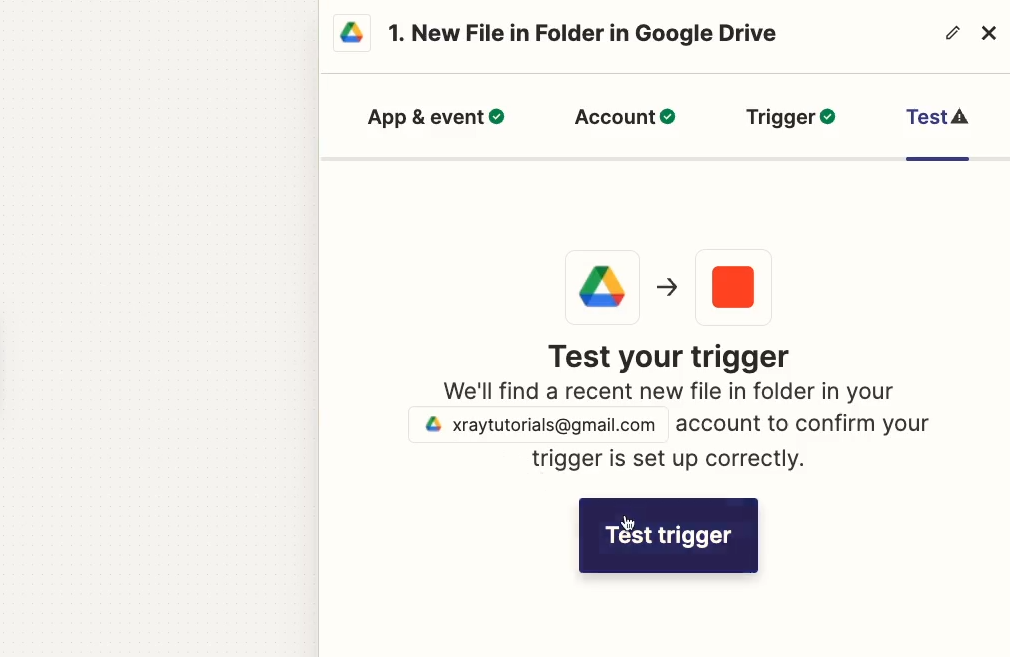
Once you’ve specified the folder you want to use with either method, it’s time to run a test.
But before you test a trigger in Zapier, you need to have test data to work with. If you don’t have test data to use, you won’t be able to test your trigger, and it will be very difficult or even impossible to build your automation.
For this automation, that means we’ll need to have a file already in the folder, since the trigger is set to watch for new files in the folder. In other words, if there is no file in this folder, the test will fail.
In our example, we’ll add a file now in Google Drive called “Test Proposal”.


Once your test data is all set, go back to Zapier, and test your trigger by clicking on the “Test Trigger” button.
After a couple of seconds, Zapier should give you a list of up to three files found in your folder.

Zapier triggers will always return a lot of data. For files in Google Drive, this will include things like the file’s URL, its contents, its created time, and a lot more.
Note that different apps will return different data in the trigger. If you’re using alternate apps as you follow along, expect to see data unique to the app you’re using.
Each piece of data – or “variable” – is broken down into labels and values. The labels are in the blue rectangles on the left, while the values for the specific selected record are to the right.
Every Google Drive file pulled into Zapier will have all the same variables with all the same labels, but the values for those variables can be different each time the automation runs.

For instance, every file will have a Title, but that exact title will depend on the doc in question. This is called dynamic data, and it’s a key part of how Zapier works.
But we’ll touch more on that later. For now, continue with this test record and add an automated action to our Zap.
Clicking “Continue” will add a step to your Zap, but you can also click on the plus sign to add an action to your Zap.

Next, you’ll need to pick an app and an event in the same way you did for the trigger.

Search for the app that you want to automate. In our case, that’s Slack.
Then, choose the “Event” you want the automation to perform. For our example, “Send Channel Message” is a good match.

Click “Continue” to add the action to your Zap.
Once again, you’ll need to sign in to the relevant app and authorize Zapier. We’ll sign in to Slack, and allow Zapier the access it needs.

Click “Continue” again, and begin configuring your automated action.
The available fields and settings for an automated action will vary depending on the app, but you can use Zapier’s help text to figure out what you need to provide.

Also note that the required fields will be marked with an asterisk, so you can always start by filling out those. For this Slack message, you’ll need to identify the channel you want to use, and compose the message to send.
To specify a Slack channel, you can once again either pick one from the list, or use the channel’s ID.
To find a Slack channel’s ID, open up the channel in Slack. Then, click on its name at the top of the channel window. At the bottom of the panel that pops up, you can view the ID and copy it to your clipboard.

Then, go back to Zapier, click “Custom” and paste the ID here.

But again, choosing from the list is fine, too. Just make sure to use a channel that you don’t mind sending test messages to.
Now, you can compose the message.
In text fields like a Slack message field, you can provide both static text, and dynamic data retrieved from the trigger (or other earlier steps).
We’ll start with some static text. Just type a simple message like this:
A new file has been added to the “Proposals” folder.
Then include some labels for the dynamic data we’d like to provide.
File title:
File link:
Download PDF:

To include dynamic data in your Zaps, just use the “insert data” panel.
The data will be organized by the step it came from. In this Zap, the only previous step is the trigger, so that’s the only step you can see right now.
In longer Zaps, like the one pictured below, it’s easier to see how the data is broken up by different steps.

To find a specific variable, you can enter a keyword in the search bar. We want the file’s title, so we’ll search for “title”.

In the results, we can see a variable called title, with the value of “Test Proposal”. Click on it to insert it into your message.
Now, the message will include the title of whatever file triggered the automation to run in the first place.
If that’s “Test Proposal”, it will say ‘Test Proposal’. If the file that triggered the Zap is called “Contract for FakeCo”, it will say “Contract for FakeCo” here.
Note that while you’re building in Zapier, you can see both the variable name (highlighted in yellow below) and the variable value (green).

However, when the message is sent in Slack, you’ll just see the value. That’s why we added a label for “File Title” ourselves as static text.
Now, follow the same process to add dynamic data for “file link”. Just note that the main URL for a Google Drive file is called the “Alternate Link”, so that’s what you should search for and insert into your message.

Finally, add a link where users can download this doc as a PDF. That variable is called “PDF URL”.

Now the message is all set.
Those are the only required fields, but it’s always a good idea to review the optional settings as well. Send this message as a bot, and give it a unique name. In our example, we’ll call ours “New File Freddy”.
Then, give your bot an icon using Slack’s syntax for emoji. For instance, we’ll use the :file_folder: emoji for ours.

By default, “include a link to this Zap” should be set to “Yes”. Whenever sending automated messages, it’s always convenient to know where that message is coming from, so keep this option enabled.
Finally we’d recommend setting “Auto-expand links” to “no”, so the message won’t show previews for all these links we’re adding. That would take up a lot of space, and we’d rather keep Freddy here nice and trim.

You can leave the remaining settings to their defaults.
Once your action is fully configured, click on “Continue” to give it a test.
Click on “Test Step” to test your automated action.

The step will immediately run using the data that you selected in the trigger.

Zapier should give you a success message with a summary of the data that was sent to Slack. But it’s always best to check your apps to see what everything looks like in the wild.
Open up Slack, and check for the message sent by Zapier. In our example, we can see the message right there in the Tutorials channel.

It provides the file name, a file URL, and a PDF download URL. Clicking on the Google Drive link opens up the doc in Drive, while clicking on the PDF link starts downloading it right away.
Everything looks good!
But before we wrap up this tutorial, we’d recommend running a live test to see the full automation work in real-world conditions.
Click on “publish”, and your Zap will be turned on.

To run a live test, just perform your trigger condition while the Zap is on. In this case, that means we just need to add a file to the Google Drive folder.

On Zapier’s free plan, you’ll need to wait fifteen minutes for your Zaps to run.
So take a quick break, and check back in 15 minutes.
After a little wait, you should see a Slack message with links to your newly added file.

Now that you’ve built your first Zap, let’s quickly go over your main resources for viewing, maintaining, and managing your automations in Zapier.
If you click on “Zaps”, you’ll see a list of every Zap you’ve made sorted into user-created folders. We’d strongly recommend using these folders to keep your Zaps neatly organized. In any folder, you can see your Zaps.

Click on the arrow on the right of any Zap’s name to access additional options, like duplicating the Zap or turning it into a template.

Under “Zap History”, you can see a summary of every Zap’s activity on your account. You can filter the entries by date range, specific Zaps, the apps involved, and more to easily find what you’re looking for.

You can also use the search bar to search within both the titles of your Zaps and the data that the Zap processed.

Once you’ve pulled up the history you’re looking for, you can click any of these entries to see more information.

Zap History is the best place to start troubleshooting when a Zap is encountering errors or just not working as expected.
If you click on “Apps”, you’ll see every app connected to your Zapier account. These will be the apps that you’re using Zapier to automate, like Google Drive, Slack, LinkedIn, Hubspot, etc.

You can click on any individual app to see the specific accounts that are connected to Zapier.

Note that you can add several accounts for the same app to Zapier.
From there, you can test each connection, reconnect it if the credentials have expired, or rename the connection to help distinguish different accounts.

Under the “Zaps” tab, you’ll see a list of any Zaps that use this app across all of your accounts.

When you’ve only got a Zap or two in your library, these organizational features might not seem very important. But once you start building a larger automated infrastructure, you’ll need to refer back to these options frequently.
Now let’s take a look at Zapier’s pricing structure.
Zapier recently overhauled their pricing, so this is worth a glance even if you’ve used Zapier in the past.
Note that you can get a 33% discount on the price of any plan if you pay for an annual subscription. The prices we mention apply to monthly subscriptions.

While Zapier does include a free plan, it’s not really going to give you much practical functionality. With two-step Zaps only and just 100 tasks a month, you won’t be able to do much with it except try Zapier out.
For $30/mo, the starter plan unlocks Zapier’s basic features, but limits you to 750 tasks a month, 15-minute wait times to run Zaps, and only 3 premium apps total.
You can check out Zapier’s site for a full list of premium apps, but know that it includes some popular software like Shopify, Salesforce, and PayPal.
The starter plan can be great for an individual builder who’s just getting started, but if you’re looking to extensively automate your work, you’ll probably need to consider the Professional plan.
At just under $75/mo, the pro plan unlocks unlimited premium apps, conditional logic in your Zaps, and 2,000 tasks each month. Your Zaps will also run every 2 minutes.
For a solo builder, this will be everything you’ll need to build any automation you want. But for good collaboration features, you’ll need to check out the Team plan, or the Company plan.
The team and company plans, which start at just over $100/mo, offer shared workspaces, shared app connections, a 1-minute wait time to run Zaps, and several other advanced features.
Since it’s an important part of every Zapier plan, we want to take a moment to explain what “tasks” are in Zapier and how they impact your pricing.
You can read this page from Zapier’s help docs for more detail, but here’s the gist of it:
Most successful automated actions count as one task. Zapier’s formatter steps and paths don’t count as tasks, and neither do triggers.
So finding a file in Google Drive to launch a Zap does not consume a task, but sending a message in Slack does consume a task.
You can add more tasks to any of your paid plans for an additional monthly charge. Just open up Zapier’s pricing page and select the amount of tasks you want to see how it affects the price.
Note that while tasks are tracked and limited in every Zapier plan, there is no charge for the data being sent. Other automation providers often limit the amount of data you can process, making Zapier a good choice for automating tasks involving large files and data sets.
Ultimately, if you’re just getting started with Zapier, you can use the free plan to follow along with this tutorial. Then, if you’d like to explore Zapier further, you can try out the starter plan. But there’s really no need to jump to the Pro Plan until you’re already using several Zaps to automate your daily work.
With its unmatched and growing library of about 7,000 integrations, its easy-to-use visual editor, and its versatile extra features, Zapier is a popular choice for no-code builders.
However, it’s not the only no-code automation provider available, and its high price tag won’t fit everyone’s budget.
If you’re looking for an alternative to Zapier, you’ll want to consider these options.
Make, formerly known as Integromat, has fewer integrations than Zapier, but still boasts support for over 1,500 popular web apps.

It likely won’t be as intuitive as Zapier for pure no-coders, but Make is arguably easier to use for users with some technical background. There’s a little less abstraction, and you’ll get more direct control over your workflows in Make.
However, you won’t find as many extras like Canvas, Interfaces, or Tables. However, Make has recently added a new AI builder similar to Zapier’s.
You can learn more about Make in our Make beginner’s guide.
If you’re a Microsoft Office power user, or if your organization is already fully onboard with Microsoft apps, then you’ll probably want to check out Power Automate.

Built by Microsoft, Power Automate includes lots of features for integrating neatly with their other software.
You can check out our Power Automate beginner’s guide to learn more and get started.
If you’d like to explore which automation providers support the apps you use every day, just go to XRAY.Tools and search for your software.
We’ve indexed Zapier, Make, Power Automate, Workato, Bardeen, and N8N so you can compare top automation providers in one place, triggers to triggers, and actions to actions.
While software like Zapier, Make, and Power Automate is easily accessible to any no-code builder, creating workflows that support your entire team or organization can be a difficult task for anyone.
If you’d like to automate your company’s work at scale, a Chief Workflow Officer Membership from XRAY will be the better strategic choice. With a CWO membership, we design and build automations with your team’s input, so you can just focus on getting your work done faster than ever.
For approximately the cost of a senior employee’s salary each year, you can amplify the output of your entire team.
You can learn more about XRAY’s Membership options or schedule a free discovery call on our services page.
If you’re looking for short-term help with automation instead, you should check out XRAY Hourly.
XRAY Hourly is XRAY’s solution for quickly connecting small businesses and freelancers to vetted automation experts.
Through this platform you can schedule remote calls for low-code support billed on a convenient hourly basis.
With its easy-to-use interface and massive library of integrations, Zapier makes it simple for anyone to start automating the apps they use every day. Build on what you learned in this beginner’s guide and try creating your own automated workflows.
If you’d like to see more automation tutorials and beginner’s guides, be sure to check out our blog or our YouTube channel. You can also follow XRAY on Twitter, Facebook, or LinkedIn.


.pptx.png)
.pptx.png)