
Back in late 2023, Slack updated their workflow automation features with an impressive array of new options.
But while the new options give you several ways to automate your work with the communications app, there aren’t many choices for automation triggers.
Thankfully, they’ve included one versatile option that makes it easy to connect Slack to the rest of your software: webhook triggers.
In this tutorial, we’ll show you how to build automations in Slack with webhook triggers, which will let you run your automations on demand from apps like Zapier, Make, Airtable, and many more.
We’ll also demonstrate how to pass variables into the webhook to give your automation dynamic data to work with.
To begin, open up Slack and sign into your account. You’ll need a paid plan at any tier to access automated workflows.
You can find automations in the navigation bar on the left, although it may be hidden by default. You can click “more” to see all the hidden options, including “Automations”.

After selecting “Automations”, you’ll see several templates you can use to quickly start building automations, but we’ll start from scratch by clicking on “New Workflow” in the top right.

To set up your new automation, you’ll need to choose an event that starts the workflow. For this tutorial, that will be “From a Webhook”.

As it says in the description of the webhook trigger, this means your Slack automation will run whenever a request is sent to a custom URL.

If you’d like, you can set up variables in your webhook trigger to make sure your automation has some dynamic data loaded in from the start.
Just click “Set up variables”.
Then, enter a “Key” (label) and a data type for each variable you want to include. For our example in this tutorial, we’re building a simple automation to send Slack alerts for each new contact in an Airtable CRM.
As such, we’ll just include some basic info like “Name”, “Email”, and “Service Requested”.

These will all be text variables, but you can also set different variable types like Slack Channel ID and Slack User ID.
Adding variables like this isn’t strictly necessary. However, if you don’t provide any variables, then the only data your trigger will process will be some simple metadata like the timestamp for when the request was sent.
You’d need to use search steps to find and retrieve additional information.

Once your variables are all set, click “Continue.”
Now, you can create an automated action that will run whenever the webhook receives a request. Just choose the app and action that you want to automate, and fill in the relevant fields and settings.

As an example, we’ll make a simple Slack action that sends a custom message to a channel, but you can create any action you’d like in dozens of different apps.
To configure a Slack channel message, you just need to specify a channel to send the message in, and compose your message.

In actions like this Slack message, you can include any of the variables sent over in your webhook. Just click “Insert a variable” to bring up the list of variables and select one to add it to the message.

In our example, we’ll insert all three variables into the message - name, email, and serviceRequested.

Once your action is configured, click “Save”.
You can add additional actions to the automation if you’d like, but we’ll stick with this one action for our example. When your automation is complete, click on “Finish up” to publish it and give it a name.

Once published, your automation will run whenever you send a request to the webhook URL.

Unfortunately, there are no built-in testing features in Slack’s workflow portal, which is a feature we’d like to see added soon.
However, you can still test your automation by sending a request to the webhook URL.
You can send a request like this from any number of different apps, such as Zapier, Make, or Postman. Any app that lets you write custom HTTP requests with JSON formatting is fine.
For the sake of this tutorial, we'll use Airtable.
If you’re not familiar, Airtable is a low-code database app. We frequently use it at XRAY to build custom apps and automated workflows.
We’re a certified gold services partner at Airtable, so you can reach out to us if you need any help with Airtable implementation or building new custom features.
For our example, we’re using a simplified CRM in Airtable which tracks some basic info about each contact. You can see that table pictured below.

Under this base’s “Automations” tab, we’ve created an automation that runs whenever a new contact is added to the Contacts table.

The most important step here is the custom script, which we’re using to send a request to the Slack URL.

If you’d like to follow along in Airtable, you can find a template of our custom script in this tutorial’s resources board.
The exact syntax and options will be slightly different based on the app you use to send the request, but the actual request will largely consist of the same components whether it’s in Airtable, Zapier, Make, or any other software.
You’ll need the webhook URL, the request method, a header, and a body with any extra info you want to pass along (i.e., the variables we created earlier in Slack).
Webhook URL
The webhook URL is easy to locate. Just open up your Slack automation and edit the trigger.
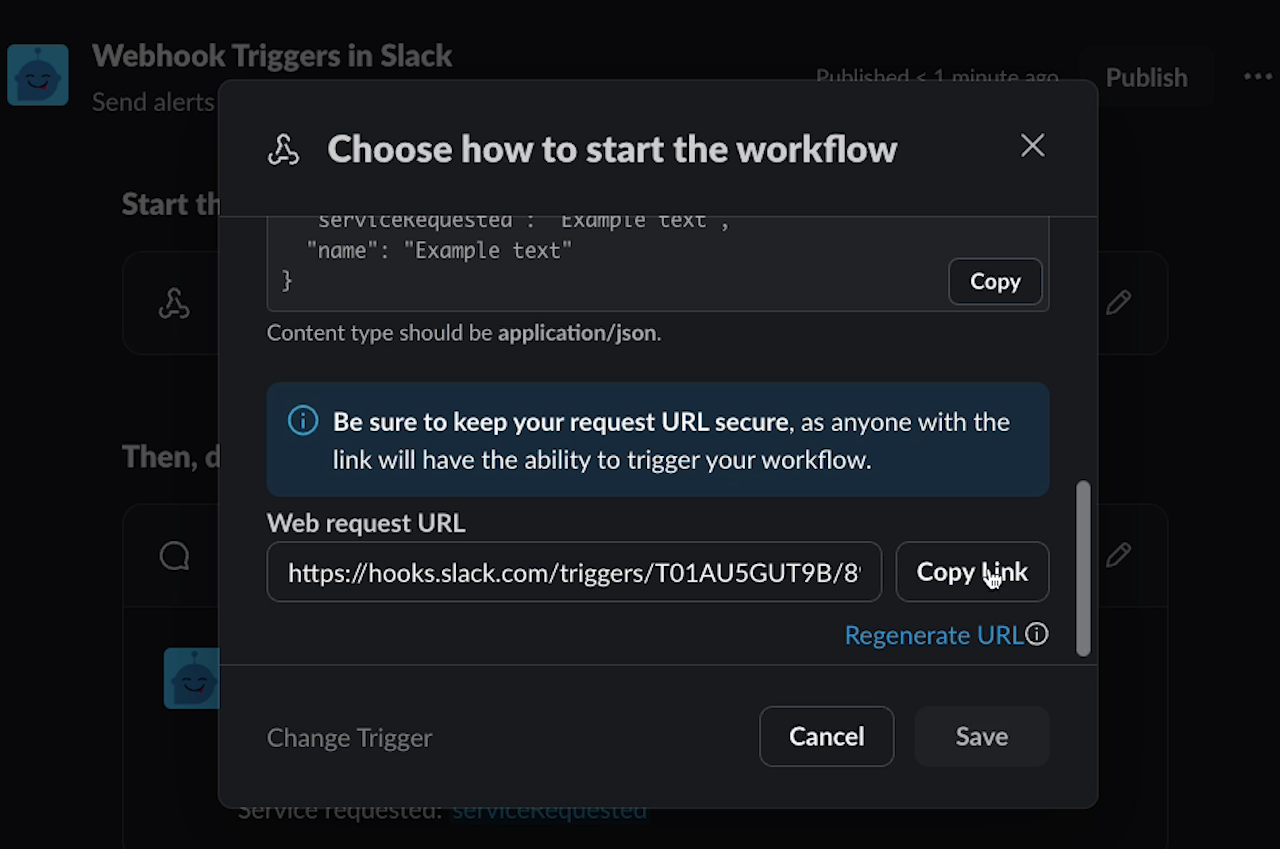
You can copy the URL here and paste it into your request.

Request method
The request method will be POST.
Header
In the header, you’ll need to specify that the content type is JSON.
Body
In the body, you can provide data for all the variables that you listed in Slack, using JSON formatting.
If you’re using Airtable to send your request, make sure to create matching input variables in Airtable to go with all your Slack variables. Input variables can be created on the lefthand panel of Airtable’s script editor.

You’ll also need to declare a variable or constant that stores all of your variables as an array. You can see this in the second line of our script.
Once your request is configured, give it a test. Airtable makes that easy with a “Test” button in the top right corner of the script editor.

After testing, we can see a console message in Airtable confirming the script ran.
And instantly in Slack, there’s a new message sent to the correct channel, with all of our variables included.

This webhook-triggered automation is all set.
With webhook triggers, you can get real-time responsiveness in your Slack automations, and integrate with apps that Slack doesn’t have native support for. It just takes a little configuration in Slack and a few lines of JSON.
But if you’re not experienced with code, you can always ask AI for support, or reach out to our team at XRAY.


.pptx.png)
.pptx.png)