
When you’re building no-code automations, you often need to use multiple providers to support a single workflow.
But even as your automations move from Zapier to Make and back again, you need to make sure that your data stays consistent.
That’s why in this post, we’re going to show you how to easily send data between Zapier and Make automations using webhooks or an intermediary database.
We’ll begin by demonstrating how to send data from a Zapier automation to a scenario in Make, formerly known as Integromat. Then, we’ll show you the same thing in reverse - we’ll send data from a Make scenario to a Zap.
Finally, we’ll quickly demonstrate how you can use an app like Airtable as an intermediary database to move data between different automation providers.
To follow along, just open up Zapier and Make, and pick any apps that you want to test out. In our examples, we’ll use Airtable and Slack, but you can choose any software you’d like.
We’ll start with a brief overview of how to send data from Zapier to Make with webhooks. Then, we’ll explain each step in detail.
1. Open or create a Zap with at least a trigger step.
2. Add a “Webhooks by Zapier” step. Choose “POST” as the event.
3. Create a new Make scenario, and choose “Webhooks” as the trigger.
4. Add a new webhook, and copy it to your clipboard.
5. Paste the webhook URL into your Zapier “Webhooks” step.
6. Configure the data you want to send to Make as key-value pairs.
7. Test the automations by running your Make scenario, then testing your Zapier step.
8. Review the data in Make, and add automated steps that use data from the webhooks trigger.
To begin, open an existing Zap or create a new one.
Your Zap needs to at least have a trigger with some test data loaded in. However, your trigger can be in any app that you’d like to use.
In our example, we’ve retrieved a record from Airtable using a “New Record in View” trigger.

Once your trigger is all set, add a new step to your Zap, and choose “Webhooks by Zapier” as the app.

Note: “Webhooks by Zapier” is a premium app, meaning that you won’t have access to it on Zapier’s free plan. If you’re using the starter plan, you’ll be limited to 3 premium apps.
After adding the Webhooks step, choose an event.

The options you see here represent methods that you find in an API call. “GET” is used to search for data; “POST” is used to create data; and “PUT” is used to create or update data.
Choose POST to send data from Zapier to Make.
After choosing your event, you can configure your webhook step.

The first field you need to fill in is the URL. This is the URL you’ll send data to with your webhook.
To generate and copy this URL, switch over to Make.
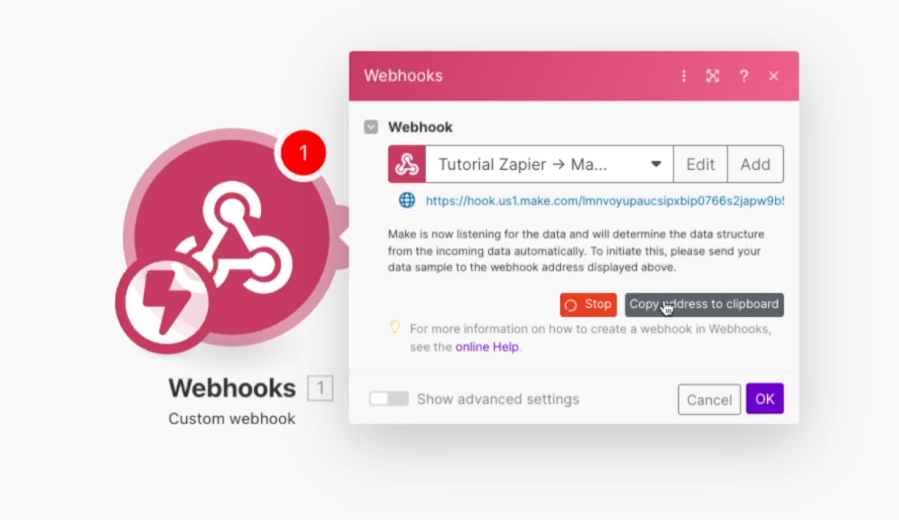
In Make, create a new scenario. For the trigger, search for the “Webhooks” app.

Then, choose “Custom Webhook”.

In your webhooks trigger, you can either choose an existing hook to use for your automation or create a new one.

Click on “Add” to create a new webhook. Give it a unique, descriptive name and save it.

Your new webhook will instantly begin listening for incoming data, but you’ll need to configure your Zapier webhook step before you can send data over.
Click on the button to copy the URL to your clipboard, then return to Zapier.
Back in Zapier, paste the URL you copied into the URL field.

The “Payload Type” will default to “form”, which is what we’d recommend using. You can also use JSON and other formats, but “form” is easiest to work with in Zapier and Make.

Under the “Data” section, you can create key-value pairs for each piece of data you want to send over to Make. Initially, Zapier only gives you one blank key-value pair, but you can add more by clicking on the plus button.
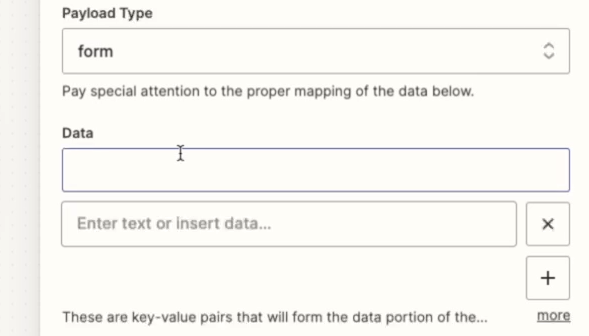
The first field in the pair is the “key”, which is essentially the label for the data you want to send. For instance, this might be “Name”.
The second field is the “value”, which is the actual data you want to send. For example, this would be the company name itself, like “Erin’s Flowers”.

When Make receives this webhook from Zapier, it will process the data with the labels you provide here, so be sure to give them brief, descriptive labels.
You can add as many key-value pairs as you’d like here by just clicking on the plus button. In our example, we’ll also add data for “Project Manager” and “Status”.
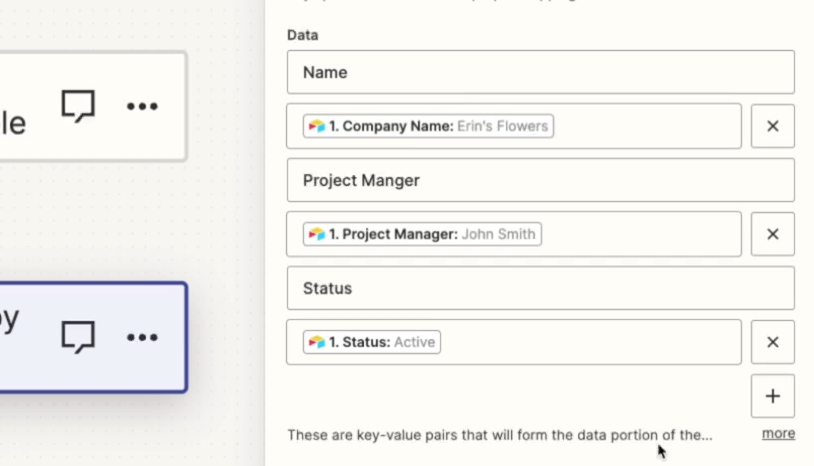
Note that Zapier will handle URL encoding for you, meaning that you don’t need to worry about punctuation and special characters, like the apostrophe in “Erin’s Flowers”.
Once you’ve added all the key-value pairs you want, your webhook is all set. You can leave all of the other settings to their defaults.
Next, it’s time to test what you’ve built and send some data from Zapier to Make.
Testing the webhook that bridges your two automations will require switching back and forth between Make and Zapier, so you may want to open them up side-by-side on your desktop.
Open up the Make scenario you created earlier.
To make sure that it’s listening for incoming data, run the scenario by clicking on “Run once”.

Then, switch back to Zapier and test your Webhooks step.

Make should instantly receive data from the test. Click on the number over your Make trigger to review the “bundle” it retrieved.

You should see all the information from your key-value pairs, with the labels and data that you configured in Zapier.
You can now use this data just like you would use variables retrieved from any app in Make.
For example, we’ll add a Slack step to the scenario that sends a message to our Tutorials channel with an alert about a new lead. We’ll just include the lead’s company name in the message.

After adding any steps you’d like to include in your scenario, make sure to give the whole workflow a test.
Click on “Run once” in Make, then “Retest step” in Zapier.
Then, open up any relevant apps to confirm that your data was sent correctly. When we open up Slack, we can see the message we sent.

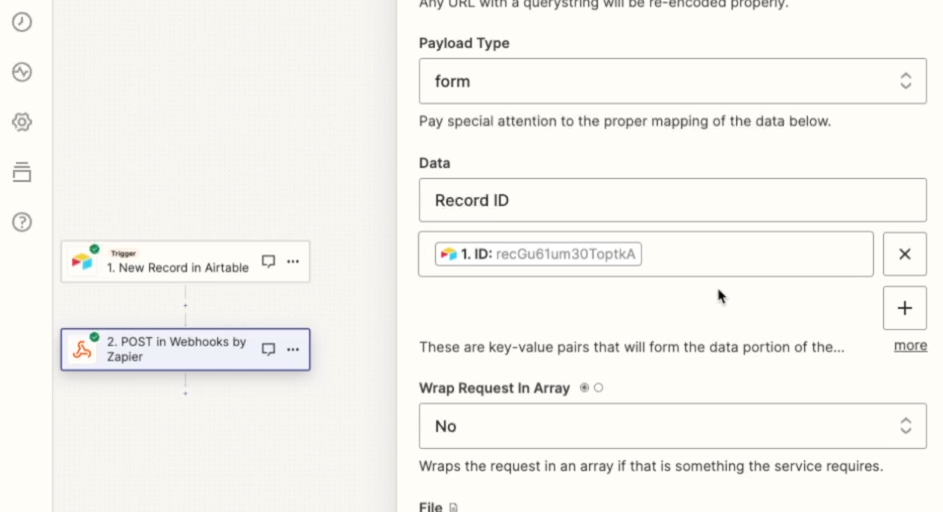
As an alternative to creating a separate key-value pair for each data point, you could use a webhook to send a unique ID for the record in question.
Then, your second automation can use the ID to look up the relevant record and retrieve all of its data at once.
This method will require an additional search step in your automation, and will be slower than an instant webhook-based automation. It also requires you to use an app like Airtable that associates each record or object with a unique ID that can be retrieved by Zapier. While most apps do use IDs like this, they won’t always be very easy to find with Zapier.
Conversely, it’s easier to maintain and update automations built with this technique, since there’s only a single piece of data being sent. Additionally, it can be a bit more secure to avoid sending each data point individually to a webhook.
Note: we’re going to demonstrate a lookup with Airtable. This process will work with many other apps, but the exact variables and their names will be different.
Using a lookup ID instead of several key-value pairs is a simple change.
Open Zapier, and edit your Webhooks step.

Remove all of your key-value pairs except for one. In this pair, enter “Record ID” as the key, and enter the record ID retrieved by Zapier in the value field.
Test the automation once again using the same approach as before. Click “Run once” to ensure that the Make scenario’s webhook is listening for requests, then test your Zapier automation.

After running the test, check Make to review the data your webhook trigger received. You should see a single piece of data – the Record ID sent by Zapier.

Add a new step to your Make automation to find the record or object by its ID after the trigger (and before the Slack step). Add a step and choose the app you want to perform a lookup in.
We’ll choose Airtable as our app and select “Get a Record” as the event. If you’re using a different app, you’ll still likely use a “Get” or “Find” event.

Configure the step to search for the record or object in the correct location. For Airtable, that means we need to identify the base and table, and use the ID retrieved in the Webhooks trigger.

Test the step to load in some data. You’ll have to copy and paste the record or object ID manually for the test.

If you examine the lookup step’s data, you should see all of the information from the record that was retrieved.
Finally, update any subsequent modules to use data from the lookup step rather than using data from the trigger, which is no longer present.

Test the entire workflow again to confirm that it all works. Run the Make scenario, then test the Zap.
Check that all of the steps after your lookup worked correctly. In our example, a Slack message was sent successfully, so our automation is all set.

Now let’s cover how the same process works in reverse, and explore sending data from Make to Zapier with Webhooks. It’s ultimately pretty similar to sending data in the other way, so we won’t go into quite as much detail.
1. Open or create a Make scenario with at least a trigger step.
2. Add an “HTTP” step, and choose “POST” as the event.
3. Create a new Make scenario, and choose “Make a request” as the event.
4. Create a new Zap with a “Webhooks by Zapier” trigger. Set the event to “Catch a Hook”.
5. Copy the provided URL and paste it into your Make HTTP request.
6. Set your HTTP request method to “POST”, and choose “multipart/form-data” as the body type.
7. Configure the data you want to send to Zapier as key-value pairs.
8. Test the automations by running your Make scenario, then testing your Zapier webhooks trigger.
9. Review the data in Zapier, and add automated steps that use data from the webhooks trigger.
Begin with a scenario in Make. Your scenario should have a trigger that you’ve already tested and loaded data into.

Add a new module to the Make scenario, and choose “HTTP” as the app (NOT webhooks).

Select “Make a request” as the event.

To configure the request, you’ll need a URL to send the request to, which you can generate in Zapier
In Zapier, create a new Zap. Choose “Webhooks by Zapier” as your trigger, and select “Catch hook” as the event.

Click “Continue”. In the test window, a URL will be generated for this webhook. Copy it to your clipboard.
Go back to your Make scenario, and paste the URL into the URL field.
In the “Method” dropdown, select “POST”, and set the body type to “multipart/form-data”.

For each piece of data you want to send from Make to Zapier, you’ll need to add an item under the “Fields” section.

For each item, set the type to “Text”. Then, provide a label for the data in the “Key” field, and the data itself in the “Value” field. Like Zapier, Make will handle URL encoding for punctuation.

Once you’ve finished adding all the data you want to send as key-value pairs, click “OK” to save and close the module.
Then, test the scenario to send a request to your Zapier webhook.

Go back to Zapier, and test your webhook trigger.

You should see the test data that you sent from Make.
[test data]
You can now add steps to your Zap that use the data retrieved in the webhook trigger.
Just like with Zapier, you can use a single key-value pair containing a record ID instead of sending each individual piece of data. Just be sure to include an additional lookup step in your Zap as well.
Note that should also add a Record ID field to Airtable, because it will make it much easier to search for a matching record by its ID in Zapier.
You can use the RECORD_ID() formula to display the ID of each record.

In addition to using webhooks, there are some other ways to run sequential automations in Zapier and Make.
For instance, you could also create an operational database. This is a database that stores and manages data for all your automations.
With an Operational Database, you could use Zapier to start a workflow, and drop some data off in Airtable.

Then, Airtable would trigger a Make automation to run that uses the same data.

That way, the Make automation can reference the data created or updated by Zapier without needing to involve webhooks at all.

And of course, you could switch the order of the providers if you want - it would work the exact same way if you started with Make and picked things up with Zapier.
Just like with webhooks, there are some pros and cons to this method. It’s going to be a bit slower than using instantaneous webhooks, and it could be a bit easier for your team to accidentally break the automation by editing your Airtable views.
But on the other hand, it gives you more visibility into the process, allowing you to see the data every step of the way. You could also add a human checkpoint here, where a person would review and approve the data before allowing the automation to continue to the next step.
When dealing with multiple automation providers, you should try out Guardian by XRAY.
Guardian aggregates error emails from multiple accounts into one place making it easy to detect and manage automation errors across your accounts and your clients’ accounts.

Just go to guardian.xray.systems to get started.
This is a must-have if you’re managing automations in several providers with multiple clients.
With webhooks or operational databases, it’s easy to send data from one automation provider to another. You can set up a simple automated step to directly send all the data you want, send over a record ID for a quick search, or deposit data into an operational database and retrieve it with the next automation.
No matter which approach you choose, you can seamlessly build a single workflow that spans multiple automation providers. To learn more about building automated workflows, check out our blog or our YouTube channel. You can also follow XRAY on Twitter, Facebook, or LinkedIn.

.pptx.png)

