
This article was written by Exalate.
Teams using software to manage their projects store large volumes of business data. This data is vital, but hard to access without using the application that created the data in the first place.
When multiple teams use different platforms, much of their data might become inaccessible to teams using different software. Using an integration to share information between these various platforms can greatly benefit all teams and the organization as a whole.
Getting different platforms like Jira and Salesforce to communicate is hard but with the right software, you can share data effortlessly, transforming the reach of your teams and letting each part of your organization complement the others.
With the right integration solution in place, teams can easily decide when and how they need to make specific data accessible to one another through a Jira Salesforce integration.
Here’s a common use case: sales data (including new feature requests) is useful to a project planning team, and the information on new features can be useful to the sales department.
Moving data automatically allows everyone to work together more closely, without the need for manual data transfer or meetings.
Here’s how to set up this integration.
The first step is to install Exalate on both platforms. Let’s start with Jira. Navigate to the Atlassian Marketplace and type “Exalate”. You’ll see a few options appear.

Pick “Jira Issue Sync & More”. Click “Try it free” and follow the guide to install it.
Next, set up Exalate on Salesforce. You can find the Exalate Connector in the appexchange marketplace.
If you require expert help to set up or customize Salesforce, you might want to hire a Salesforce developer from Toptal. Toptal specializes in connecting businesses with top-tier developers to ensure your Salesforce setup is done efficiently.

Click “Get It Now” and follow the prompts to install it.
Now that Exalate is installed on both ends, you can create a connection between the two, starting from either side. Go to the connection screen and click “initiate connection”. You can set up 2 types of connections, basic or script.
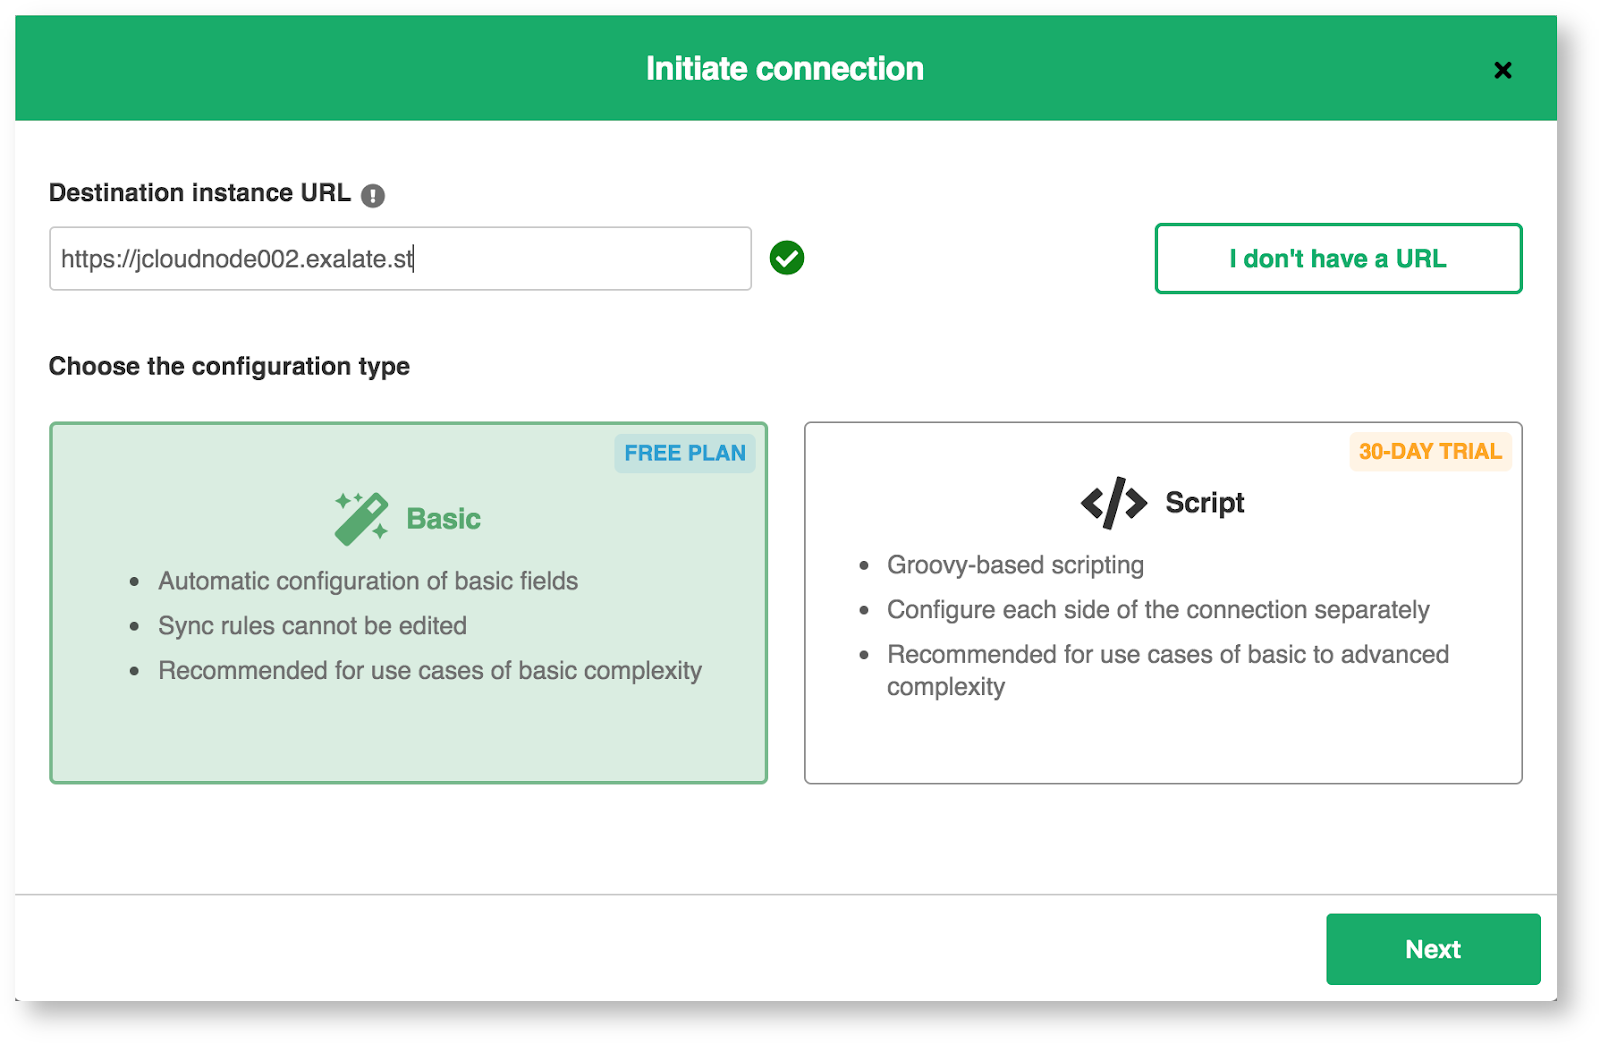
Follow the prompts for either one. You will then see your connection listed in both platforms.
If you click the edit button on a connection, you’ll see several tabs. Click “Rules” to edit your connection rules.
Connection rules let you choose how fields are mapped from one item to the other. Exalate allows both teams to control how items are sent from their own platform, and to choose the mappings for incoming items.
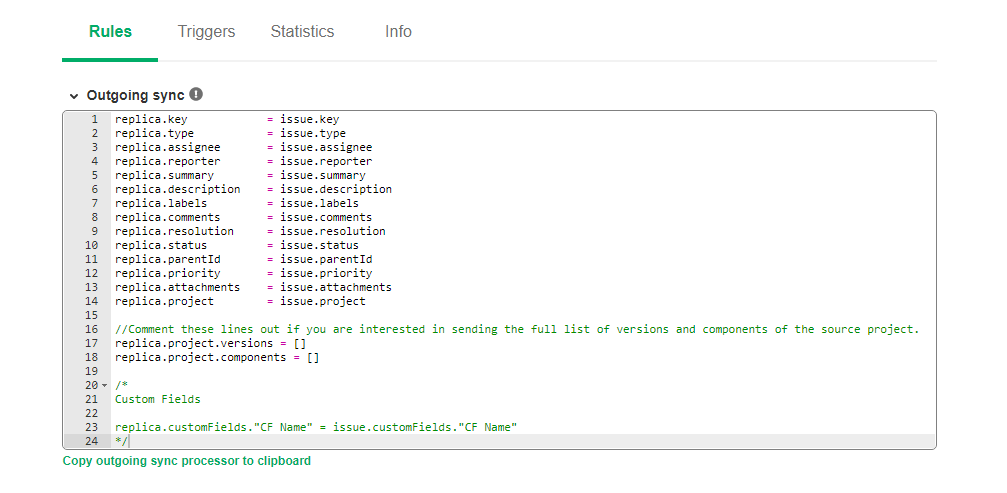
These can be added to, deleted, or commented out to be used later. If you want to map a field to something other than the default, you can change it accordingly.
Perhaps you want to assign a specific person to items on your system, so you could replace the incoming issue.assignee = replica.assignee with issue.assignee = “Mel Henderson”.
If you have coding experience, you can get fancy and combine fields, add a prefix to an incoming value, or use conditional logic to assign values. There is plenty of scope to get creative.
Triggers determine when items are synchronized. Essentially, they’re conditions. Click the “Triggers” tab first and click “Create Trigger” next.
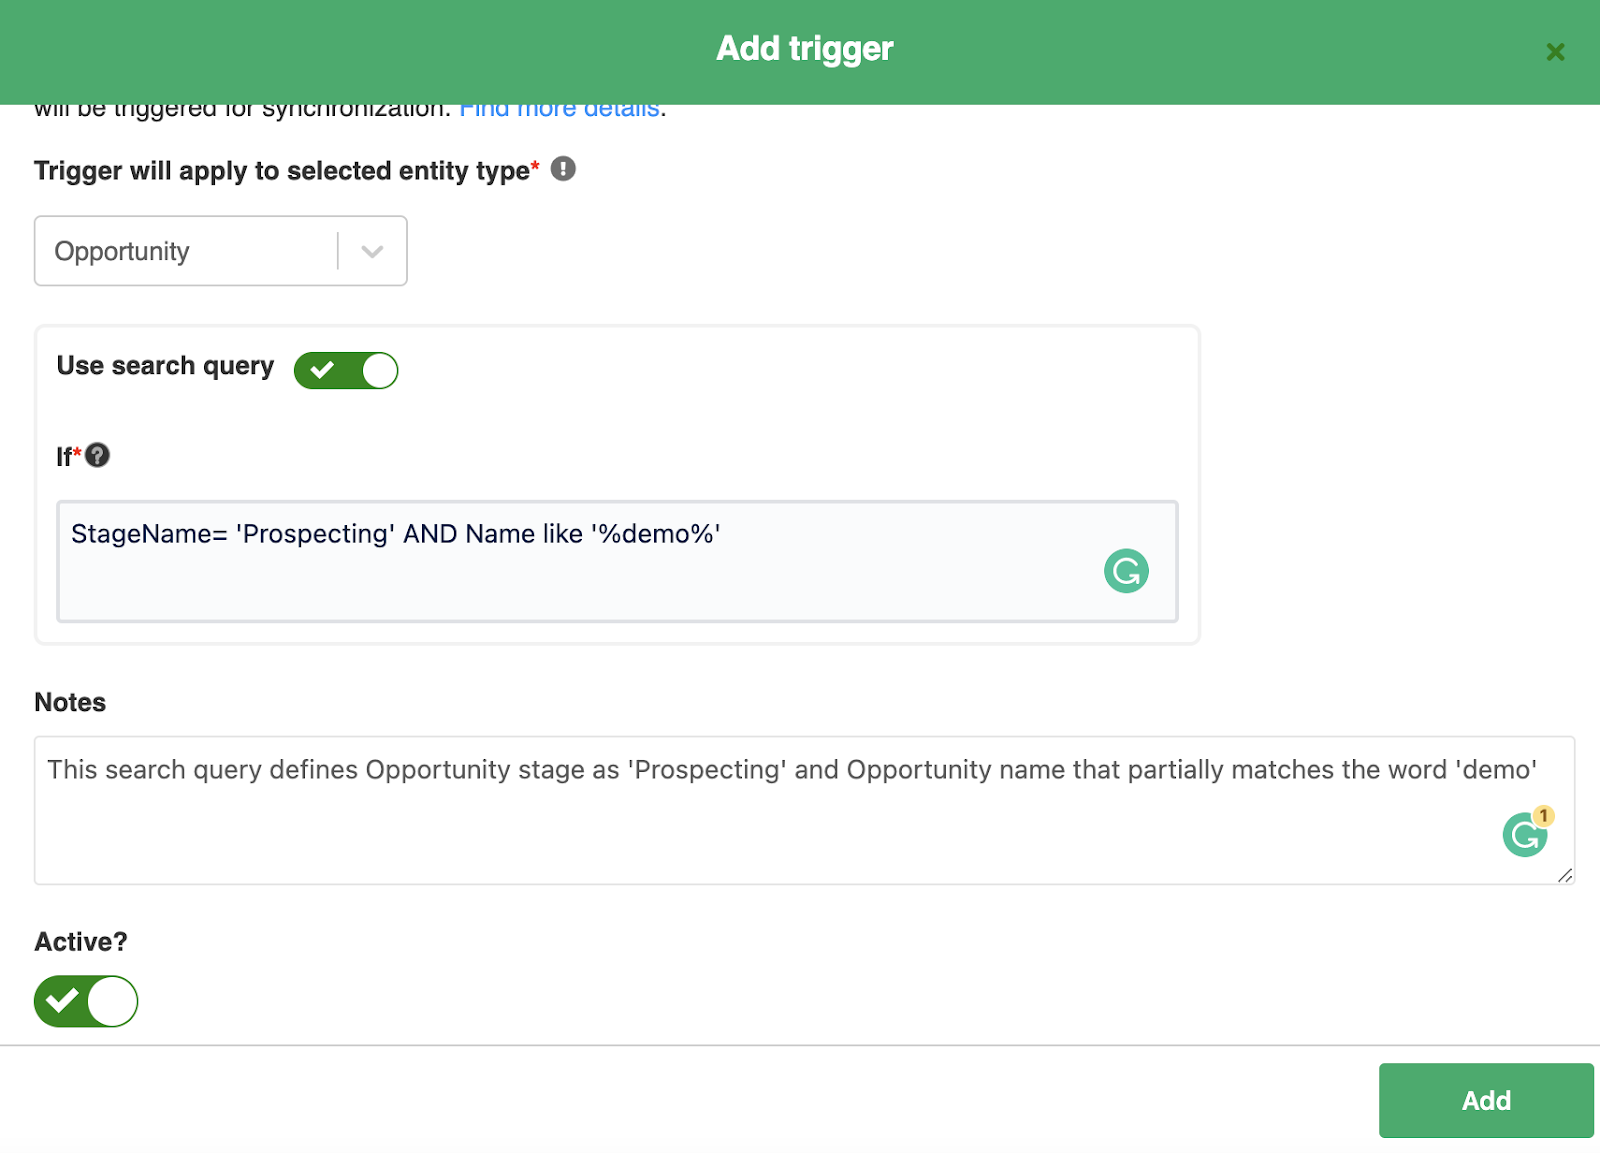
On the screen that pops up, enter a query that matches the items you want synced. You can use triggers to sync all tickets of a particular type, or pick out specific values.
In Jira you use Jira Query Language (JQL). In Salesforce it’s Salesforce Object Query Language (SOQL).
After that, you can add a note to let you know what the trigger is for. Don’t forget to click the “Active” control. When you’re done, click “Add”.
You can create multiple triggers, too.
Now that your connection is ready, it’s time to test it. Create an item that matches the triggers you set previously. Start synchronization by clicking “Bulk Exalate” on the triggers list, then check to see if your item has moved from one platform to the other.
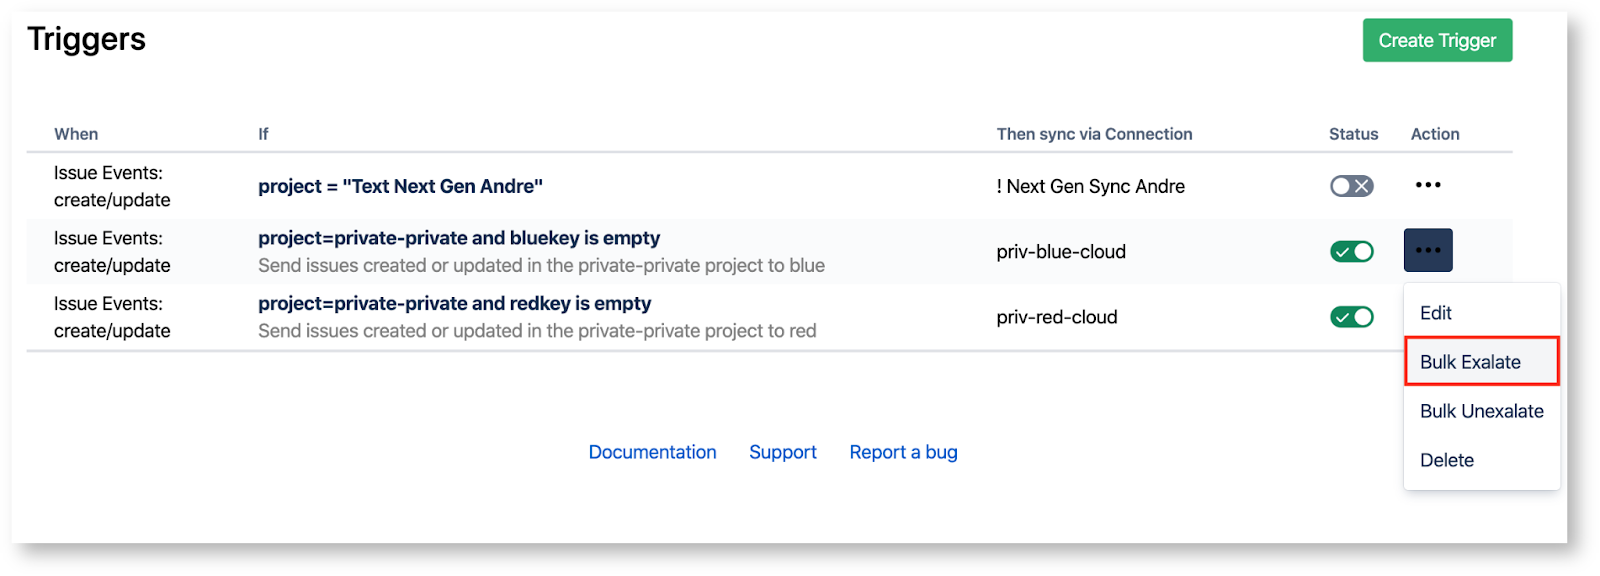
If not, check your sync rules carefully to make sure they cover the item you created. It’s common to make a mistake when you’re new to the system.
Once it’s working as intended, you can go back to work. Any items you create will be shared automatically with your other team.
There are many scenarios where synchronizing data can help.
For example, let’s consider a development team using Jira to work on new features. The sales team, who work in Salesforce, keeps tabs on what customers are asking for. Tickets dealing with requested features can then be synced into Jira’s system so developers can see them and decide whether or not to add them to the product.
Conversely, the synchronization can also automatically send Salesforce information about which features the developers are working on, and when they are expected to arrive, making it easier for the sales team to inform their leads about upcoming features.
In another scenario, developers might design custom software for enterprise clients. The sales teams can collect specific product requirements or feature requests from key clients residing within Salesforce. For instance, this can be logged as Cases belonging to a key Account or Opportunity.
The sales team could then pass this information to the development team, leading to useful insights for designing custom software tailored toward those clients.
As a final example, let’s imagine that an organization is using Jira as a goal-setting platform, while their sales team is tracking their metrics on Salesforce. By syncing goal-related Jira tickets to Salesforce, they could easily monitor everyone’s progress toward their goals. You can sync goal-related tickets so that they are kept up to date in both Jira and Salesforce. Then everyone can easily monitor progress towards their goals.
Integrating software platforms sounds hard, but it doesn’t have to be. The right tools make it easy, and with Exalate everything happens automatically. The setup process is quick and straightforward, and allows you to take complete control over what’s shared, and when.
With your integration in place, your teams have more information at their fingertips and can make better decisions. That can only benefit you.
If you want to know more, check out Exalate and learn how it can help connect your teams.
If you’d like to learn more about building no-code and low-code automated workflows, check out the other posts on XRAY's blog or our YouTube channel. You can also follow XRAY on Twitter, Facebook, or LinkedIn.
If you require expert help to set up or customize Salesforce, you might want to hire a Salesforce developer from Toptal. Toptal specializes in connecting businesses with top-tier developers to ensure your Salesforce setup is done efficiently.


.pptx.png)
.pptx.png)