
Tired of being locked into your software’s outdated and restrictive payment integrations?
Your business deserves modern payment processing that works with all your critical software.
PayJunction has a no-code solution that can help your business to save valuable time and money. PayJunction’s No-code Payments Integration® is a powerful browser-based tool that eliminates redundant data entry and costly errors.
It lets you automatically sync transaction information with any browser-based app, giving your business and customers a more modern payments experience.
In this guide, we’ll take a look at PayJunction’s key features and functionality.
Then, we’ll show you how to set up their no-code Chrome extension so you can integrate PayJunction with any web application.
Finally, we’ll wrap things up with a brief demonstration of how to connect PayJunction to Zapier to start automating your payment workflows.
PayJunction is payment processing software with over 25 years of industry expertise.

They have solutions that let you run payments at a physical point of sale, submit digital payment requests, or directly enter card information through a simple virtual terminal.
No matter how you’re collecting payments, it can all be easily managed online with PayJunction’s simple software that runs in your browser window.

You can also use a simple Chrome extension to integrate PayJunction with the web apps you’re already using - even your own custom web software.

With your own custom no-code integration, you’ll be able to automatically extract data from your CRM, ERP, or any other web app. Then, that same data will be automatically filled out in PayJunction whenever you need to create a new charge or invoice.
No more tedious copying and pasting, no more errors from manual entry – all of the data automatically appears right where you need it.
In addition to integrating directly into your apps through a chrome extension, PayJunction can also connect with any web app you want via Zapier.

You can use no-code Zapier automations to log every new transaction in Quickbooks, create new rows for transactions in Google Sheets, or update customer information in Hubspot.
But that’s just scratching the surface – Zapier has integrations for over 8,000 web apps and counting.
That means you can connect your PayJunction data to virtually any app you can think of. We’ll show you how to start automating PayJunction with Zapier at the end of this guide.
Ultimately, one of the key benefits here is freedom of choice.
A lot of businesses rely on highly specialized software that’s particular to their industry. While those apps can be excellent for managing your dental practice, or your vet office, or an auto dealership, their payment options are often lacking.
If your integrated payment provider offers poor customer service or doesn’t have the features you need, then you can make the switch to PayJunction – all while still using whatever software you’d like to manage your business.
PayJunction offers three main pricing plans.

The Standard plan offers a simple and competitive fee structure for credit card and ACH transactions.
For larger organizations, the Enterprise plan is a fully customized setup tailored to fit your business.
Finally, there’s a Surcharge plan that allows you to pass that majority of credit card fees onto your customers. However, this plan is only available in certain states, where authorized by law.
You can learn more about learn more their pricing plans on PayJunction’s site.
There, you can pick a plan, submit some information, and get a customized pricing plan from PayJunction’s team.
--
All in all, if you’re looking for an affordable and convenient way to process payments at your company that integrates with the software you’re already using, PayJunction is a great choice.
After selecting your pricing plan and getting access to your new PayJunction account, let’s take a look at how to set up no-code integration.
To get started, you’ll need to install PayJunction’s chrome extension – called “No-code Payments Integration”.
Once you’ve added the extension to your browser, you may want to pin it for easy access.
Click on the extension and sign in with your PayJunction username and password. Then, authorize the extension to access your account.

You can then select defaults for the Smart Terminal, merchant and ACH accounts.

Once you’ve finished the basic setup, you can instantly start processing payments.
However, as we mentioned previously, you can also set up a custom integration to instantly autofill transaction data from any web app.
To demonstrate the process of creating a no-code integration, we’ll create an integration for the custom web app pictured below. You can follow along with these steps to create an integration for your own web app.

To start creating an integration, open up the web app to the specific page you want to integrate in your browser, then open the PayJunction extension.
Click the gear icon at the top to view Settings, then select “Integrations”.

Then, click “Integrate”.

Give your integration a name.
Under “URL”, you’ll see the URL that the integration will be applied to. In many cases, you may want to replace part of the URL with an asterisk “wild card” so that it applies to a wider range of pages.

The asterisk stands in for any sub-page that might be found within your URL. For example, www.test.com/products/* will apply the integration to www.test.com/products/shoes as well as www.test.com/products/hats
With your URL all set, you can choose a default action. For our example, we’ll stick with ‘Charge’.

If you click on “Integration Settings”, you’ll see some useful options for controlling how your integration runs. One setting in particular that we want to highlight is the “Auto Open” toggle.

When this is enabled, your integration will open up automatically whenever you load an integrated page.
Once you’ve configured these settings to your liking, you can return to your integration.
For all of the other fields, like transaction amount, invoice number, first name, and so on, you can either enter data directly, or dynamically map each field to an element of your app.
To map a field, just click on the target icon.

Then, select the matching element on your screen.

For instance, we’ll map ‘Transaction Amount’ to the ‘Amount’ value.
When you map a field to your integration, you’ll see it highlighted in blue.
After mapping all of the relevant fields on our web app page, the integration looks like this:

Note that you can also use filters to match data against regular expressions. For instance, we’ve used the following expression to extract the customer’s first name only from their full name.
^(\w*)

Before wrapping up an integration like this, you may also want to add some automated actions, which you can do at the bottom of this Integrations panel.

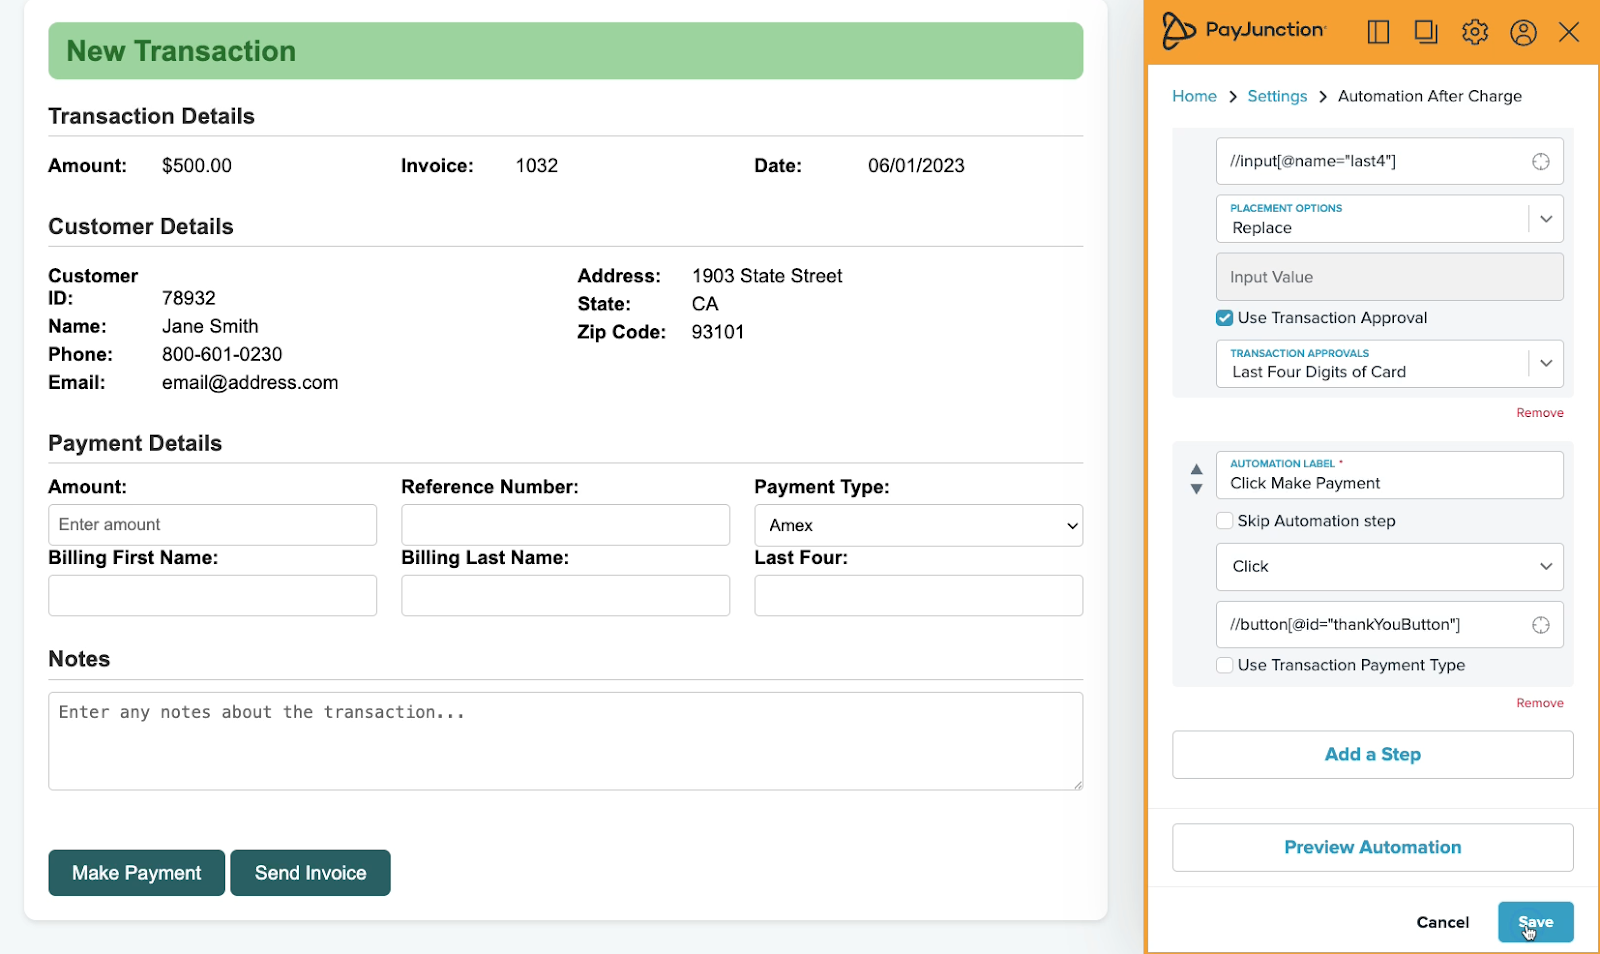
For instance, we’ll add an automation that runs after the charge is processed.
We’ll set up the automation to fill in our app with all of the payment information that’s being processed in PayJunction. That way, the two sources will stay reconciled, with both having a consistent record of the transaction.
Add an “Input” step to enter data from the PayJunction integration into your web app.

The automation uses the same point-and-click “target” system as the main integration. Just click on the field that you want to fill in with data from PayJunction, such as the “Amount” field below.

Then, you can select “Use Transaction Approval” to select from transaction data. We’ll select the “Total Amount”.

You can add another automated input step for each field you want to fill in. You can also use a “Click” action to have your automation click an element in your web app, such as clicking the “Make Payment” button in the app pictured below.

Once all your mappings and automations are set up, click “Save” to complete the integration.
With your integration set up, all you have to do is open your web app and the no-code payments extension.
Then, a payment will be automatically prefilled with data based on your custom mappings.

The customer can swipe or tap their preferred payment method to complete the payment.

After the transaction is complete, any “After charge” automations you’ve set up will run. In our example, that means that the payment details are automatically added into our web app, and the payment is marked as processed.

In my PayJunction account, you’ll see that same transaction in your records.
Your customer will also receive a receipt at their provided email address.

--
Setting up an integration like this just takes a few minutes, and then, you’ll be ready to instantly fill in data for all of your transactions going forward.
And thanks to the simple point and click setup, you can create integrations for any web app you want.
In addition to the functionality provided by the no-code integration, you can connect PayJunction to Zapier to access its constantly growing library of over 8,000 web apps.
This includes everything from CRMs like Hubspot and Copper to spreadsheet apps like Excel and Google Sheets, or accounting apps like Quickbooks Online and Zoho books.
If you’re not sure whether or not your app is supported by Zapier, you can just do a quick search on XRAY.Tools to check.
But whichever apps you want to automate, your first step will always be the same – you’ll need to connect your PayJunction account to Zapier.
To begin, sign in to Zapier, and select “App connections”.

Add a new connection.

Search for “PayJunction”, and select it from the results.

Then, you’ll just need to choose your account type, sign in to PayJunction, and click ‘Authorize’.

You’re now all set to start automating PayJunction.
Need some help setting up your PayJunction automations in Zapier?
With XRAY Hourly.com, an XRAY service, you can get expert guidance from a hand-picked engineer in 48 hours or less.
Our team at LCE will help you set up an automation and show you how it all works with one-on-one collaborative calls.
There’s no long-term commitment. Just schedule as much time as you need on a flexible, hourly basis.
We guarantee that you’ll make progress in every session, getting one step closer to accomplishing your goals with Zapier, PayJunction, Softr, or any other low-code app.
Just go to lowcodeengineers.com to reach out and schedule your first hour.
Finally, let’s wrap up with this video by building a simple automation with Zapier and PayJunction. This will be a simple two-step automation that you can follow along with on any Zapier plan - even a free one.
The Zap will trigger whenever we process a new transaction in PayJunction. Then, it will automatically send a message in Slack with an alert about the new transaction.

If you’re not really a Slack user, don’t worry. The basic setup and techniques that I’m going to cover will apply to any app you want to populate with data from PayJunction.
To begin, create a new Zap.

You’ll need to choose the trigger app and event that prompt your automation to run. Search for PayJunction as the app.

For the event, you’ll see several options. You can run automated actions for new deposits, for failed payments, for new invoices, and for several other events.
For this automation, use “New transaction”.

Zapier should automatically select your PayJunction account here, but you can switch the account if you have multiple. Then, click ‘continue’.
Now it’s time to test your trigger. Clicking “Test” will look for a recent transaction in your PayJunction account.

After a moment, you should see one or more recently processed transactions. Choose one, and click “Continue with selected record”.

Next, you need to configure an automated action that follows the trigger.
Just like with the trigger, you’ll need to pick an app and event. For this example, the app will be Slack, and the event will be “Send Channel Message”.

Note that you’ll need to authorize your Slack account, as well.
There are several settings available for the automated message, but the two main things you need to configure are the destination channel, and the text of your message.
In our example, we’ll pick our “tutorials” channel in Slack.

When you compose your Slack message, you can use a combination of static text and dynamic data. To access all of the dynamic data retrieved in your Zap’s trigger (or other previous steps), click on the plus button.

This will let you enter details specific to each transaction, like the total amount and the customer name.

Note that this same principle applies to any app you automate with Zapier. If you’re not using Slack, you could just as easily enter this data into Google Sheets or Quickbooks, for example.
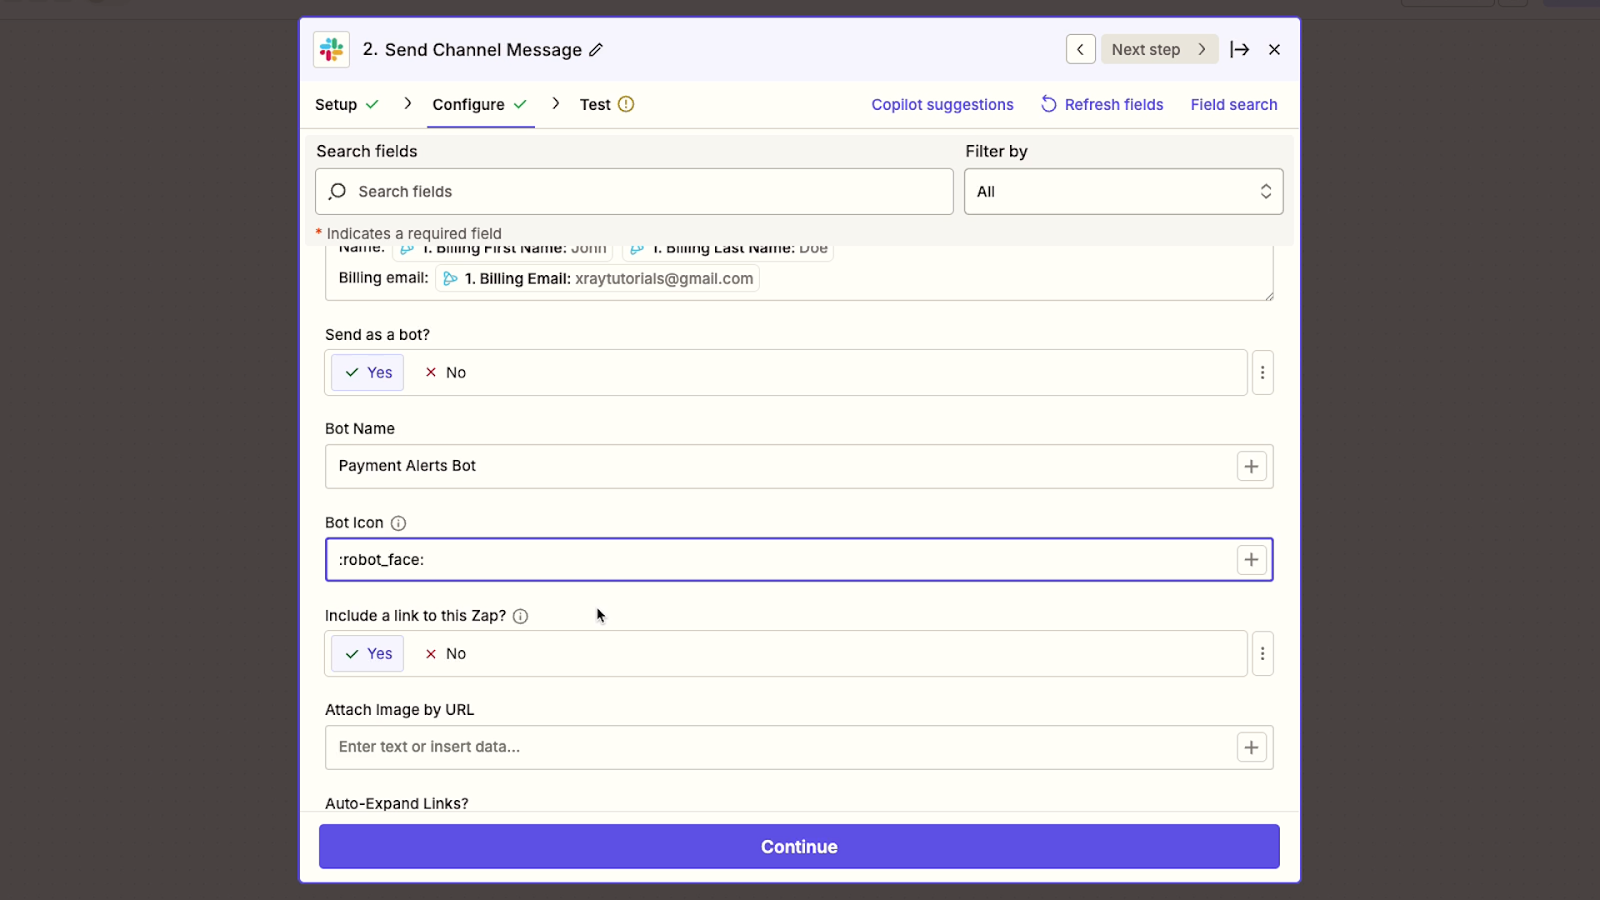
There are several other optional settings that you may want to configure in your Slack message, such as providing a unique name and icon for your Slackbot to use.
Once your automated action is configured, give it a test. Note that testing an automated step in Zapier will actually perform that action, so make sure you’re OK with sending the message before you proceed.

After Zapier runs the test, you should see a confirmation that the action ran correctly.

You can also check Slack to see the message that was sent.

Publish your Zap and turn it on to have it run automatically whenever your trigger event occurs.
—
This example is just the beginning of what you can do with Zapier and PayJunction.
You could easily expand on this workflow by adding more steps to send data to your accounting software, or build a separate workflow that creates invoices in PayJunction based on data in your CRM.
With over 8,000 apps to choose from, you can build any workflow you want in Zapier.
You can explore additional Zapier tutorials on our YouTube channel to learn more.
PayJunction offers you the freedom to process payments anywhere with any software your team already uses. No complicated coding required—just simple browser-based tools that integrate seamlessly with your existing workflow.
Head over to PayJunction’s site to start saving time and money on your payment processing today.

.pptx.png)

