
If you’re running a YouTube channel, keeping track of each video’s performance is essential for making sure that you’re reaching your audience with the right content.
However, viewing all of your stats in YouTube analytics isn’t always enough. With limited options for sorting or running calculations, YouTube’s native analytics panel might not help you reveal the insights you’re looking for.
In this post, we’ll show you how you can use a tool called Data Fetcher to import all of your YouTube channel stats into Airtable.
This will let you view and sort your stats in a convenient location where you can take advantage of all of Airtable’s key features - like workflow automation, customizable data views, and more.
The image below shows what your table will look like once you’ve finished setting up Data Fetcher.
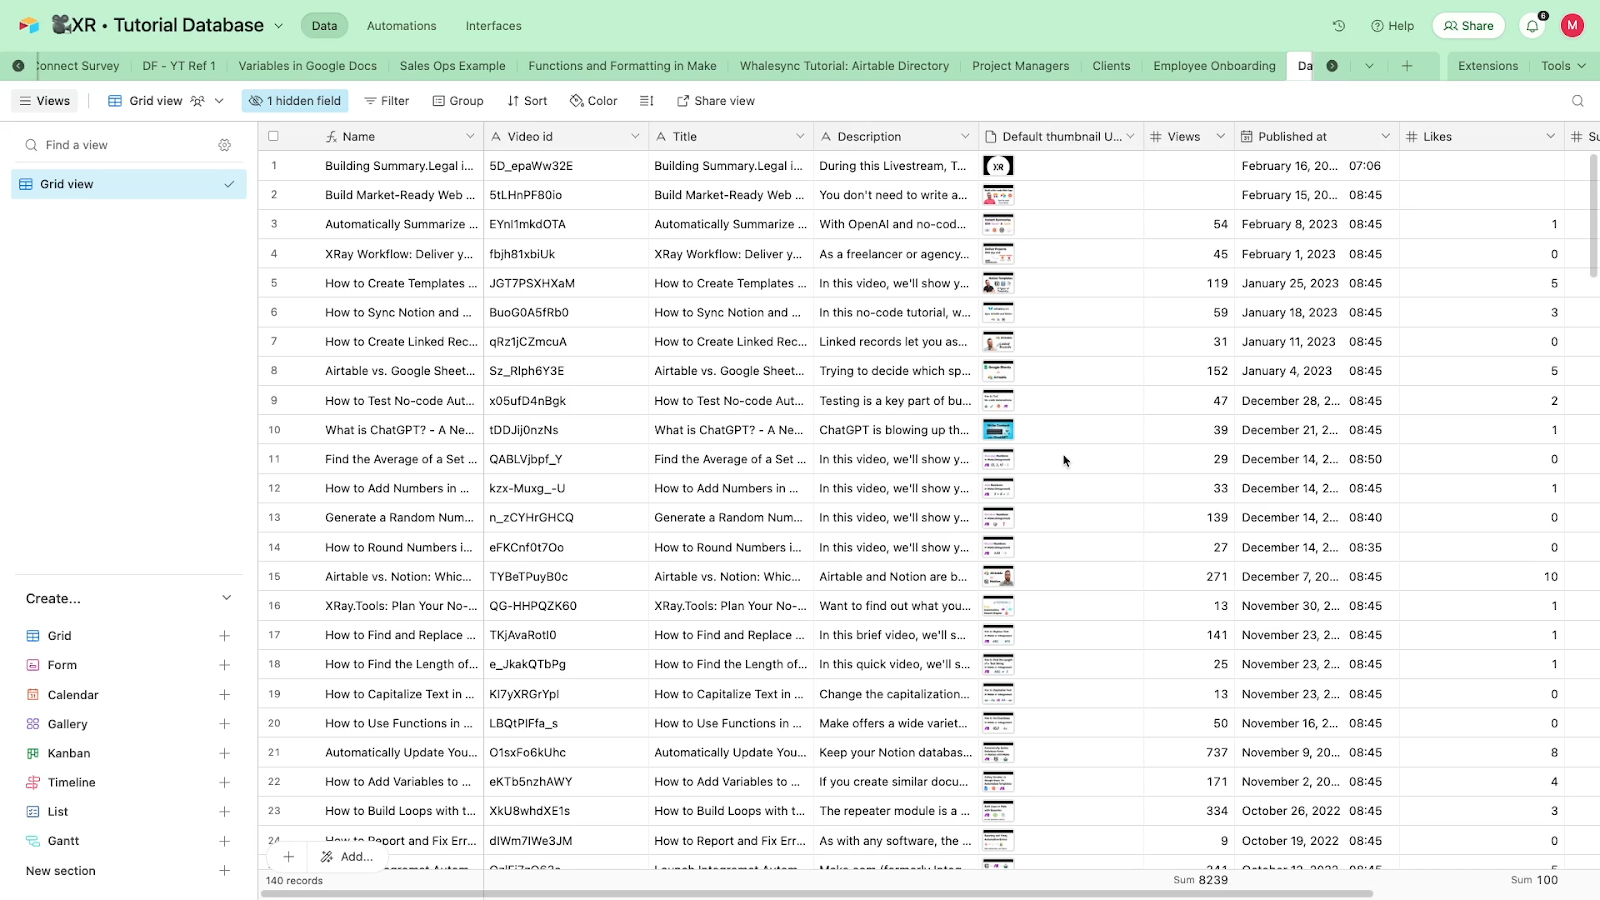
You’ll have a list of every video in your channel, along with key stats like views, subscribers gained and more. We’ve chosen a limited selection of fields from YouTube to keep things simple, but you’ll be able to add as many fields as you’d like.
With a premium Data Fetcher plan, you can schedule automatic updates. All of these fields would update automatically at whatever time interval you designate. If you’re using the free plan, you’ll just need to import the data manually each time to update your records.
Now let’s take a look at how you can build the table and configure Data Fetcher step by step.
First, create a table in Airtable where you’d like to import your YouTube data.
If you know all of the fields you would like to include in the final table, you can add them now, but it’s not necessary. In general, it’s easier to just leave the table blank for now, and simply let Data Fetcher create fields for all of the imported data instead.
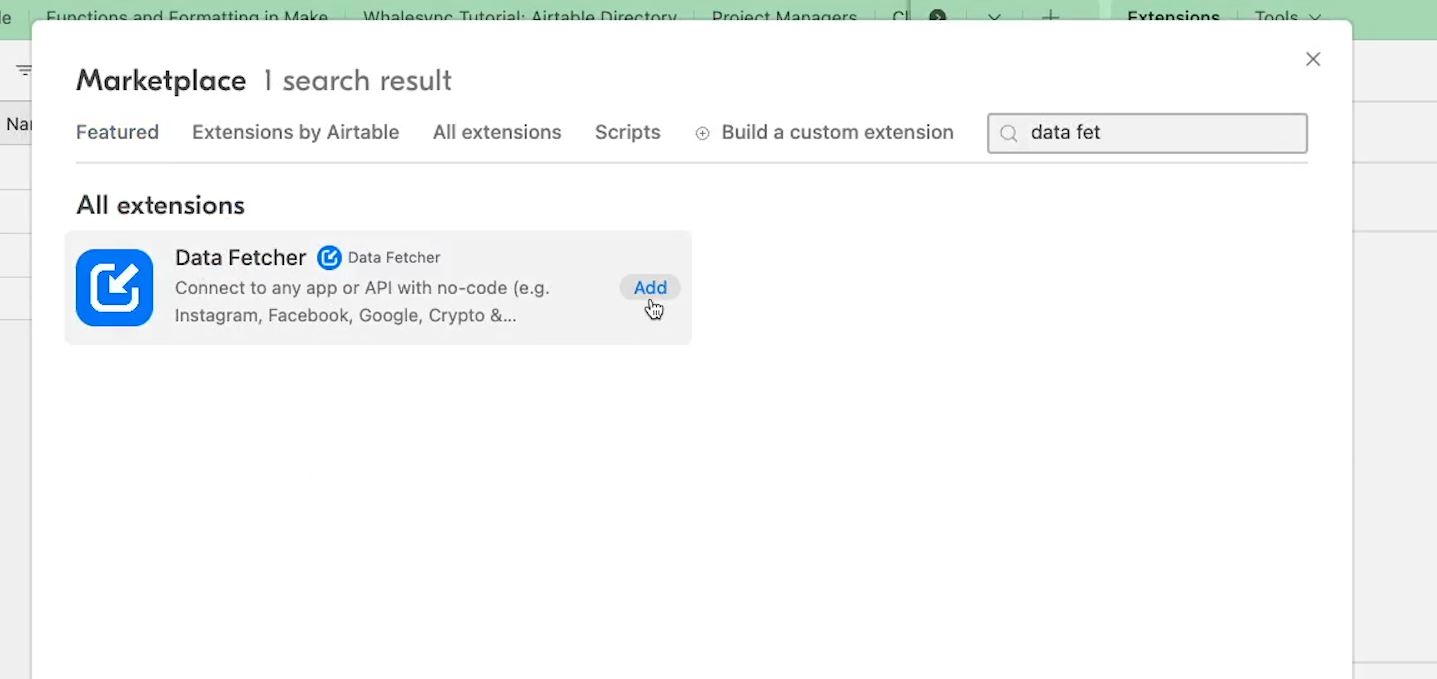
Click on “Extensions” in the top right. Add an extension, and search for “Data Fetcher”. Click on “add” to add Data Fetcher to your base.
To make configuration easier, hover over Data Fetcher in your extensions panel, and click on this square icon to make the panel fullscreen.
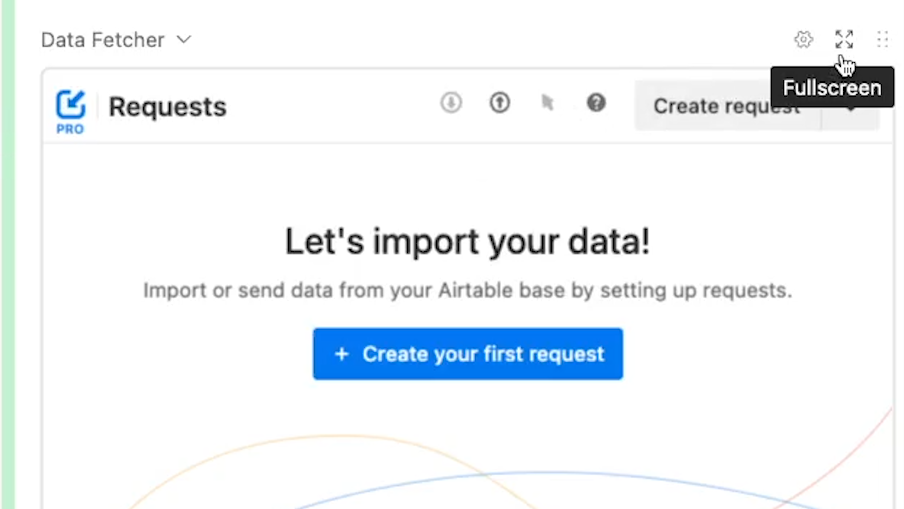
To begin importing data, click on “Create Request”. In Data Fetcher, a “Request” is an action that imports data.
Search for the app you want to use.
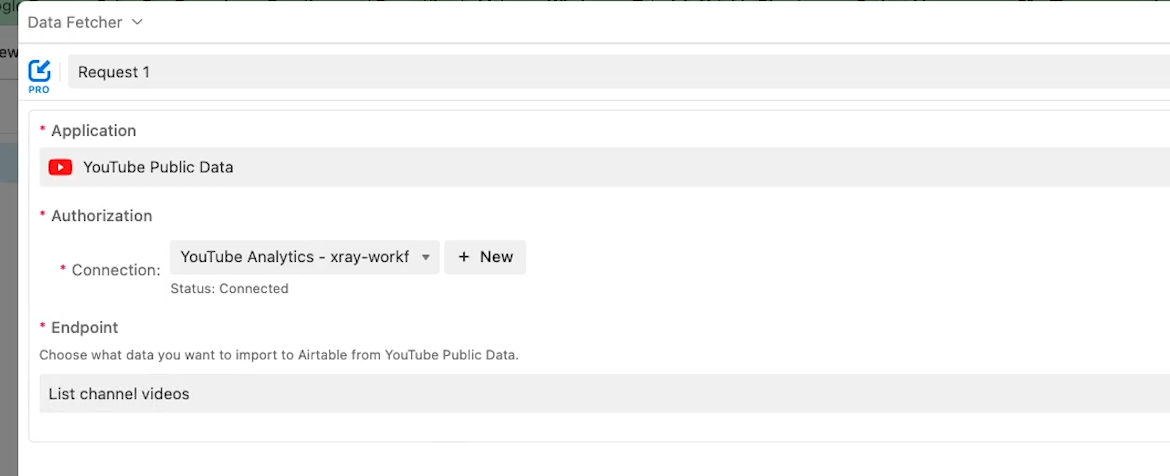
When you enter “YouTube”, you’ll see two different options: YouTube Public Data, and YouTube Analytics.

To get all of your YouTube data into Airtable, you’ll need to create two separate requests - one for each of these options. We’ll start with YouTube Public Data.
Under “Authorization”, create a new Connection to sign into your YouTube account and authorize Data Fetcher.
The “Endpoint” dropdown will give you a few options for the type of data you want Data Fetcher to retrieve. Choose “List Channel Videos” to list all of the videos that have been published to a specific channel.
Click on “Save and Continue”.
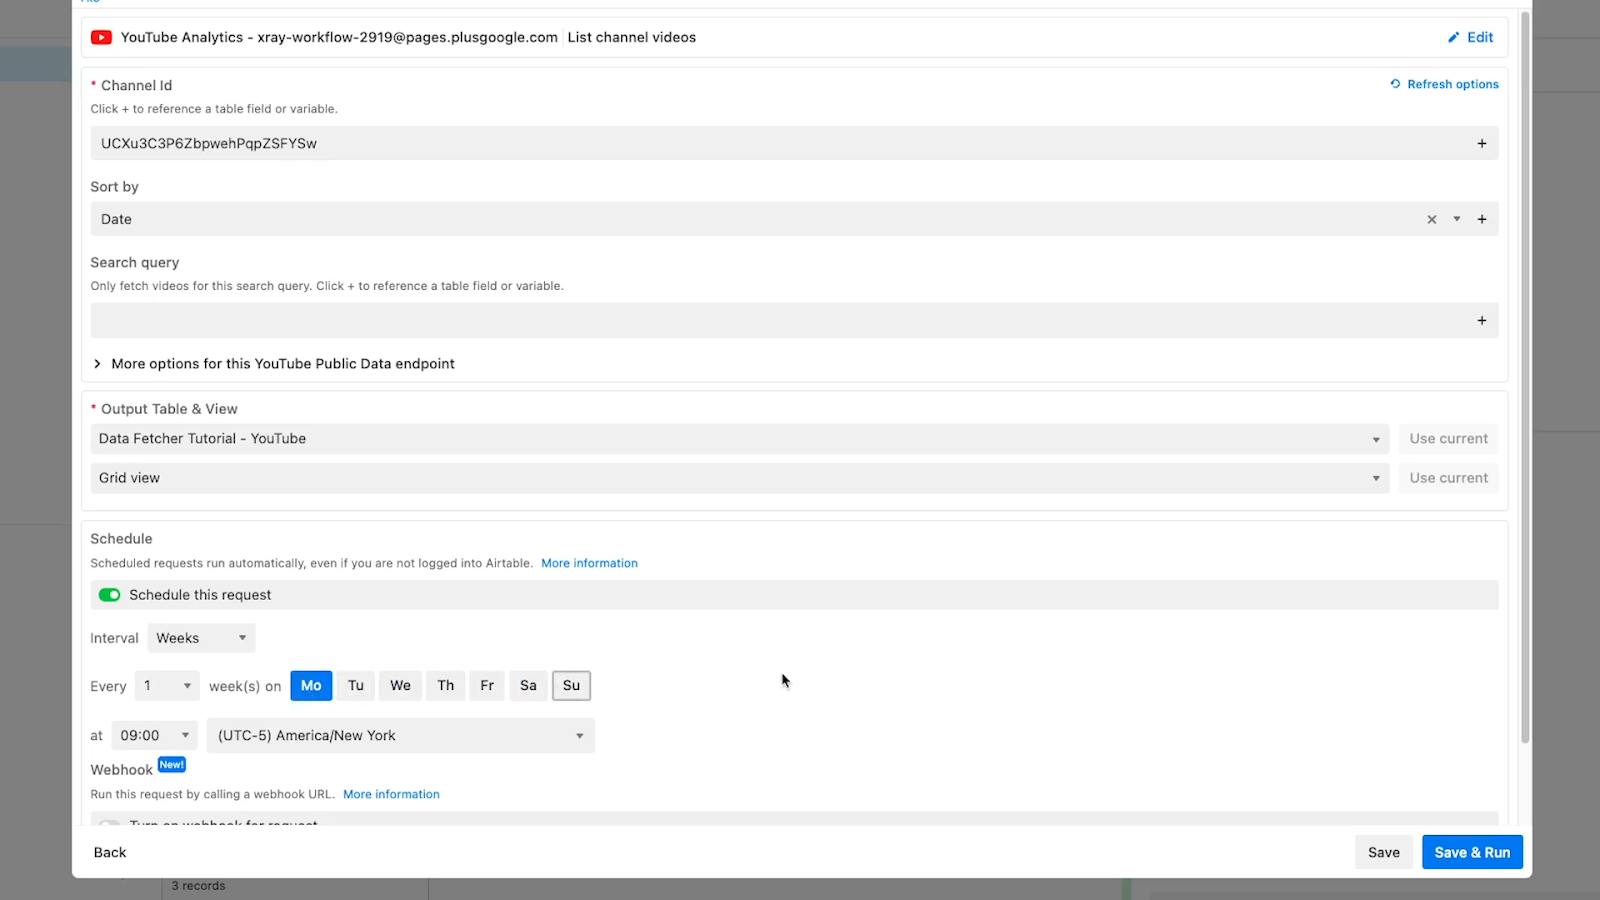
Now, you’ll need to enter the ID of the channel you want to get data for. You can enter any public channel into this field, but if you want to expand on this data with YouTube analytics info, you’ll need to choose your own channel.
Open up your YouTube channel in another browser window, and copy the string of characters after “/channel/”

Paste this into the “Channel Id” field.
Choose a field to sort by, like date or view count.
Then, you can add a search query if you’d like to limit the results to videos on your channel that match certain keywords. In our example, we’ll just leave this blank since we want to import data for all of our videos.
Next you can choose the table and view that you want to import your data into. By default, this will be set to the table and view that you already have open, so you probably won’t need to change these.
Finally, if you have a paid plan, you can schedule your plan to run automatically at regular intervals. Schedule your request as desired, and click on “Save & Run”.
Next, you’ll see a table of the information that Data Fetcher retrieved. In this window, you can choose which fields you want to use, and which fields you want to map them to in your Airtable base.
Just uncheck fields you don’t want to import. For instance, we’ll uncheck “Default thumbnail width”, since it’s not really useful for much of anything.
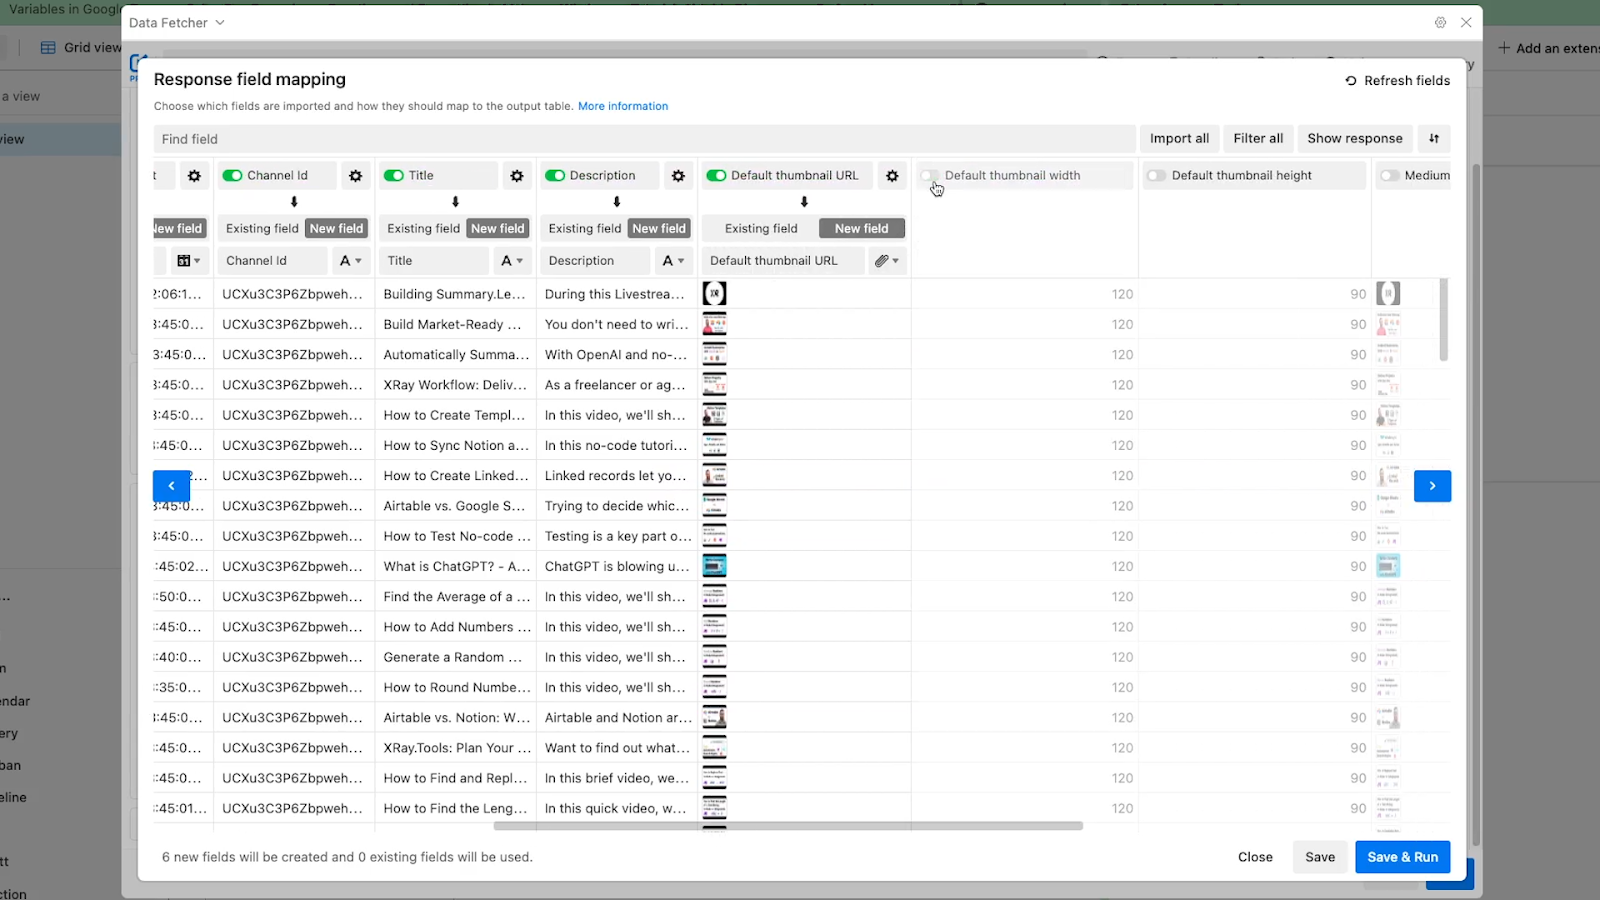
NOTE: You must include the “Video ID” field to successfully update this data with YouTube analytics data in the second part of this tutorial.
Once you’ve configured all the fields to your liking, click on Save & Run to finish the import. Your table will now be populated with data for every video uploaded to your channel.
To add statistics like video views to the public data, you just need to add a second Data Fetcher request for YouTube Analytics data.
Go back to the Extensions panel, and add a new Data Fetcher request. This time, you’ll choose “YouTube Analytics” as the application. Connect with your YouTube account, and click “Save & Continue”.
Choose a date range that you’d like to request data for. You can pick from several preconfigured options, or enter a custom date range.
Then, pick the fields you’d like to import. There are dozens of options here, including likes and dislikes, shares, annotation impressions and more. You can choose any number of fields you’d like here.
The “Split by” field lets you determine how records will be divided. So if you choose “Day”, there will be a record for each day. If you choose “Video”, it will create a separate record for each video, and so on.
To ensure that this data maps accurately to our existing YouTube data, choose split by Video. Next, you can add filters to limit your results. Again, we’ll be leaving this field blank to make sure we get all of our channel’s videos.

To make sure that this request will update your existing records instead of creating new ones, click on “Advanced Settings”.
Make sure that “Update” is selected instead of “Append”. Then, under “Update Based on Field”, select “Video Id”.
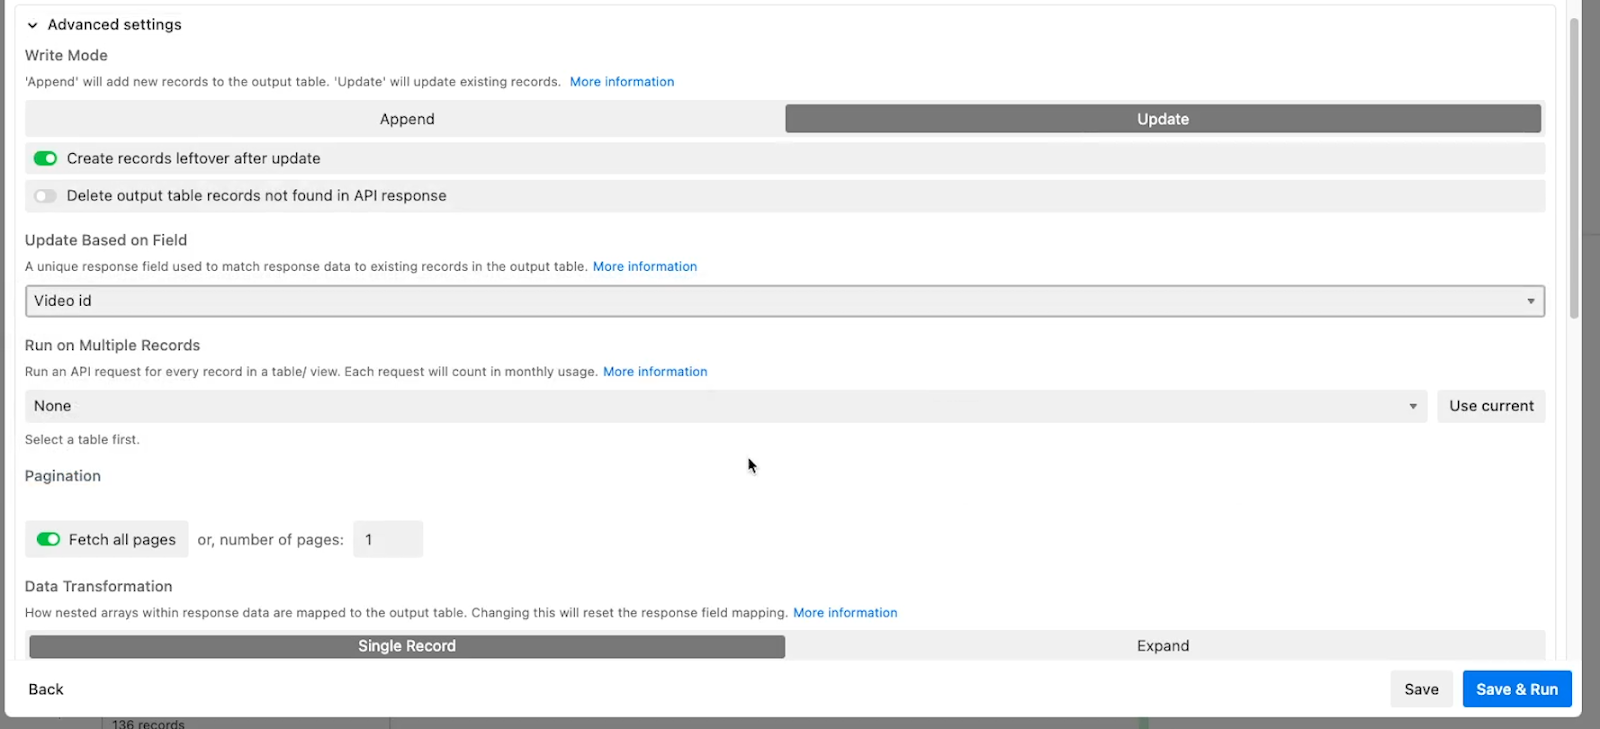
Click “Save & Run”, then map your fields. Click on “Save & Run” once more, and your table will be updated with new fields.
Now that your YouTube data is in Airtable, you can view and manage it in one convenient spot. You can use views and filters to easily sort your data, use formulas to run calculations and discover insights, or even trigger automations to run.
Everything from simple data comparison to workflow automation will be easier with all of your data in Airtable.
If you’d like to learn more about workflow automation, be sure to check out our blog or our YouTube channel. You can also follow XRAY on Twitter, Facebook, or LinkedIn.

.pptx.png)

