
Email overload is a productivity killer. Turning actionable emails into proper tasks requires copying, pasting, figuring out due dates, and assigning team members. This tedious busywork destroys focus and wastes valuable time.
Fortunately, there's a better way. With the right automation setup, any email can become a perfectly formatted Notion task with just one click.
This guide shows how to build an AI-powered workflow that reads emails, extracts key details, and creates organized tasks automatically.
The automation works through a simple three-step process:
1. Email Labeling: Add a specific label to any Gmail email
2. AI Analysis: AI by Zapier reviews the email content and intelligently generates task attributes like descriptions, due dates, and priorities
3. Task Creation: A new database item appears in Notion with everything perfectly formatted
This approach eliminates manual data entry while ensuring no important emails slip through the cracks. We're using AI by Zapier because it's simple to configure and offers free AI responses with select models like GPT-4o mini.
You can continue reading for a more detailed breakdown, but here's a high-level overview of what you'll need to do to build this automation:
1. Set up accounts and connections for Gmail, Notion, and Zapier
2. Create test data (a labeled email and Notion database)
3. Configure the Gmail trigger to watch for labeled emails
4. Set up AI by Zapier to analyze email content and extract task details
5. Write a custom prompt that tells the AI exactly what information to extract
6. Configure output fields for structured data (title, description, due date, etc.)
7. Connect to Notion to create database items
8. Map AI outputs to your Notion task fields
9. Test the complete automation and verify results
10. Publish and activate your workflow
Let's dive into each step.
Before building the automation, you'll need three accounts: Gmail, Notion, and Zapier. If you're an Outlook user, don't worry – the steps are nearly identical with minimal adjustments.
Good news for anyone testing Zapier out: the free trial will work just fine. You can build the entire automation on their free plan, although you'll need to upgrade to a pro plan to turn it on and use it.
Start by authorizing all your accounts in Zapier. Head over to "App connections" and search for each service you need (e.g., Gmail and Notion).
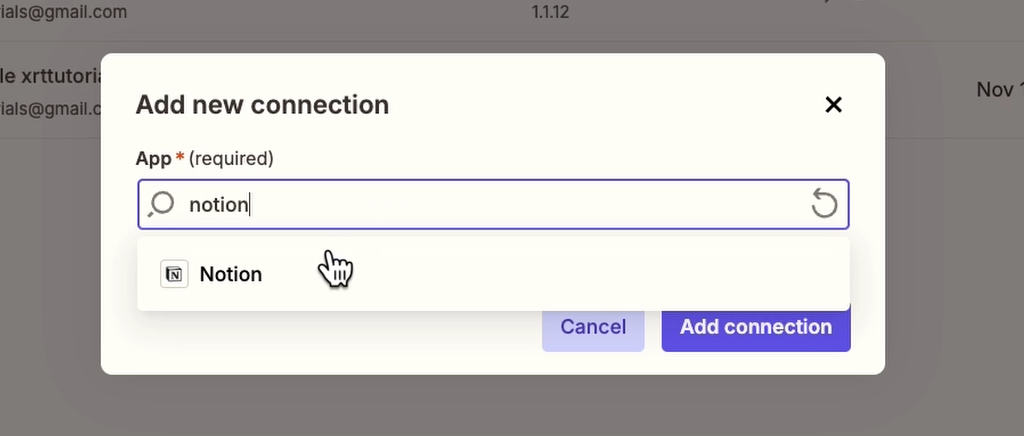
Sign in with your account and grant the necessary permissions.

Here's a pro tip that isn't well-documented but will save you frustration later: make sure your Notion page is visible to Zapier.
Open the specific Notion page you want to automate, click those three dots in the top right corner, hover over "Connections," and make sure Zapier appears in that list.
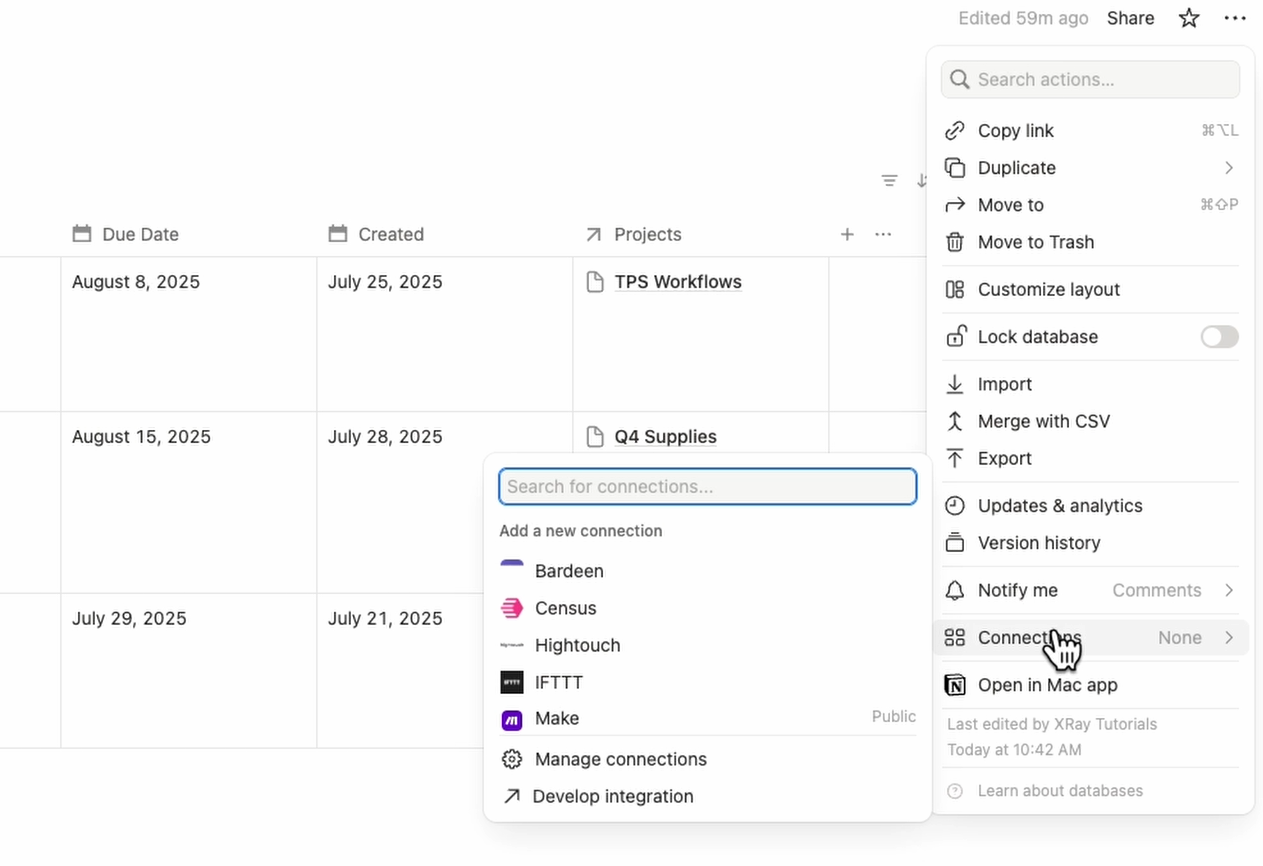
If it doesn't, search for Zapier, click it, and confirm the connection.
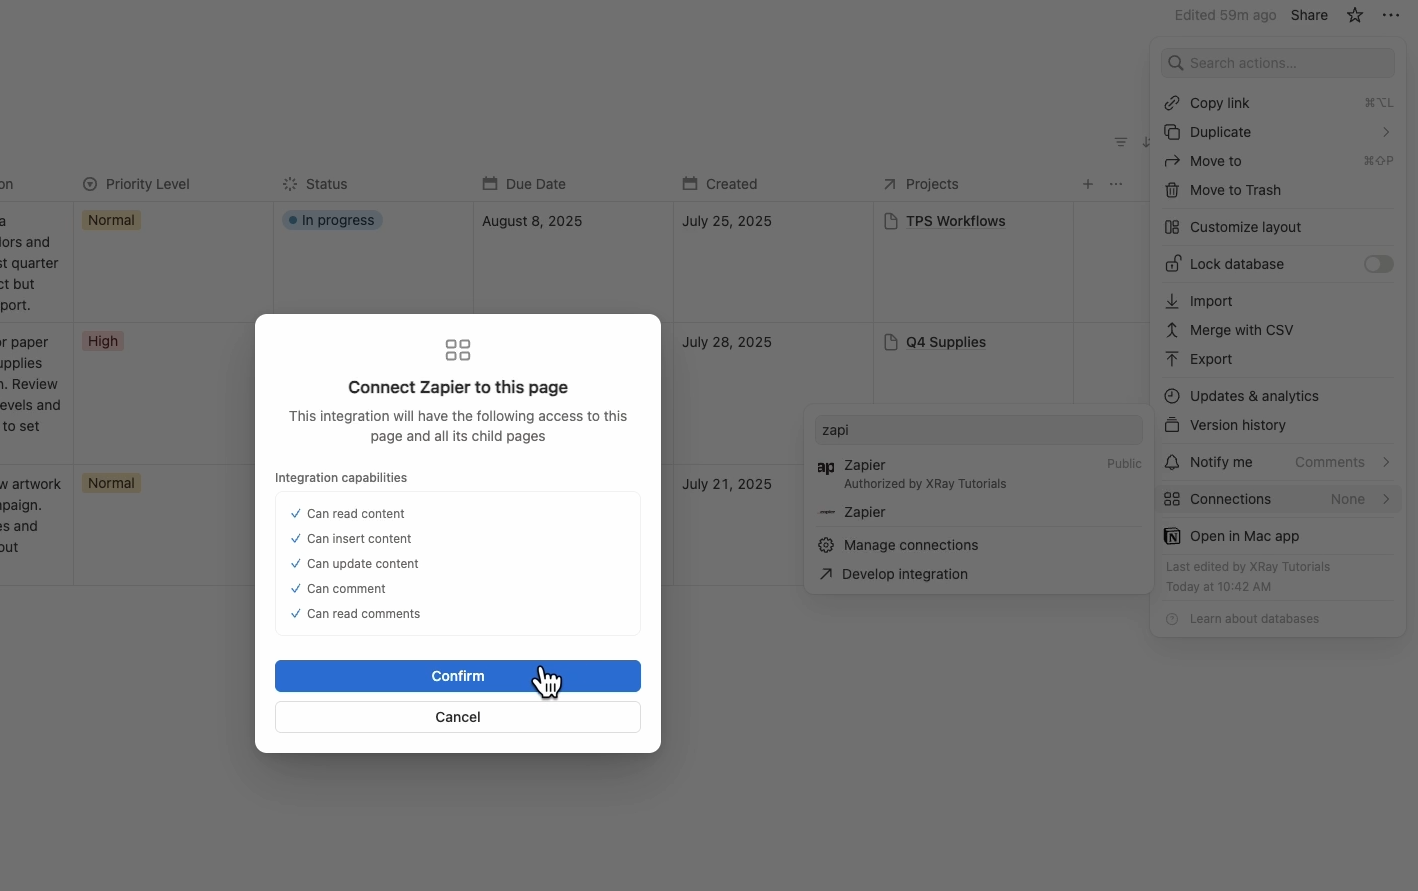
This simple step fixes most Notion/Zapier connection issues that trip people up.
Every time you're creating a Zap, you need real data to test with as you're building. For this automation, that means two things:
1) You’ll need to create an email that actually describes a task and add a label to that email – something like "Create Notion Task."

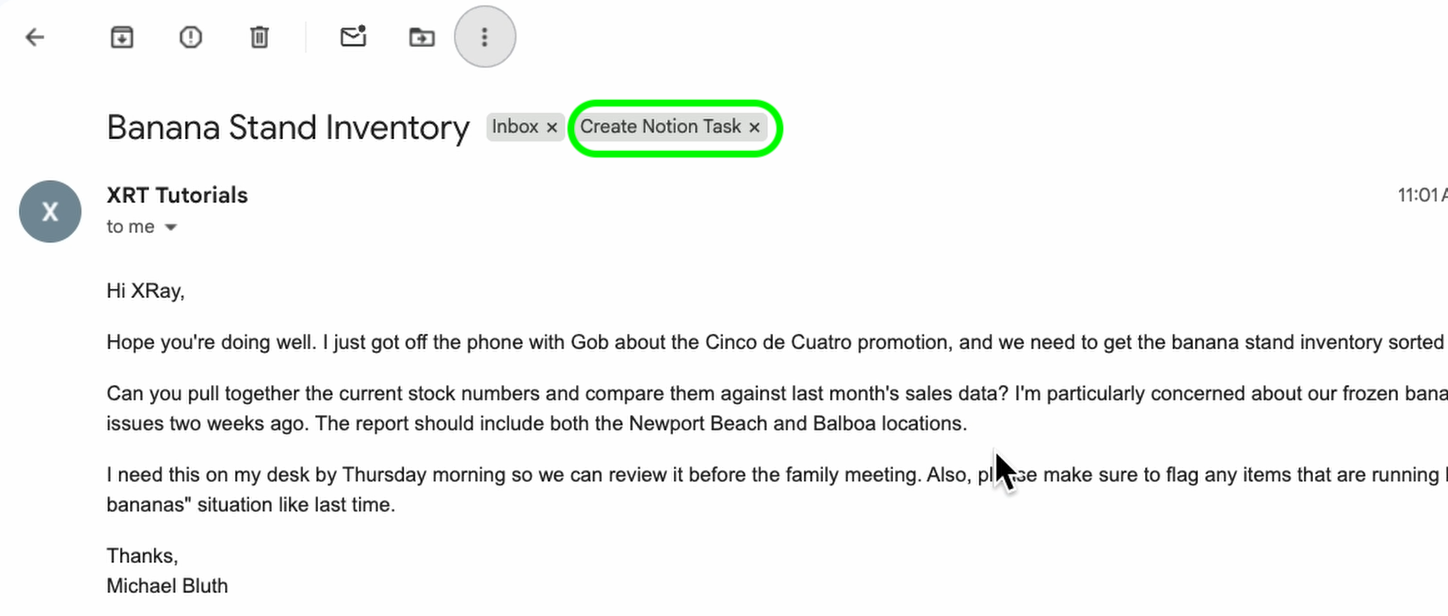
That's what you'll use as test data in the trigger.
2) You'll also need to make sure you have a database set up in Notion where you can create new tasks.

The automation will create new items in this database, so it needs to be ready before you start building.
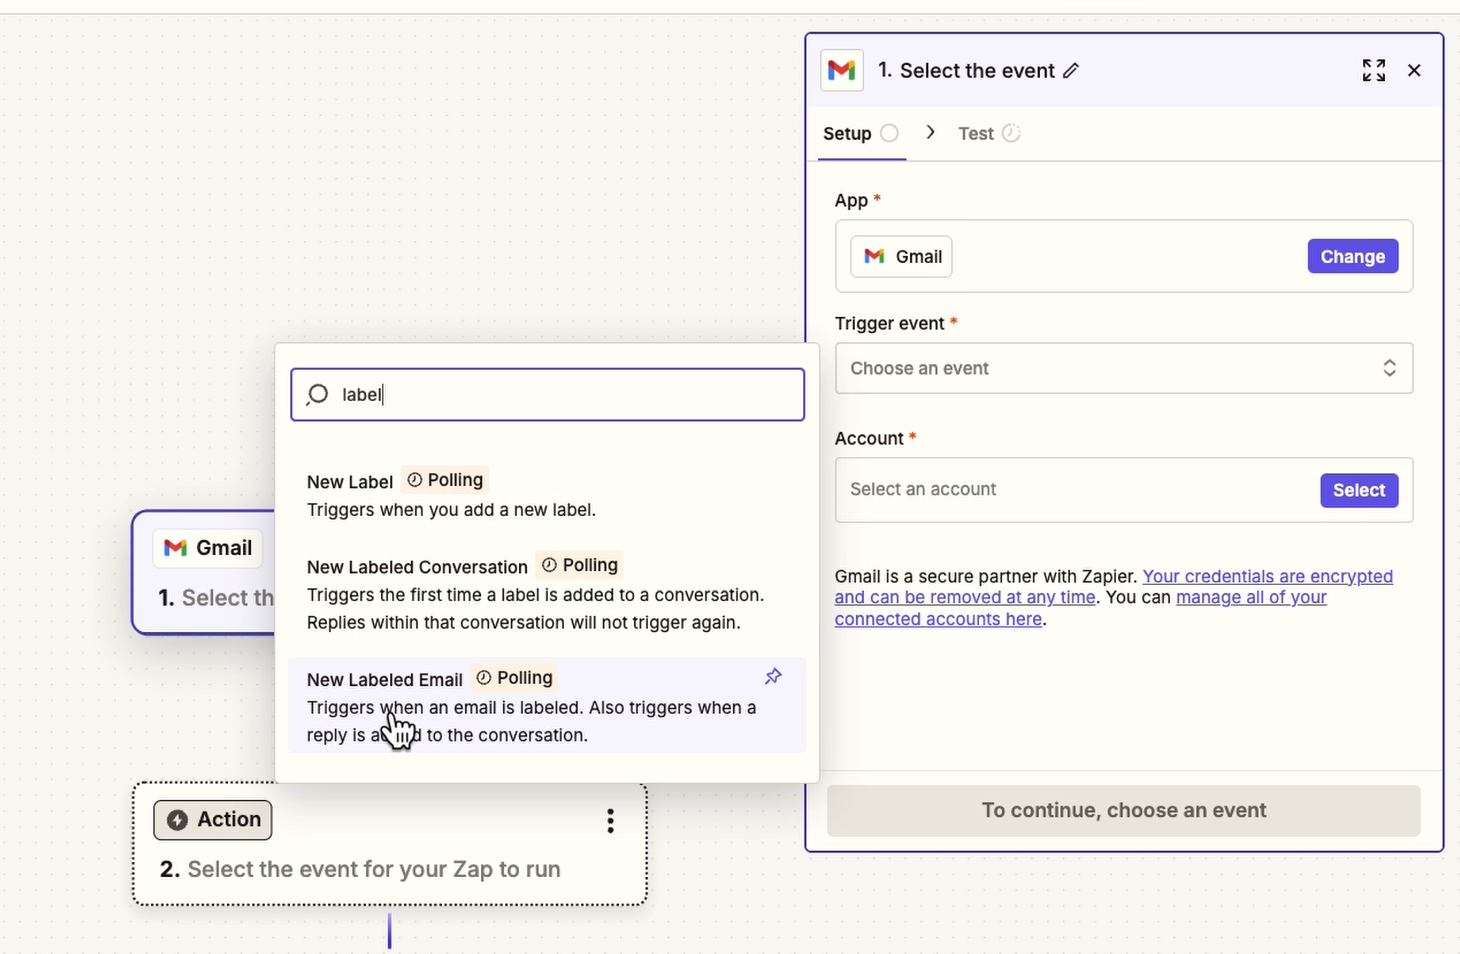
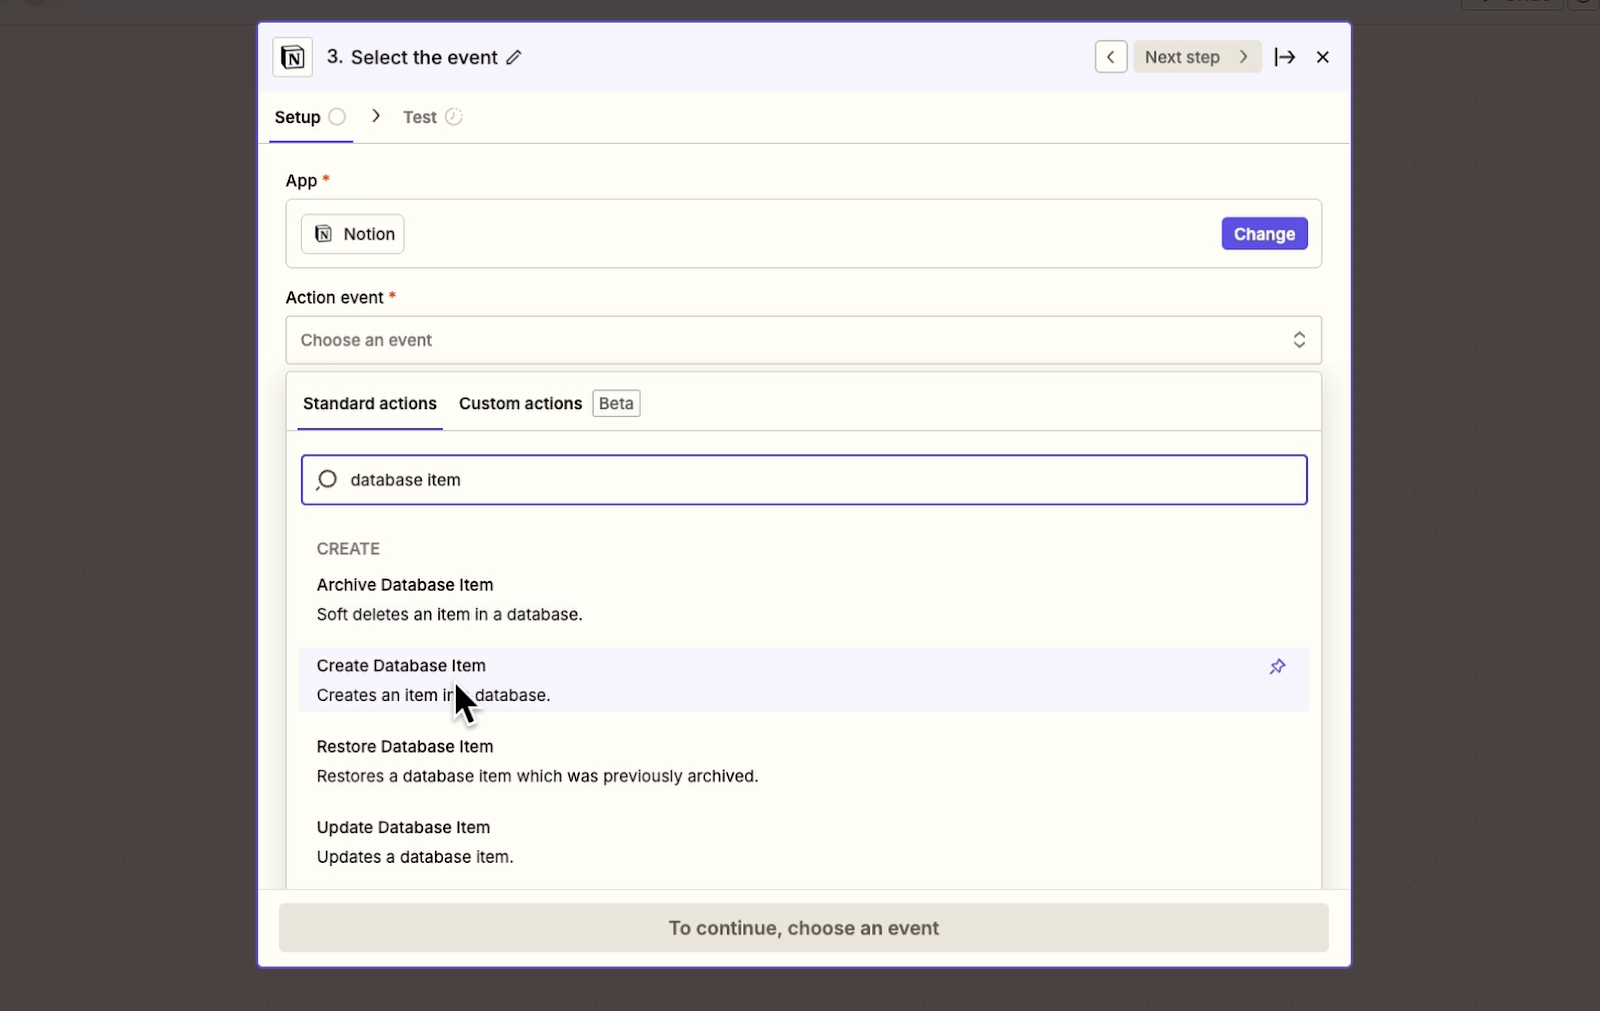
Create a new Zap in Zapier and click on the empty trigger. Select Gmail as your app and choose "New labeled email" as the trigger event.
This ensures the automation only runs for emails you've deliberately tagged, which prevents spam or irrelevant messages from creating unnecessary tasks.
Choose your Gmail account from the dropdown and hit "Continue."
The trigger configuration is pretty simple – all you need to do is choose which label to watch for. In our case, that's "Create Notion Task."

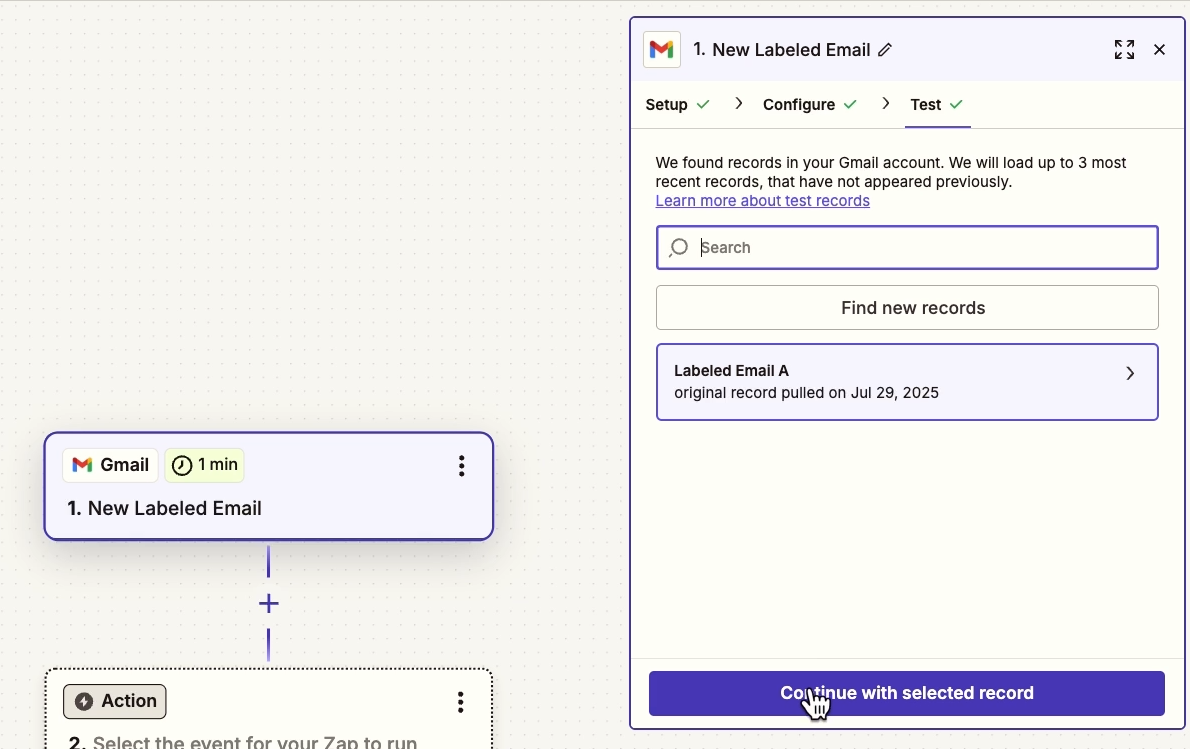
Hit "Continue," and now you get to test your trigger. Click "test trigger" and Zapier will scan your Gmail inbox for any emails with that label.
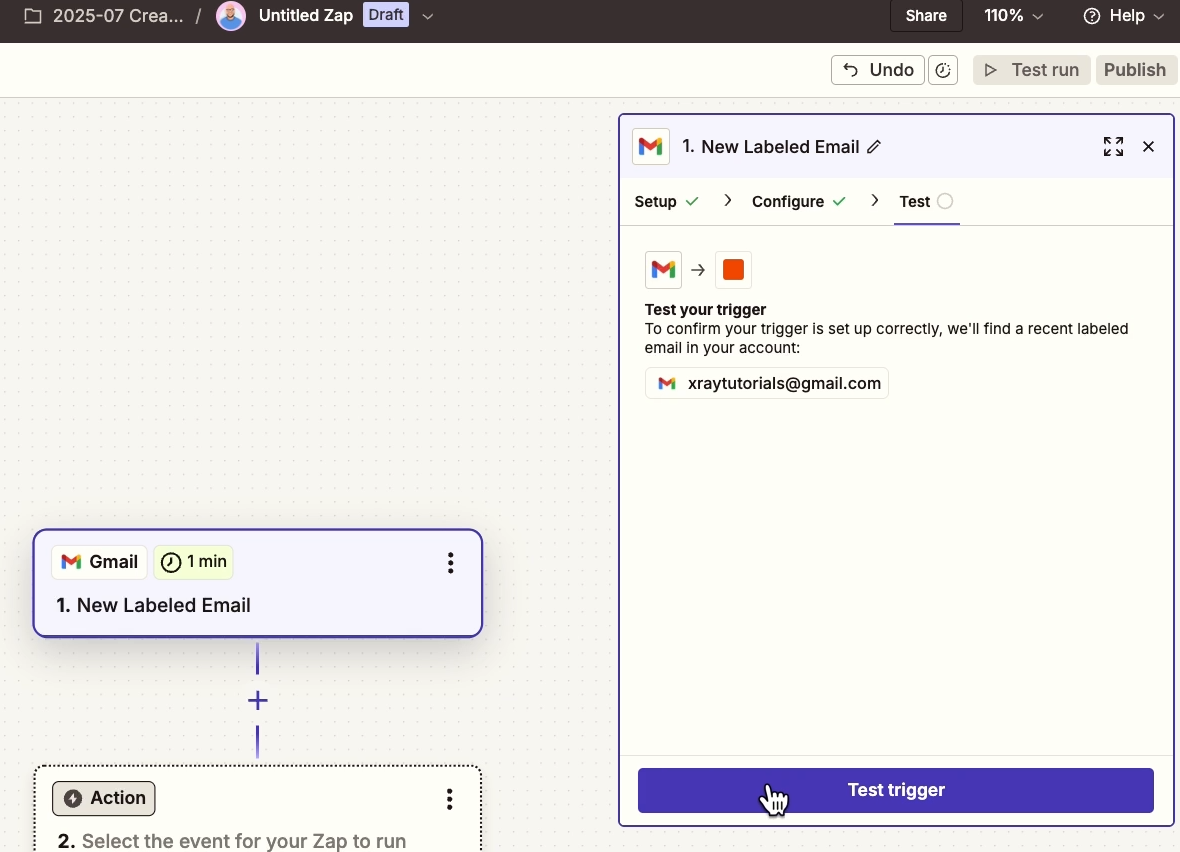
It should find that test email you created earlier. Once it pulls that message in, click "Continue with Selected Record," and you're ready for the fun part.
Now you're going to send that email content to AI for analysis. Add a new action step and choose "AI by Zapier" as your app.
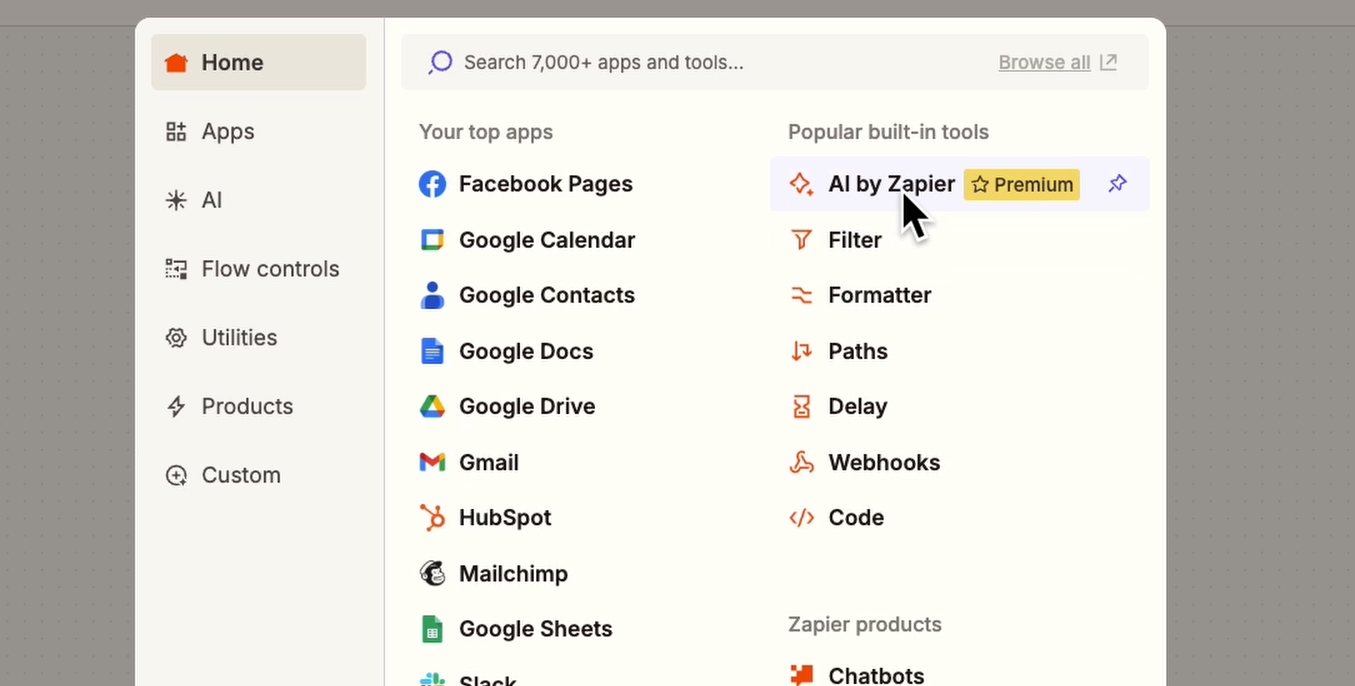
This is Zapier's built-in AI tool, and it's perfect for what we're doing in this workflow. You can send prompts to several different AI models, many of which offer free usage like GPT-4o mini.
Plus, it makes it easy to configure structured output, which is exactly what we need to populate our Notion task fields.
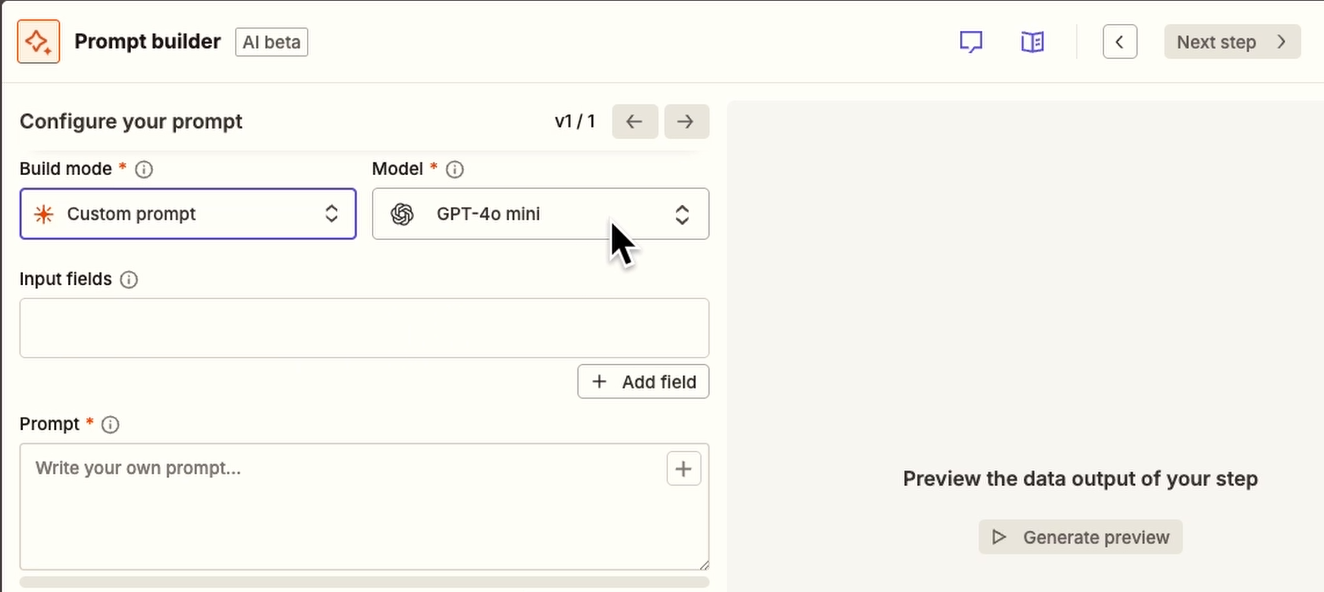
The AI step requires several configuration settings:
Build Mode: Stick with "Custom prompt" since we're not using one of their templates
Model Selection: Go with GPT-4o mini – you can tell which models are free by looking for the lightning bolt icon.
Input Fields (optional): We'll use these to store team member names mapped to their Notion IDs for proper task assignment. The AI might be able to figure out a person's name from the email, but Notion needs specific user IDs to actually assign tasks.
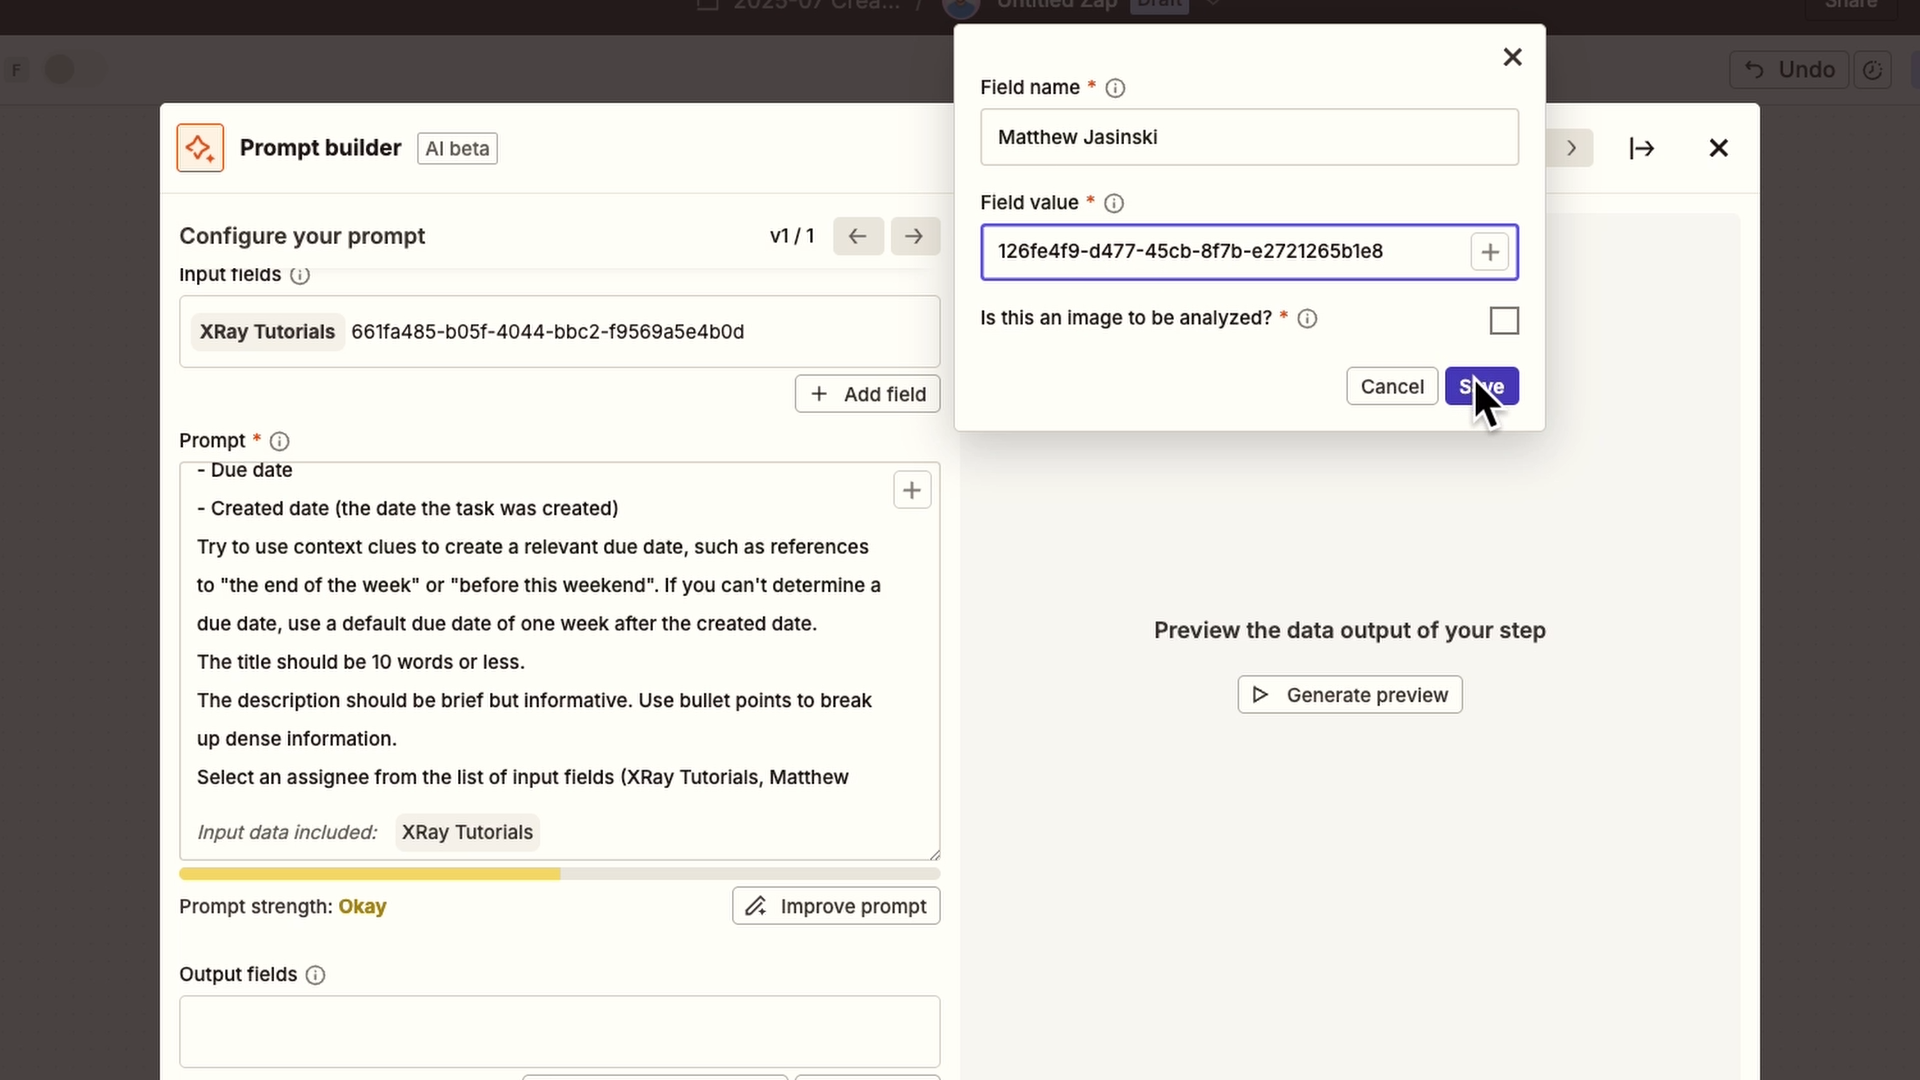
For teams wanting something more advanced, you could set up a dedicated operational database table that includes all of your users, their IDs, and email addresses.
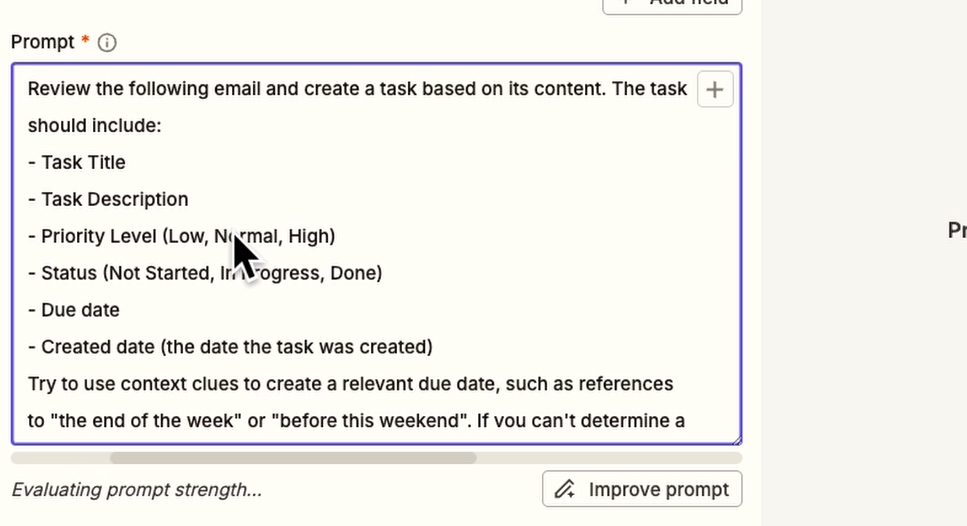
Now for the prompt itself – this is really the heart of our automation. You need to write clear instructions telling the AI exactly what you want it to do with your email content.
Our example prompt, pictured below, will ask it to analyze the email and extract task information from it.
The key here is including dynamic data from that email trigger we set up. Be sure to include information like the email body, the sender information, the date – all the context the AI needs to make smart decisions.

You can use forward slash as a shortcut to bring up all the data Zapier pulled from your email and insert it into your prompt.
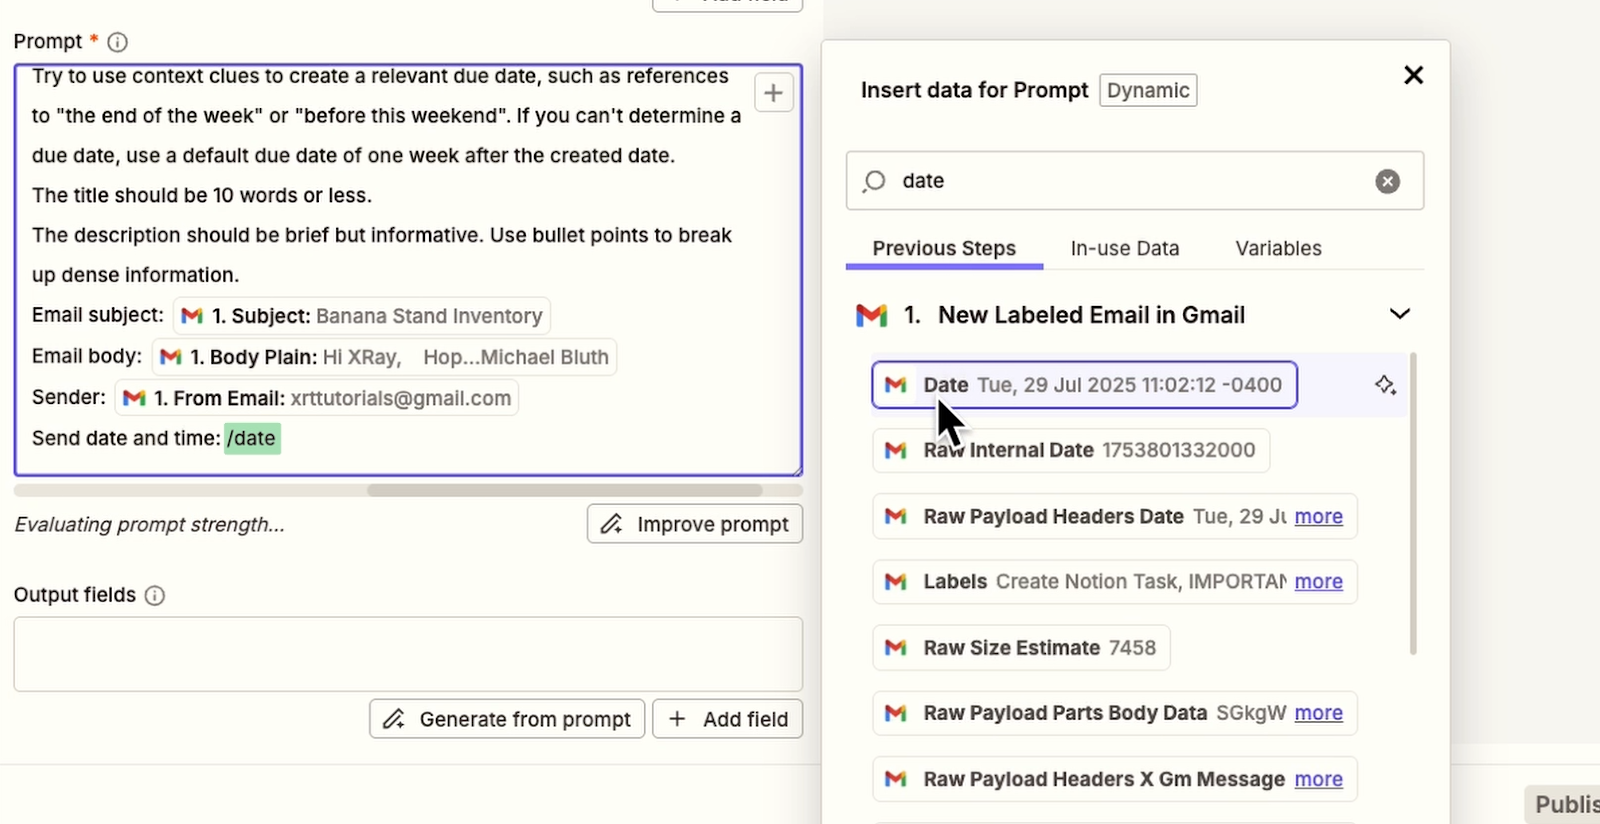
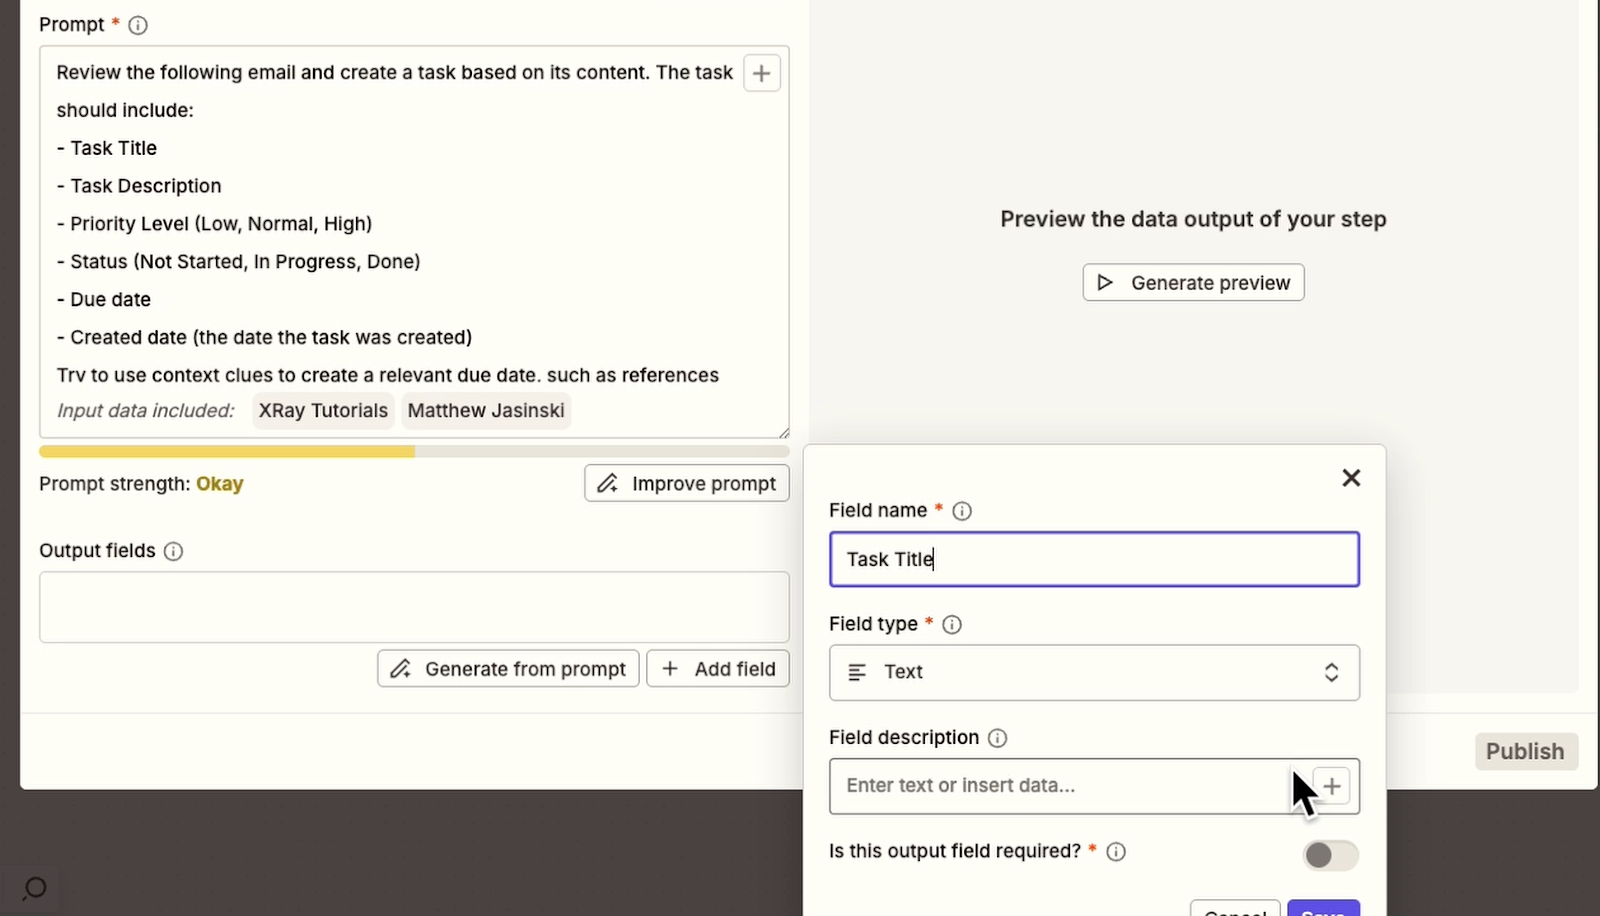
Another crucial aspect to keep in mind: you need to be very specific about the output format you want. You'll want to describe each field you need – e.g., Task Title, Task Description, Due Date, Status, Created Date, Priority Level, and an Assignee.
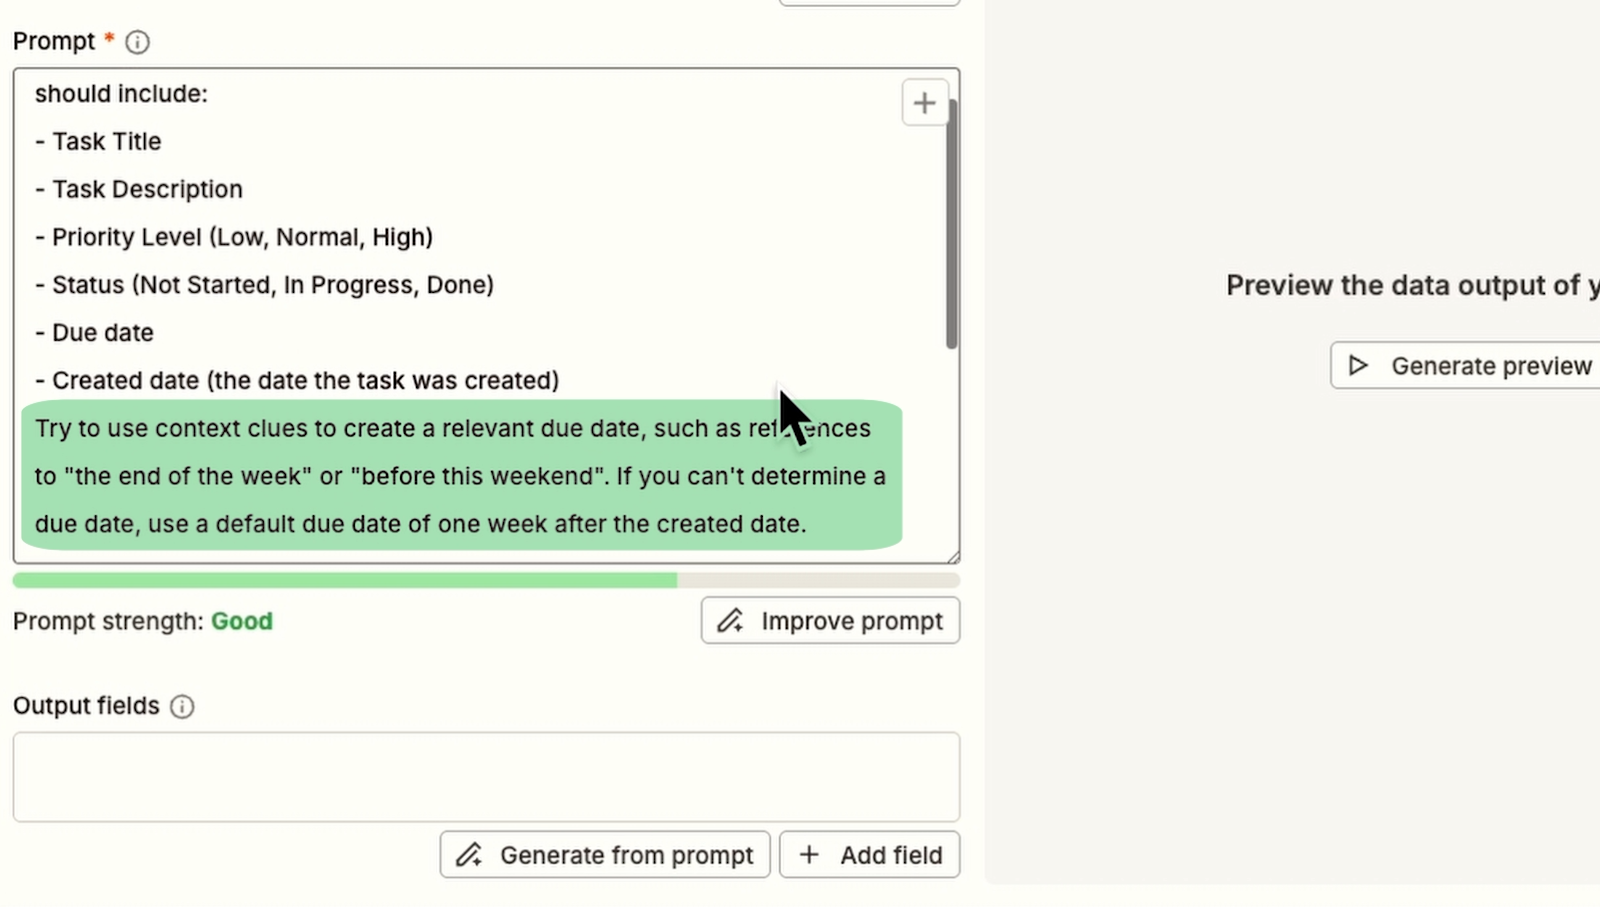
You also need to give the AI guidance on how to handle each one. For the due date in our example, we’ll tell it to try determining the date from the email's context. However, if it's unclear, it should default to one week from when the email was received.
For each piece of data you want back from the AI, you need to create an output field. Give each field a descriptive name and select the appropriate data type.
For select fields like Status or Priority, make sure to provide the exact options the AI can choose from – things like "Not Started," "In Progress," and "Done" for status.
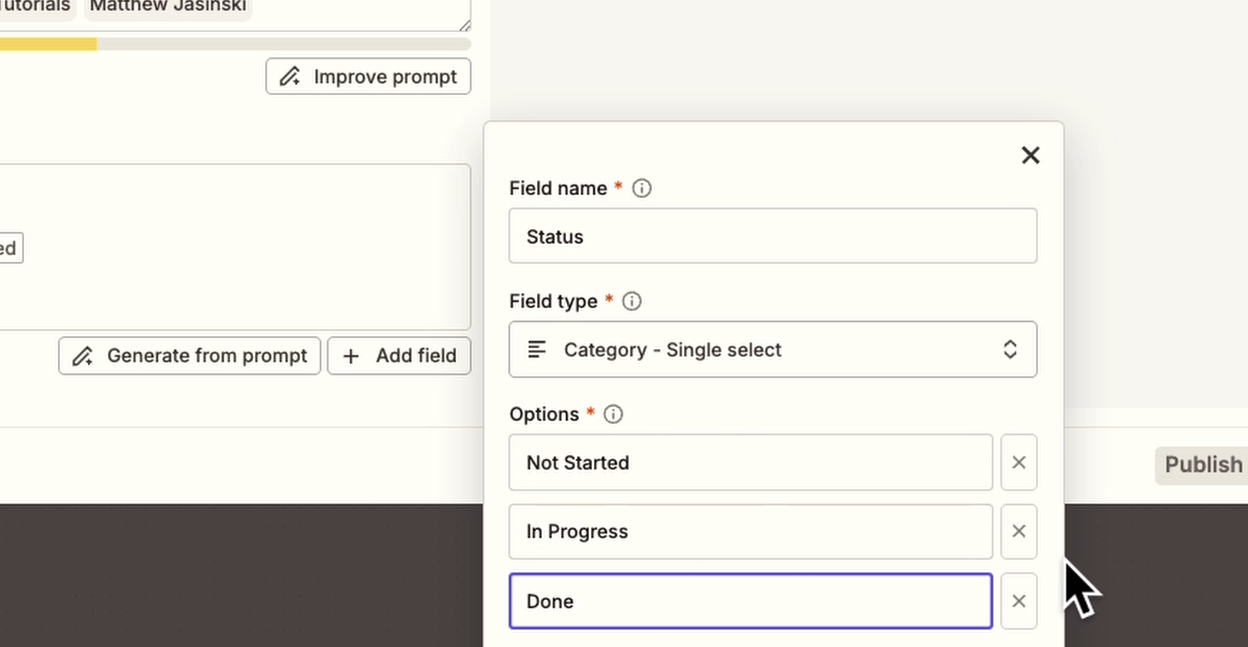
You can also mark fields as required if they're critical for your workflow. Most of these should be marked as "required" for consistent results.

Once your prompt is complete, click "Generate Preview" to see how the AI processes your test email.
You should see it break down the email content into clean, separate fields that match exactly what your Notion database expects.

If something looks off, adjust your prompt and test again. When you're happy with the output, close that window and move on to the final step.
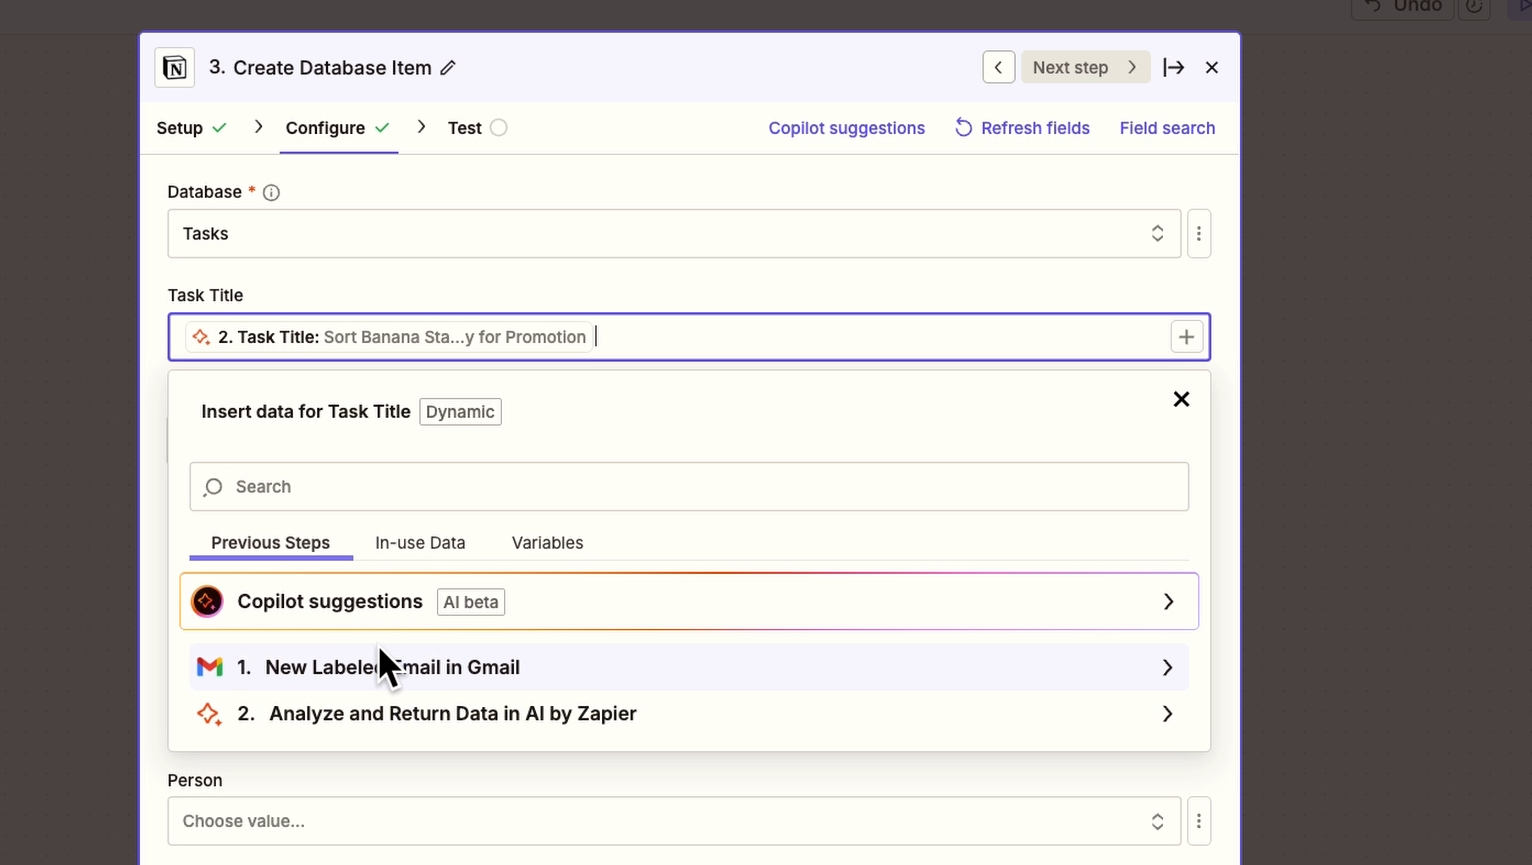
Let's take all that beautifully structured data from our AI and turn it into an actual task in Notion. Add another step and select Notion as your app, then choose "Create database item" as the event.
Select your Notion account and hit "Continue."
The configuration here is pretty straightforward. First, select which database you want to create tasks in – you can either pick from the dropdown list or search by name.

Give it a moment to load, and you should see all your database's custom fields appear.
Now comes the satisfying part: mapping the AI output to your Notion fields. For each field in your Notion database, you'll map the corresponding output from your AI step. Use the forward slash shortcut or click the plus button to insert the data.
Here's an important detail for dropdown fields like Priority or Assignee: click those three dots next to the field and choose "Custom" instead of "Static."
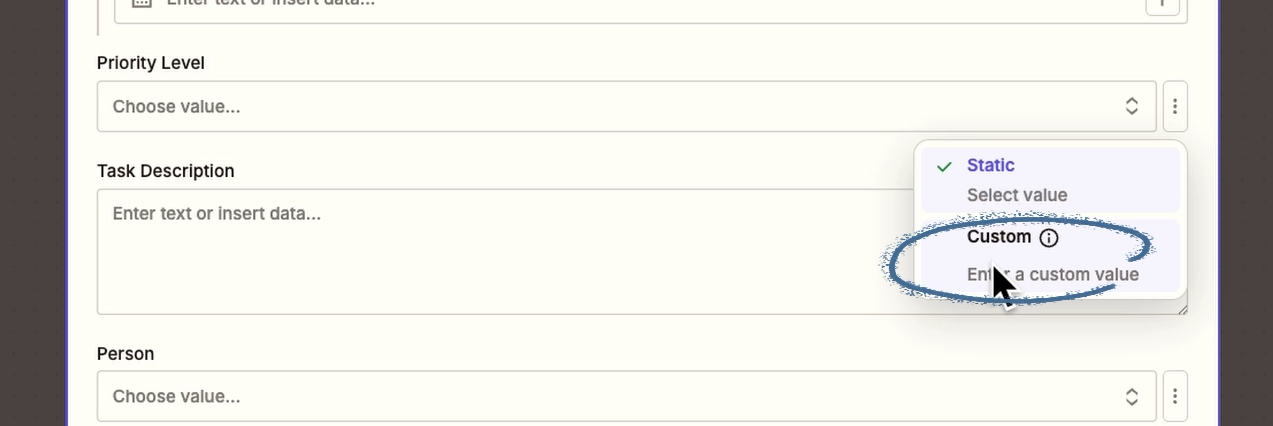
This lets you map dynamic values from your AI output instead of being stuck with one fixed option for every task.
For date fields, you typically just need to enter the start date from your AI output. Don't worry about an end date unless your Notion database uses date ranges. But if you are using date ranges, you'll also need to make sure to include that in your prompt to ensure the output format is correct.
Once you've mapped all your fields, click "Continue" and proceed to test the step.
When you click "Test step". Zapier will create an actual task in your Notion database using all the settings you just configured.
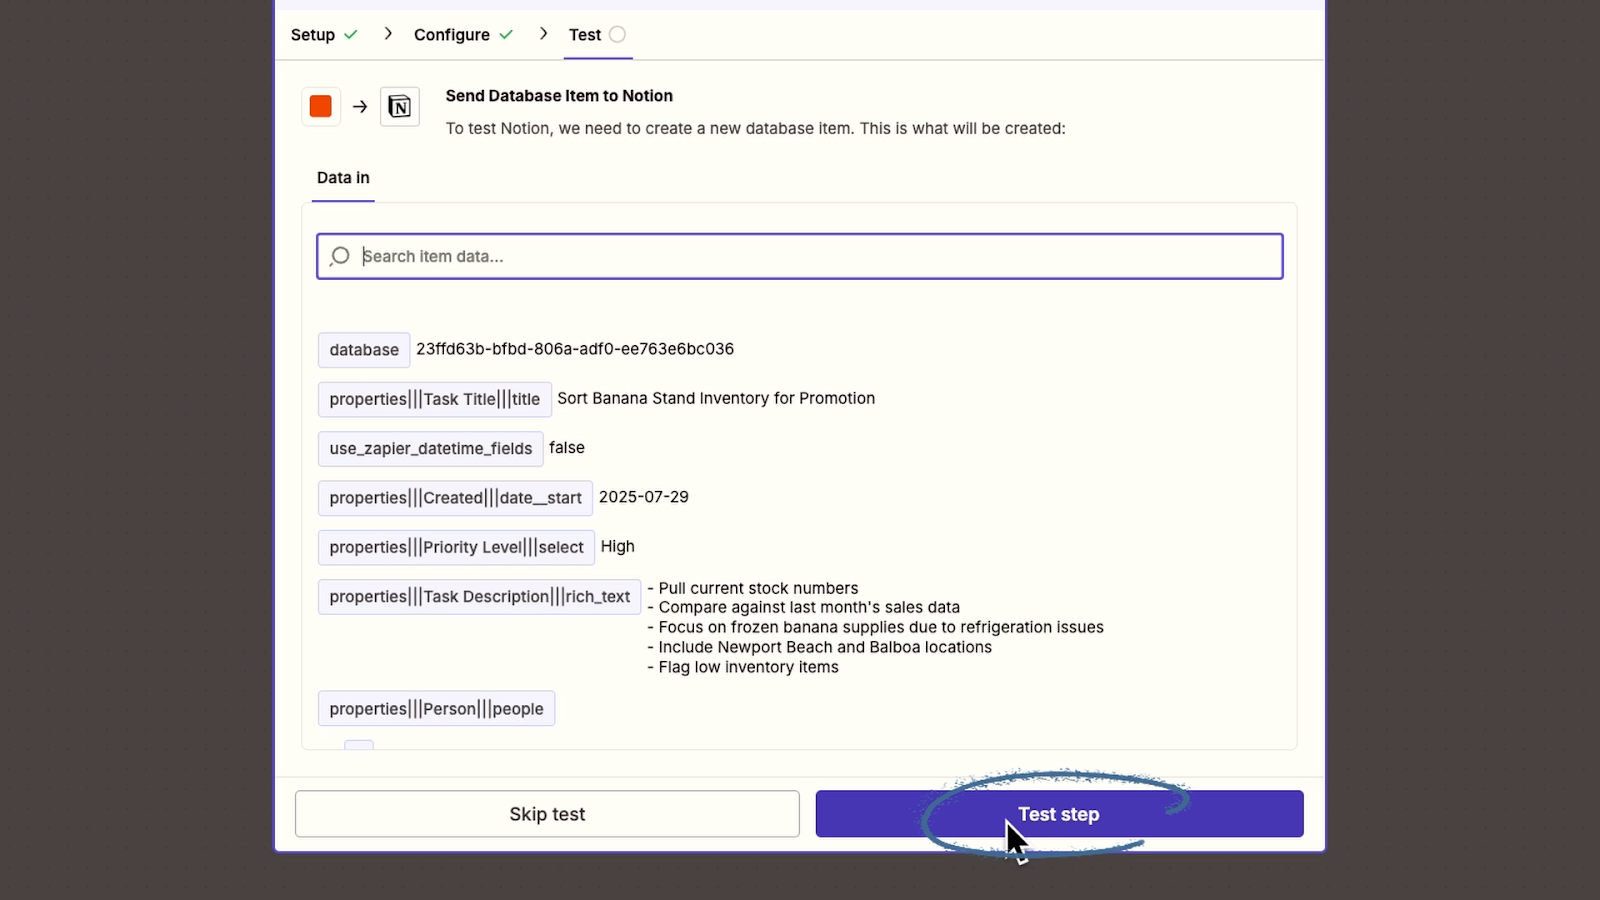
If everything is configured correctly, Zapier will report that the step was executed successfully. However, it’s always best to verify by checking Notion directly.
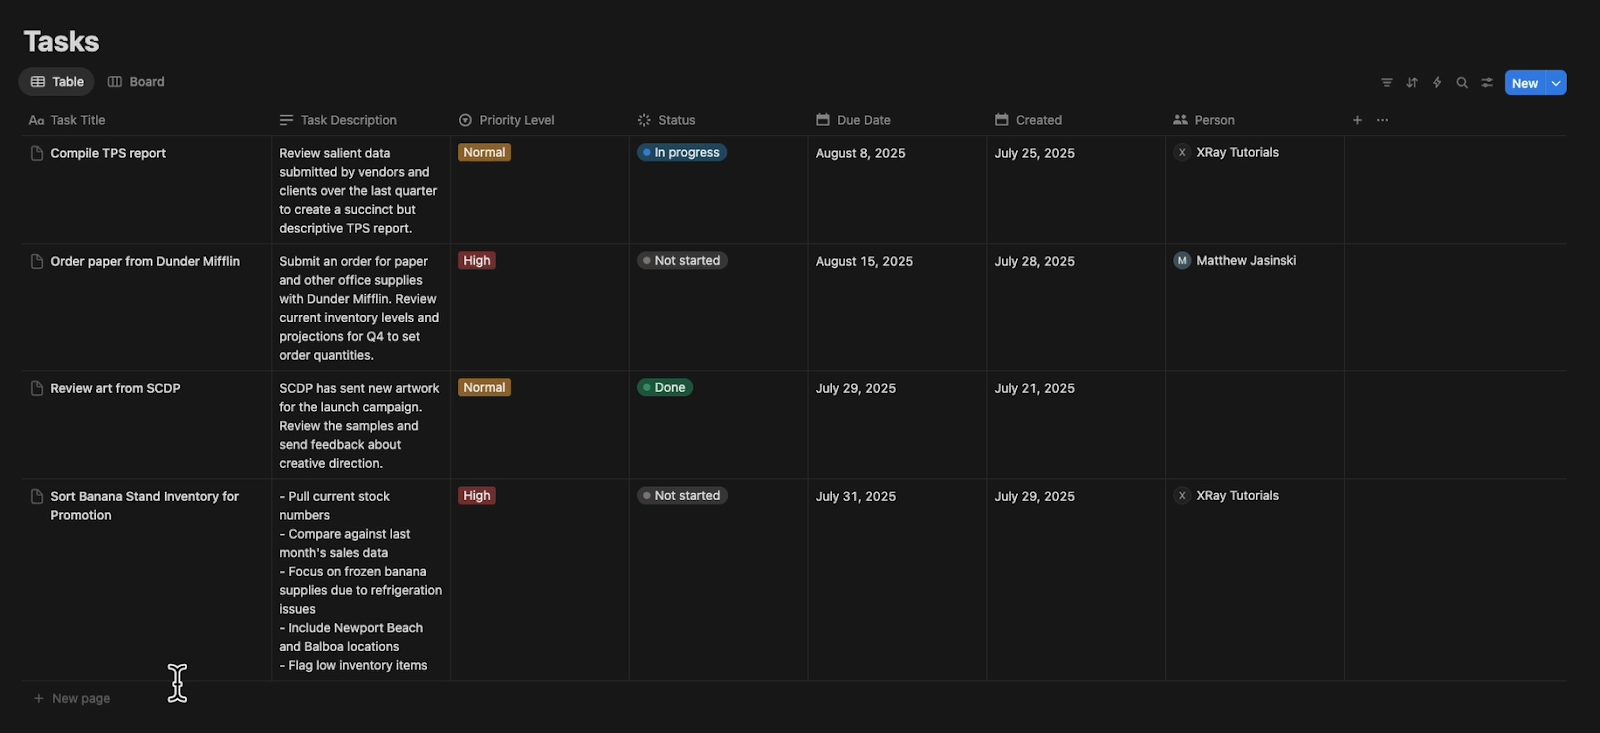
In Notion, you should see a perfectly formatted task with all the details extracted from the original email. In our example pictured below, the select fields are properly configured with no random new options added, the assignee is correctly set, and dates are accurate.
With all components tested and verified, the automation is ready for deployment. Hit publish and turn it on in Zapier.

From this point forward, adding the specified label to any email triggers the entire process automatically.
The system eliminates copying and pasting between applications and removes the burden of remembering task details from scattered emails. Simply label an email and let the automation handle the rest.
Need help setting up your AI automations? With XRAY Hourly.com, you can get expert guidance from a hand-picked engineer in 48 hours or less. Whether you need to set up an automation, an AI agent, or a Notion workspace, our team will help you get it done and learn how it all works with one-on-one collaborative calls.
There's no long-term commitment – just schedule as much time as you need on a flexible, hourly basis. We guarantee that you'll make progress in every session, getting one step closer to accomplishing your goals with Notion, Zapier, or any other low-code app.
No more copying and pasting between apps, no more trying to remember task details from scattered emails. Just label it and let the automation handle the rest.
This automation eliminates the tedious busywork of email-to-task conversion while ensuring nothing slips through the cracks. The AI analysis provides consistent task formatting, and intelligent field population saves significant time on every email you process.
You now have a systematic approach to email-driven task management that scales effortlessly as your volume increases. The setup also provides a foundation for more advanced automations – future enhancements could include learning algorithms that improve task creation over time, integration with additional project management tools, or automated priority scoring based on email patterns.
This approach shows how modern AI tools can eliminate routine administrative work, freeing you and your team to focus on high-value activities that actually drive business results.

.pptx.png)
.pptx.png)
