
When Zapier doesn’t have the integrations or features that you’re looking for, you don’t need to give up on building the automation.
Instead, you can just use an API call to create the functionality yourself.
In this post, we’ll show you how to write an API call in Zapier.
We’ll walk you through some strategies you can use to write API calls in your Zaps, even if you’re not familiar with coding.
You can use these techniques for both the “Webhooks by Zapier” action, or Zapier’s new “API Request” actions, which are currently in beta.
First, let’s explore when and why you should use API requests or webhooks in Zapier.
In most cases, you’ll want to use an API call whenever Zapier doesn’t natively support the functionality that you want to access.
There are three main use cases for writing API calls in your Zaps:
• If Zapier doesn’t have an integration for the app you want to automate, you may be able to build your Zap with webhooks instead.
• If Zapier does support the app you want to automate, but doesn’t support the specific action you want to perform, then you can try to add that action with a webhook action, to make a custom API call.
• Finally, if Zapier supports your app and your desired action, but doesn’t have all of the configuration settings that you want to use, then webhooks with an API request may be able to help.
Since using webhooks in Zapier is mostly about compensating for the things Zapier can’t do, we’d always recommend doing a quick search on XRAY.Tools before you commit to writing an API call.
Just enter the name of your app, and you’ll see every trigger, action, and search that you can automate with it in Zapier, Make and Workato.
Even if you’re pretty sure Zapier doesn’t support what you want to do, it’s always worth a quick check first. Zapier updates support for their apps weekly, so you never know what may have changed since you last tried building your workflow.
Checking XRAY.Tools will also show you if your app has support for Zapier’s new “API Requests” feature.
API requests are in beta at time of writing. Right now, they offer somewhat similar functionality to the “Webhooks by Zapier” action which we’ll be using first in this tutorial, but they let you skip a few steps by including authorization, which is often one of the trickiest parts of API Calls.
On the other hand, you will need to write the body of your request as code, and won’t be able to structure it as a simple form, so it may be easier for low-coders to stick with the “Webhooks by Zapier” action.
If your app has support for API Requests, you’ll see the action right alongside all the app’s other available actions in XRAY.Tools.
If you don’t see an “API Request” action, or if you just don’t want to write out your request with code, then you can just use the “Webhooks by Zapier” action instead.
Now let’s go through the process of creating an API call in Zapier step by step.
Before we start building an API call, we’ll first take a moment to confirm that we can’t do what we want with Zapier’s prebuilt actions.
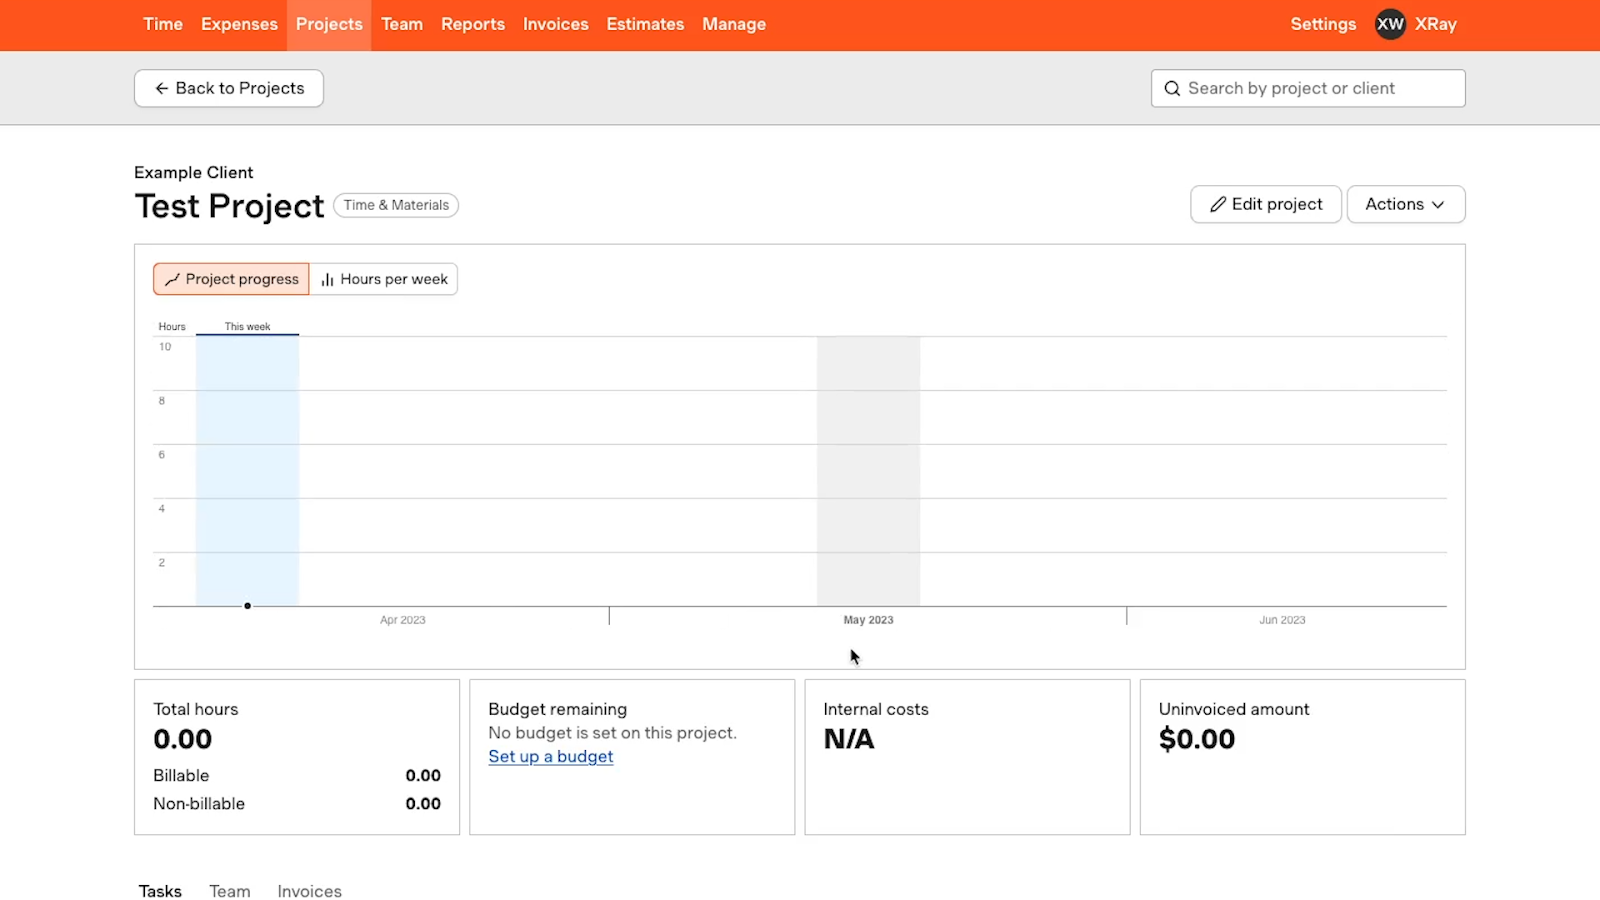
For our example, we want to automatically create projects in Harvest. This is something we can do in Zapier.
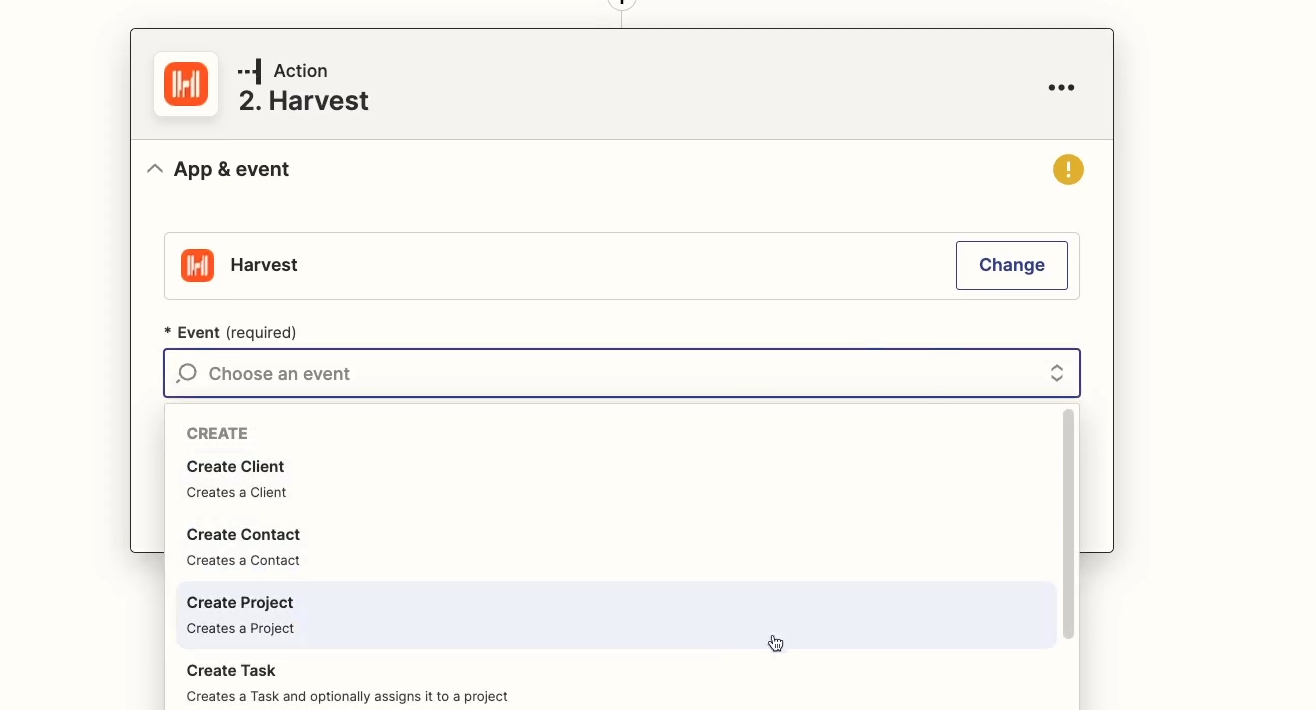
However, we also want to make sure that every project created by this automation is set to a fixed fee of $750.
“Fixed fee” isn’t an option that Zapier gives us, so we’ll need to go with an API call instead. And since “API request” isn’t available for Zapier’s Harvest integration, we’ll need to use the dedicated “Webhooks by Zapier” integration.
Our example Zap already has a trigger to watch for new records in Airtable, so we’ll add an action by searching for “Webhooks by Zapier”.
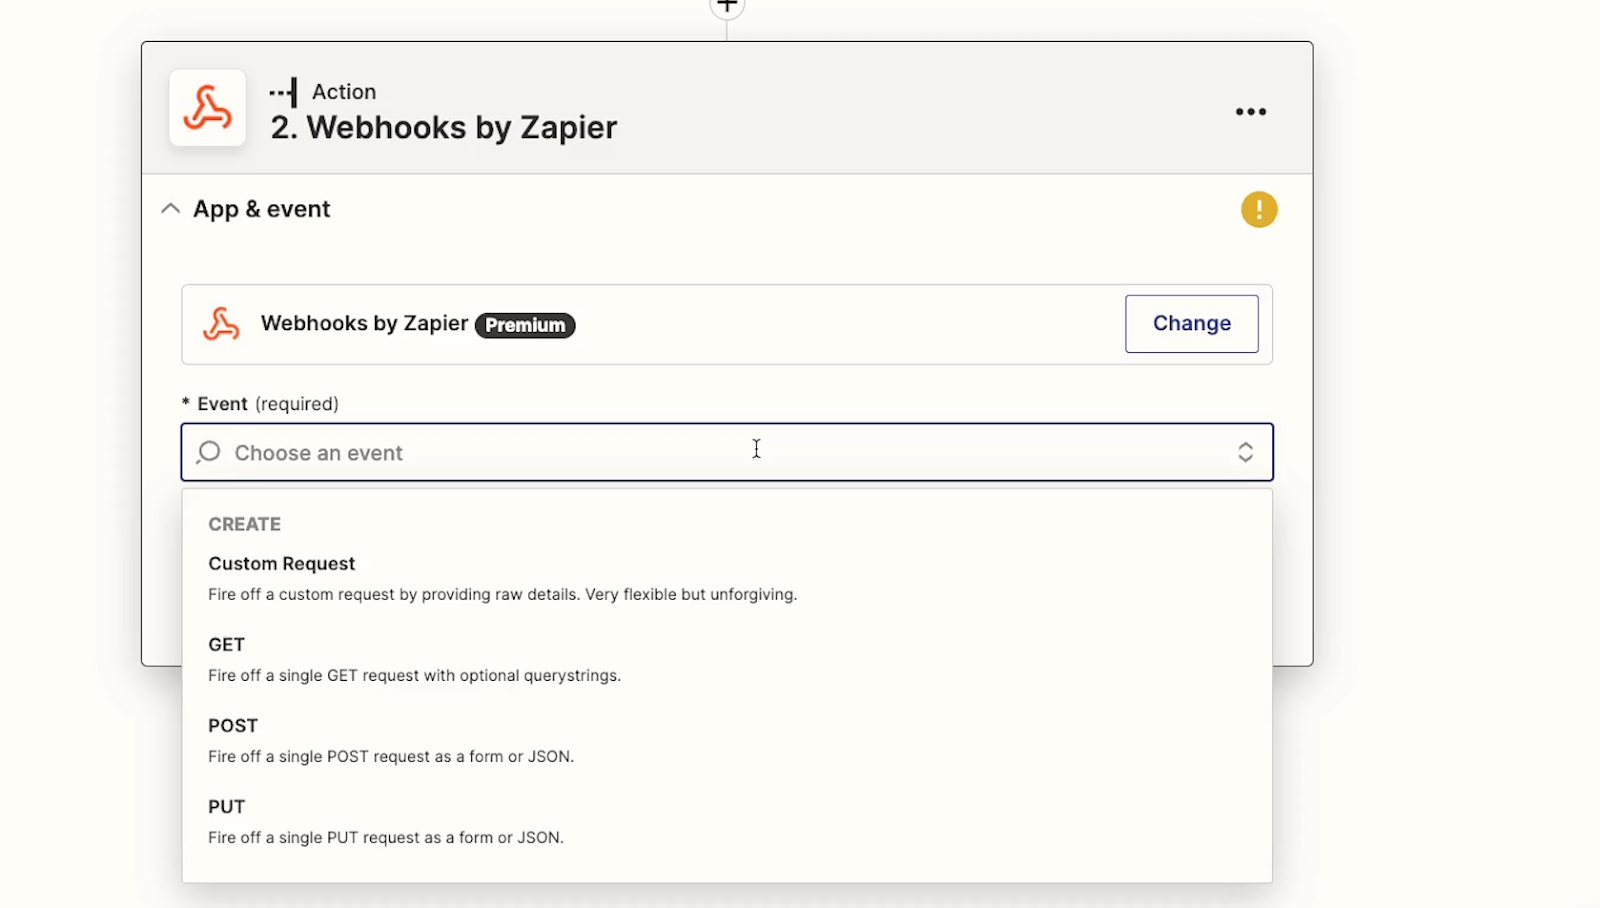
The webhooks action will prompt you to pick an event type. If you’re not familiar with writing code, or API calls specifically, this might already seem a little confusing, but don’t worry; there’s an easy way to make sense of it.
Your options are Custom Request, GET, POST, and PUT.
• GET will let you search for existing data in your app.
• POST will allow you to create new data.
• PUT will allow you to create new data, or update existing data.
• Custom Request will let you choose other methods, like PATCH or DELETE.
NOTE: Zapier does not natively support any DELETE actions across any application, so Custom Requests will be your only option if you’re trying to automatically delete something. If you choose to write an API call to delete data, be very careful; any errors in your API call might end up deleting data you didn’t intend to destroy.
You can probably figure out which will suit your needs just based on those descriptions, but this is as good a time as any to check your app’s API docs to be sure. You’ll be referencing the API docs a lot as you’re building, so you may as well start early.
If you Google “[your app] api docs”, the official API documentation should be one of the first results.
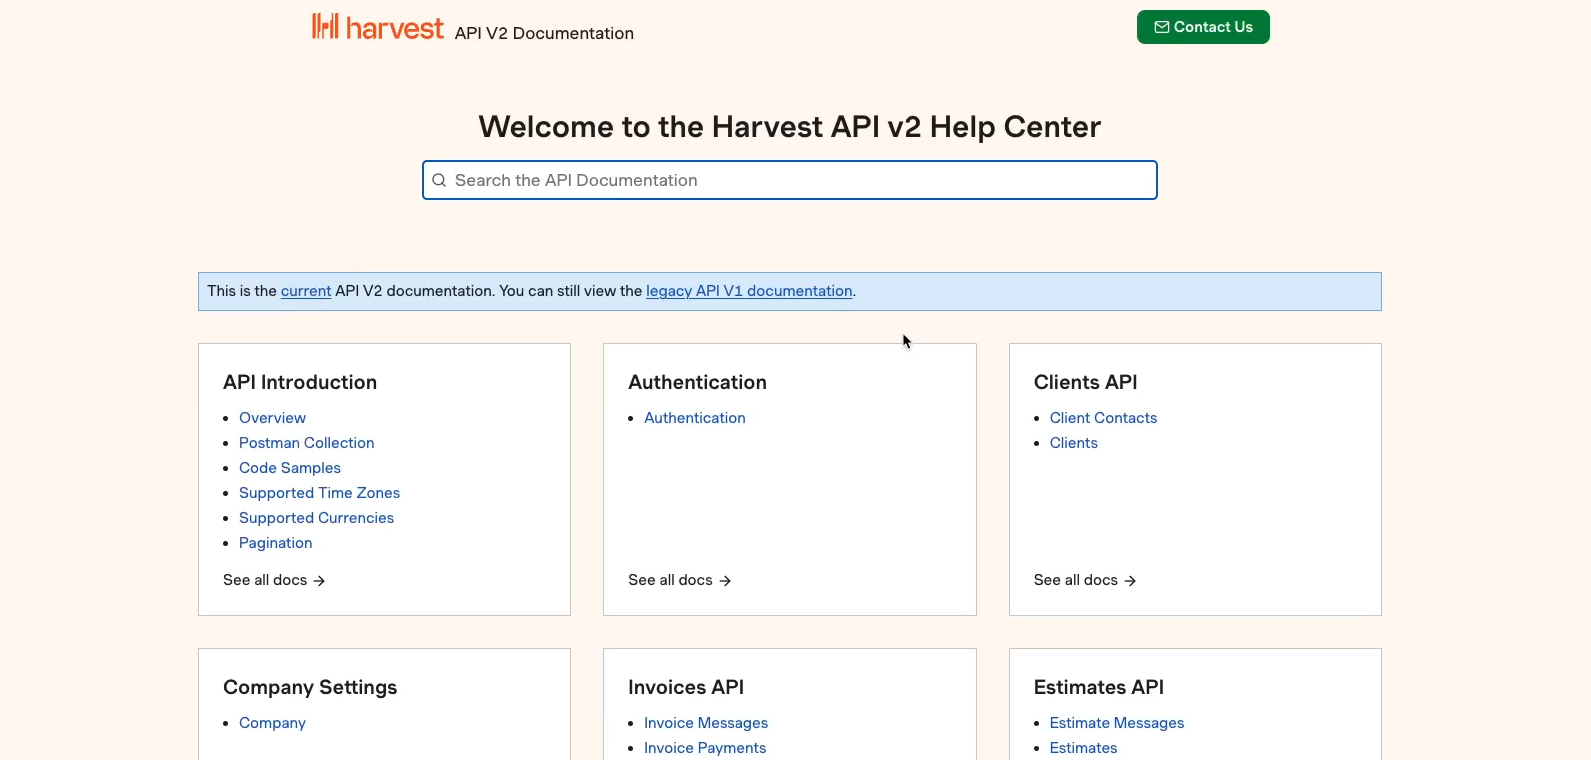
Harvest’s API docs are very well organized, and include lots of useful examples to help us get started.
Unfortunately, not every app will keep neat and tidy documentation like this, but if you’re struggling, you can always search for support from other users or leave a comment below and we’ll try to help you out.
Since we want to create a project in our example, we’ll scroll down to the “Projects API” section, and click on “Projects”.
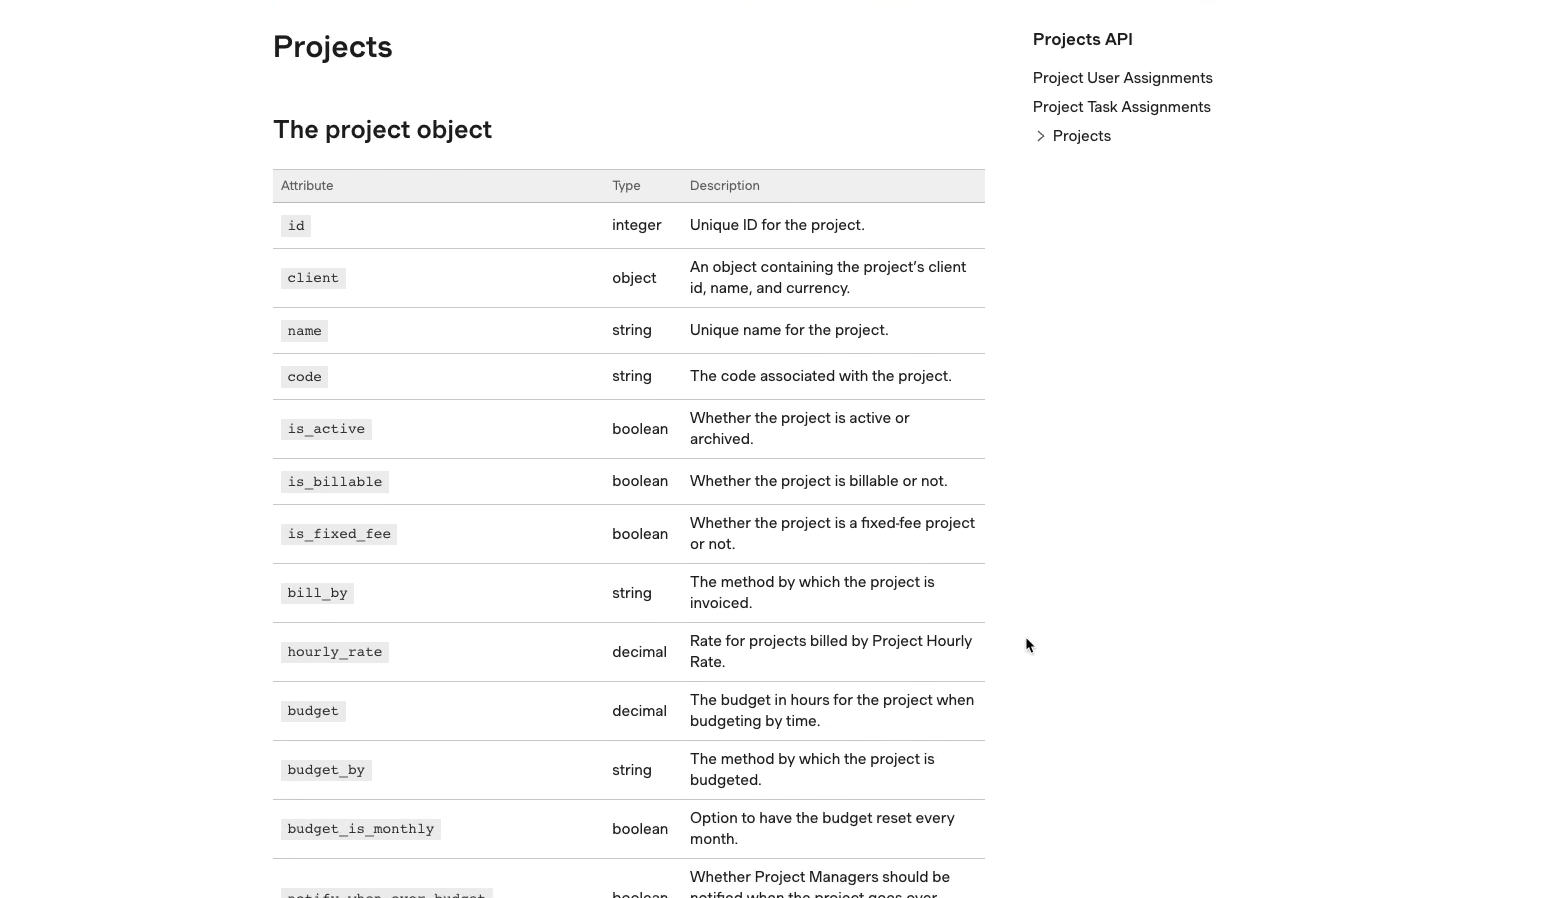
Here, the docs explain all of the attributes that make up a “project” object in the app. These are all the settings that we have access to via Harvest’s API. If it isn’t listed here, then we can’t add it, update it, find it, or delete it.
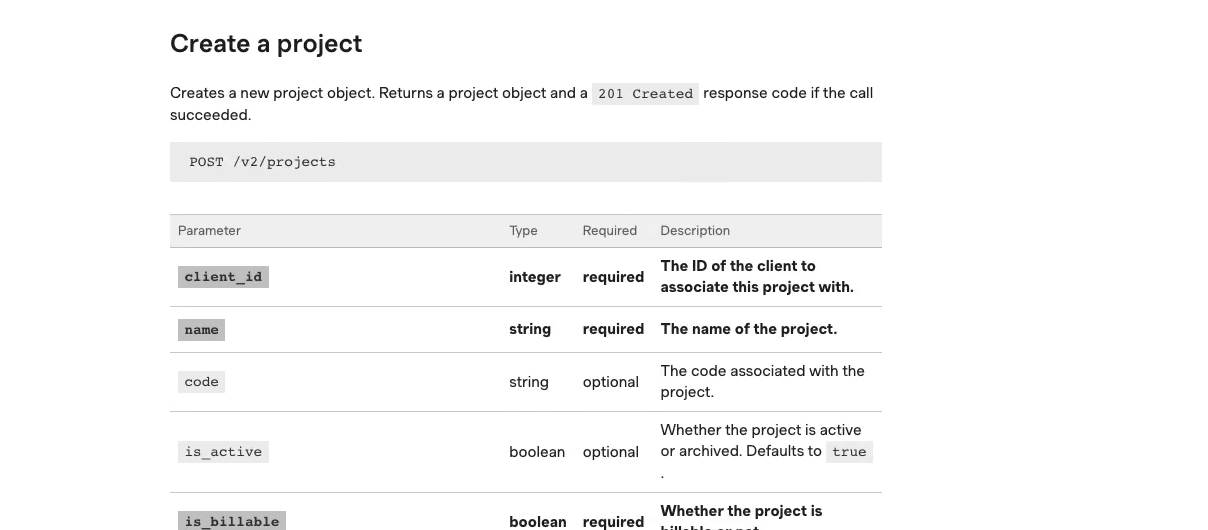
Under “Create a project”, we’ll see more specific information about actually creating a project. Right at the top of the section, we can see the type of request we’ll need to use: POST.
So we’ll choose POST as our event back in our Zap, then continue.
When you’re creating an API call in Zapier, the best approach is to start with the bare minimum, and build up from there.
Your first goal should be to successfully create an object with the webhooks step. Just provide the required fields, and type in static data for now.
Once you’ve done that, you can go back and configure more specific settings, or add dynamic data from earlier steps in your Zap.
Every API call needs a URL to send your request to. Your app’s API docs will specify the required URL for your desired action.
In the Harvest API docs we can see an example of a full API call that will create a new project.
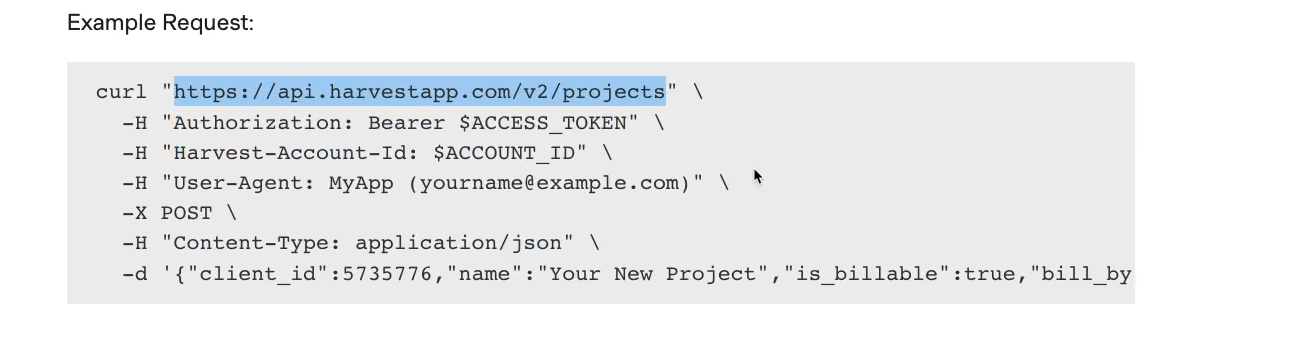
In the first line, after “curl”, we can see the URL we need to use. Once you’ve found your URL, just copy and paste it into Zapier, without the quotes.
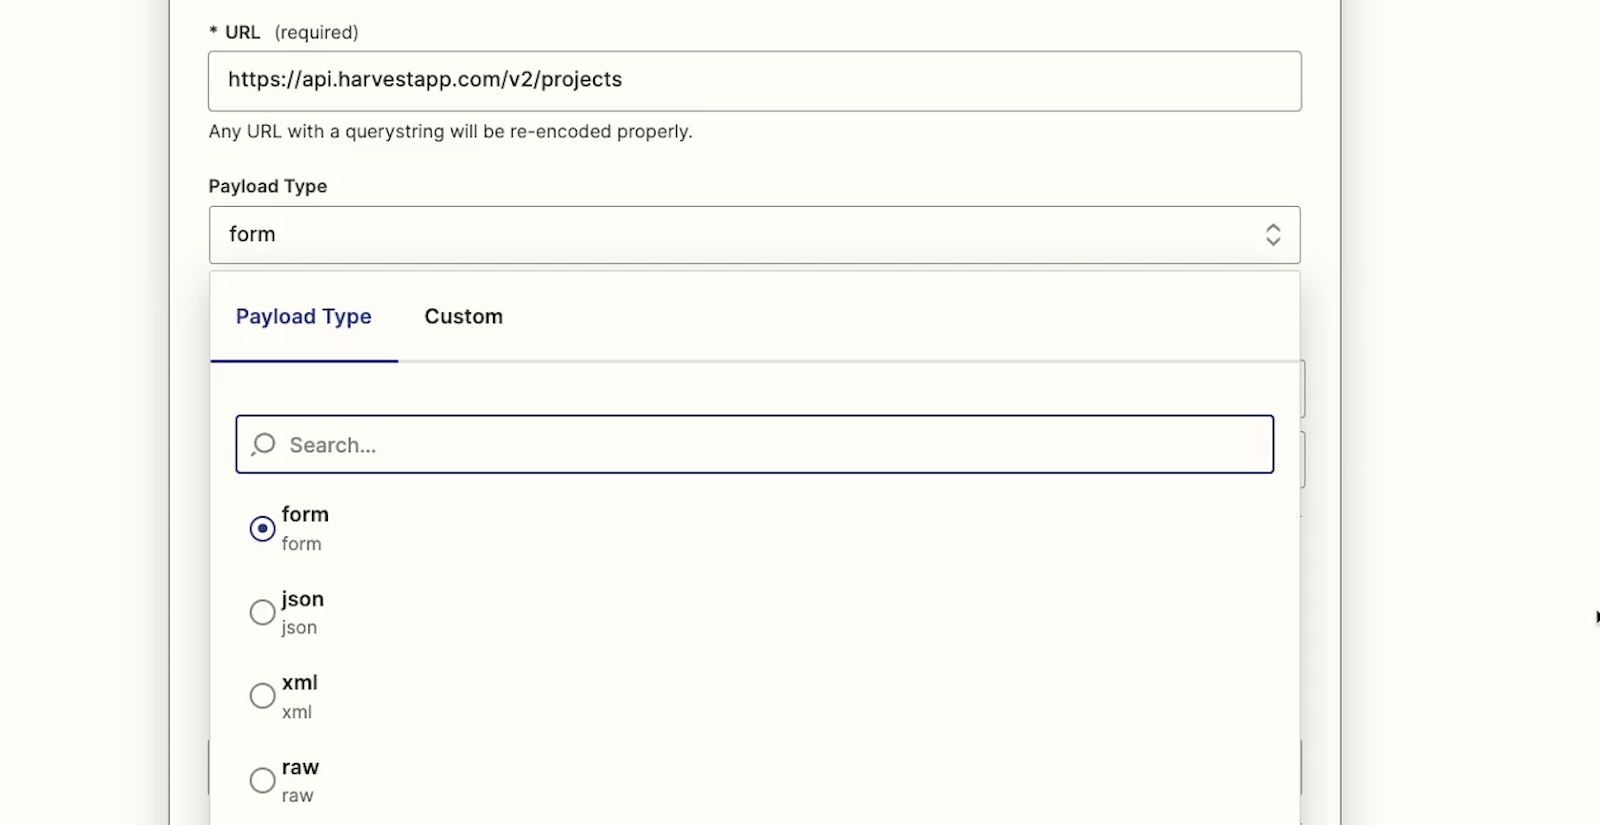
If you’re primarily a no-code builder, we’d recommend sticking with “form” for the payload type.
That will let you enter all the data you need into each form field, similar to any other step in Zapier, instead of needing to mess around with specific coding syntax.
If you’re more comfortable with coding, you can choose another option like “json” or “raw”, but we’ll stick with “form” for our example.
Technically, these three formats are equivalent, so it's up to you and what you’re comfortable with.
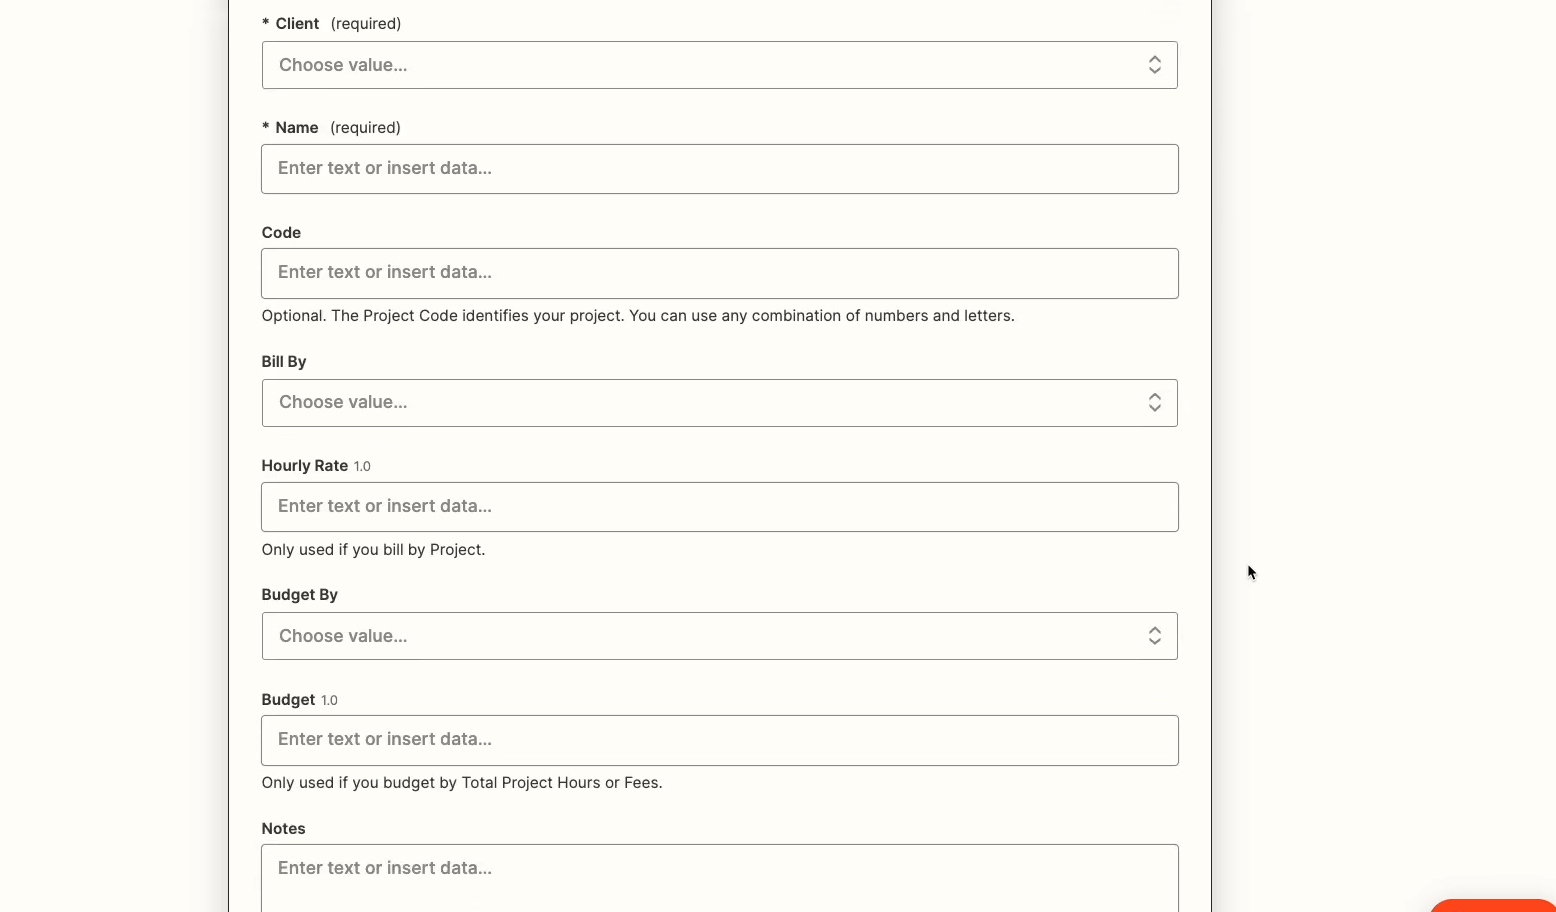
Under this data section, you’ll need to fill in information for each attribute of the object you want to create (or update, or find).
In our case, that means we’ll need to define several attributes to create our “project” object.
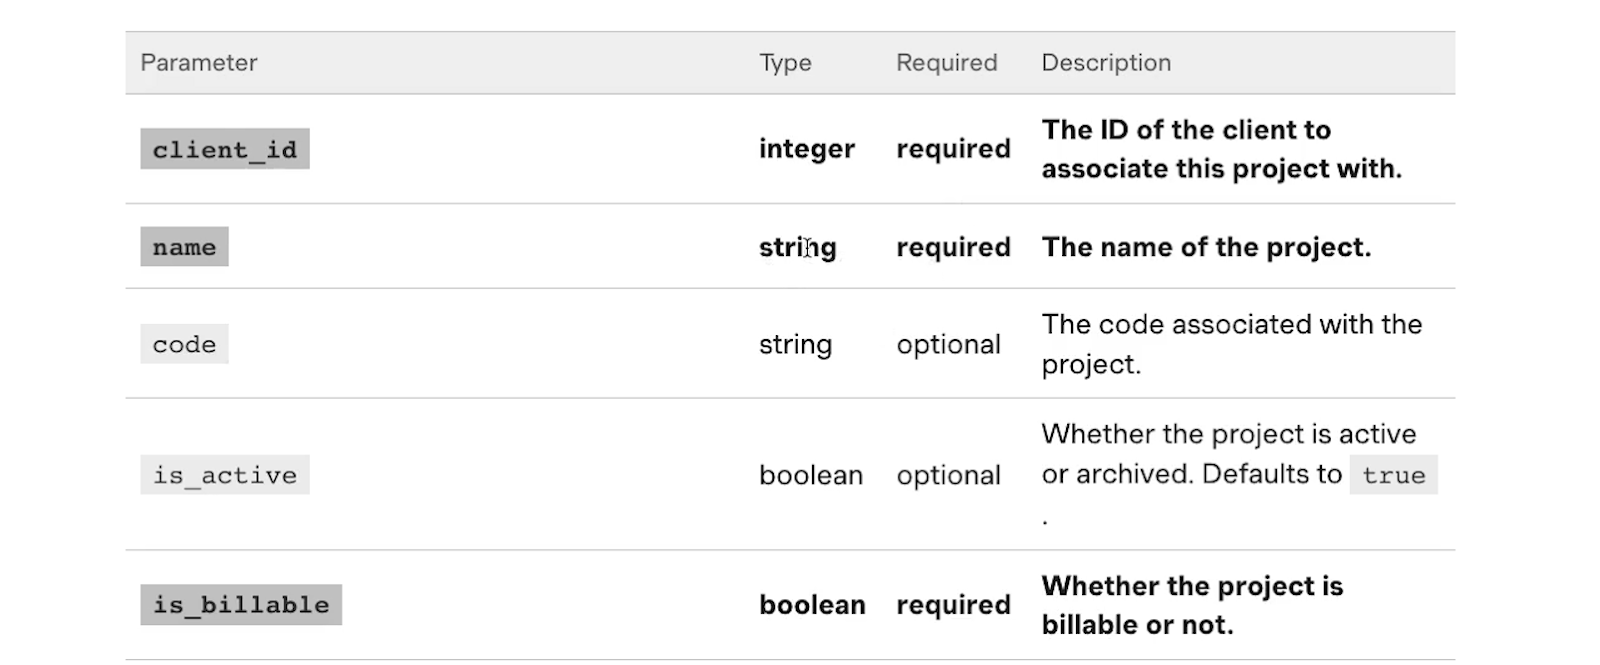
Going back to Harvest’s API docs, we can see that several parameters are bolded. These are the parameters that are listed as “required”, so these are the ones we’ll start with.
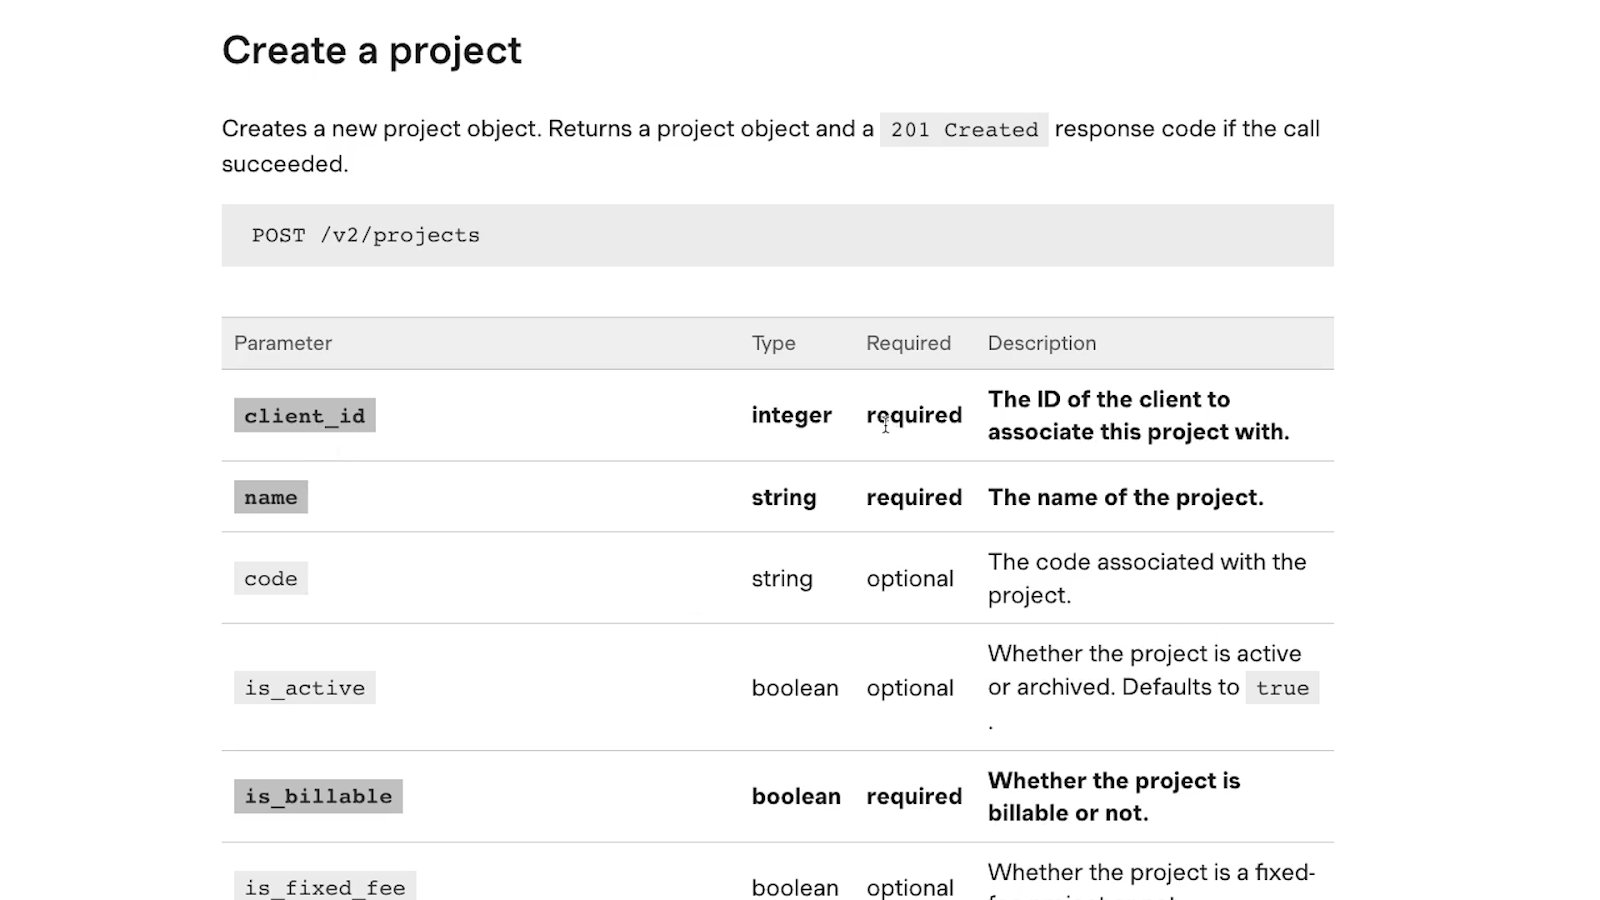
Again, it’s always best to start with only the required fields. Even though the optional parameters include settings that we want to access, we can add those once we know that our API call is working as intended.
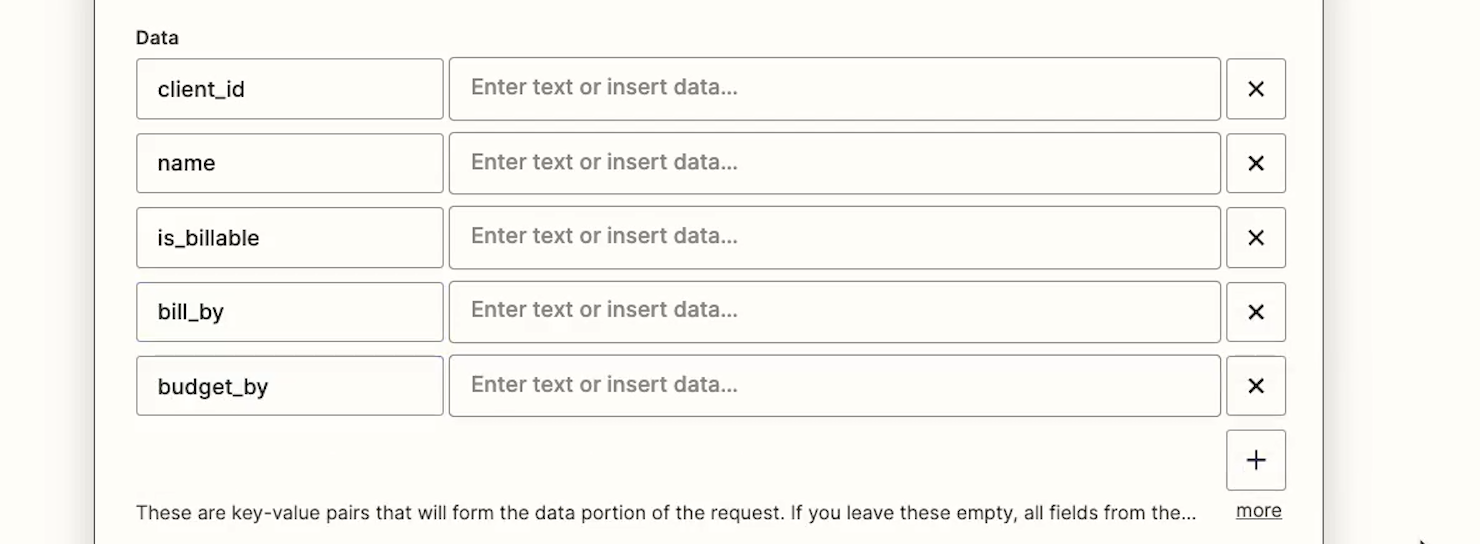
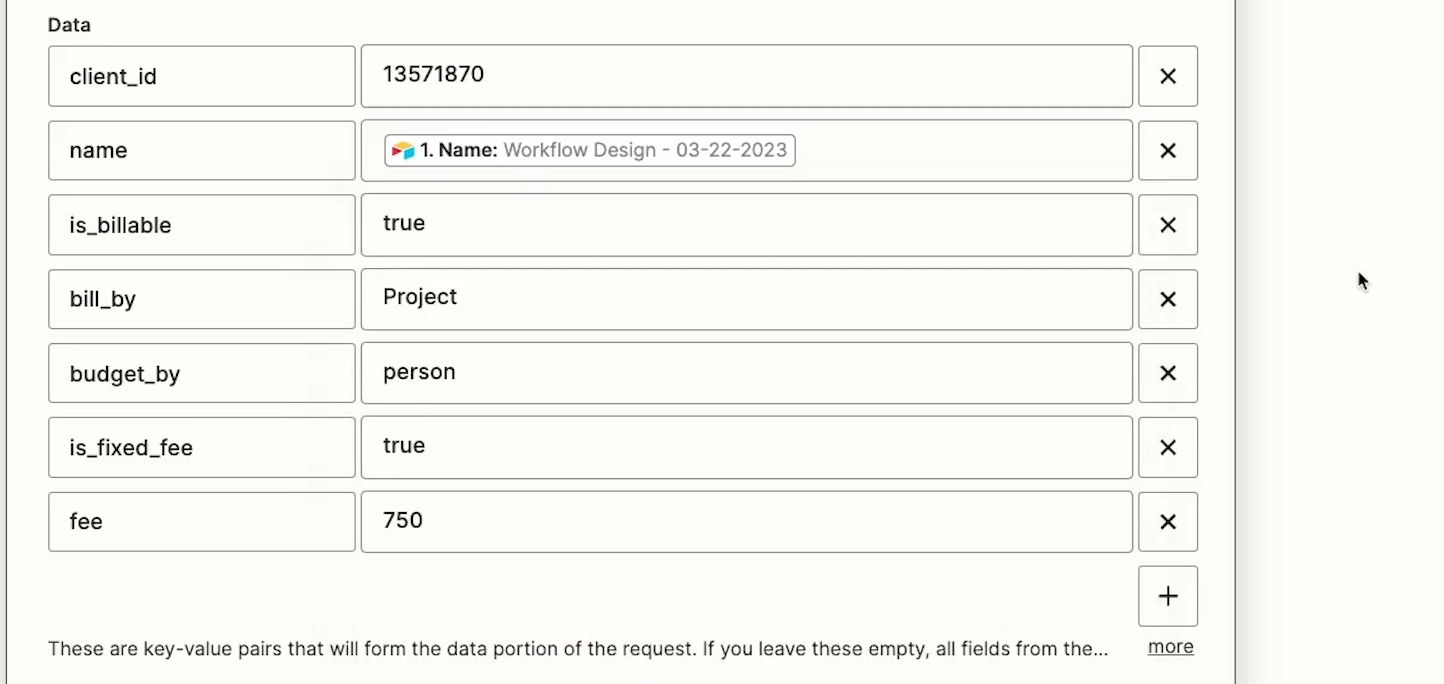
Once you’ve determined which fields are required, create a key-value pair for each of them in your Zap.
In our example, we’ve added key-value pairs for client_id, name, is_billable, bill_by, and budget_by. These labels are the “keys” - essentially, the name of each pair. Next, we’ll fill in the “values” - the setting or content it includes.
The client ID attribute will tell Harvest which client we want to create the project for. We’ll grab the ID from the URL bar of the client’s page in our Harvest account, and paste it into Zapier.
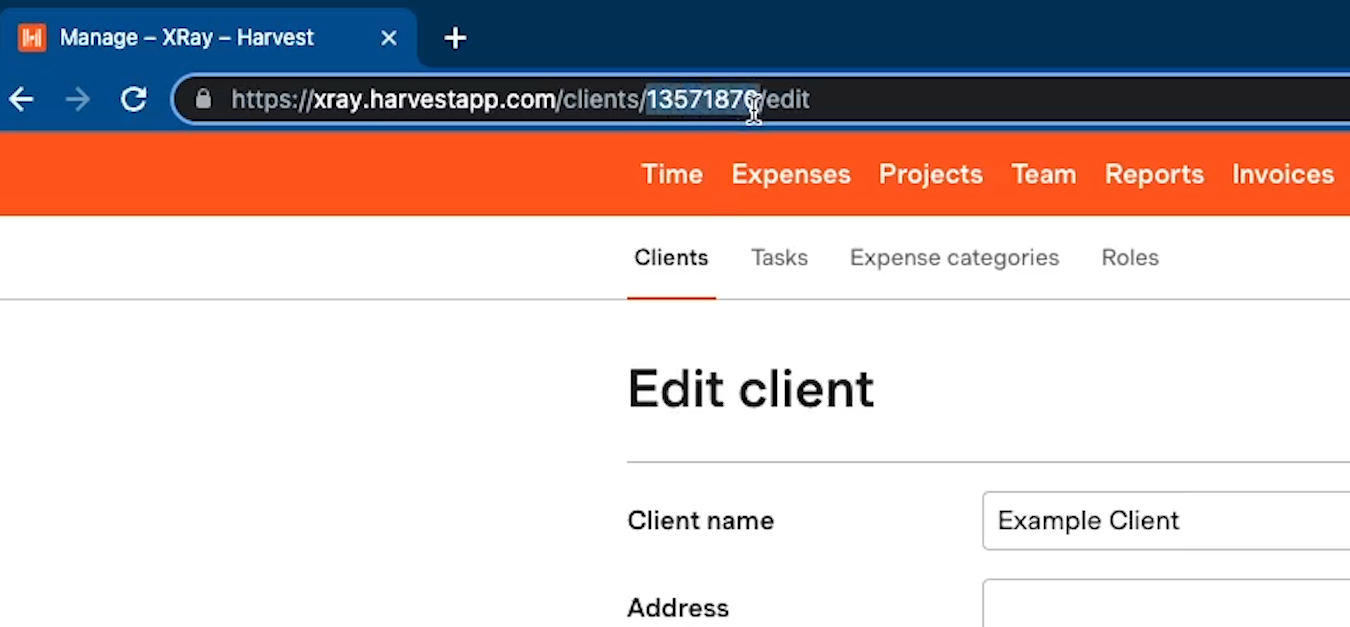
This is a common trick for finding IDs for objects in your apps. Logging into your SaaS tool will often show your object’s ID inside of the URL bar - whether that object is a client in Harvest, a page in Notion, or a task in Trello.
Next, we need a name for our project. The API docs indicate that this parameter accepts a “string”, which basically means that it just needs text.
We can give our Project any name we want. We’ll enter it without any quotes or other special characters.
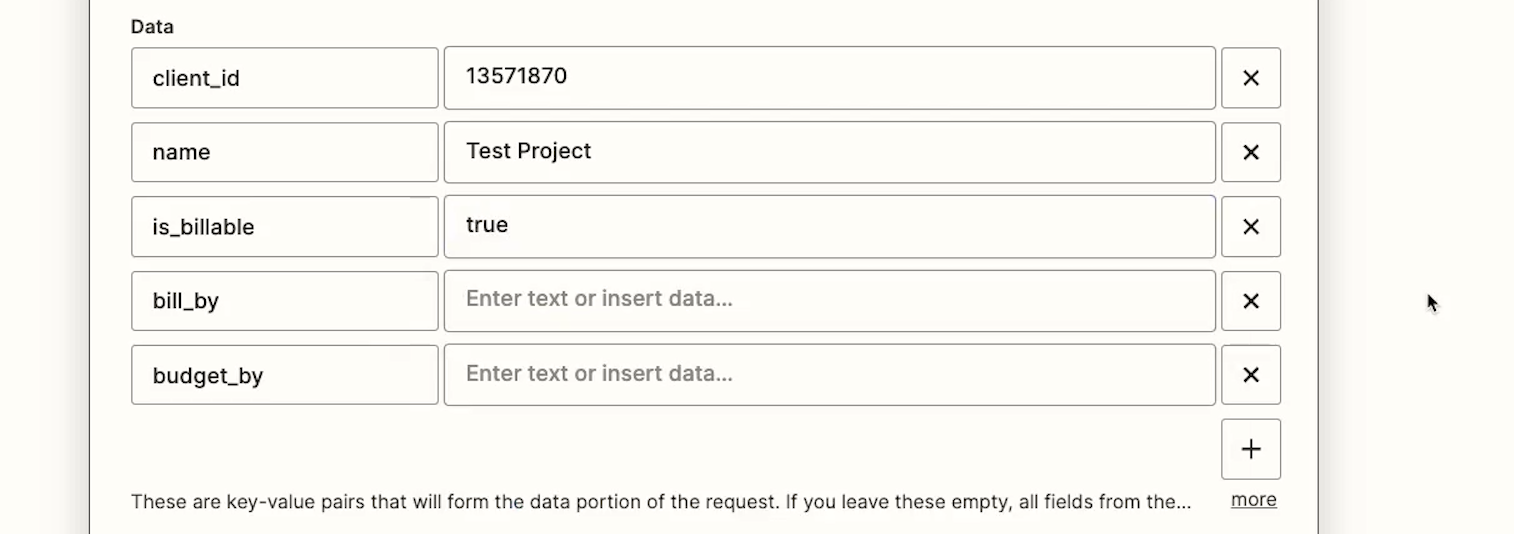
“Is_billable” is a boolean parameter, which means it accepts values of “true” or “false”. Since we want our project to be billable, we’ll enter “true”. Again, we’re not including any quotes or any other special characters.
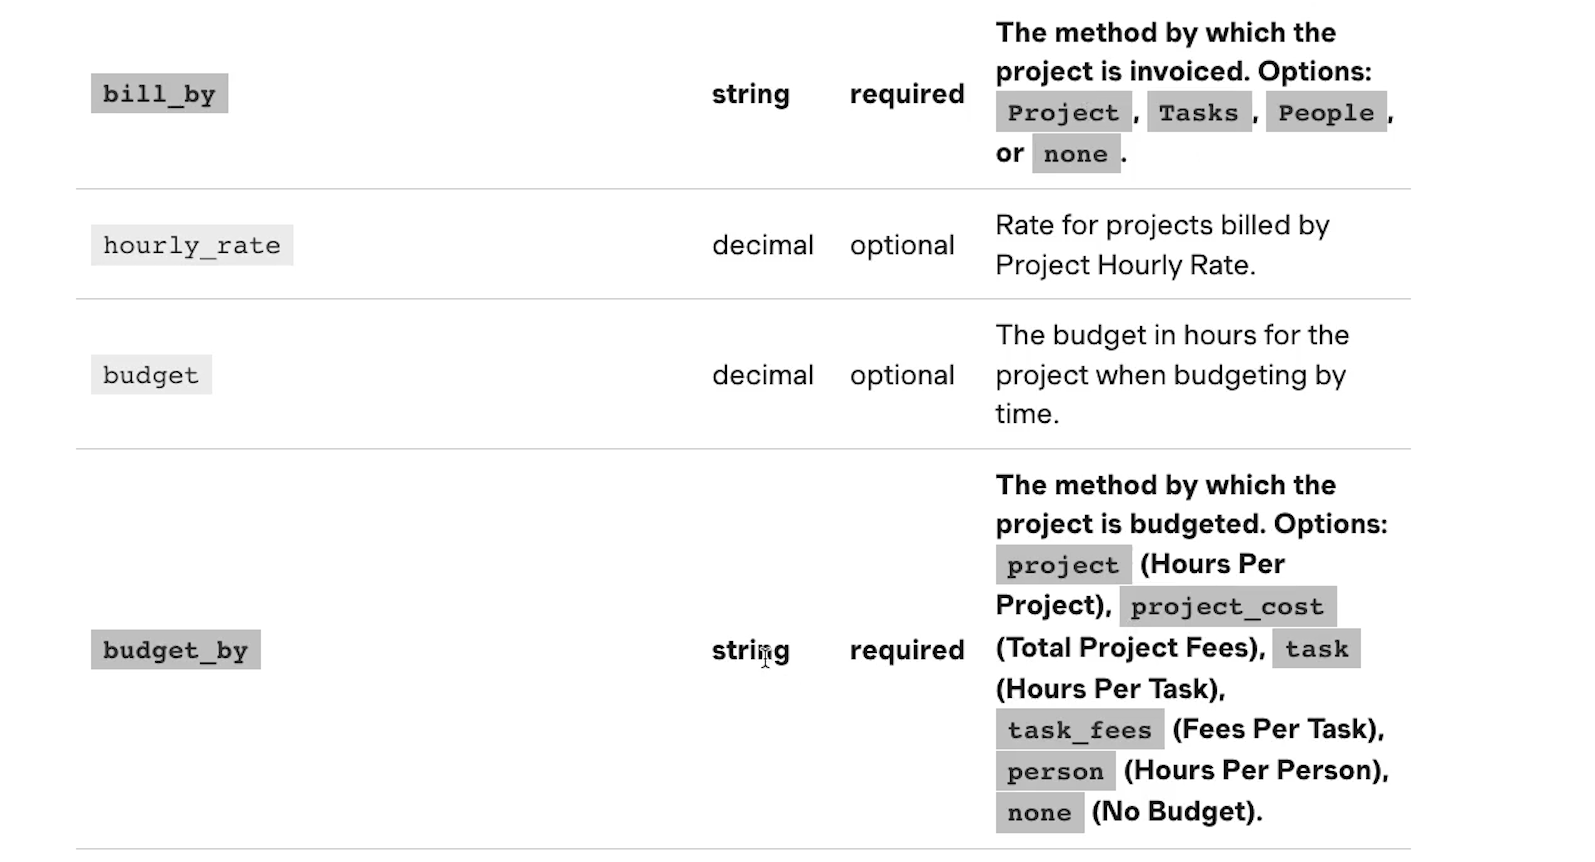
“Bill_by also accepts a string, but in this case, the string has to match one of the four options indicated in the description. We’ll bill by “project”, and enter Project exactly as it appears in the documentation.
Budget_by is similar to bill_by. We’ll enter “person” to set our budget based on hours per person.
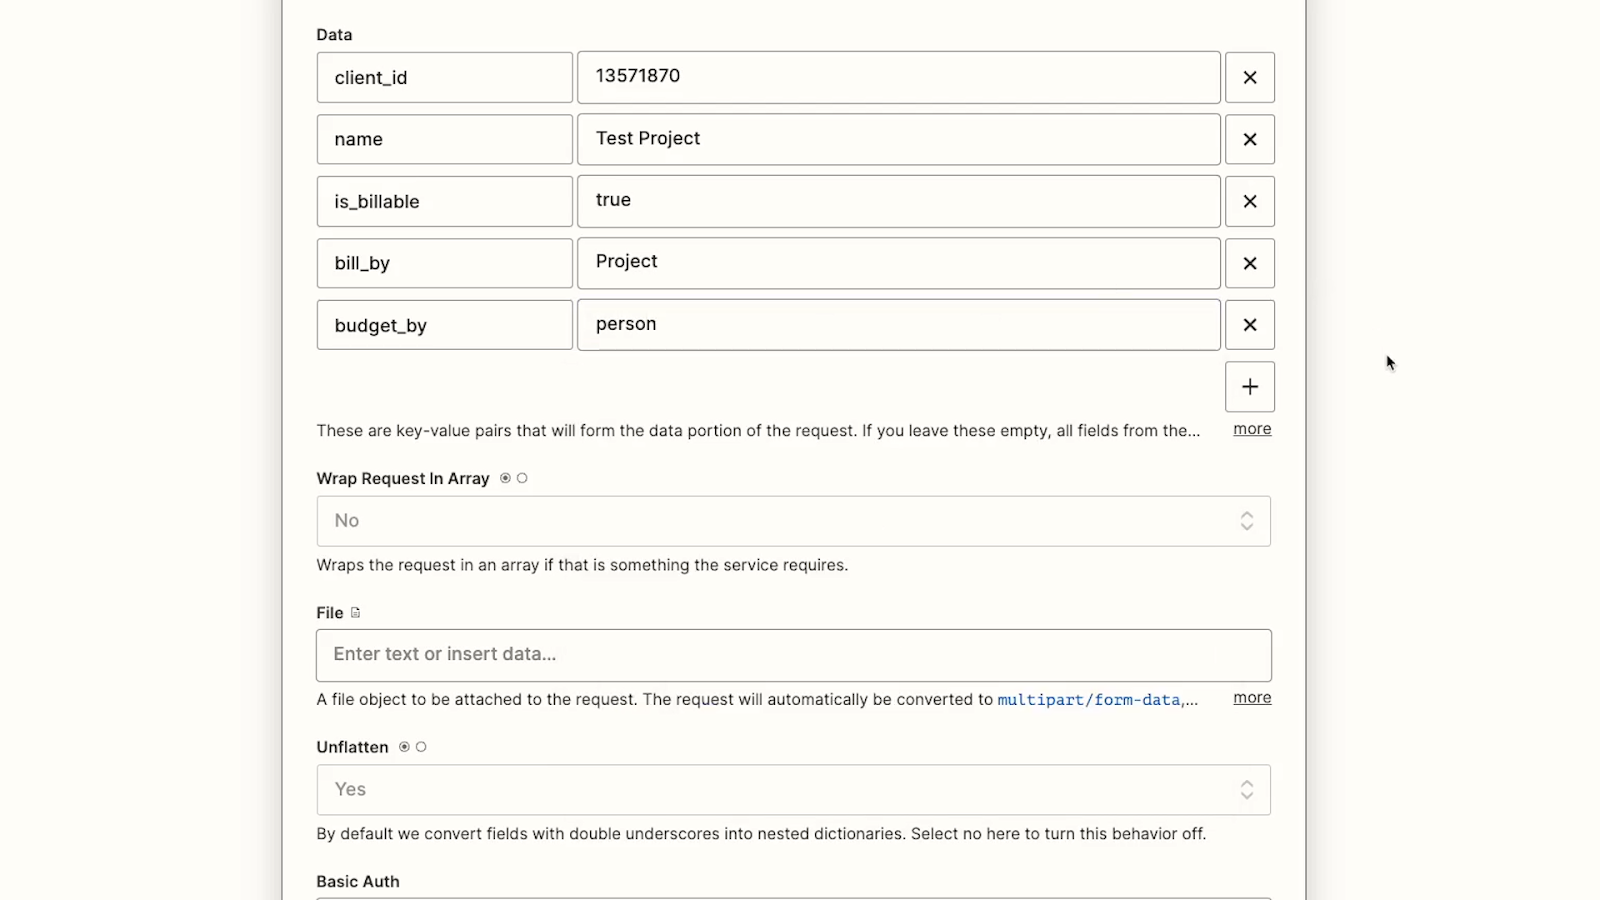
The remaining options can be left to their defaults for our API call. In most cases, you won’t need to edit these.
All of the data we want to create is in place, but we need to fill out the headers first. Headers are often used in API calls to identify and authenticate the user making the request.
Just as a reminder: if you’re using an “API Request” action instead of a webhook, you won’t need to include any additional headers for authorization.
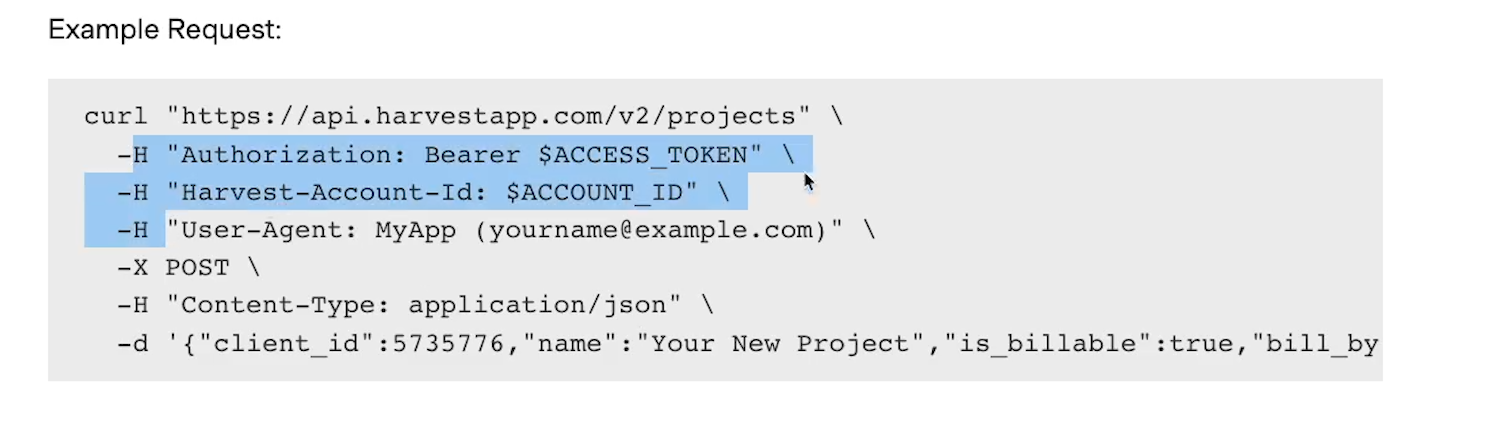
If we go back to the example API call that we found in the Harvest docs, we can see three lines of code flagged with an “H”. These are the headers that we need to include in our API call.
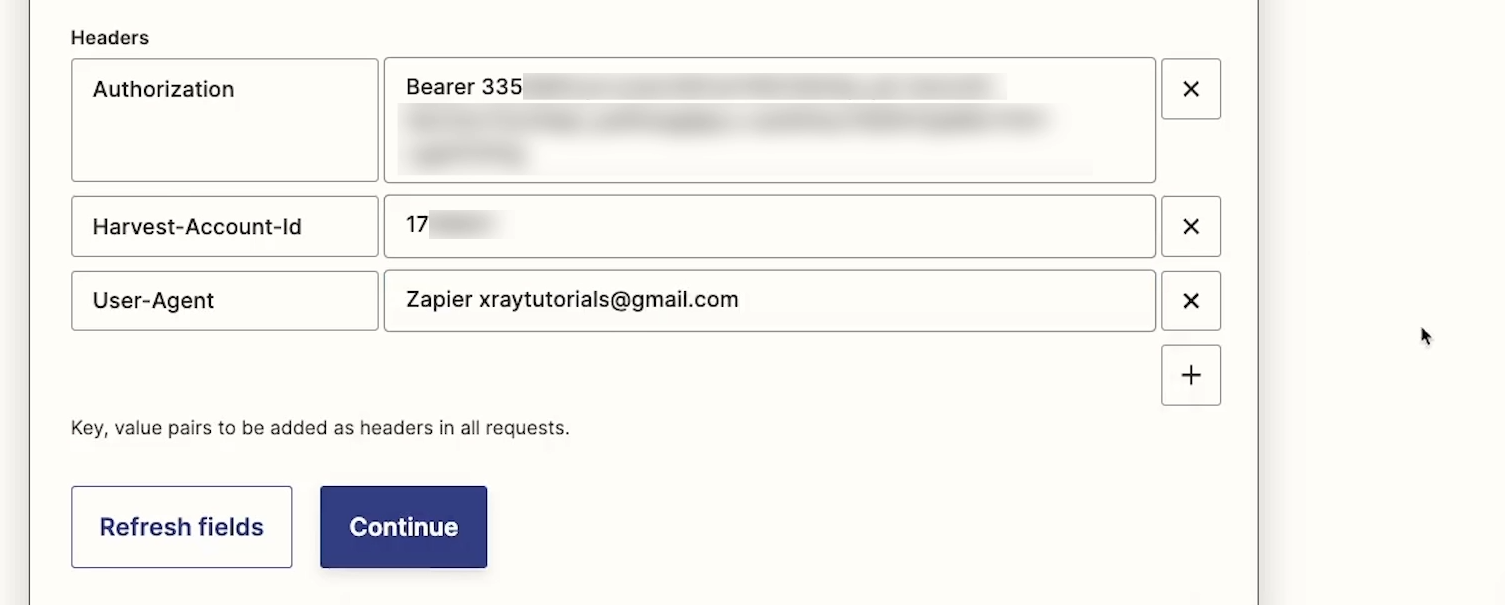
We’ll add each of them as keys under Headers, leaving out the colon and quotes: Authorization, Harvest-Account-Id, and User-Agent.
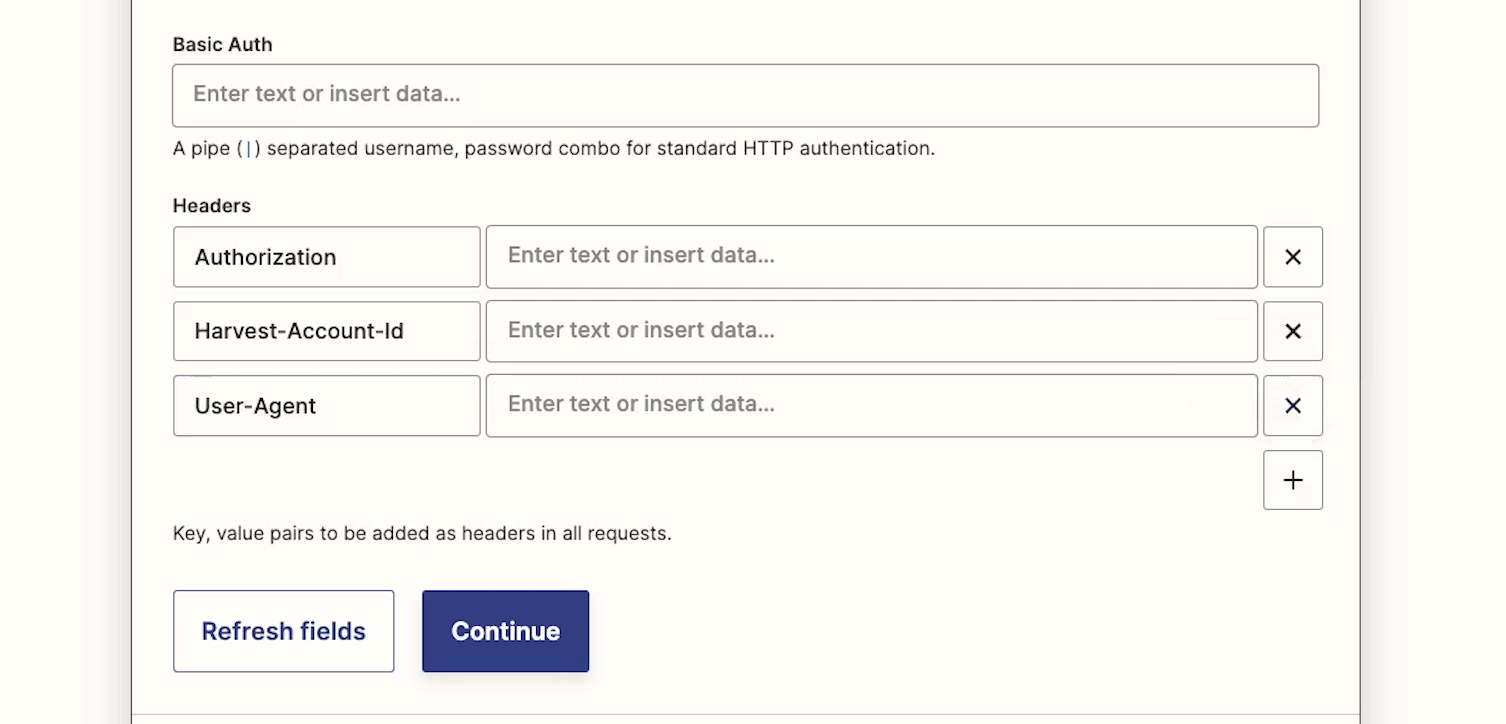
For the value associated with ‘Authorization’, we need to enter the term “Bearer” and a space, then provide a personal access token from Harvest.
We can just go to the developers section in Harvest to create a token and copy it. We can also see our Account ID in this same section, which we’ll need next.
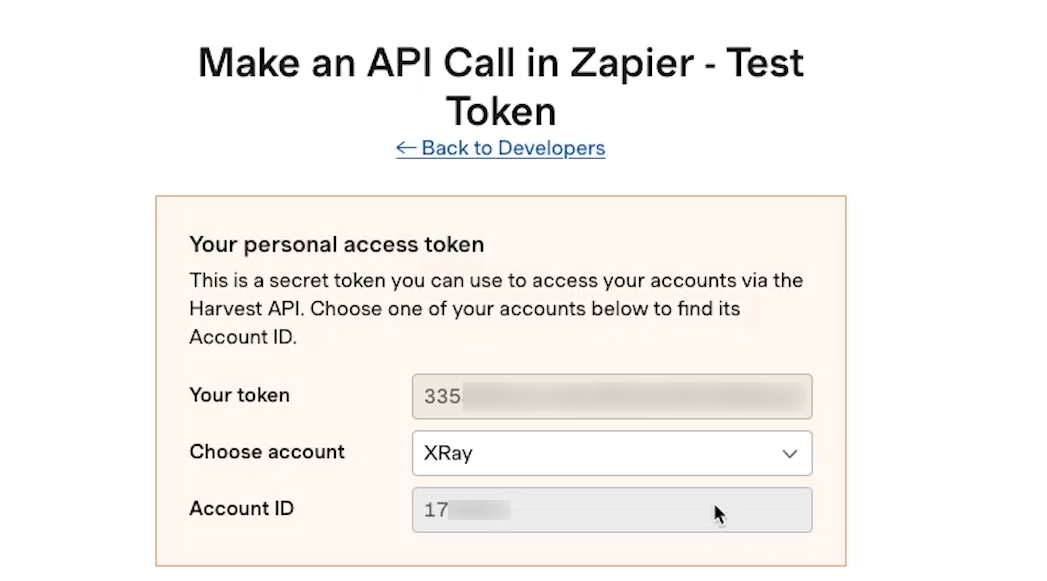
Sensitive data like access tokens and account IDs can generally be found under a “developers” setting, or elsewhere in your app’s preferences. Your API docs may contain information specific to your app, or you may need to search through their other support docs.
Once we’ve pasted both of these into Zapier, we just need to provide a User Agent. This simply identifies the user making the API call. Their API docs don’t appear to include any specific information about what’s required here.
Harvest suggests using your email address, but it appears that you can put anything in this field; the API call will work anyway.
This is an area of API calls that will differ for every application. The requirements in your header can be tricky, so be patient and test one thing at a time.
Now that we have our data and headers all set, we can test the step.
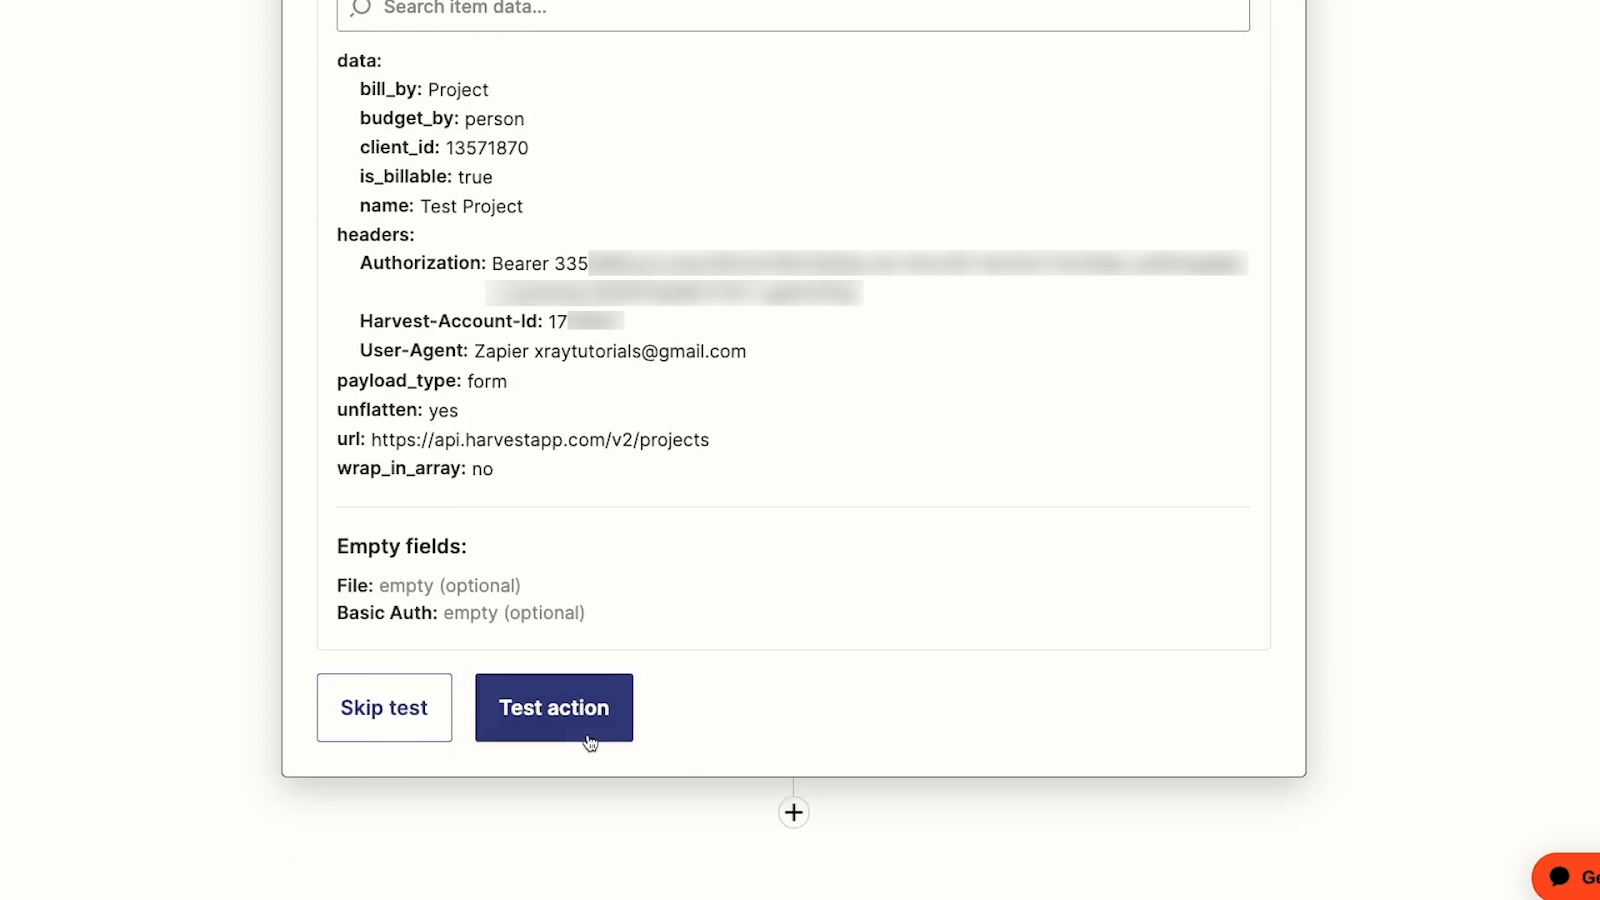
Success! We’ve created a project. If we check Harvest, we can see the project, complete with all of the options we configured.
Now that we’ve built our bare minimum API call, we can go back and add the optional parameters we want to use, and dynamic data generated by Zapier.
Building up from a simple API call and testing your changes one step at a time will be a huge help when you inevitably run into some errors.
It will make it much easier to isolate the change that’s likely to have caused the error in the first place.
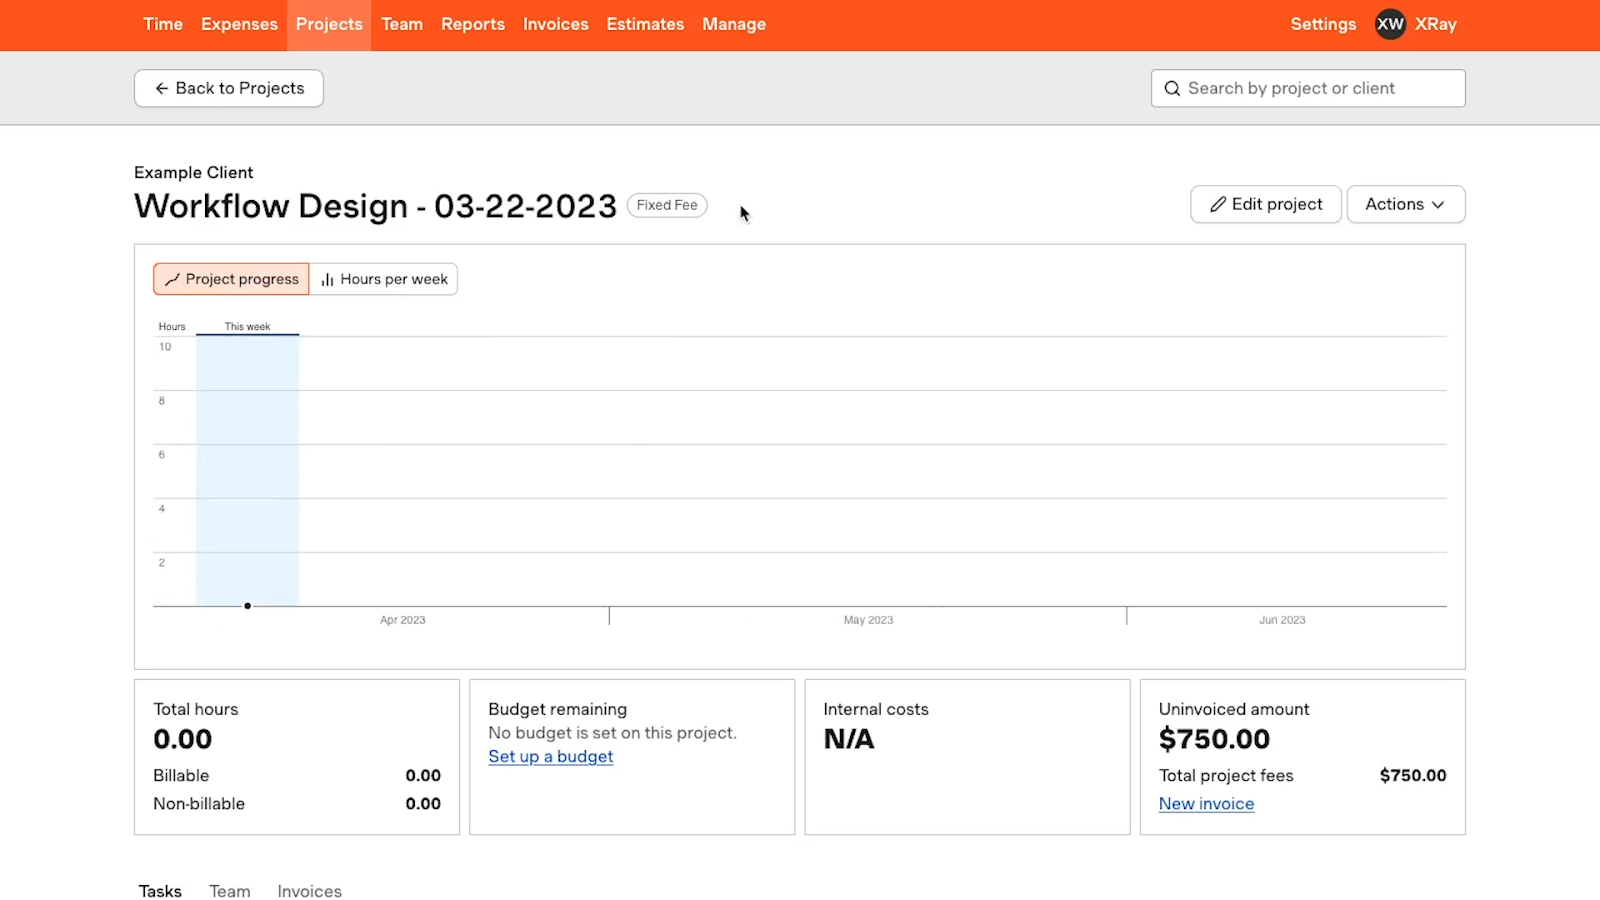
First, we’ll go back to the data section of our API call and add key-value pairs for “is_fixed_fee”, which we’ll set to “true”, and “fee”, which we’ll set to 750.
Then, we’ll add some dynamic data to one of the other data fields. We’ll replace the project name with the “Name” field that Zapier retrieved from Airtable.
We’ll test the Zap again, and confirm that a project was created in Harvest with a fixed fee of $750.
Next, we’ll take a quick look at the other method of creating API calls in Zapier.
As mentioned earlier, the API request action is only available for a select list of apps right now. You can check the whole list in this Zapier support page, or you can search for your app in XRAY.Tools to see if “API request” is supported.
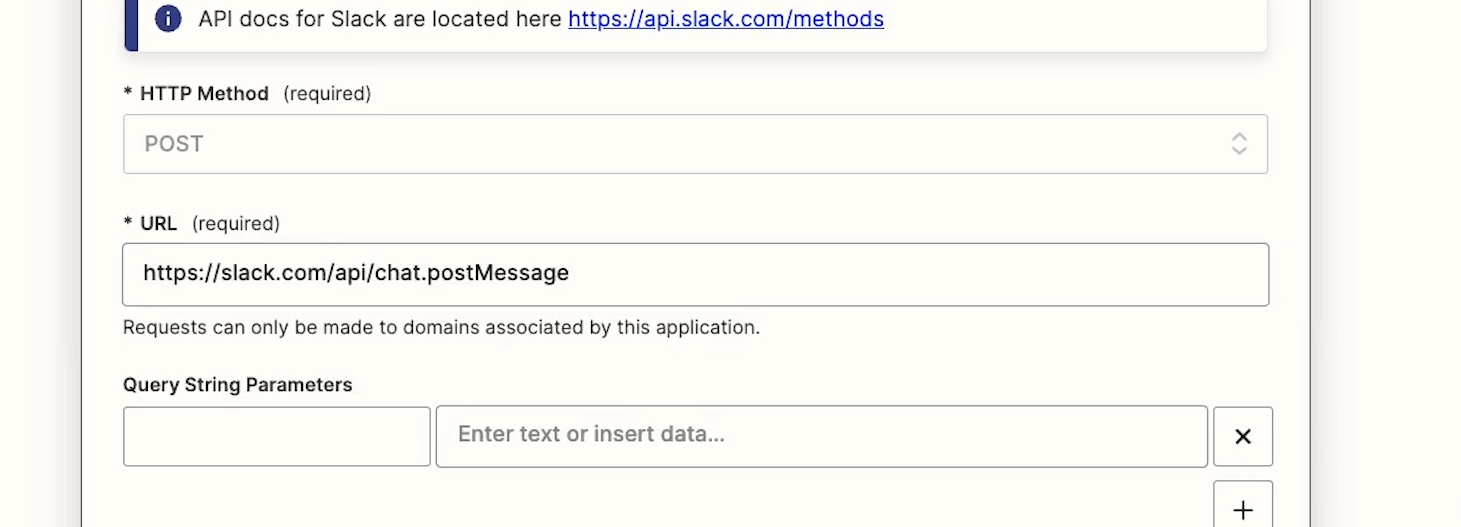
For our example, we’ll use the API request action to send a message in Slack, since we can see here in XRAY.Tools that Slack has an “API request” action available.
We’ll pull up Slack’s API docs for reference, and create a new Slack action. We’ll choose “API request”.
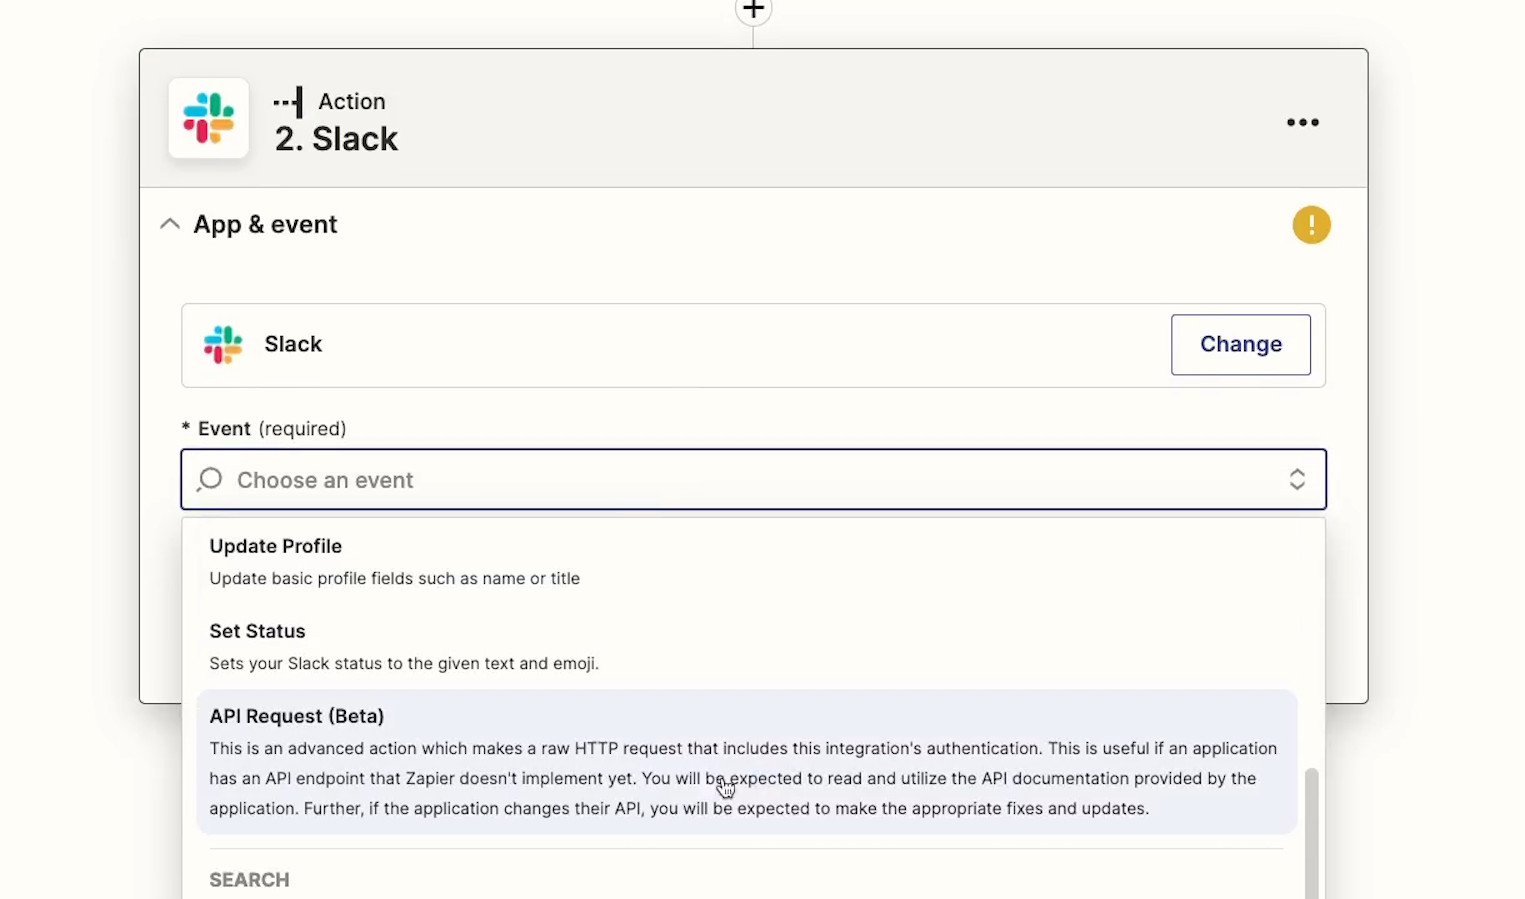
The API Request options are somewhat similar to our earlier Webhooks steps, but there are some key differences.
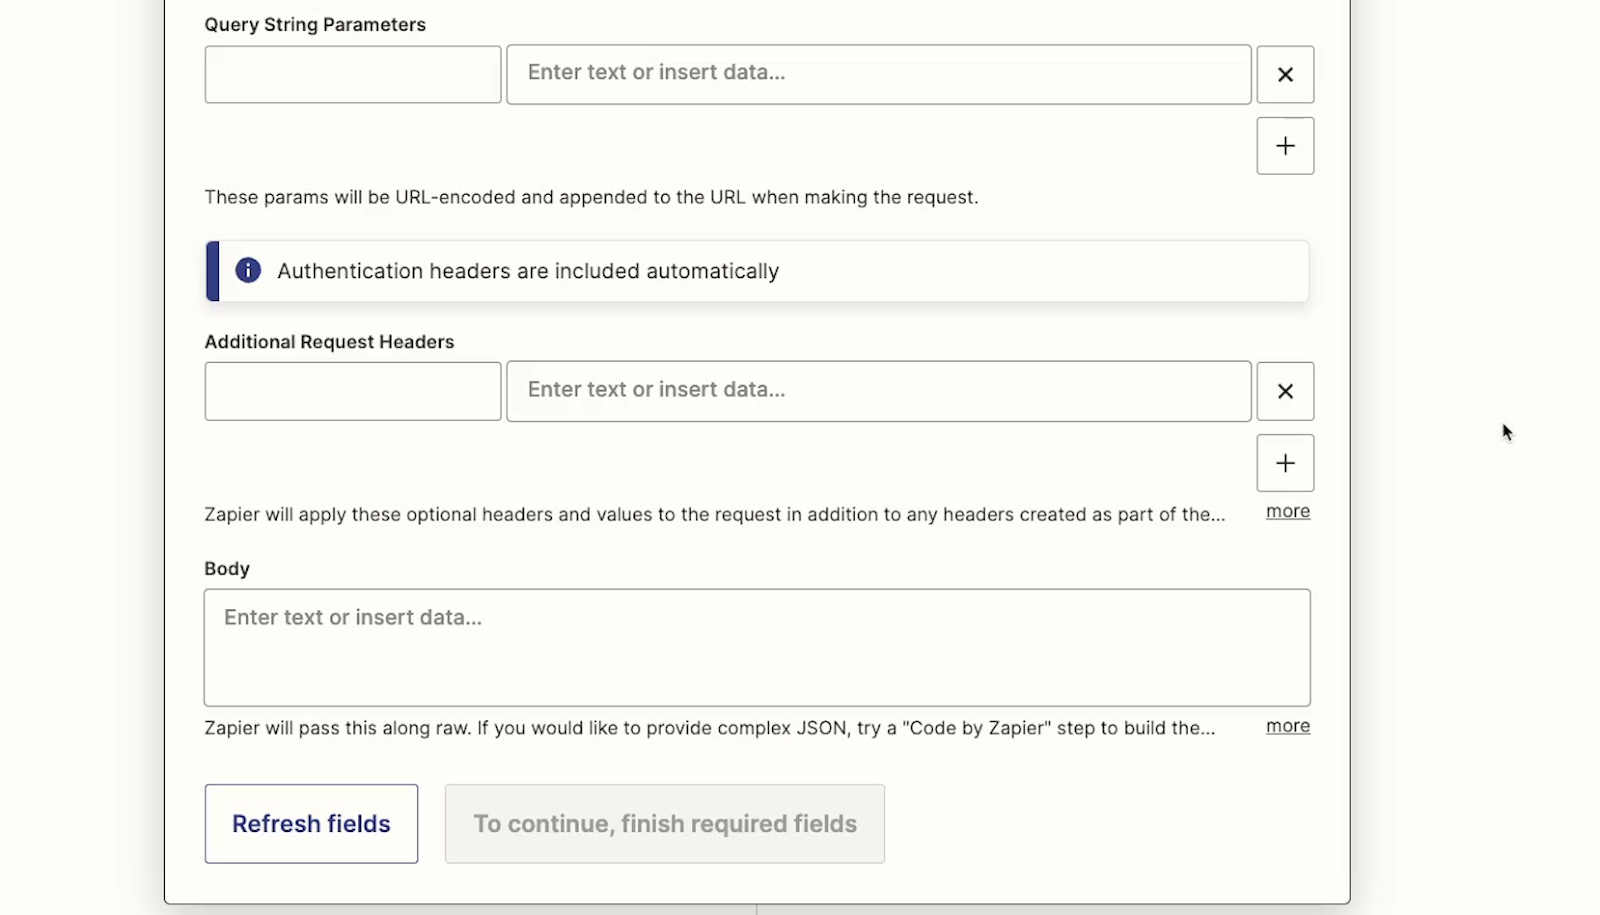
As Zapier notes, authentication is handled automatically, so we don’t need to include any headers for authentication.
You can also only pass along raw data with the API requests action; you currently can’t enter key-value pairs into convenient text fields like before.
But just as before, you’ll need to provide a Method and a URL, which you can find in your app’s API docs.
By default, this action will send URL-encoded data. URL encoding is a bit of a pain to work with, so in our example, we’ll add a header to change the Content type to application/JSON.
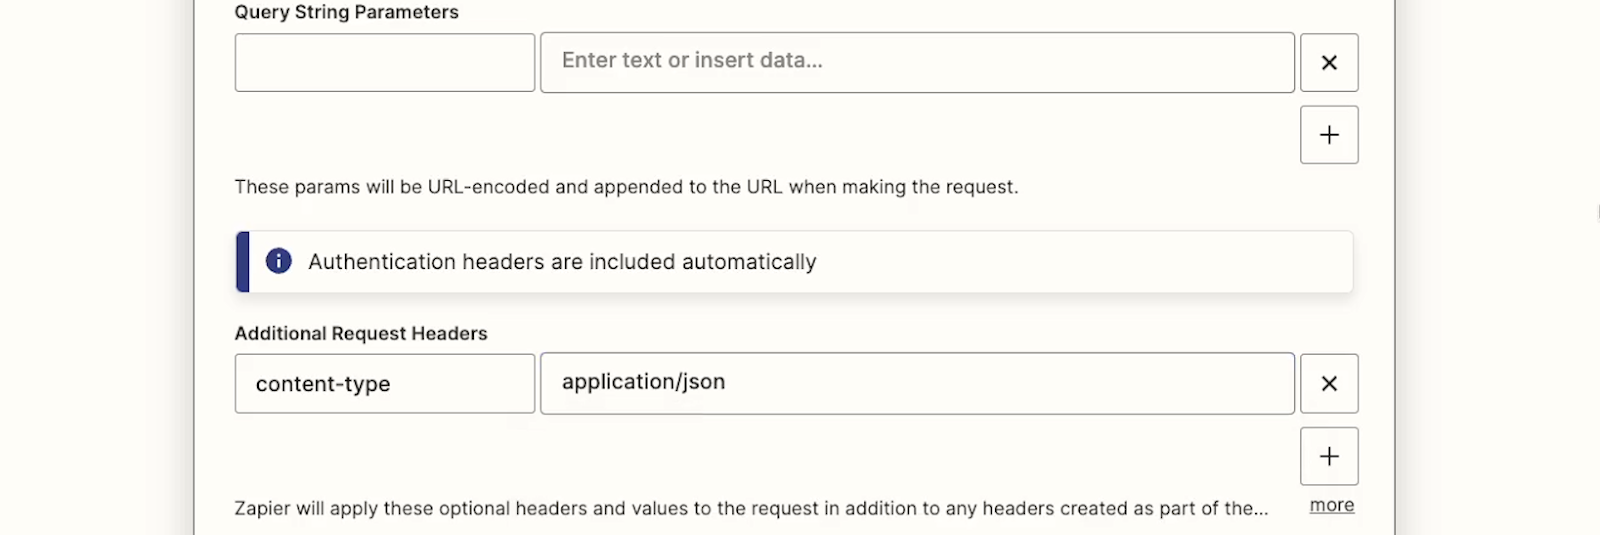
That will make our body much easier to read, and we won’t have to include characters like “%20” for every space.
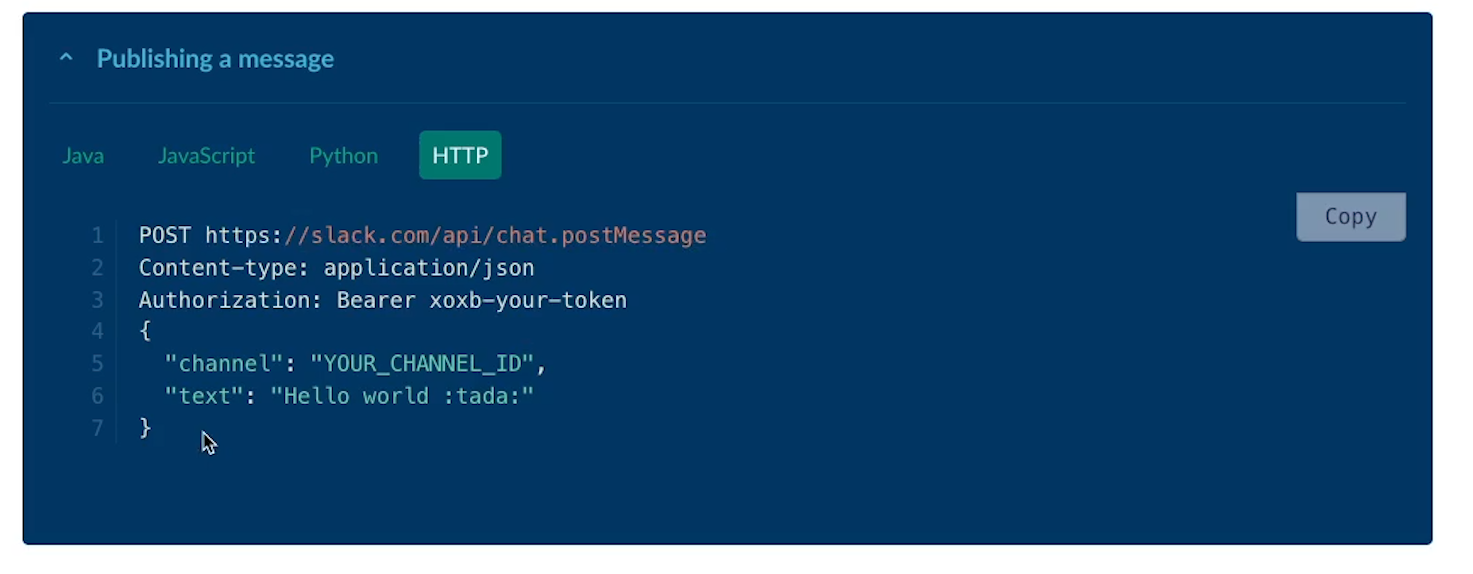
Like most API docs, Slack’s includes full examples of API calls. We’ll just copy and paste an example of a simple Slack message into the body of our API call, and update it with our own channel ID and text.

NOTE: make sure that your code syntax matches the content type specified in your header. Since we’ve set the content type to JSON, our body must be formatted as a JSON object.
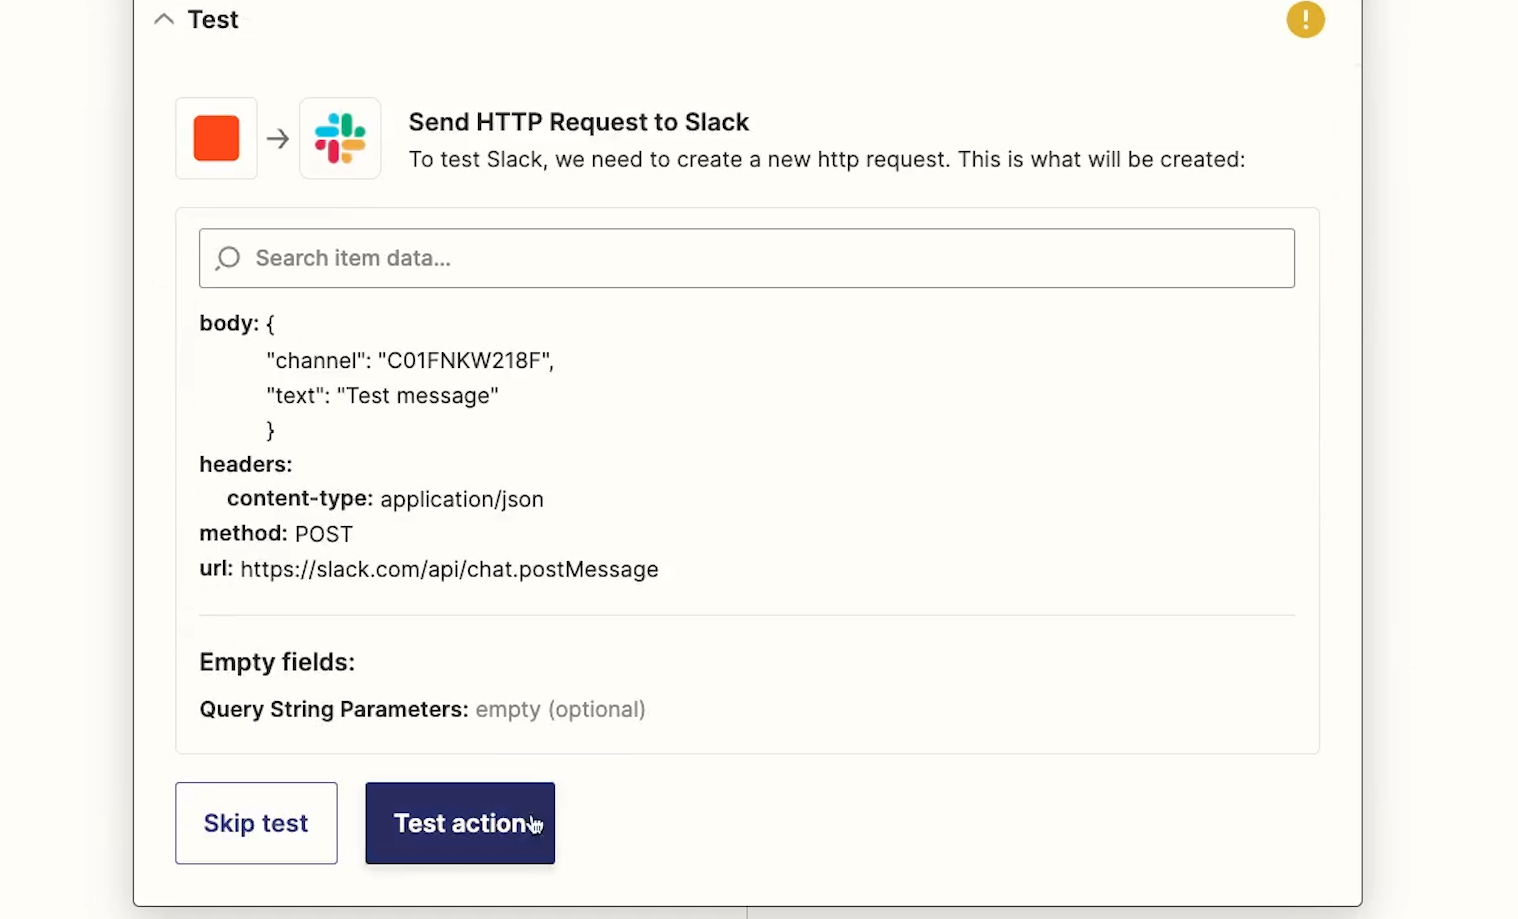
With our API call configured, we’ll test the step. Note that when you use the API Request action, your Zapier test may be considered “successful” even if your API request failed.
If you were able to send a request and get a response, Zapier usually considers that to be a success, even if it returns an error.
So make sure to review the output of the step, and check your tool directly, before continuing.
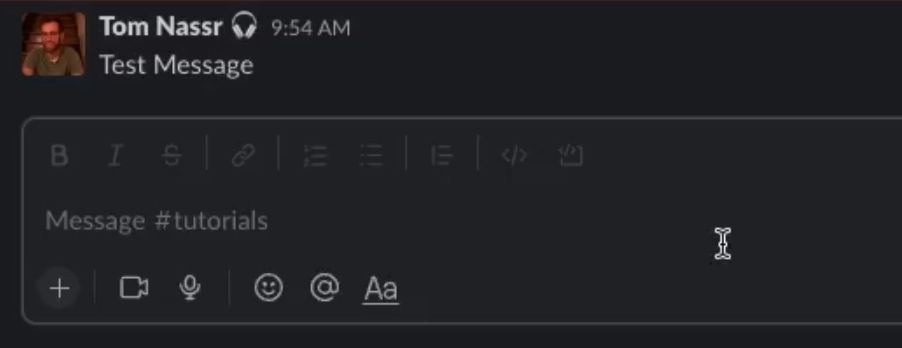
When we check Slack, we can see the message sent exactly as we set it up.
All in all, we’d recommend that most low-coders stick with Webhooks by Zapier for now. API Requests still have a lot of bugs to work out, and they’ll require you to write out the entire body of the request.
If you’re struggling to get authentication to work in a Webhooks step, then you can try out API requests. Otherwise, I think Webhooks is the way to go, especially since “requests” are still in beta and limited to a few dozen tools.
Before we wrap up this walkthrough, let’s quickly go over the kinds of error messages you’re likely to see as you’re building API calls in Zapier.
If you get an error when you test your “Webhooks by Zapier” or “API Requests” action, you’ll likely see either a 400 response, or a 500 response.
If you see a 400 error, like 404, that means there’s an error in your configuration. Check your API docs again and make sure you’ve configured everything correctly.
Look for misplaced commas, or extra quotes, or any other small typo in your syntax that might have broken your API call.
If you still keep getting a 400 error, try searching on a resource like Stack Overflow for the issue to get more information.
Again, keeping your API call simple to start with will make it much easier to find the problem. There will be far fewer variables that you need to test and control for.
If you see a 500 message, like 503, then there’s an error in the app itself. Wait a moment and try again to see if the issue resolves itself.
If you keep getting a 500 error, check to see if the app’s servers are down at a site like downdetector.com.
You may have to wait a while for the app’s dev team to address the issue, but there’s nothing that you can do to fix it. If the tool is down, the tool is down. You’ll just have to wait.
Ultimately, building API calls will often require a lot of trial and error as you figure out what’s working and what isn’t.
Just take your time, read the docs carefully, and look for help when you need it, the comments section below is a great place to start. There are also thousands of people on Zapier’s forums, StackOverflow, and other communities building similar things who can give you great advice.
Tools like Zapier provide thousands of integrations for popular apps, but sometimes, the solution you need won’t be available right out of the box.
Even if you consider yourself a no-code builder, making the jump to a little low-code with API calls and webhooks will unlock a ton of new possibilities.
So when you want to create an integration that Zapier doesn’t have, don’t be afraid to open up the API docs and start reading.
If you’d like to learn more about no-code and low-code automations with tools like Zapier and Make, be sure to check out our blog or our YouTube channel. You can also follow XRAY on Twitter, Facebook, or LinkedIn.

.pptx.png)

