
OpenAI's rollout of GPT-5 didn't go as smoothly as expected. Overnight, many users found GPT-4o removed from ChatGPT's default options, replaced by a new model that hasn't received universal praise (to say the least).
If you're among those who miss GPT-4o's specific style and capabilities, or you're simply not ready to make the switch, the good news is that you have options.
Here are two practical ways to keep using GPT-4o and other legacy OpenAI models, plus why the second method might actually transform how you use AI in your workflows.
The fastest solution is right in ChatGPT itself. Following the backlash to 4o’s sudden removal, OpenAI has quietly added GPT-4o back to the model selection menu, though it requires a few clicks to access.
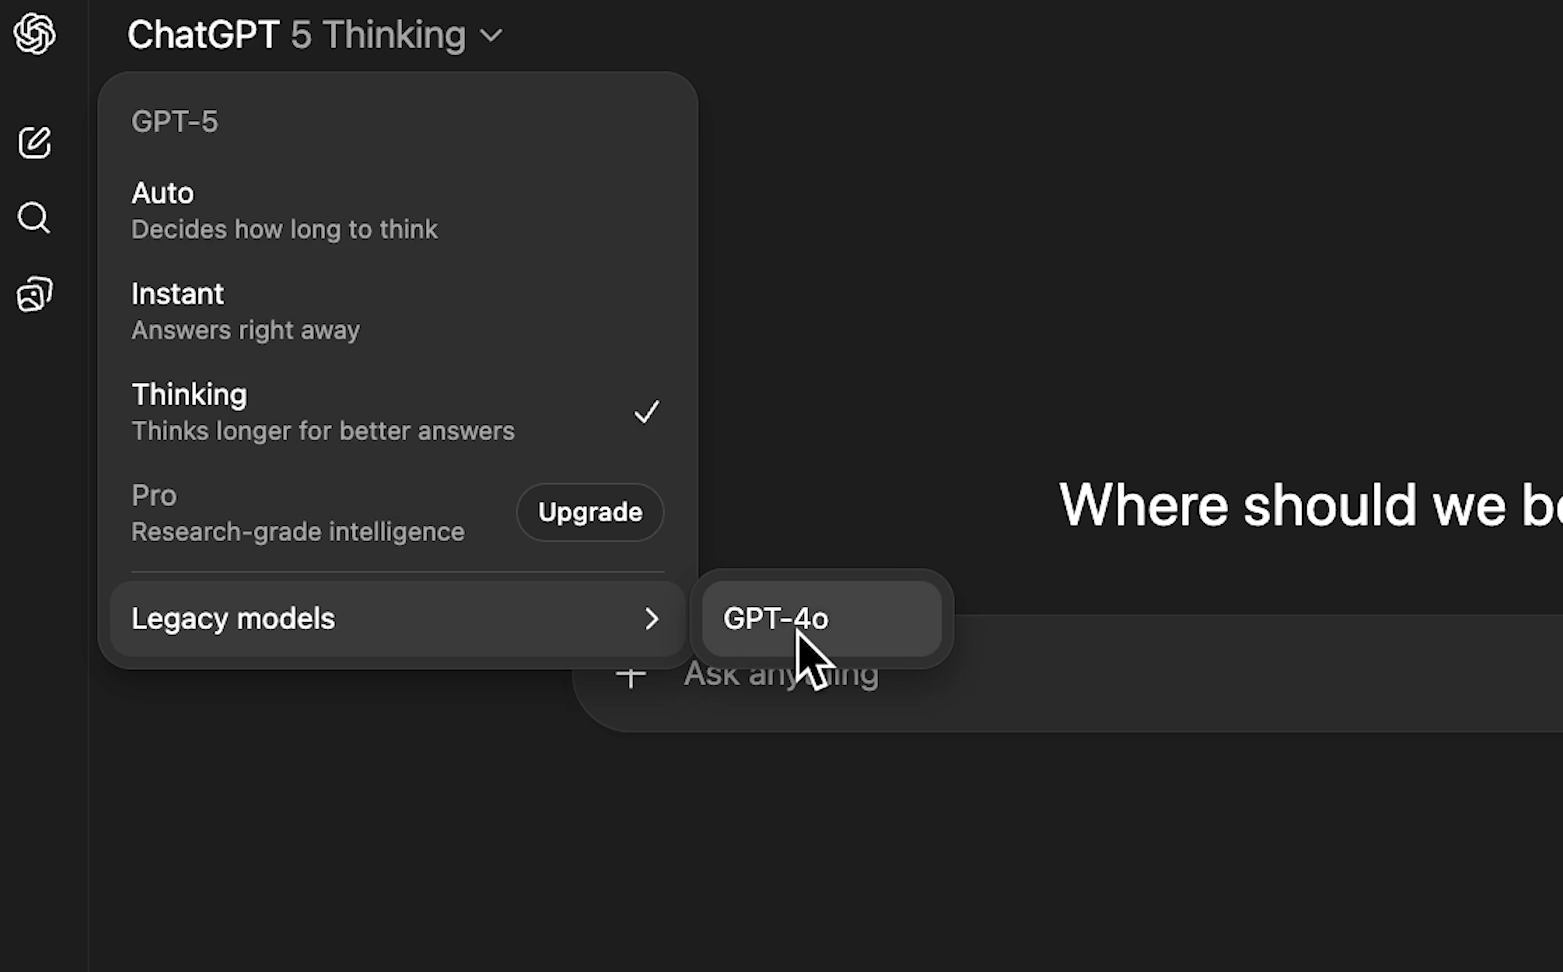
1. Click on the model name in the top left corner of ChatGPT
2. Scroll down to find "Legacy models"
3. Select GPT-4o from the available options.
For access to even more legacy models like GPT-4.1 and o3:
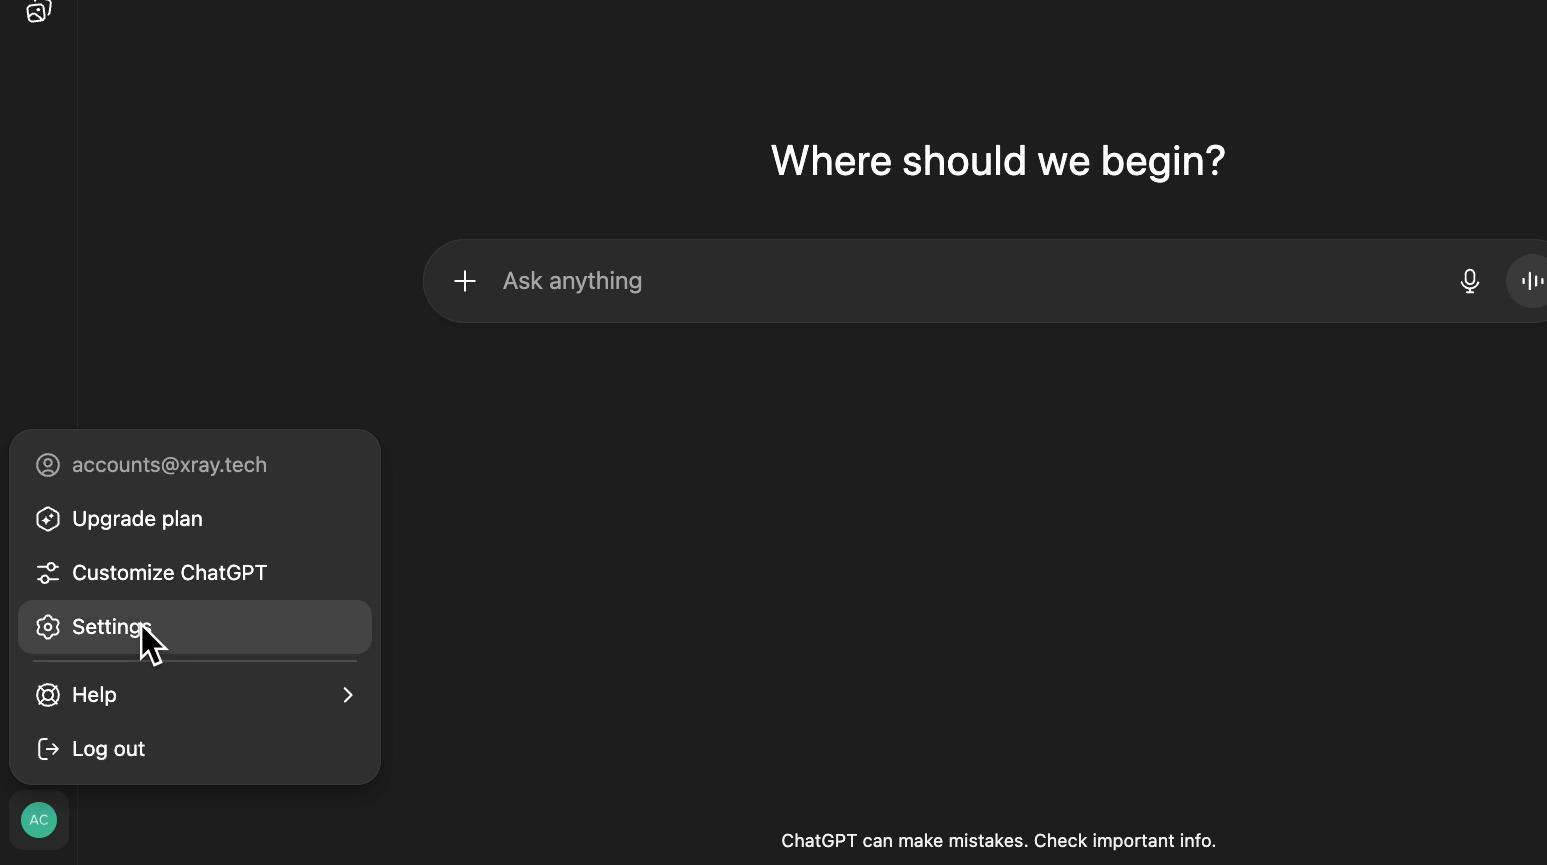
1. Click your account name in the bottom left
2. Navigate to Settings
3. Look for "Show additional models" and toggle it on
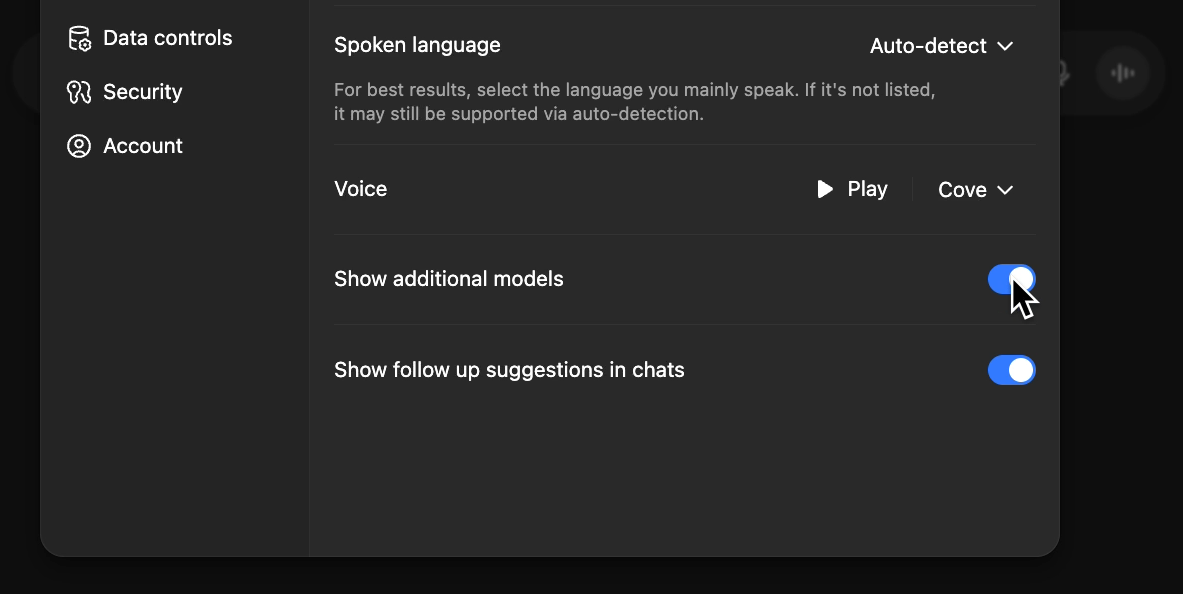
4. Return to the model dropdown to see expanded options

This approach has two significant drawbacks:
Requires ChatGPT Plus: Model selection is only available to paid subscribers
Uncertain longevity: There's no guarantee OpenAI will keep these legacy models accessible long-term
For a more robust solution with greater control, consider the API approach.
ChatGPT isn't your only gateway to OpenAI's models. The company's developer platform offers direct API access, opening up possibilities that go far beyond the standard chat interface.
An API (Application Programming Interface) lets you bypass ChatGPT entirely and communicate directly with OpenAI's models. This approach offers three key advantages:
• Broader model access: Legacy models, variants, and specialized versions
• Advanced controls: Fine-tune settings like randomness and response length
• Automation potential: Integrate AI into existing workflows and apps with Zapier, Make, etc, or create your own apps with AI
To demonstrate the possibilities, we created a simple ChatGPT alternative that accesses legacy models.
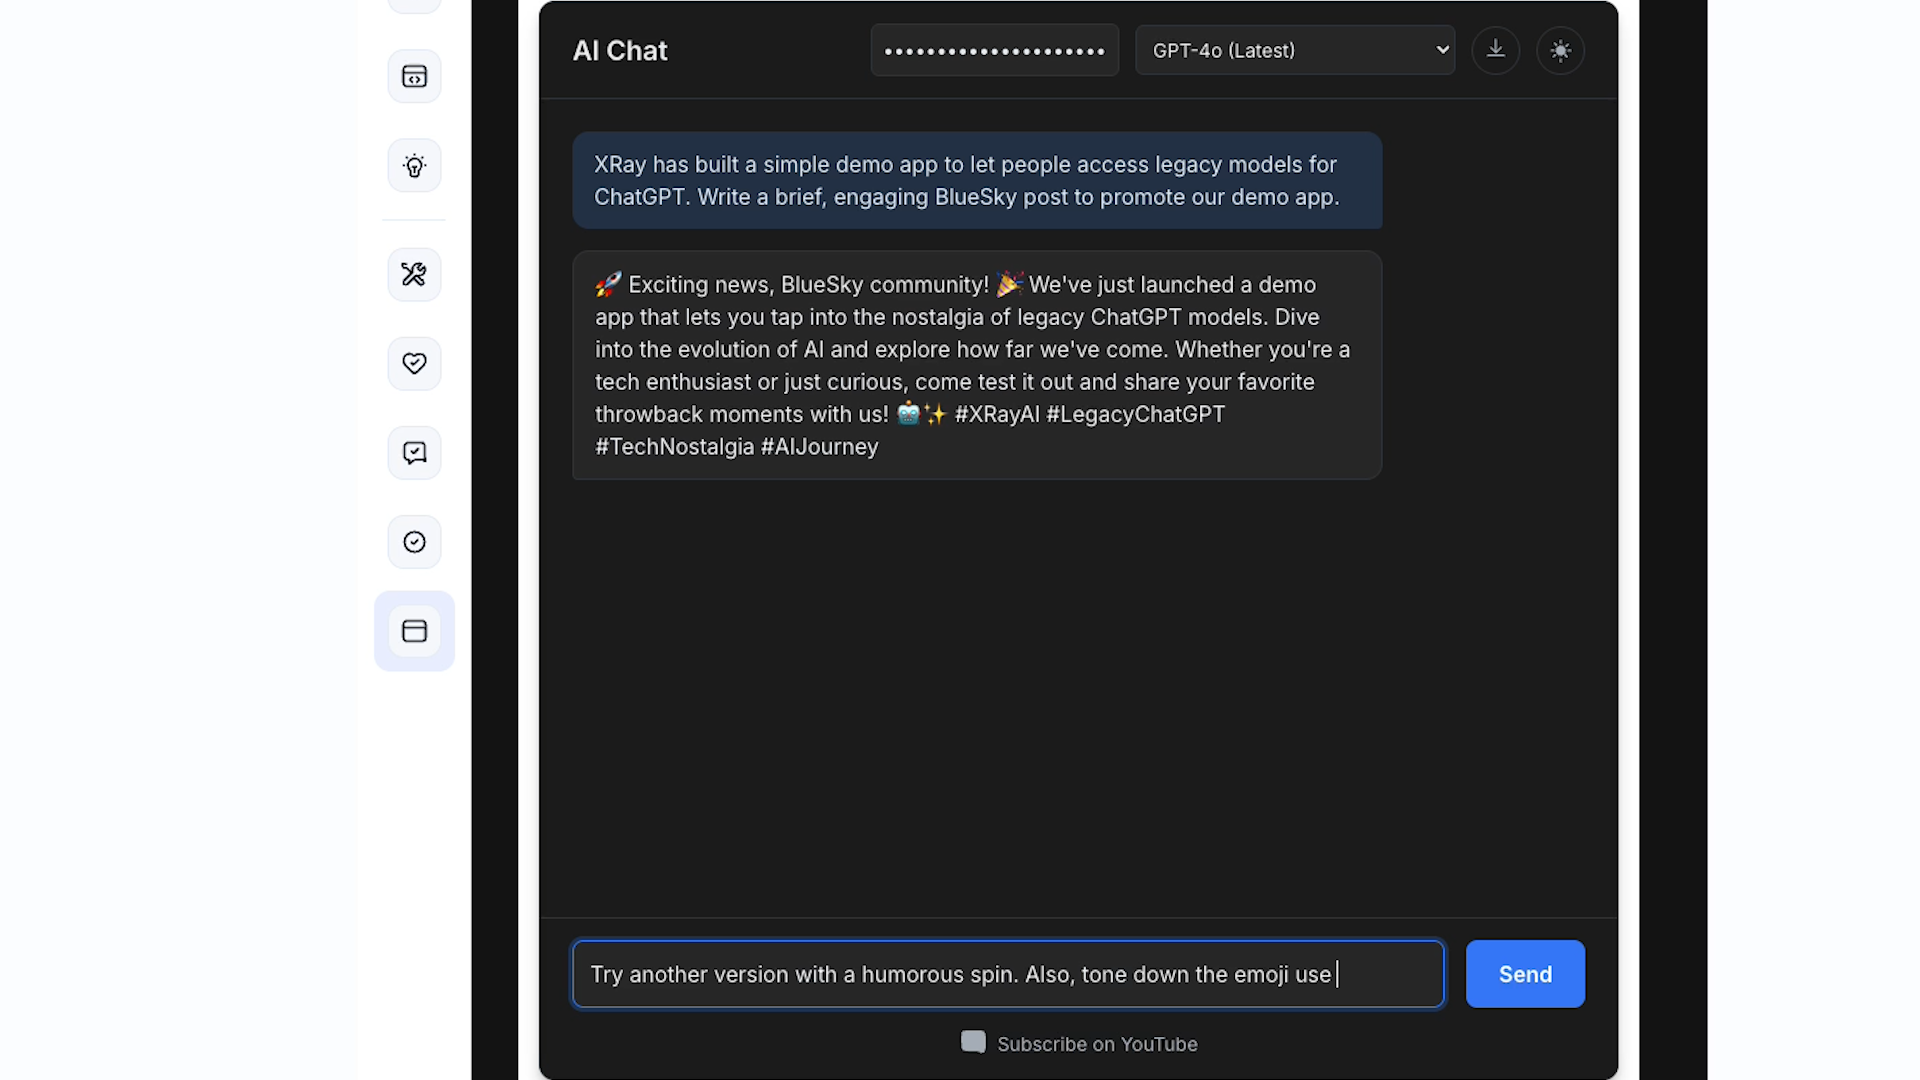
This serverless tool took about 10 minutes to build using Gemini AI assistance and includes:
• Direct access to GPT-4o variants
• Support for older models like GPT-3.5 Turbo
• Standard chat interface functionality
The app requires only an OpenAI API key to function. Users can select their preferred model and interact with it just like ChatGPT, following up on each response with a new message.
IMPORTANT: While this custom app demonstrates what's possible, treat it as educational rather than production-ready:
• Use disposable API keys for testing. Revoke the keys after trying the demo.
• Set low spending limits on your OpenAI account
• Avoid using on unsecured networks
• Consider it a proof-of-concept, not a long-term solution.
For no-code or low-code builders, the real power of API access becomes apparent when you integrate it with automation platforms like Zapier, Make, n8n, or Pipedream. These tools let you build sophisticated AI workflows without writing code.
By accessing OpenAI’s API, you can send automated prompts to your chosen model, making your frequently-used AI tasks more systematic and scalable.
You can also integrate dynamic data retrieved from other apps into your automated prompts, ensuring that each prompt includes rich context without needing to copy and paste new data every time.
No matter which platform you’re using, every AI automation contains three core components:
1. Trigger: The event that starts the automation
2. AI processing: Sending your custom prompt with dynamic data
3. Output handling: Transferring the AI's response to one or more other apps
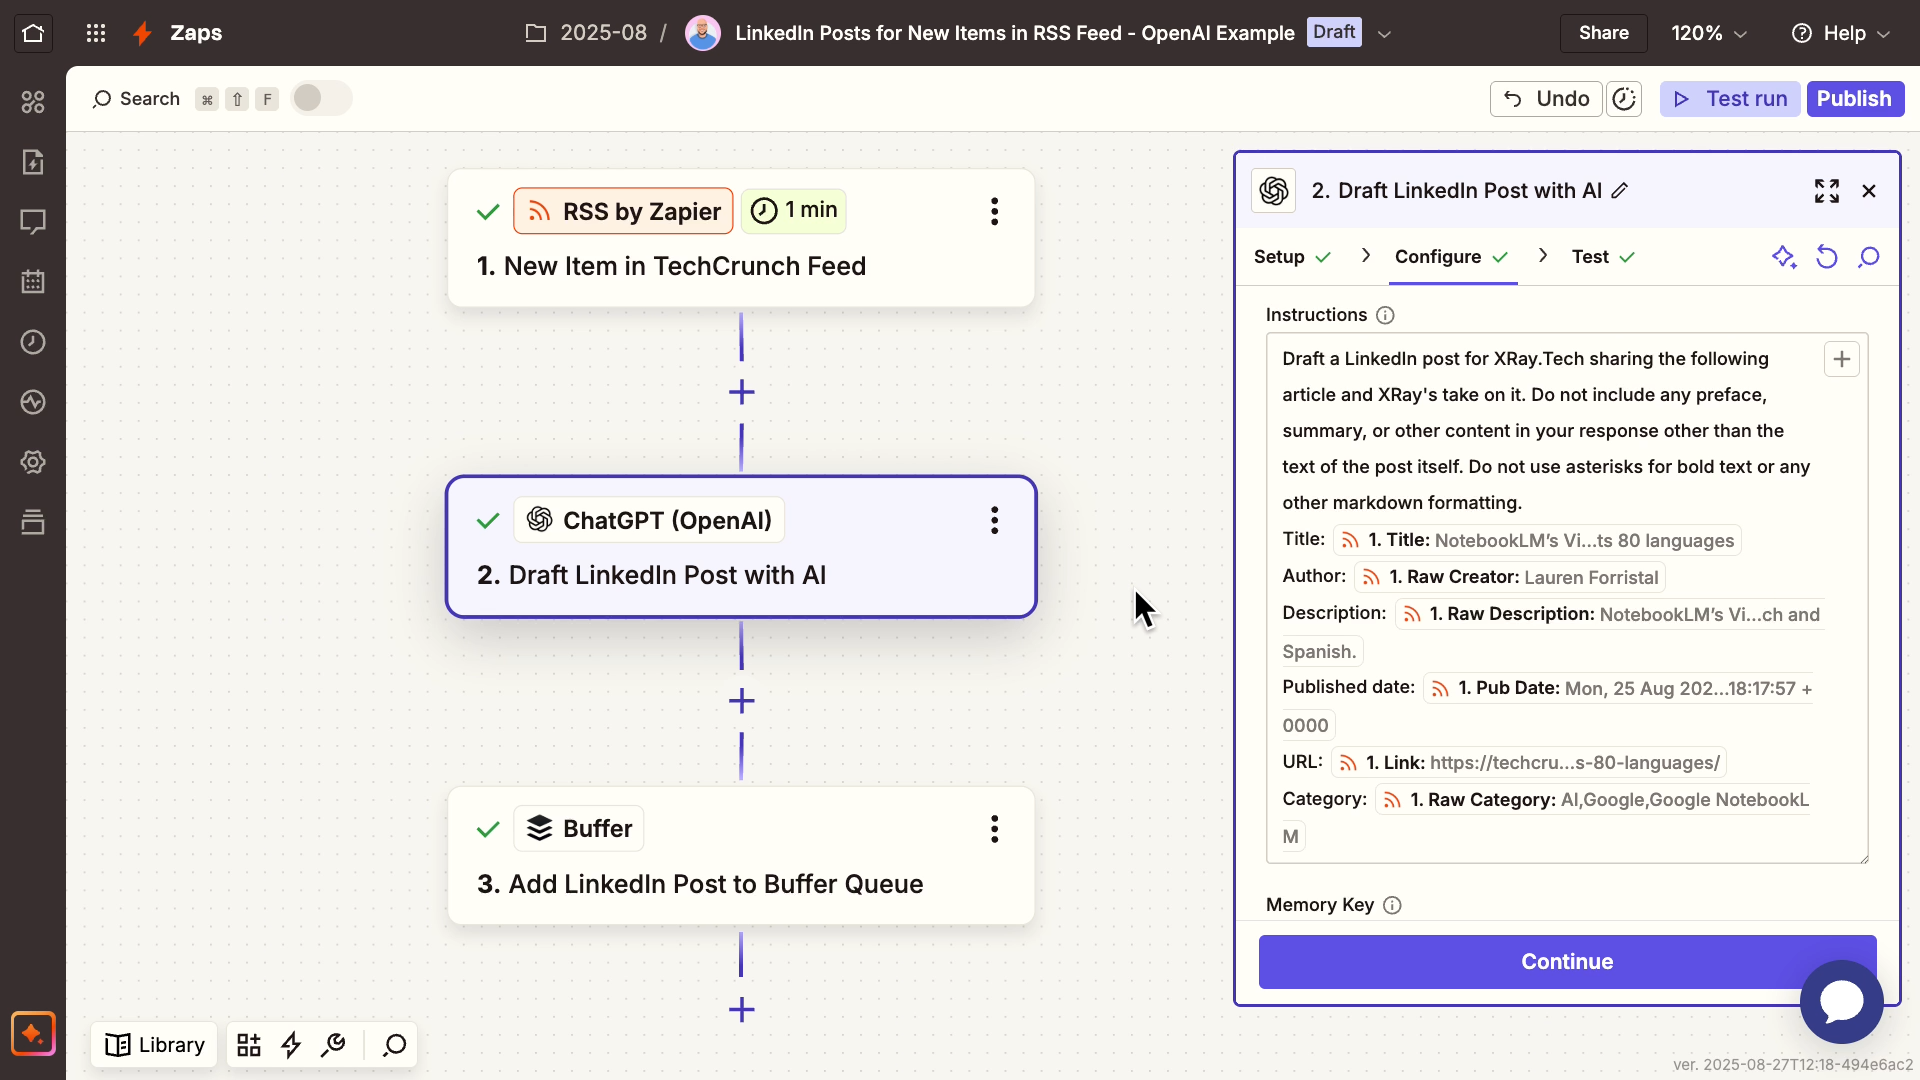
Here's how we built an automation that generates social media content from RSS feeds:
The Setup:
Trigger: New item appears in RSS feed
AI Step: GPT-4o processes the article with a custom prompt
Output: Draft gets sent to Buffer for review and publishing
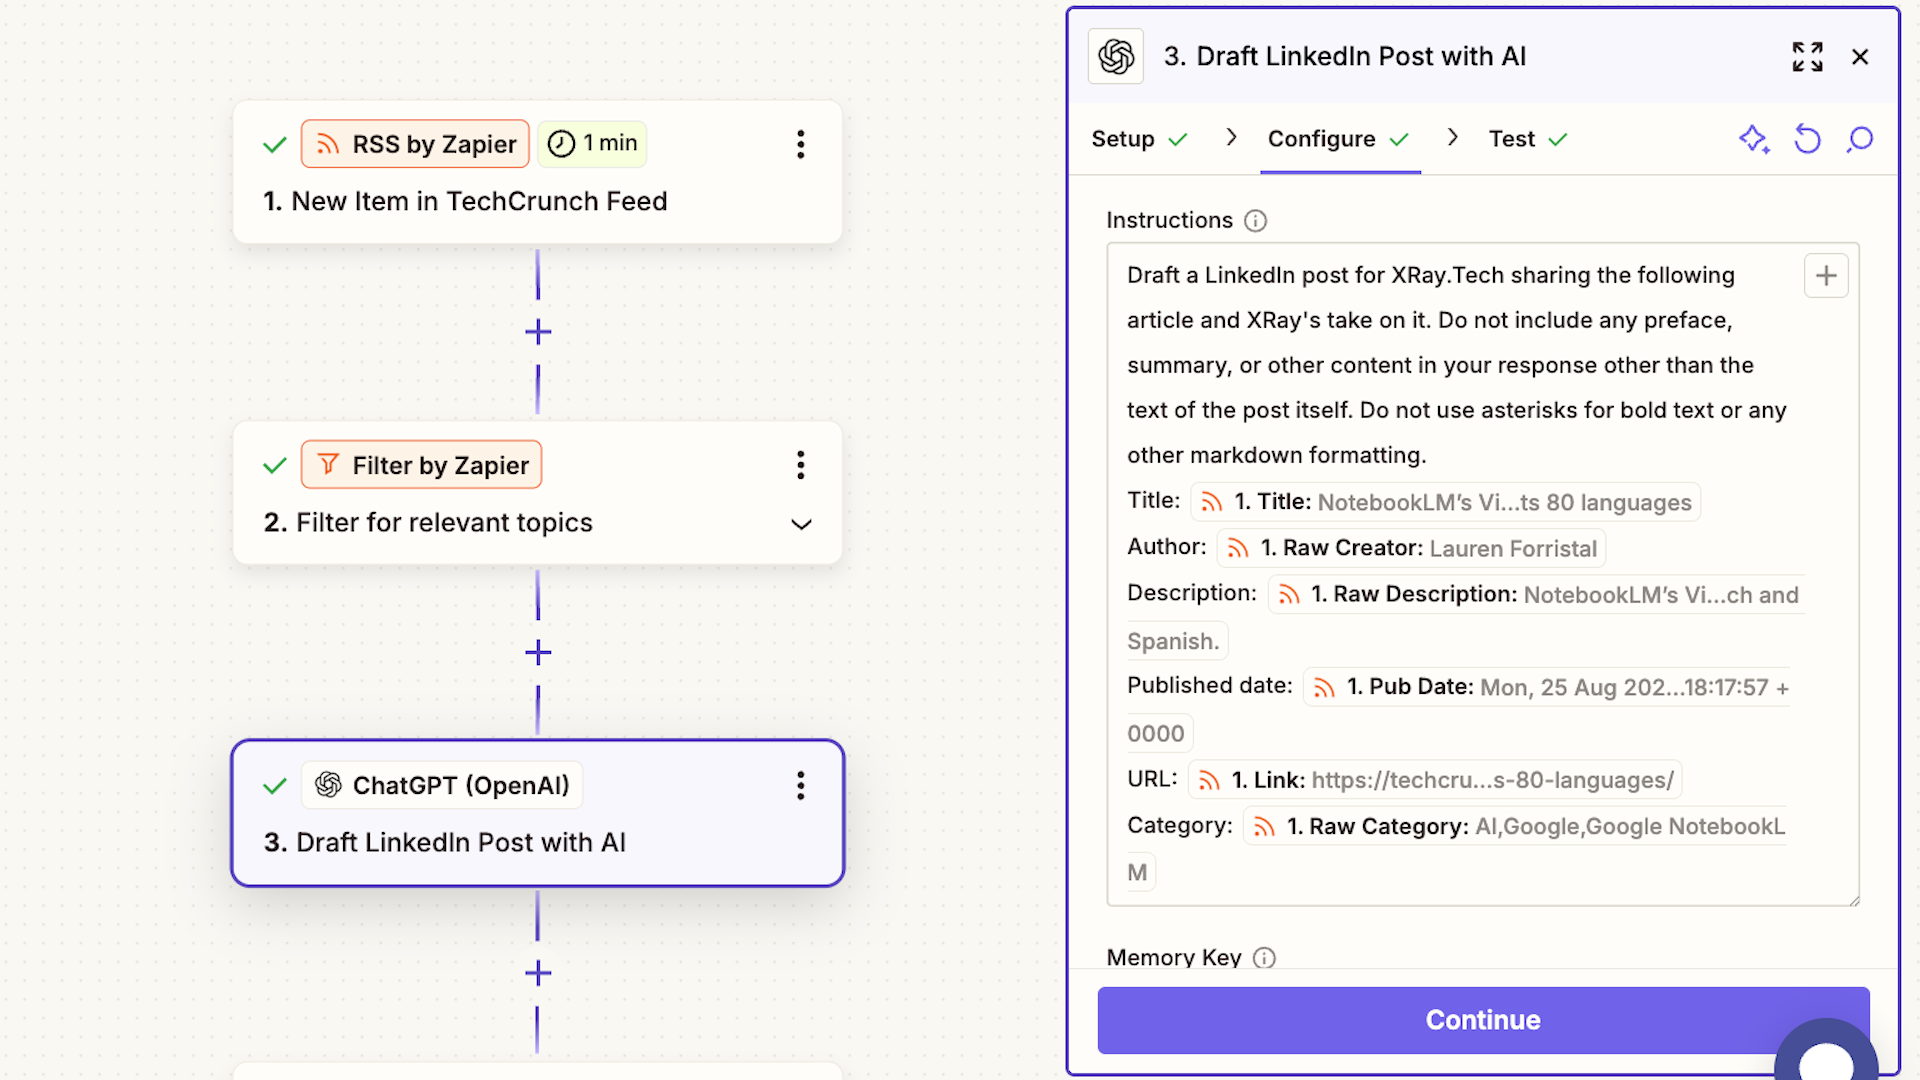
Dynamic Data Integration: The prompt includes variables from the RSS feed (e.g., article title, summary, URL), ensuring each post is unique and relevant rather than using static text.
If you’d like to learn how to build similar AI workflows, we’ve created several tutorials exploring AI automation.
You can check out these tutorials for detailed, step-by-step walkthroughs, or continue reading for a brief overview of the process in Zapier.
• Automate Claude/Anthropic with Zapier
Step 1: Set up your OpenAI account
• Visit platform.openai.com and create an account
• Purchase credits (start small - $5 is plenty for initial testing)
• Generate an API key from Settings > API Keys > Create New Secret Key
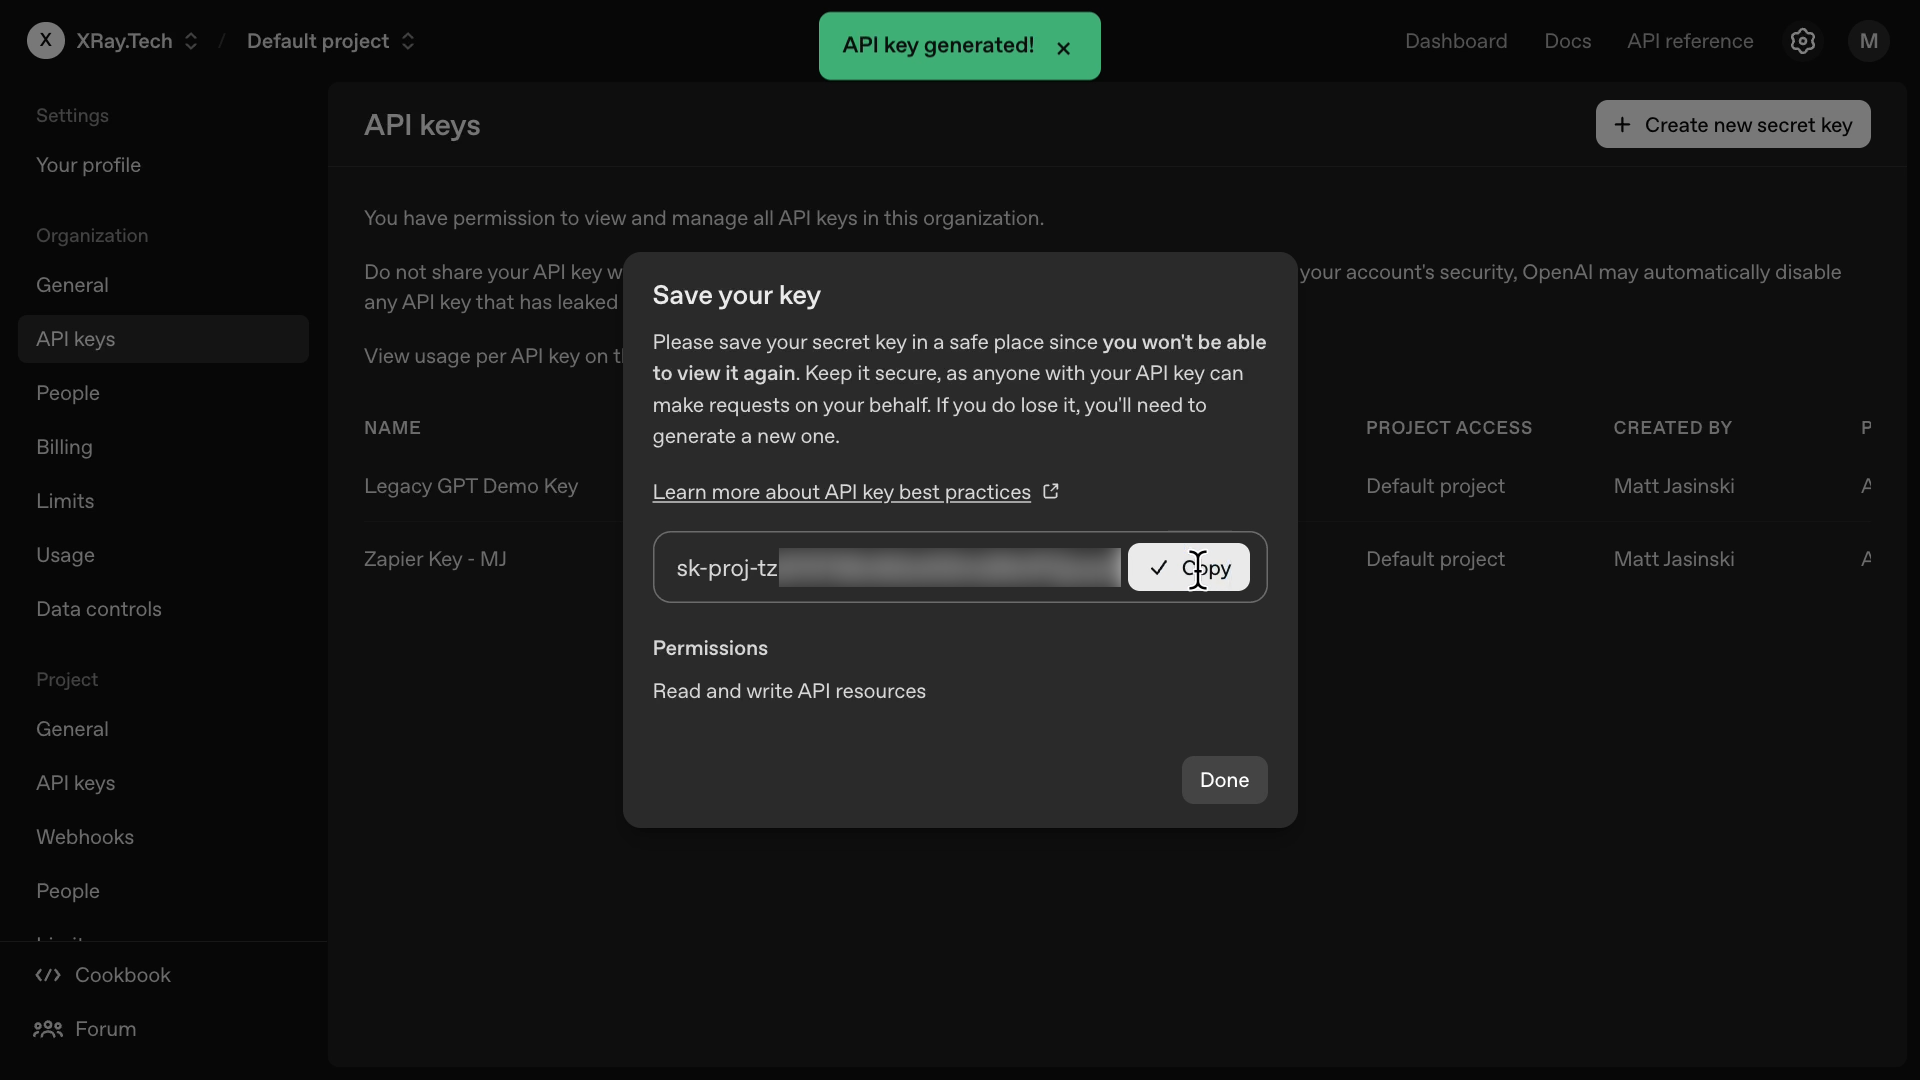
NOTE: You will only be able to copy your secret key right after creating it. If you lose the key, you’ll need to create another one.
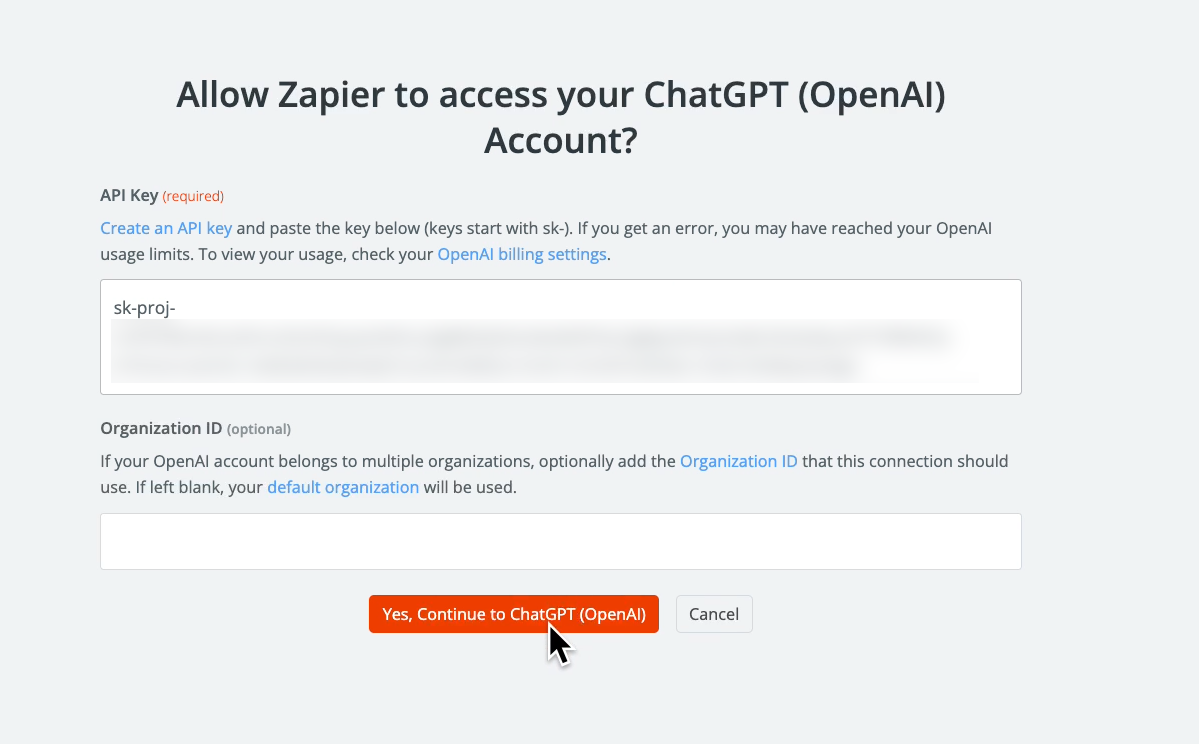
Step 2: Connect OpenAI to Zapier
Create a new connection in Zapier under “App Connections”. Select OpenAI as the service.
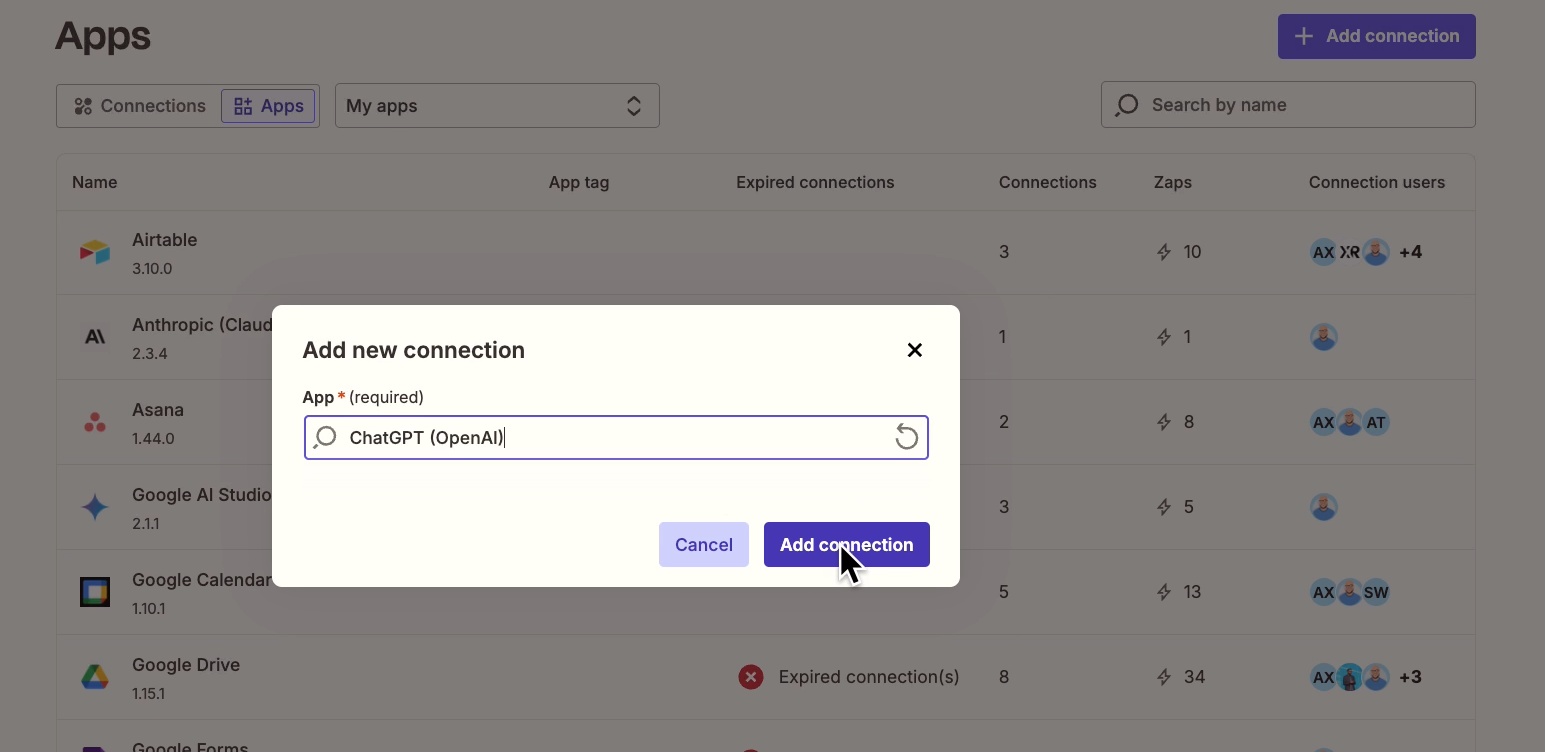
Enter your API key to establish the connection.
Step 3: Build your first automation
1. Choose your trigger (new email, CRM update, scheduled time, etc.)
2. Configure the AI step with your custom prompt
3. Add variables to incorporate dynamic data from your trigger
4. Set up output actions to send results to any app where you need them
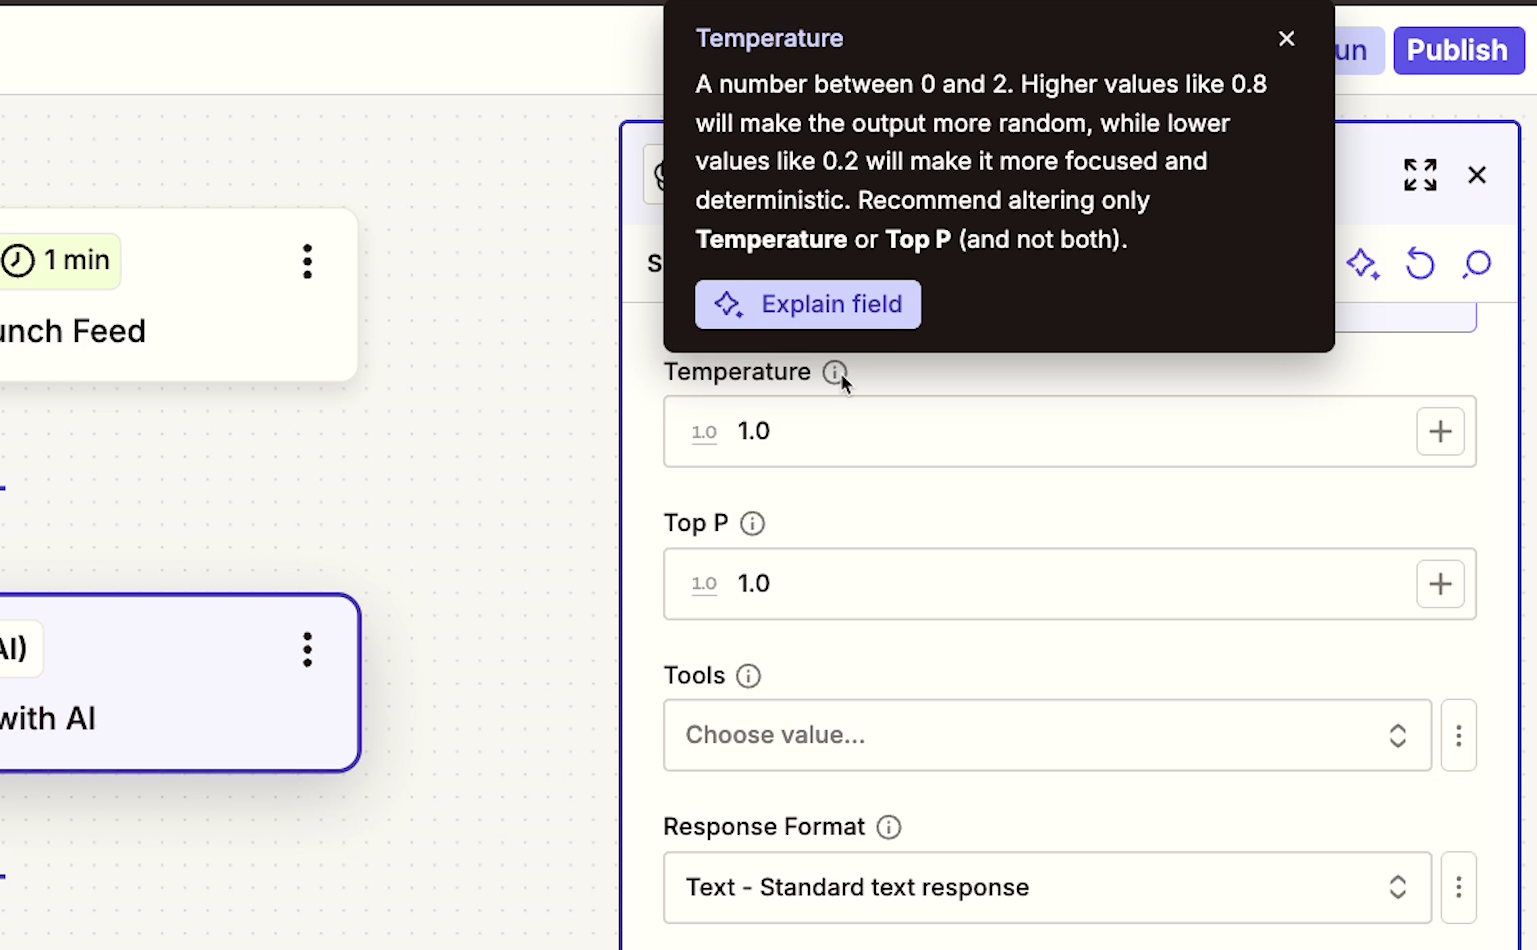
The API approach offers precise control over AI behavior through advanced settings, like temperature, max tokens, top k, and more.
You can click on the “i” symbol next to each to learn more about how these settings work.
API usage is surprisingly affordable - typically just a few cents per prompt. Combined with automation platform costs (usually $10-30/month), this approach often pays for itself through time savings.
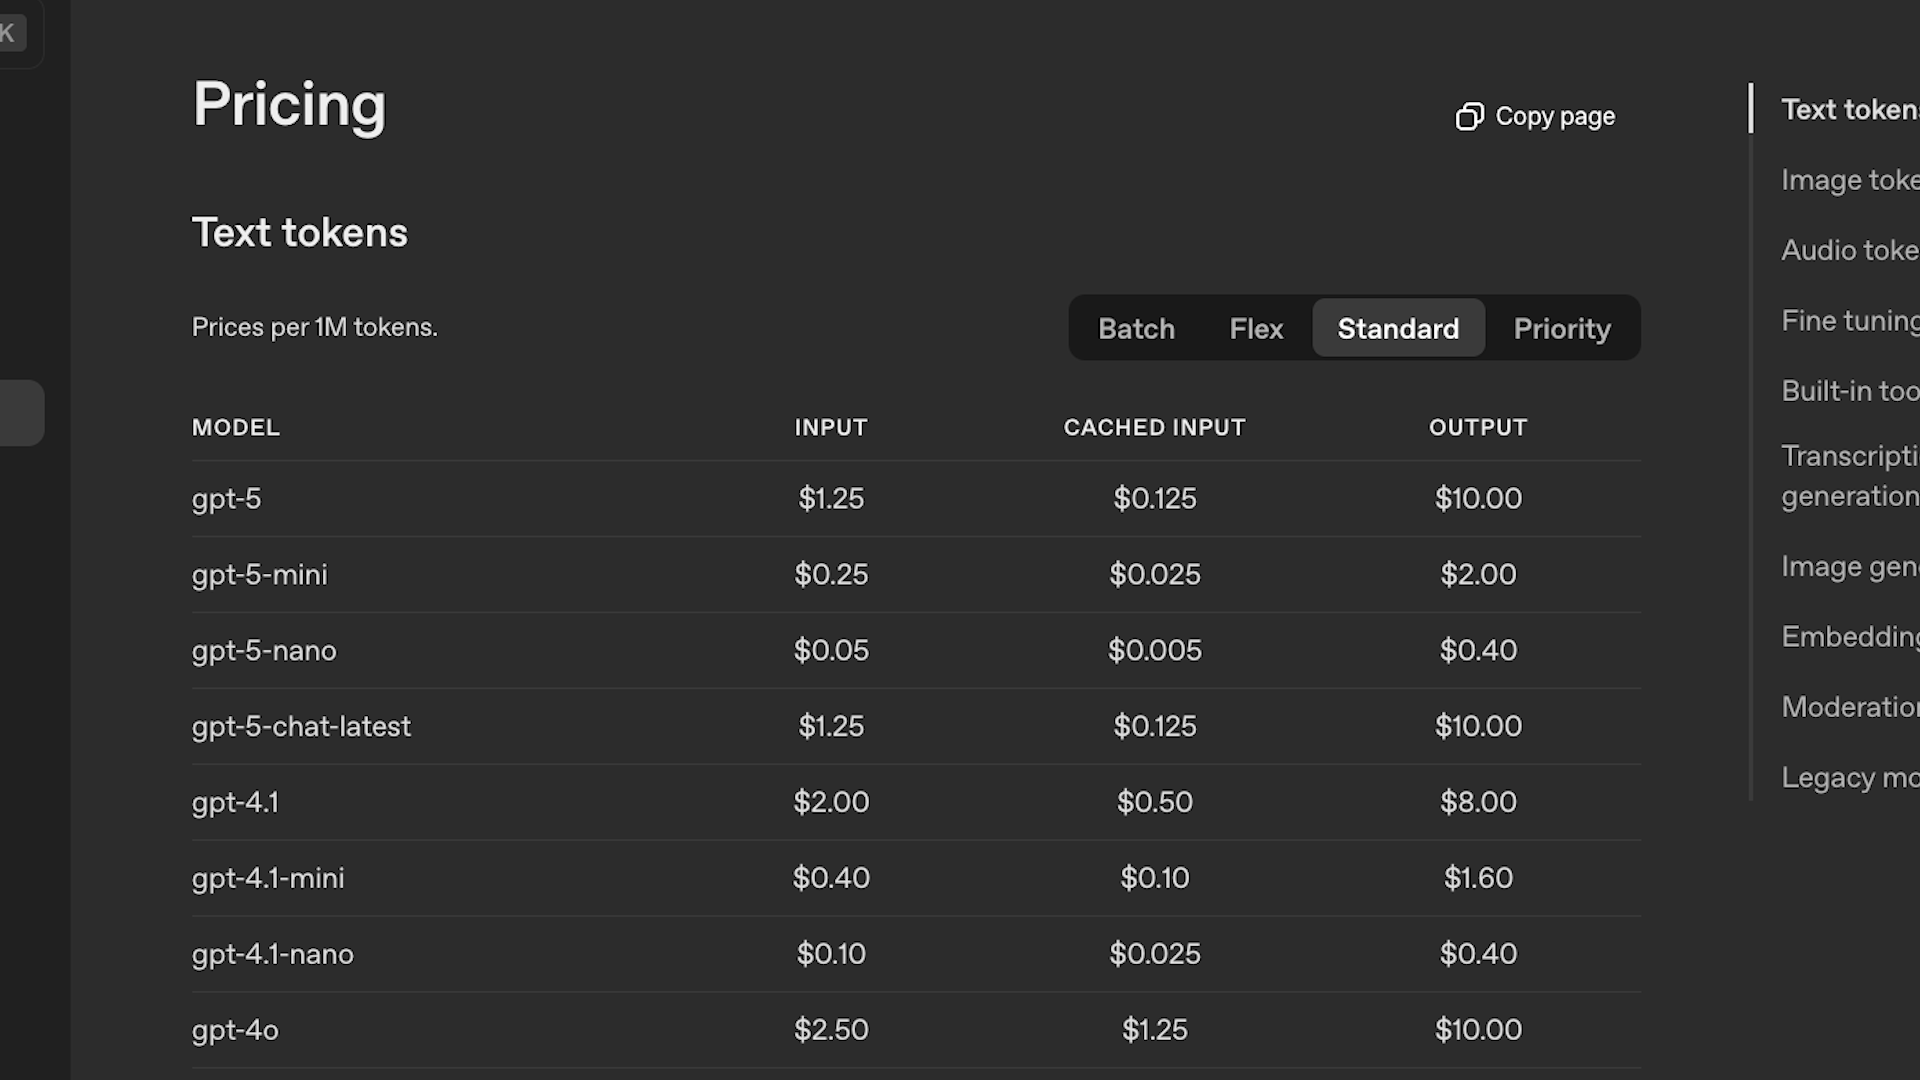
You can explore OpenAI’s API pricing in more detail here.
With over 8,000 apps available in platforms like Zapier, you can connect AI to virtually any business tool: Notion, WordPress, Slack, Gmail, HubSpot, and countless others.
AI technology moves quickly, with OpenAI, Anthropic, and Google constantly competing to deliver the latest advances. However, newer doesn't always mean better for every use case.
If GPT-4o better suits your specific needs - whether for its writing style, reasoning approach, or specialized capabilities - you shouldn't feel pressured to switch immediately.
The methods outlined here ensure you can continue using your preferred models while exploring what newer options offer. The API approach, in particular, opens doors to AI integration possibilities that extend far beyond simple chat interactions.
Whether you choose the quick settings fix or dive into API automation, you now have the tools to keep using the AI models that work best for your specific needs.
Need help setting up AI automations for your business? Our team at XRAY.Tech specializes in designing custom AI workflows that save time and streamline operations. We also offer one-on-one guidance through XRAY Hourly.com for hands-on learning and implementation support.


.pptx.png)
.pptx.png)