
If you’ve explored the no-code and low-code automation space, you’re probably already familiar with programs like Zapier that let you connect your apps together to build automations.
While Zapier is a great place to get started, and an indispensable tool for automators of any skill level, Make will give you access to more advanced techniques.
Make (formerly known as Integromat) is similar to Zapier, but offers a wider range of functions for each of the apps it supports. Conversely, Make doesn’t support as many programs as Zapier, and its more advanced technical features make it a little more difficult to learn.
In this post, we’ll walk you through a couple of simple Make automations to help you get started with the platform and show you how it works. The first automation will create an archive of every message sent in a specific Slack channel, while the second will delete messages from that archive once they’re over 1 month old.
First, create a database in Airtable where you’ll store your archive. You can also use Google Sheets if you’d like, but you’ll need to modify some of the steps in the tutorial.

Create a new “scenario” in Make, and give it a descriptive name. You may also want to use folders to keep your automations organized.
Unlike Zapier, Make doesn’t fully separate automated steps in “Triggers” and “Actions”. Instead, you’ll have to make a new module and find the right trigger from the list: “Watch Public Channel Messages [Acid]”.

The “ACID” tag means that this is an action that conforms to ACID criteria for database transactions. In Integromat, this effectively means that this module will rollback any actions it performed if it encounters an error. It will either run successfully, or it won't run at all.
You don't worry too much about the ACID tag when you're getting started with Integromat, but it's a good thing to keep in mind as you're building your scenarios.
Sign in to your Slack account, and choose the channel you want Make to watch for new messages.
To test your trigger, right click on it and select “Choose where to start” >”choose manually”. Pick a message from the list, and then click on the “Run once” button. You’ll want to do this every time you need to test your scenario.
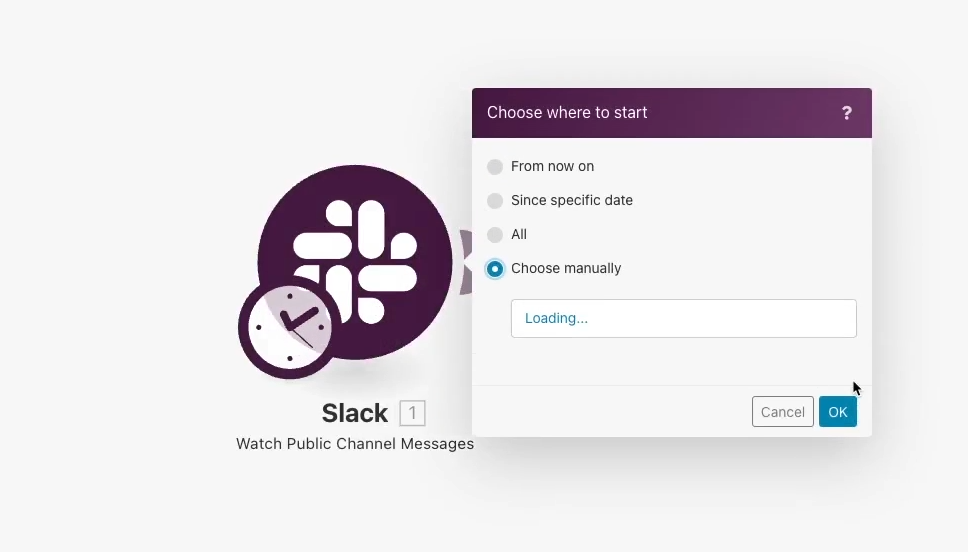
By choosing your starting point manually every time, you’ll ensure that you’re using the right test data.
Check the information that Make pulls in from Slack. You should see things like the user ID of the sender, the message content, the date it was sent, and more.
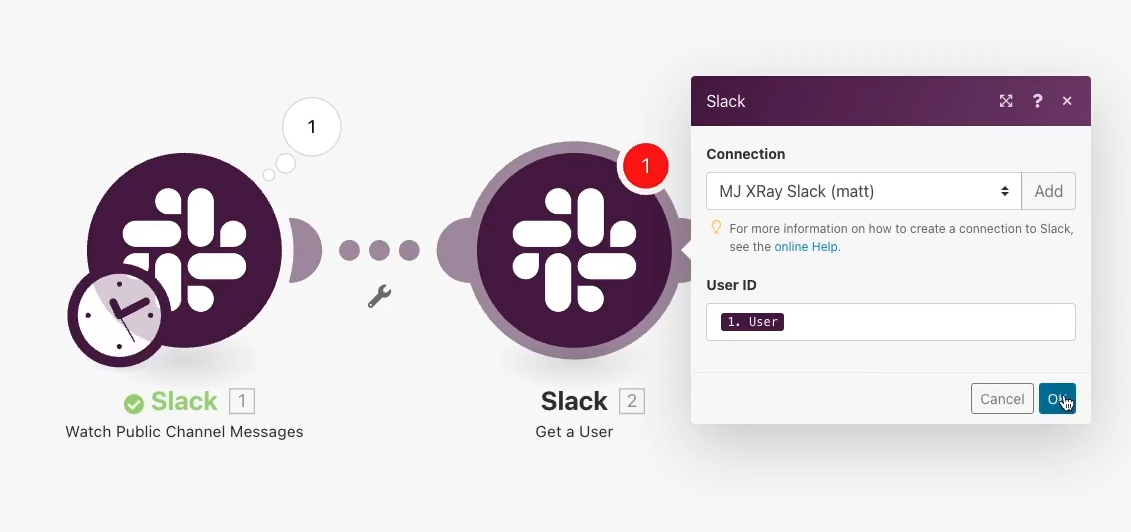
What you won’t see in the module’s data is the user’s name. If you’d like to attach a name to the message rather than just a string of random characters, you’ll need to add another step to look up the username based on the retrieved ID.
Add a new Slack module, and select “Get a User”. For the ID, enter the “ID” data pulled in by the first module.
Test the scenario again by right-clicking on the first module and selecting “choose where to start manually”, then clicking on “run once”.
Click on the number by the second module to see the data it retrieved, and you should see the user’s name among several other pieces of info.
Create a new module and choose Airtable. Select “Create a record”, sign in to your Airtable account, and choose the base and table that you want to use for this automation.
Populate it with the information you’ve gathered from the previous modules, like the message content, its send date, the user who sent it, etc.
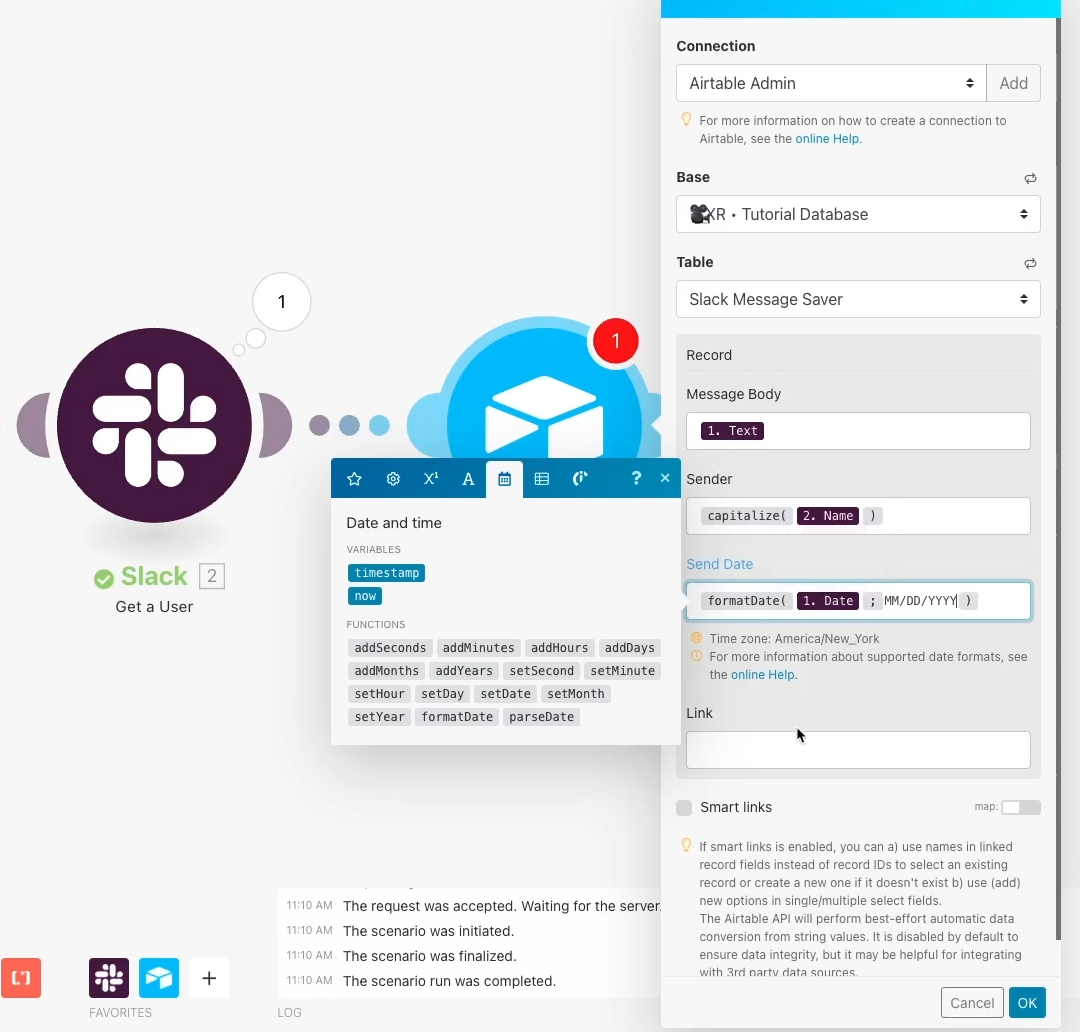
While Zapier requires additional steps to format text and dates, Make allows for easy in-line formatting. Just click on the “A” icon to bring up text formatting functions, or the calendar icon for date formatting.
Once you’ve finished setting up the module, test the scenario again using the same procedure we’ve outlined before.
Check Airtable, and you should see new messages there.
Our second automation will delete messages from our Airtable archive once they’re a month old.
Deleting records is one of the most basic functions that sets Make apart from Zapier. While Make supports deletion in most of its modules, Zapier doesn’t support it in any of their integrations as a rule.
You need to be careful when adding a step to delete records in your automations, but it can be very useful if you don’t want old data hanging around and piling up forever.
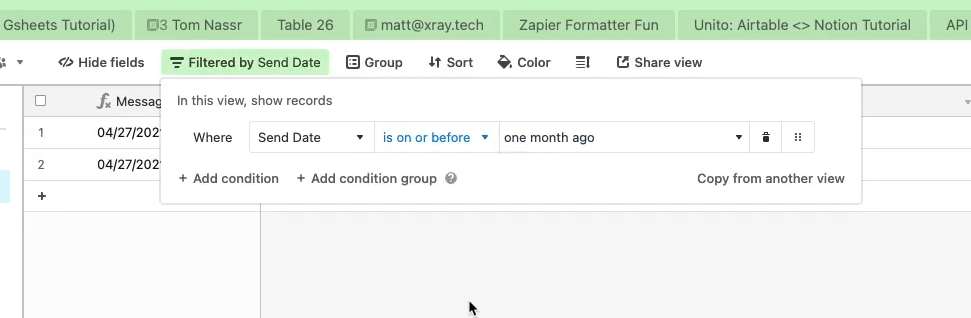
In your Airtable base, add a new view to your table called “Old messages”. Add a filter so that the view will only include records where ‘Send date’ is on or before one month ago.
Our next Make scenario will watch this view for new records. If you don’t have any old records to test with, just change the date on an existing record to make it fit the criteria.
You’ll also need to add a “Last modified” column to this table so that Airtable can tell when each record was added or updated.
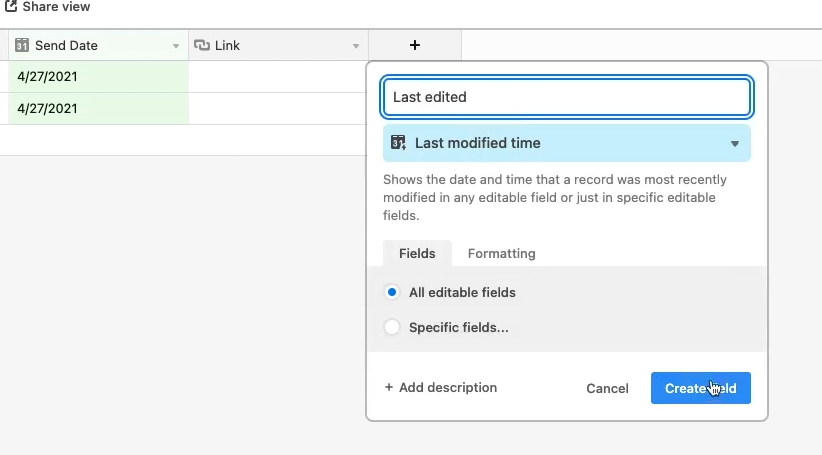
Make a new scenario, and choose Airtable for your first module. Select “Watch Records [Acid]”, and pick your base and table. Use your “last modified” column as the trigger field and choose the “Old messages” view.
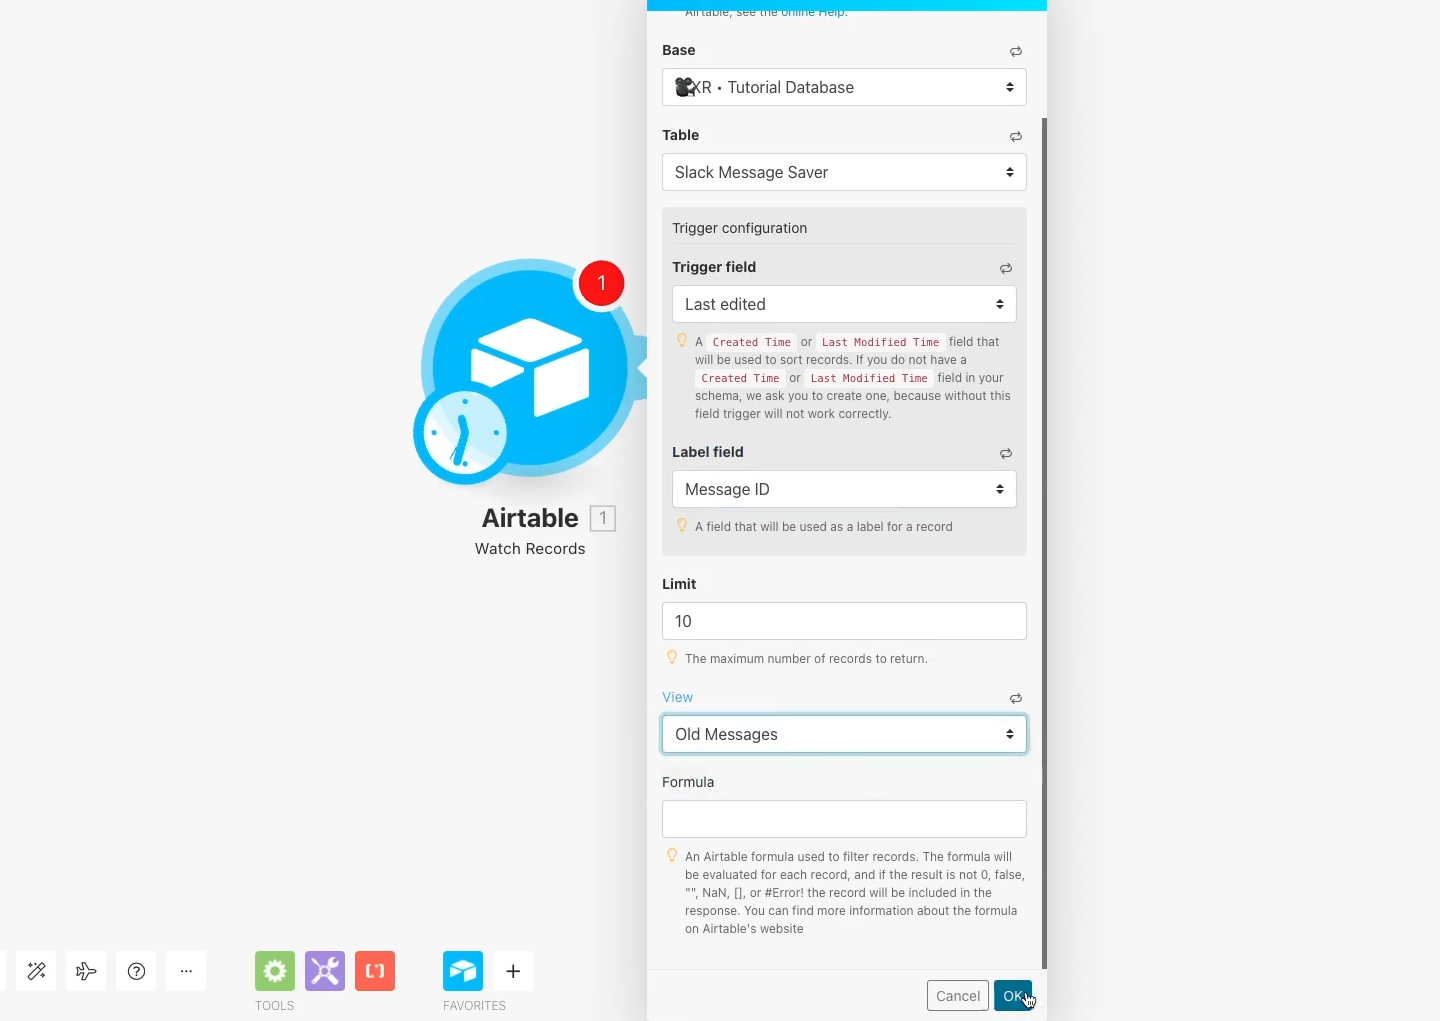
Test the module, and confirm that the right message(s) have been retrieved.
Add a new Airtable module to your scenario and choose “Delete Record”. Choose your base and table, and enter the record ID that Make retrieved in the first module.
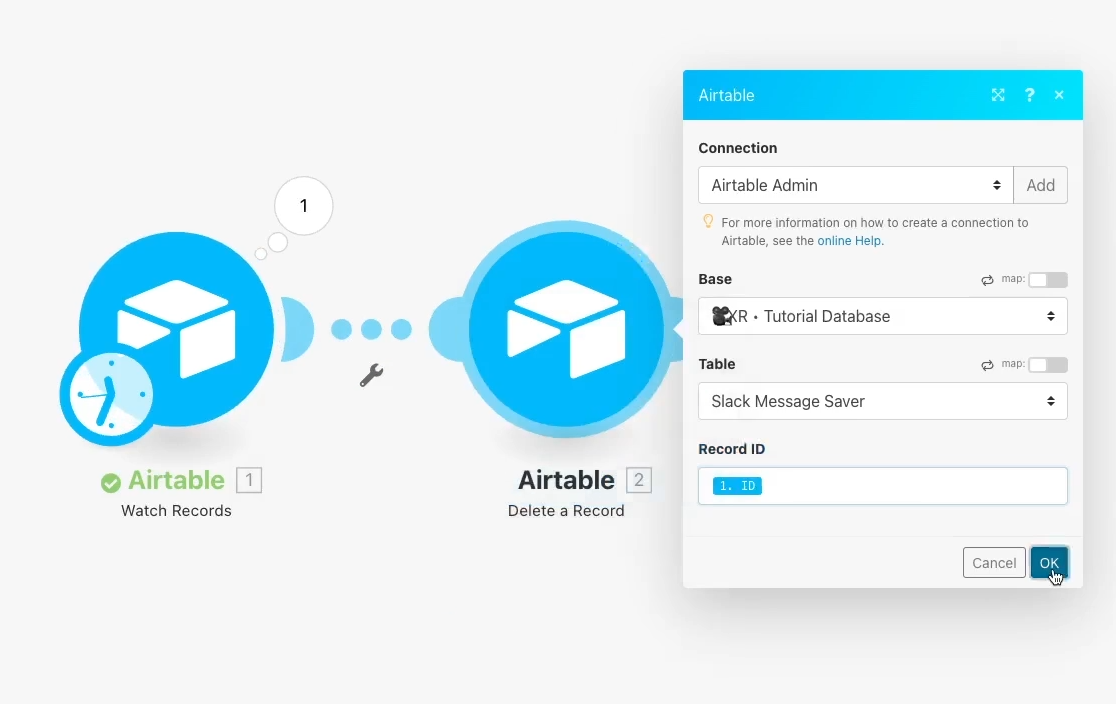
Test your scenario again, and then check Airtable to confirm that your old records have been deleted.
When you’re comparing software like Make and Zapier, there’s no one, universal right answer for which software is better. Ultimately, each tool will be better suited to certain situations. If you need more extensive and precise control, Make will likely be the better choice, but it will require some more experience to use. If you need to support a huge range of software, Zapier will likely be the ideal option, but won’t offer as many automated actions.
At XRAY, our techs know how to use both of these platforms and more so that they can use the right tool for every job, and we encourage other automators to do the same. If you’d like to learn more about Make, Zapier, Unito, and other automation platforms, check out our blog or our YouTube channel. You can also follow XRAY on Twitter, Facebook, or LinkedIn.

.pptx.png)

