
Are you tired of juggling multiple no-code tools just to build one application? What if you could create complete web apps with databases, forms, and automation all in a single platform?
That's exactly what Knack offers. In this guide, we'll show you how to get started and build your first Knack app from scratch, even if you've never used a no-code tool before.
In a nutshell, Knack is an all-in-one platform for creating internal and B2B applications that connect you and your team with your customers, partners, contractors, or members.

Unlike static website builders, Knack apps are dynamic and powered by custom databases you build right within the platform.

Everything in Knack is created and customized through an intuitive no-code interface. You can design your entire application, build forms, and style everything to match your brand without writing a single line of code. You can even host your Knack app on your own custom domain.

One major advantage? Knack has no per-user fees. You can roll out the apps you build to as many internal and external users as you want without increasing your costs.
Knack is ideal for anyone looking to build applications for internal use or for working with clients and customers. It's perfect for creating apps like:
• Custom CRMs
• Task management systems
• Customer and member portals
• Inventory trackers
• Project management tools

It's not the best fit for consumer-facing apps or if you need a native mobile application. However, if you need to build a fully responsive web app and portal for your business, it's an excellent choice.
Where Knack really shines is providing convenience and cost savings by replacing multiple specialized tools. With one tool, you can potentially replace:
• Database apps like Airtable or SmartSuite
• Automation tools like Zapier or Make
• Frontend website builders like Softr or Webflow
• Form tools like Tally
• Appointment scheduling software like Calendly
• Time tracking tools like Toggl or Harvest
You get all of this functionality in one place under one subscription. This means your team can work and collaborate within a single system instead of constantly switching between different applications.
And if you’re not fully replacing these tools, you can easily connect your Knack app to the rest of your software suite.
Knack's built-in automation capabilities allow you to create workflows that integrate with tools you're already using. It connects with over 500 different applications, including HubSpot, Airtable, Jira, Microsoft Teams, Google Workspace, DocuSign, MailChimp, Slack, QuickBooks, and even OpenAI.
You can see a full list of Knack’s integrations here.

While it doesn't match Zapier's 8,000+ integrations or Make's count of 2,000+, Knack covers most of the popular software that SMEs rely on.
Now that you understand what Knack is and what it can do, let's dive into creating your first app. We'll walk you through the process step by step.
When creating a new app in Knack, you have several options.
In addition to building from scratch, you can generate a working prototype with AI by writing a quick prompt, start from over 90 pre-built templates designed for specific use cases or import data from a Google Sheet or CSV.

For beginners, starting with a template is often the fastest way to learn. Let's use the Project Manager template as an example.

Before making any changes, it's important to understand the three main building blocks of any Knack app. Explore your app in the builder to see how each of these components are set up in the template.
Tables store the data that you and your users can display, edit, and update through your Knack application. You can create connections between various tables to build relationships between your data.

For instance, the Project Manager template includes tables for Projects, Tasks, and Task Notes

Each task is connected to a project, and every task note is connected to a task. This relational structure is one thing that makes apps like Knack powerful. You can reference the same information in several different places without needing to create redundant entries.
Under the Users section, you'll see all users registered with your app, categorized by their roles. The Project Manager template has two roles: Project Managers, and Team Members.
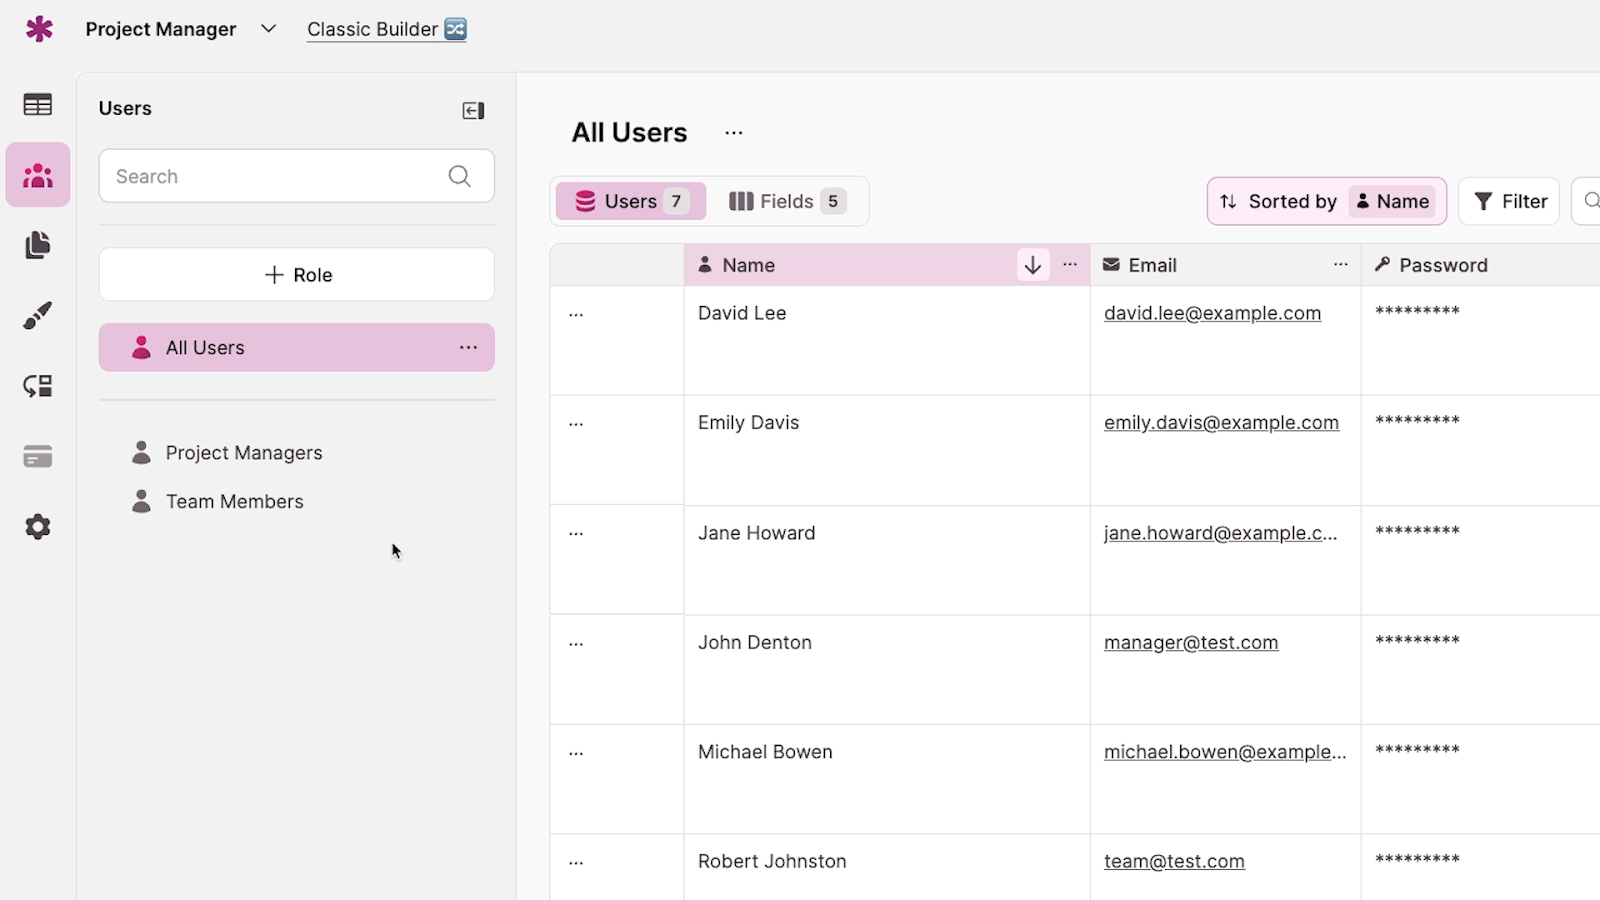
By splitting users into different roles, you can grant them access to different pages and elements within your app.
Pages are where your users interact with your app. Each page can include static content (text, images) and dynamic data from your tables.

In the Project Manager template, you’ll notice some pages are locked with a padlock icon, indicating they're restricted to certain user roles.
For example, the Projects page is only visible to project managers.
Need help building automated systems for your company but don't have the time to do it yourself? XRAY specializes in creating custom solutions with Knack and dozens of other no-code platforms.
We've helped businesses of all sizes build powerful tools that save thousands of hours of manual work.
Schedule a free 15-minute consultation to get started. We'll discuss your specific challenges, and determine your best options for automating and optimizing your company’s workflows.
Now that you understand the basic structure of your Knack template, let's make some simple customizations.
You can add any new fields that you want to any tables in your template. There are several different field types with varying options for customization, but they’re all straightforward to set up.
For example, let's add a priority field to the Tasks table. Select Tables, then open the “Tasks” table. Then, click "Add Field”.

Name it "Priority", and choose "Multiple Choice" as the data type.

Edit the default options into appropriate choices like "High priority," "Normal priority," and "Low priority"

You can also add additional choices to the field if you’d like. We’ll add “Urgent” and “Backlog” in our example.

By setting a default value, you can ensure that every new record uses the same value for this field unless otherwise edited. We’ll set "Normal" as the default value in our example.

Click Save to finish adding your new field to the table.
When you add a new field, you'll need to update any elements that display that data. Otherwise, you won’t be able to see your field on the live site.
To update an element to include newly added fields, go to Pages, and choose the page containing your tasks list.

Select the table element, and click on "Fields and Display Rules".

Then, click on the “Fields” tab to see a list of all fields from the connected table.

Add or remove any fields you’d like by checking or unchecking the boxes next to each.

While we’re editing this table element, let's also give users the ability to edit their tasks. This will add a new “Edit tasks” field to the table, which will include a button for each record. When users click on the button, they’ll be able to fill out a form to edit the task in question.
With the tasks table element selected, click on "Actions".

Choose "Edit Record". Then, click “Save Changes”.

Click on the new “Edit task” field in your table element.

Then, click on the link under “Linked to”. This will take you to the form that users will see when they edit a task.

In the form that appears, remove any fields you don't want users to edit by unchecking them. For instance, we’ll remove every field except the Task Name, Task Details, and Status fields. Those three will be the only editable fields.

Be sure to save your changes when you’re done.
Knack also makes it easy to customize the look and feel of your app to match your company’s visual brand.
To start customizing your app’s aesthetics, go to Themes.

Create a new theme, then click on it to edit it.

Creating a new theme gives you control over several important visual elements.
For instance, under the “Styles” tab you can adjust the main accent color – this is the color used for buttons, links, and other interactive elements throughout your app.
You can pick from one of the preset color swatches, or if your brand has a specific hex code, you can enter it directly for precise color matching.

One particularly useful feature is Knack's ability to adapt to user preferences regarding light and dark mode.
You can choose whether your app will display in light mode only, dark mode only, or switch automatically based on each user's system settings.

This thoughtful touch improves accessibility and user experience across different environments and times of day.
Under the Layout tab, you'll find options for further customization.
Here, you can upload your company logo to reinforce brand identity, customize the app title, and choose between horizontal or vertical navigation based on your users' needs and the nature of your application.

While Knack doesn't offer the detailed aesthetic customization you might find in dedicated website builders like Webflow or WordPress, this is by design.
The focus remains on functionality and usability rather than pixel-perfect design control. This approach keeps your development process streamlined while still providing enough visual flexibility to create a professional, branded experience.
After making changes, it's important to test your app to ensure everything works as expected.
From the builder, you can click on "Live App" to see how the published version looks and functions in your browser.

Navigate through the different pages to make sure everything looks as expected.

Try creating, viewing, and editing records to make sure everything works as planned.

Once you’ve confirmed one user role, test the app using different user accounts to verify role-based permissions.
Now that you've built and customized your first Knack app, you're ready to explore more advanced features like:
• Building custom portals for different user types
• Setting up automated workflows
• Integrating with external tools
• Creating scheduled tasks for reminders and notifications
The possibilities are nearly endless, and with Knack's all-in-one approach, you can build powerful business applications without the complexity of juggling multiple platforms or the expense of hiring developers.
If you're new to the no-code space and want to learn one affordable tool instead of multiple solutions, Knack might be the perfect place to start your journey.
This is the first in our series of Knack tutorials. Continue on to Part 2 to learn how to customize your app further with a fully functional Client Portal!
Need help building custom Knack solutions for your business? Schedule a free consultation call with our team of no-code experts.


.pptx.png)
.pptx.png)