
As a global pandemic has prompted a dramatic increase in remote work, video meeting apps like Zoom have been a vital tool for staying connected and conducting everything from routine meetings and casual chats to major conferences and events.
One of the added benefits of using Zoom is the ability to create permanent records of each call. Not only does Zoom offer cloud recordings for all of your calls (if you have a paid plan), but you can also use third-party software to transcribe those calls. Transcriptions are a great way to generate notes, review past meetings, or create content from recorded events.
In this post, we’ll show you how you can build a simple, 3-step Zapier automation that will save your Zoom recordings to Google Drive, and then send them over to Trint for transcription.
1. Trigger: New Recording in Zoom
2. Action: Upload File in Google Drive
3. Action: Upload File in Trint to Create a Transcription
For this automation, you’ll need:
• Zapier
• Zoom
• Trint
Zoom and Trint will both require paid subscriptions for this automation, as Zoom only offers cloud recording for paid plans and Trint is a subscription-only service.
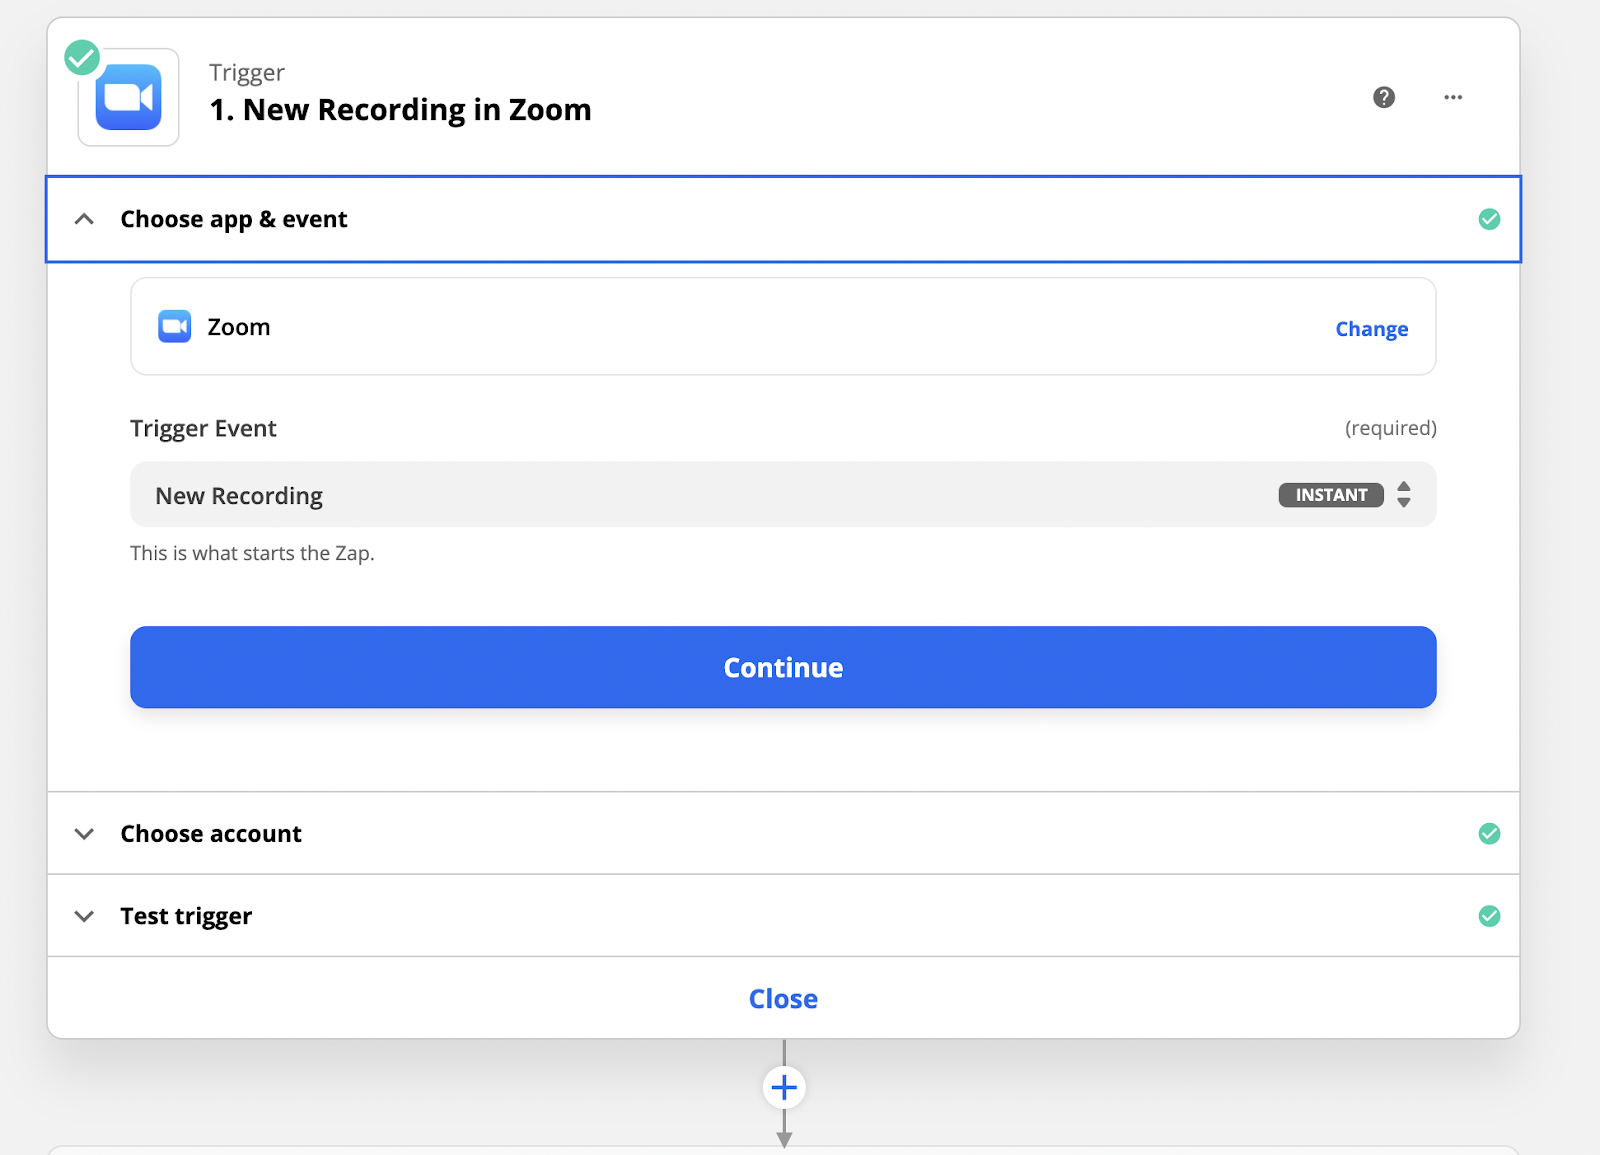
To start off your automation, choose Zoom as your trigger app and select “New Recording” as the trigger. This will make the automation run whenever you have a new Zoom recording, which will be created whenever you end a meeting that you recorded. Using this trigger makes for a very passive, hands-off automation that will run without requiring any additional input from you and your team.
Now, we need to upload your new Zoom recording to Google Drive. We’re putting the file on Drive for two reasons:
1. Trint needs an actual file to work with, but Zoom’s Zapier trigger only gives you a download URL. Drive can make a copy of the file from the URL, and then pass the file over to Trint.
2. Zoom only offers limited cloud storage for lower pricing tiers, and copying your recordings to Drive can be a more cost-effective way of holding on to your Zoom videos over the long term.
To create the step, select Google Drive as your app, and pick “Upload File” as your action. Choose a folder to store your videos in, and pick the Download URL that Zapier pulled from Zoom in the trigger step. It should be called “Video Files Download URL”.
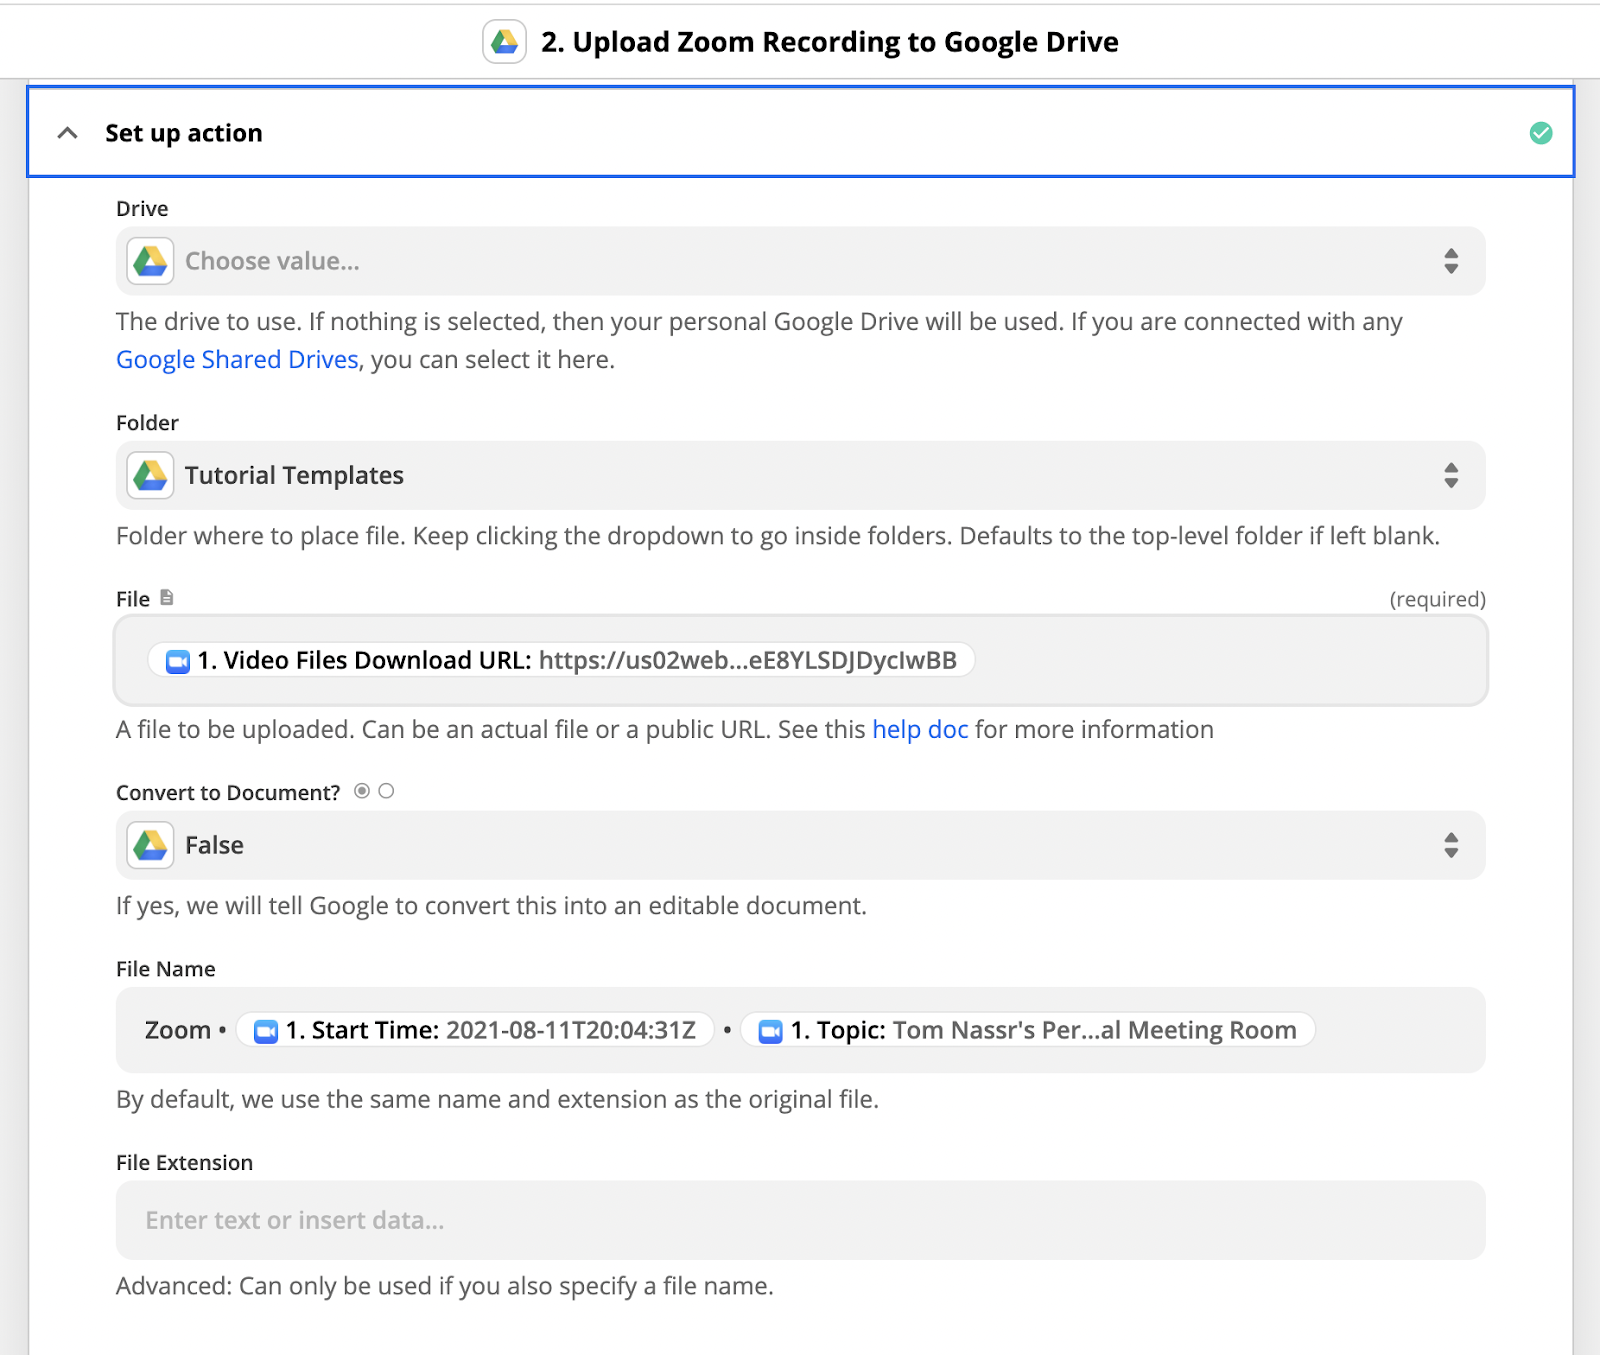
Now, give the files a template for their names. You’ll want to use a piece of data from the Trigger step in order to give each file a unique name. For instance, we named our file “Zoom • {1. Start Time} • {1. Topic}”, so each file will have a date/time and topic to differentiate it from the other files.
You can leave the “File Extension” field blank, and test the step. If everything works, it’s time to send the file to Trint.
To finish this quick automation, we’ll add one more step. Pick Trint as your app, and choose “Upload File” as the action.
Just like in the previous step, you’ll want to use the data Zapier gives you from the trigger step to give each file in Trint a unique name. In our example, we’ve used Start Time and Topic.
For the “File” field, you need to pick from the data that Zapier pulled in from Google Drive, NOT data from the Zoom trigger step. Specifically, you’ll want to pick the data that’s called “File: (Exists but not shown)”. This not-very-helpful name is just Zapier’s oblique way of saying that it can’t show you a preview of the file, which in this case is a video file.
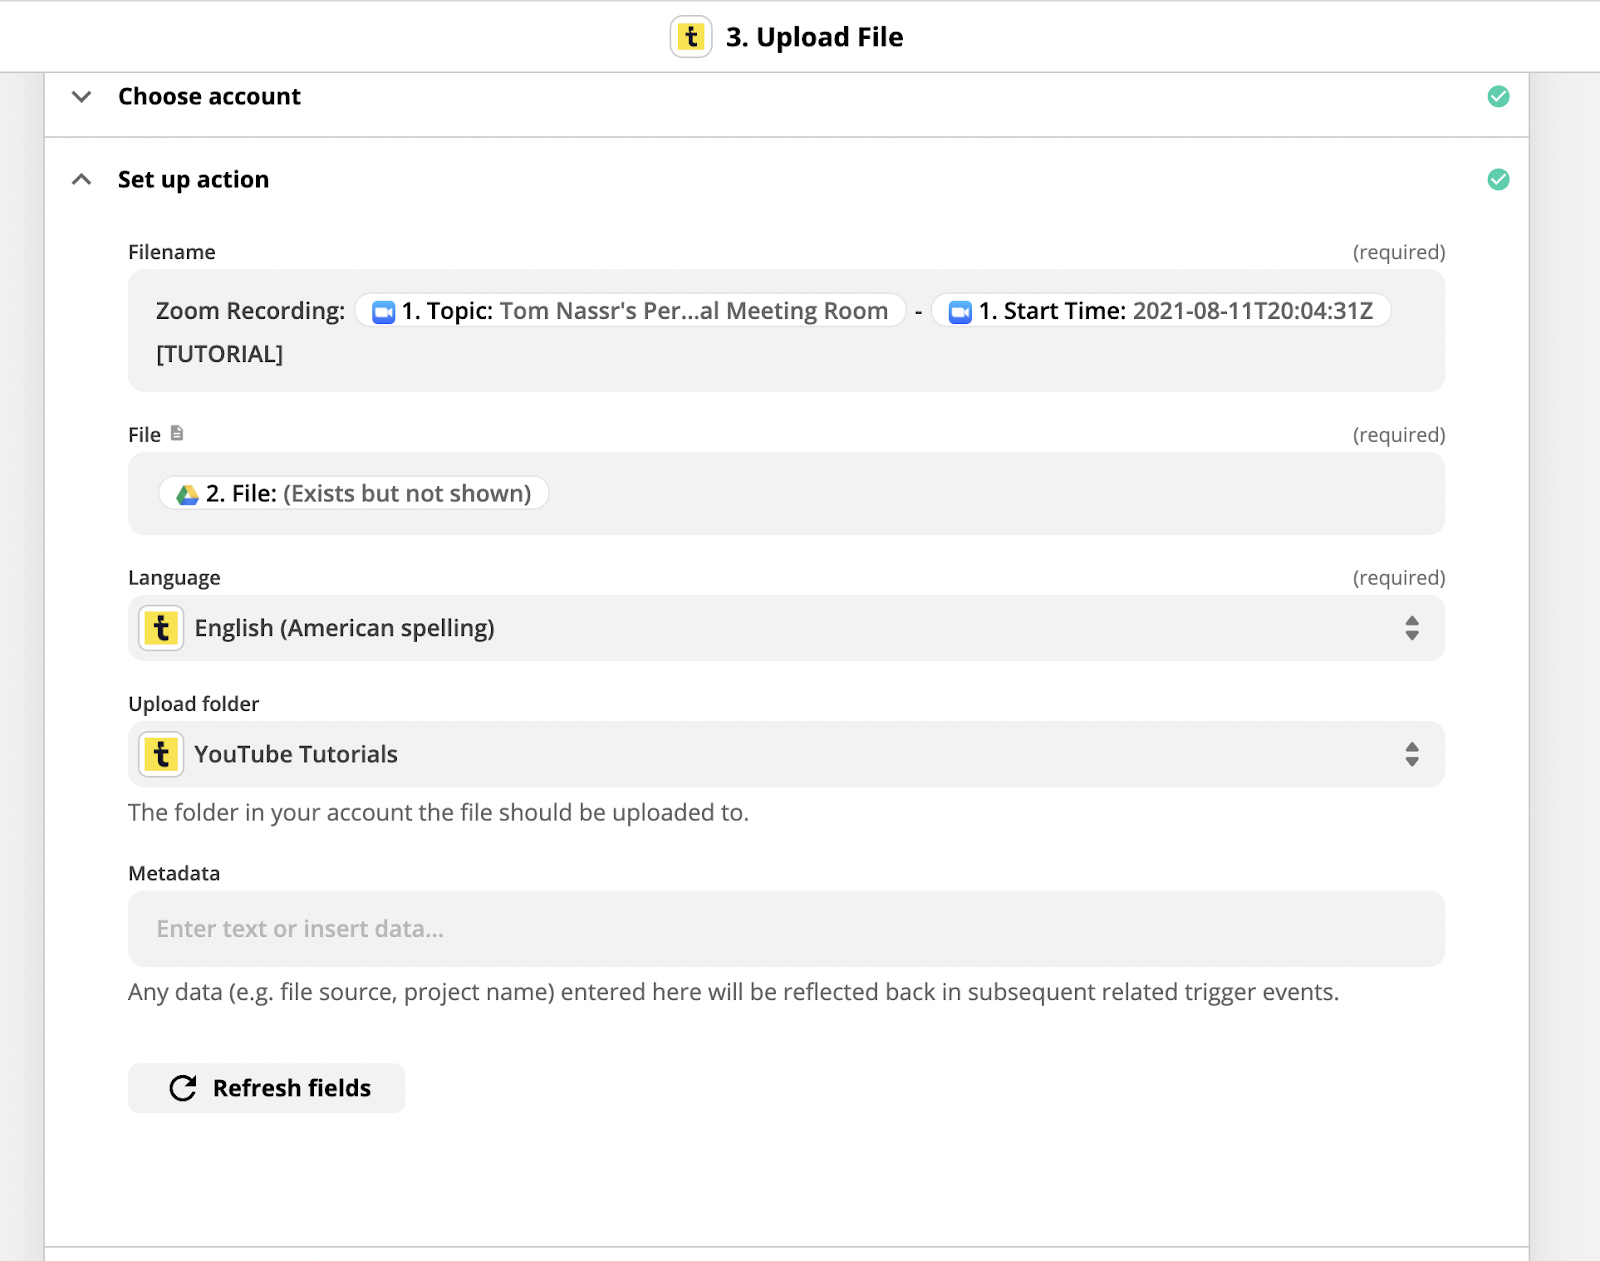
Pick your transcription language, and then optionally pick a folder to save your transcription in. You can leave the “metadata” field blank, and test this last step of the automation. Starting the transcription can sometimes take a long time, and Zapier may return a failure for your test and tell you that the app is unresponsive. Don’t worry; just try again, and it should work.
A successful test will give you a URL where you can see your transcription in progress, although it will likely take some time to complete (particularly for longer videos).
And that’s it! You’ll likely also want to add a Slack notification, or some other heads-up to your team to let everyone know that a transcription has been created and where they can find it. But we’ll cover that and other general best practices in a future blog and video.
With this automation running, you’ll create a convenient record of every Zoom meeting, every brainstorming session, every event, and every other type of call that you use Zoom for. This is a great way to build up a library of material to help generate content or just to use for your own reference.
If you’d like more automation tips or would like to learn about how automated workflows can transform your organization, check out our blog or our YouTube channel. You can also follow XRAY on Twitter, Facebook, or LinkedIn.

.pptx.png)

