
Are all of your scenarios putting you too close to your operation limits in Make? Are you looking for a better way to build modular scenarios?
In this low-code tutorial, we’re going to show you how to use webhooks to trigger your automations in Make to reduce the number of operations your automations use and save some money on your monthly bill.
At XRAY, we build automated workflows to help people save time and create more reliable processes.
We often use webhook triggers in Make to help reduce the number of operations consumed by each scenario, and to create modular automations that are easier to trigger, update, and maintain.
In this tutorial, we’ll show you how we set up webhook triggers with a custom script in Airtable, and how you can accomplish something similar with a pin in XRAY Workflow.
To get started, let’s explore why you may want to use a webhook trigger in Make.
First off, your plan in Make places a limit on the amount of data that you can process, and the number of “operations” you can run.
Every time any module runs in one of your scenarios, that counts as an operation - even if the scenario doesn’t process any data or run completely.
For instance, if your scenario has a “Watch” module as the trigger – like “Watch records” in Airtable – the trigger module will run every 15 minutes (or at what interval you’ve set it to).
Even when it doesn’t find any new records – because there aren’t any new records for it to find – it still adds an operation to your total operations used.
One or two operations won’t make much of a difference, but it adds up fast. If you’ve left your “Watch” trigger to the default of 15 minutes, your scenario will use up 96 operations a day based on the first module alone.
You could set the interval to be slower, but this often won’t suit your circumstances. Scheduling a slow interval might mean that vital information comes to you hours later than you needed it.
Even if you only expect to have one or two new records a day, you might still need the automation to run promptly when those records come in.
Instead, a more efficient and scalable approach is to replace your Watch module with a webhook trigger.
A webhook is, per Wikipedia, “a method of augmenting or altering the behavior of a web page or web application with custom callbacks.”
Essentially, a webhook lets you control actions in your app by sending a simple HTTP request.
With a webhook trigger, your trigger module won’t run at all and won’t use up any operations unless it catches a webhook.
However, it still will run instantly when it does receive a webhook.
In addition to reducing your operation usage, you may want to use webhook triggers to build more modular automations.
For instance, let’s say you have an automation that runs whenever you launch a new project for a client.
This automation would create several relevant project folders, create tasks in your project management app, and send a message to the client.
Instead of managing it all in one gigantic automation, you might want to split it into several different pieces: one for the project folders, one for the tasks, and one for the message.
You could then trigger each piece as needed with webhooks. If you’re familiar with the concept of sub-Zaps in Zapier, this will allow you to achieve a similar modular effect in Make.
Using a modular setup would make it much easier to maintain each piece of the workflow, and to call on them as needed.
You could even re-use each scenario for other automations that might require a new folder, a new task, or a message to the client.
Whatever your use case is, setting up a webhook trigger in Make is pretty simple.
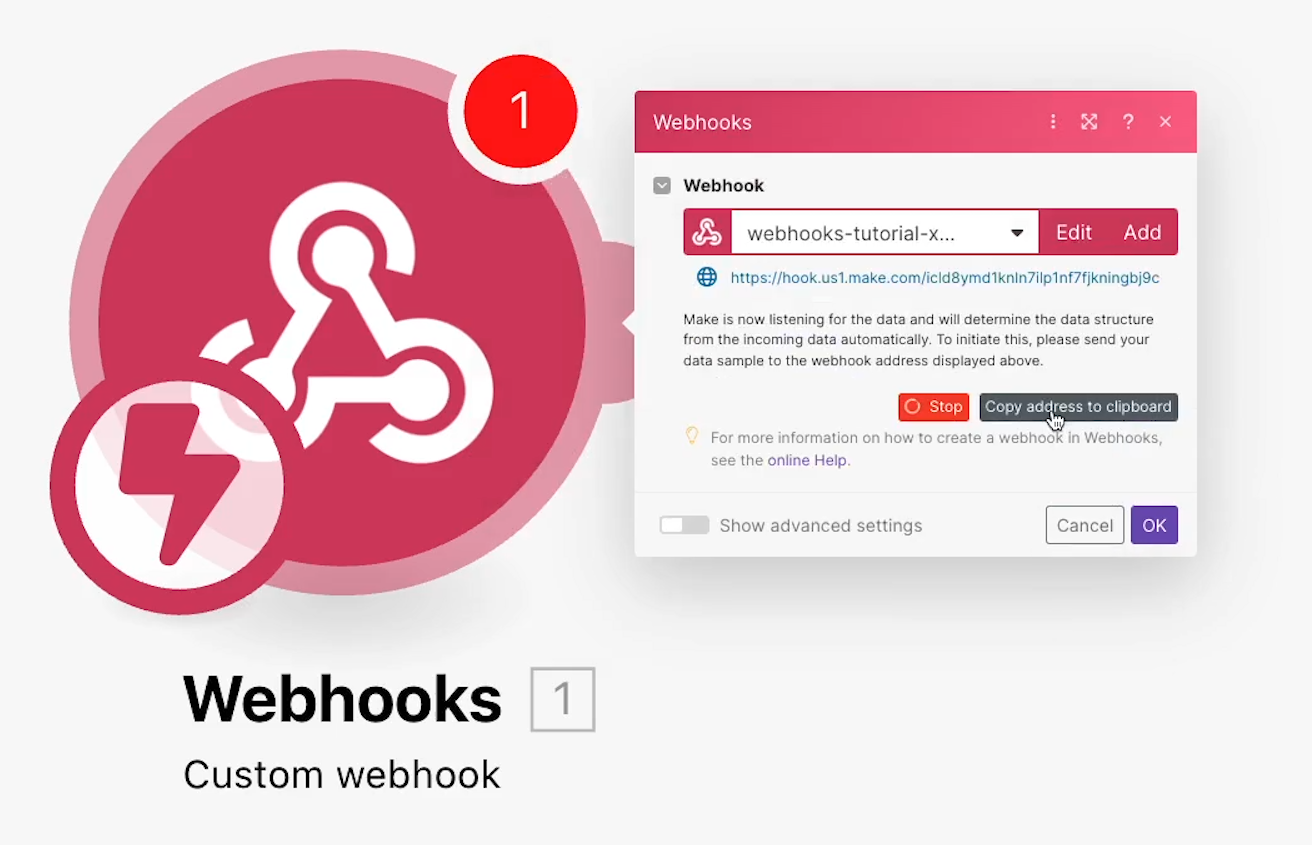
To set up a webhook trigger in Make, create a new scenario or duplicate the scenario that you want to edit.
Add a “Webhooks” module.
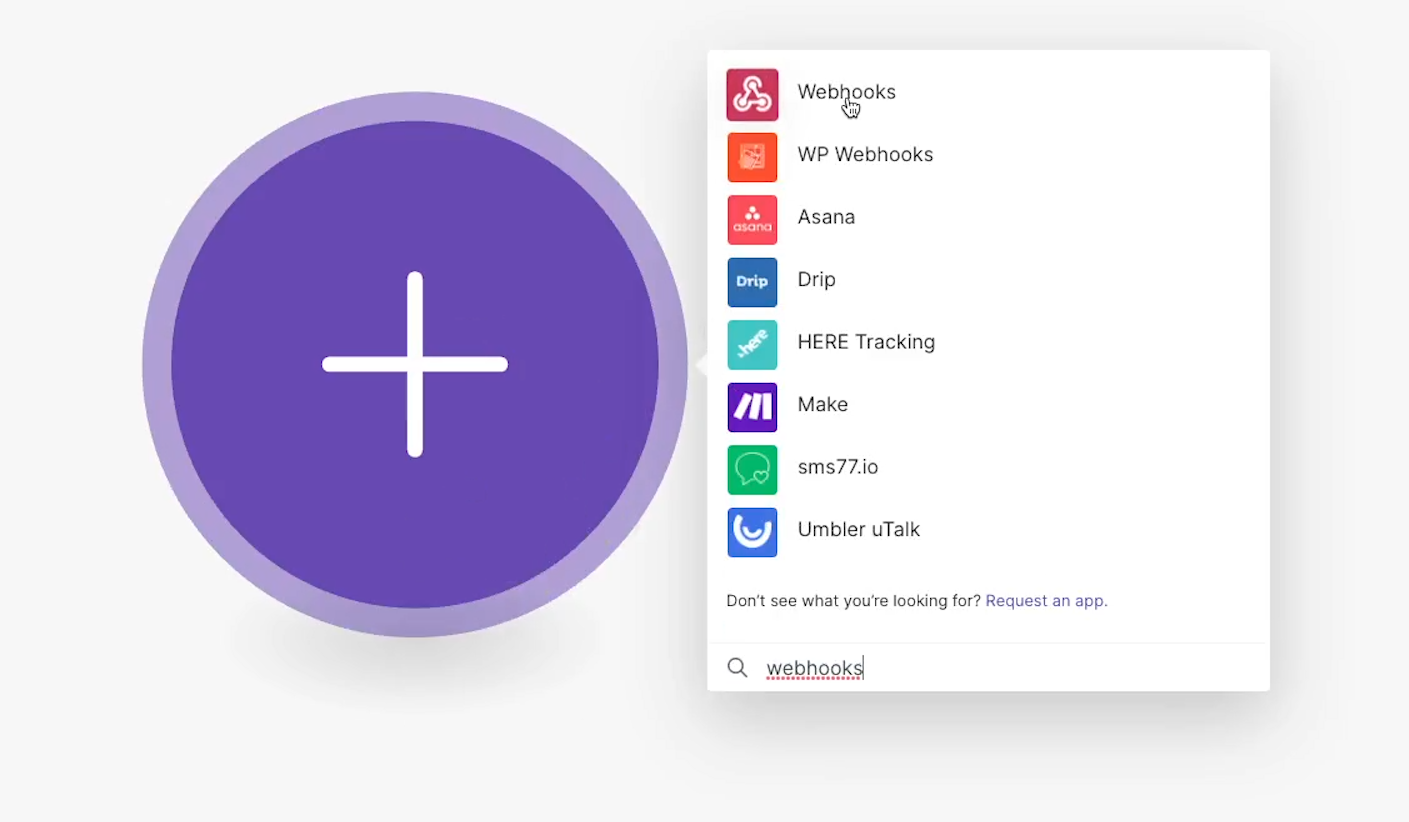
Choose “Custom Webhooks”.
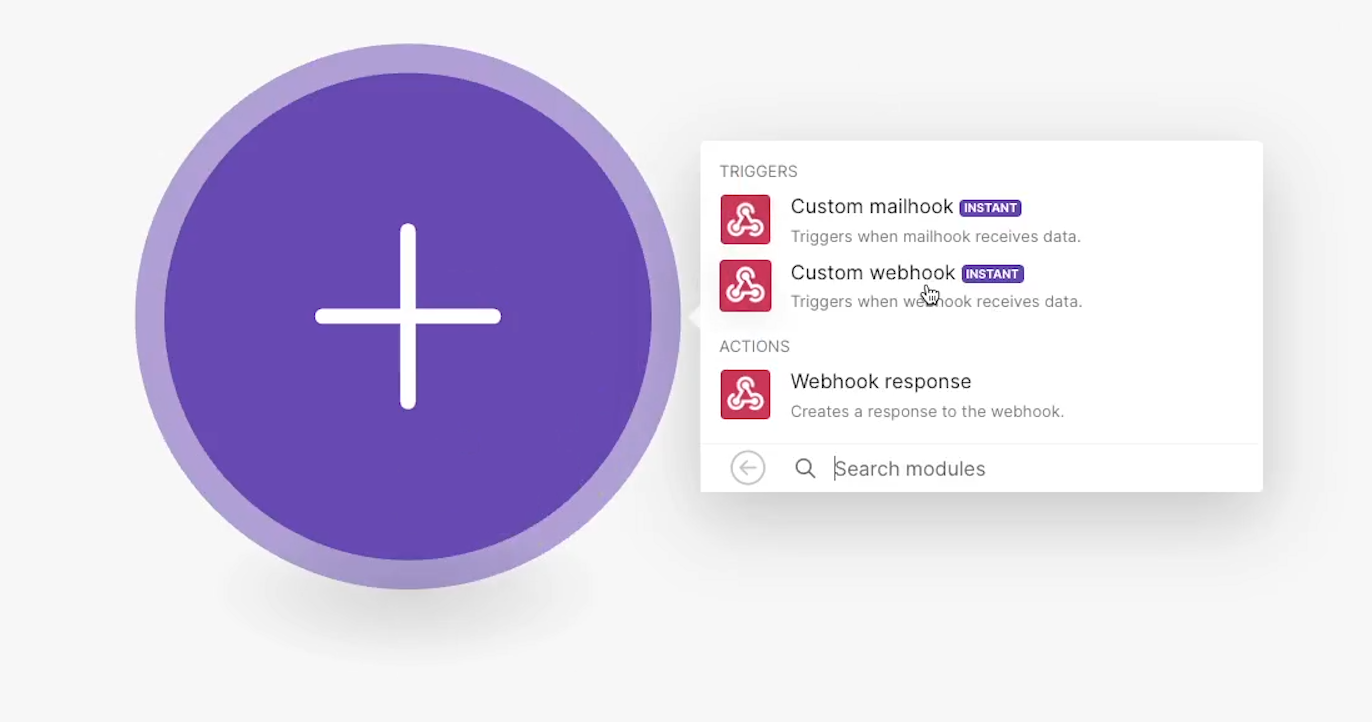
Then, add a new hook.
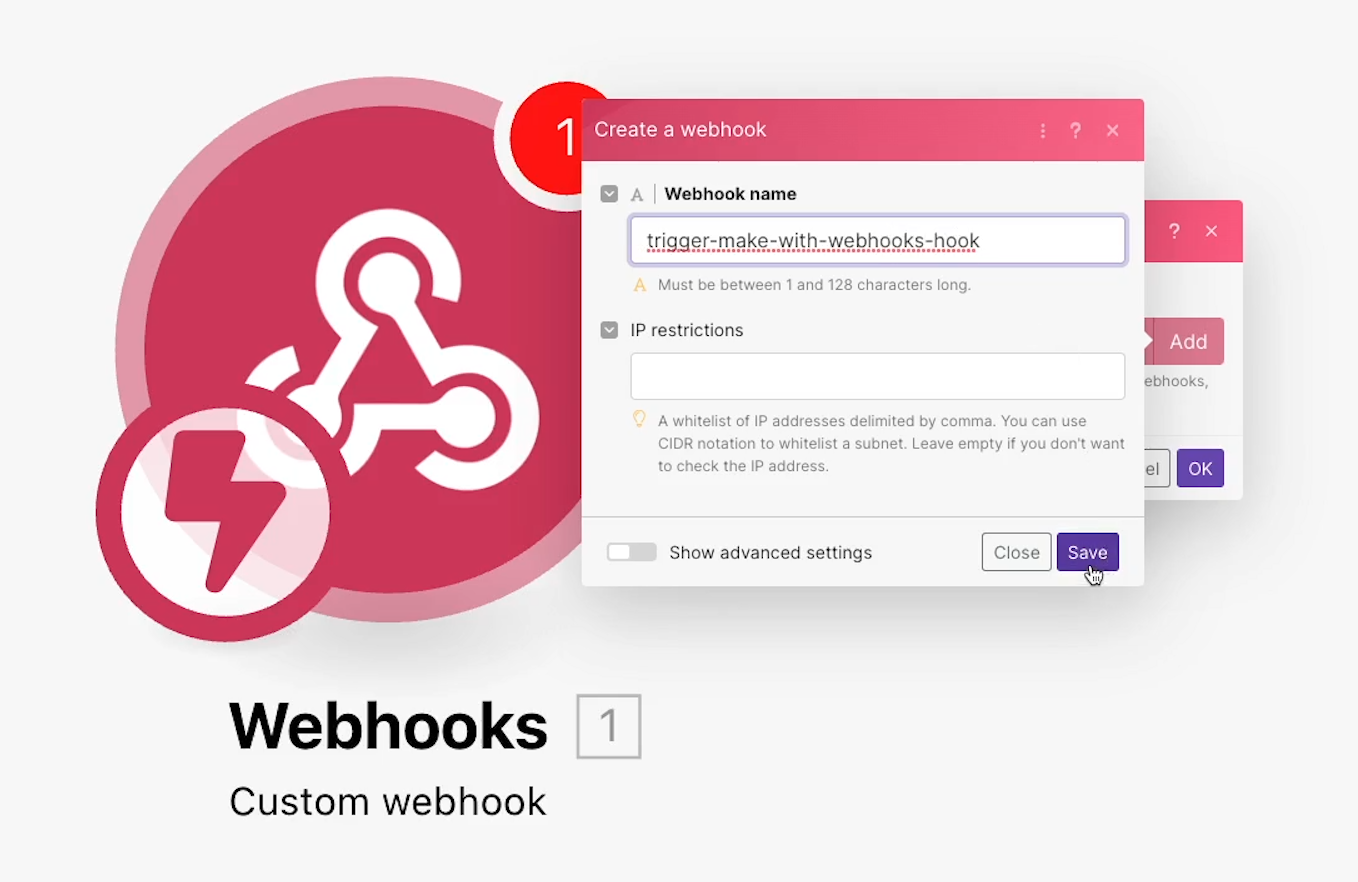
Be sure to give it a descriptive name so that you can keep track of it later in your list of webhooks. Then, click “save”.
To test the webhook, we need to configure another app to send data to the webhook’s URL.
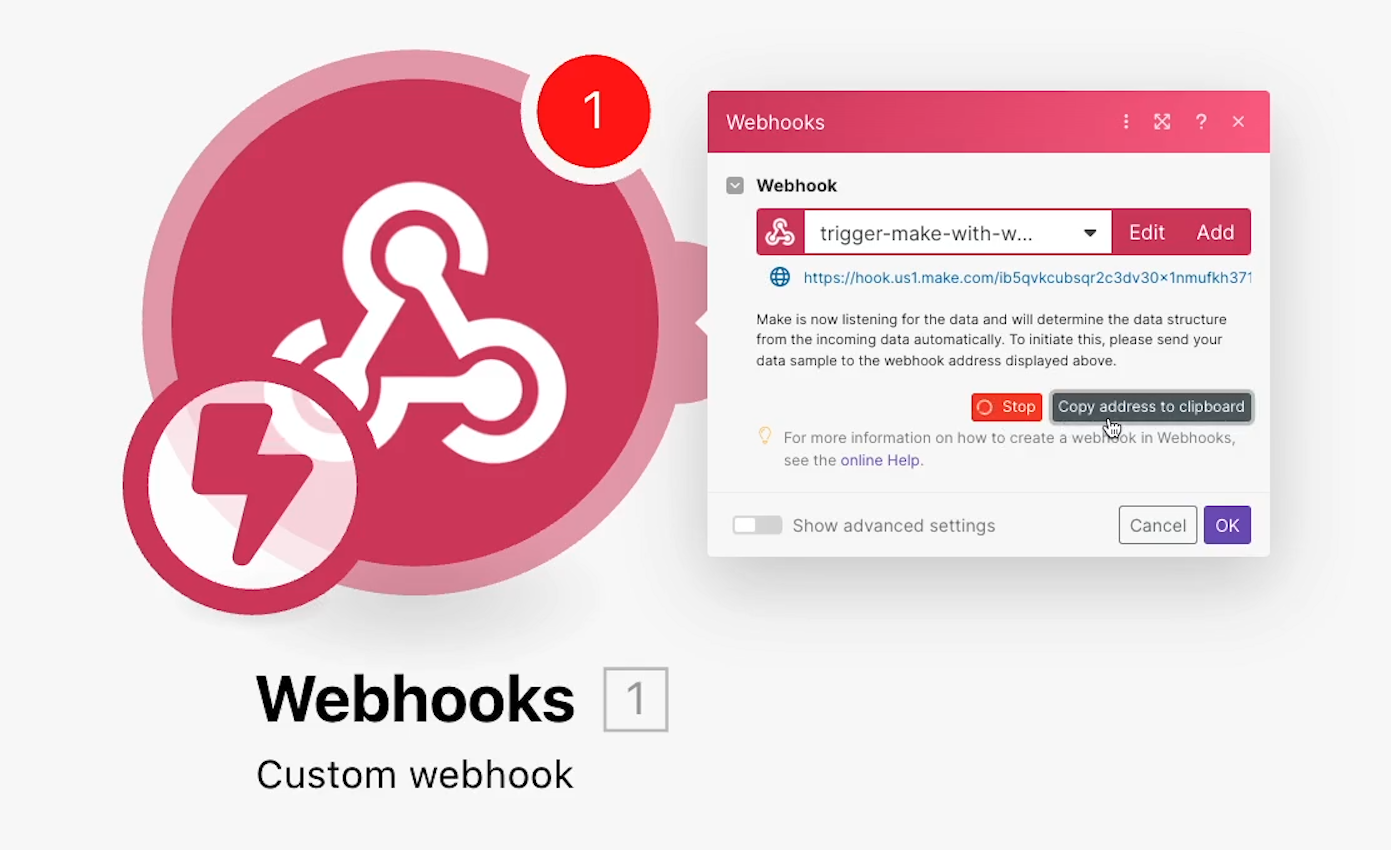
Copy the webhook to the clipboard, then open up the app you’d like to use to send the webhook.
There are many apps that you can use to send webhooks. If you’re a developer, you can use an app like Postman.
But for all the no-code and low-code builders out there, we’ll show you how it works with Airtable. Then, we’ll walk you through an even easier way to send webhooks with our own app, XRAY Workflow.
Airtable is an ideal app to use as a no-code or low-code database for your automations.
It’s a great place to store the data you create, look up data to use in your automations, and create some native automations as well.
To send a webhook from Airtable, start by creating a new automation in your base.
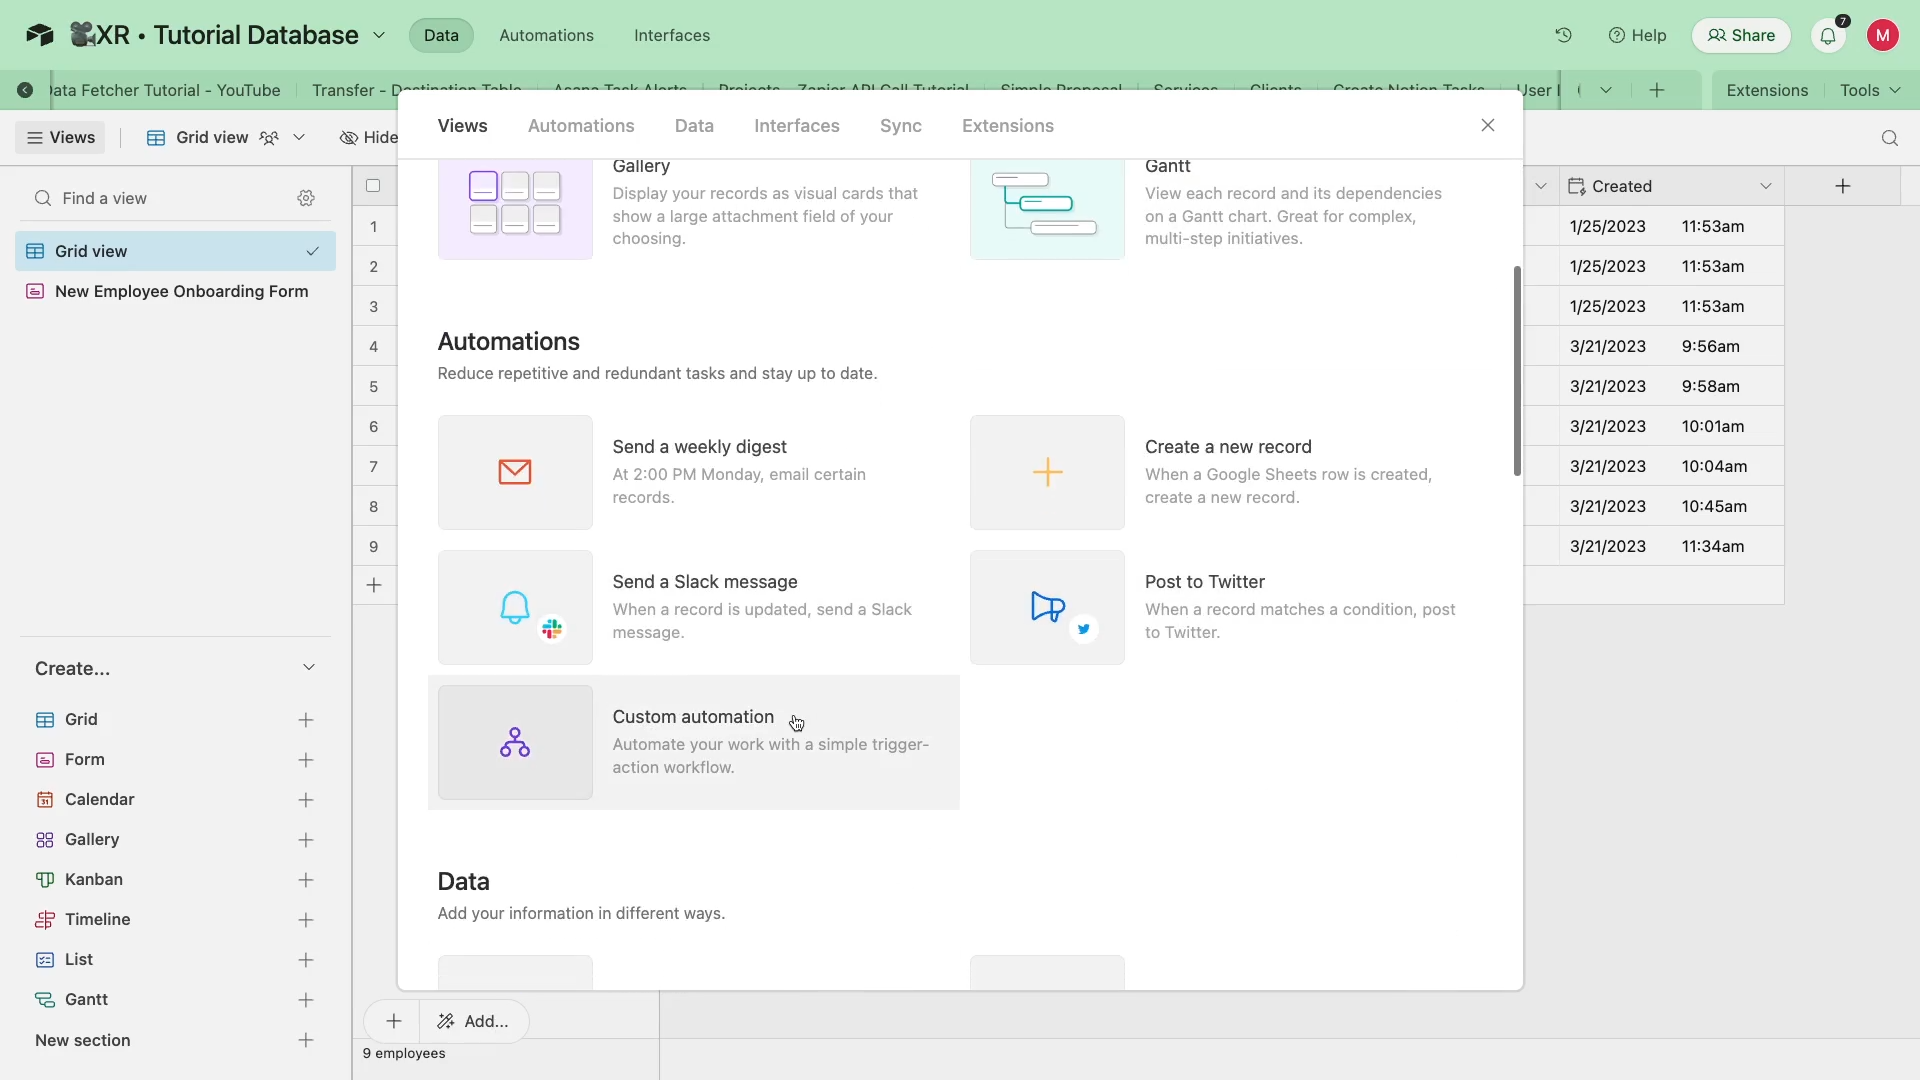
For example, we’ll just configure a simple automation that runs whenever a new record enters a specific view. You can use any trigger you’d like here, but using a “When record enters view” trigger will be a direct replacement for a “Watch records” module in Make.
Note: Airtable doesn’t bill based on tasks or operations, so you don’t need to worry about how this trigger will impact billing.
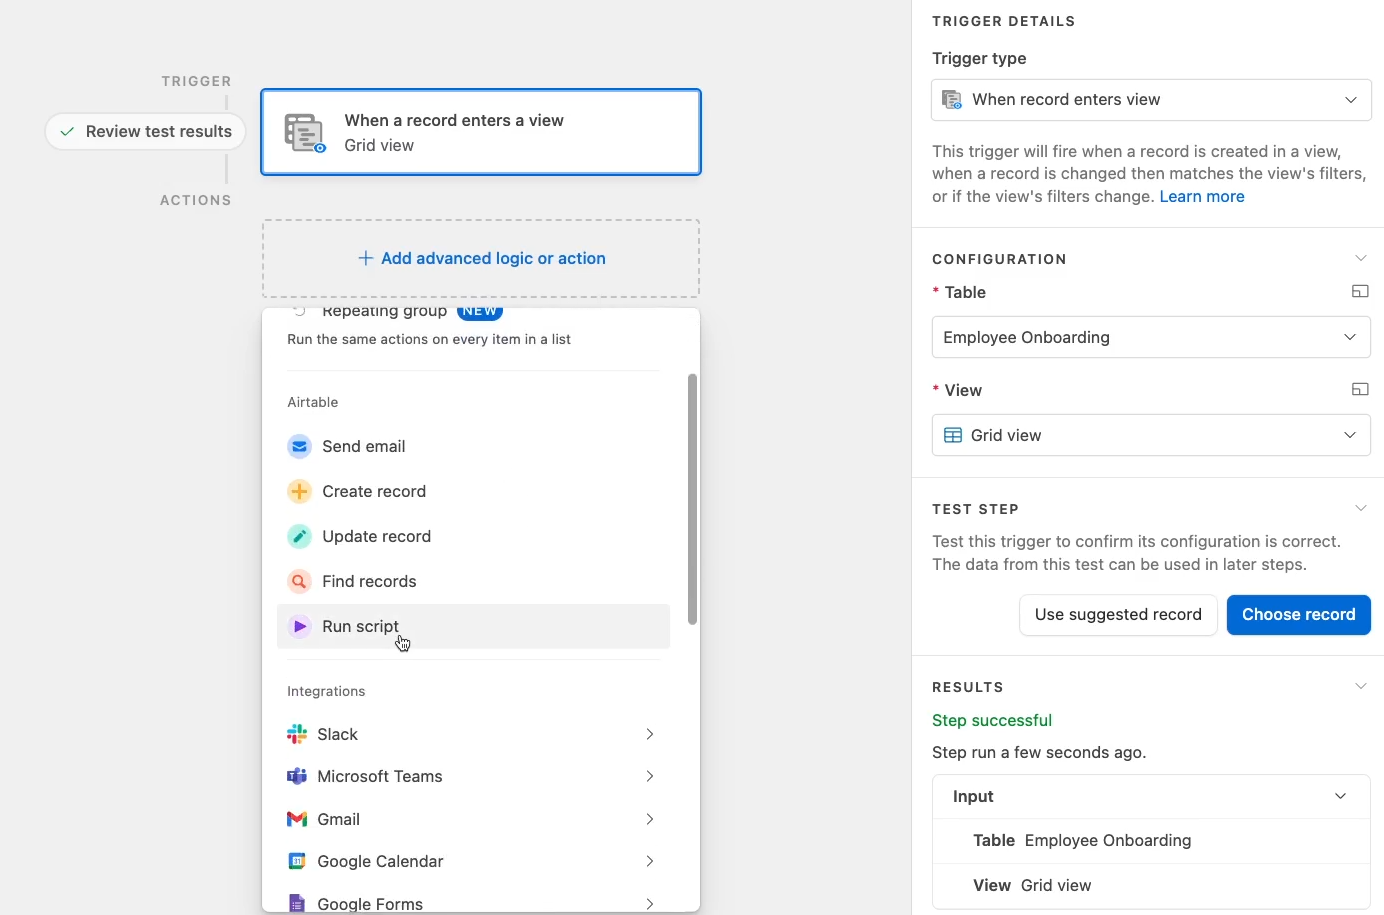
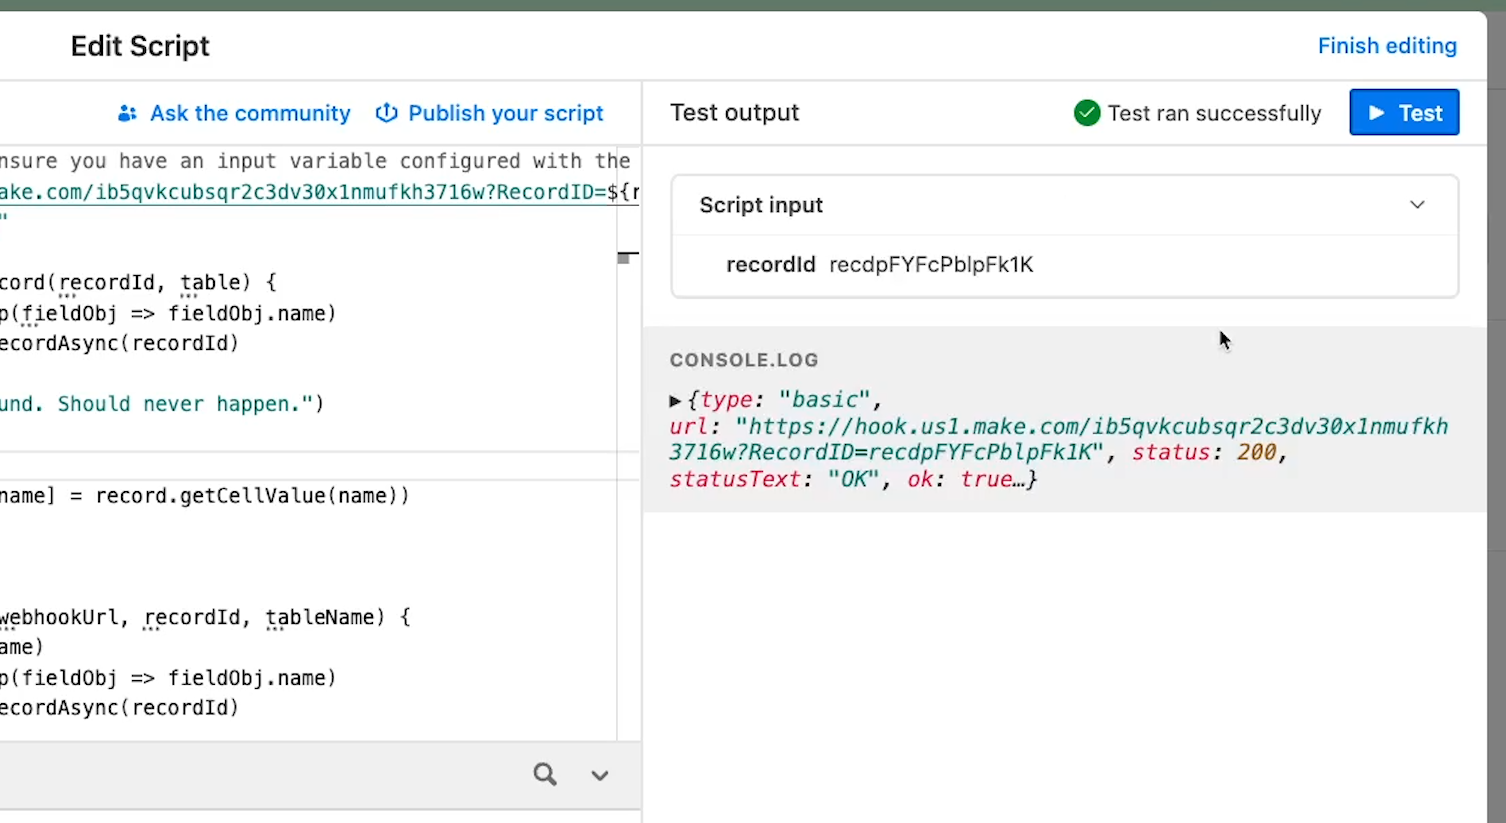
Then, add a “Run Script” step. This is where we’ll configure the automation to send data to our Make webhook.
Don’t worry; all you’ll need to do is replace a couple of lines of text. Even if you’re not familiar with coding, you should be able to just follow along with this tutorial.
We’ve included a code snippet on the resources board for this tutorial that you can copy and paste to get started. Just click here to access the resources board.
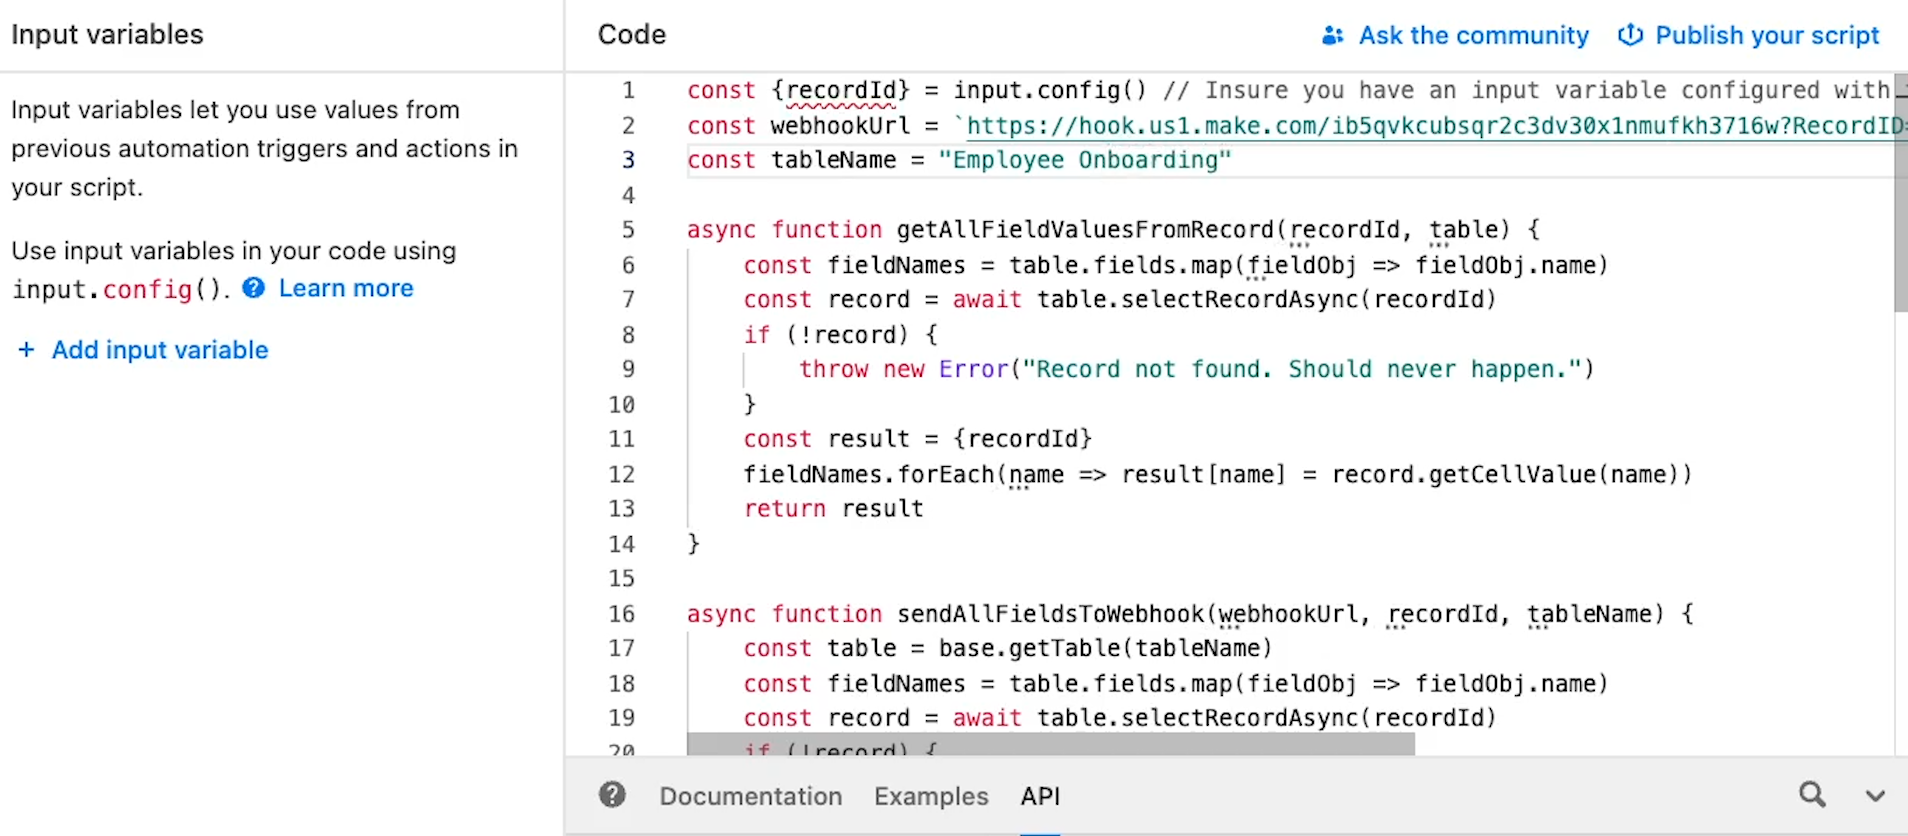
In the screenshot below, you can preview the code snippet that you’ll find in the resources board.
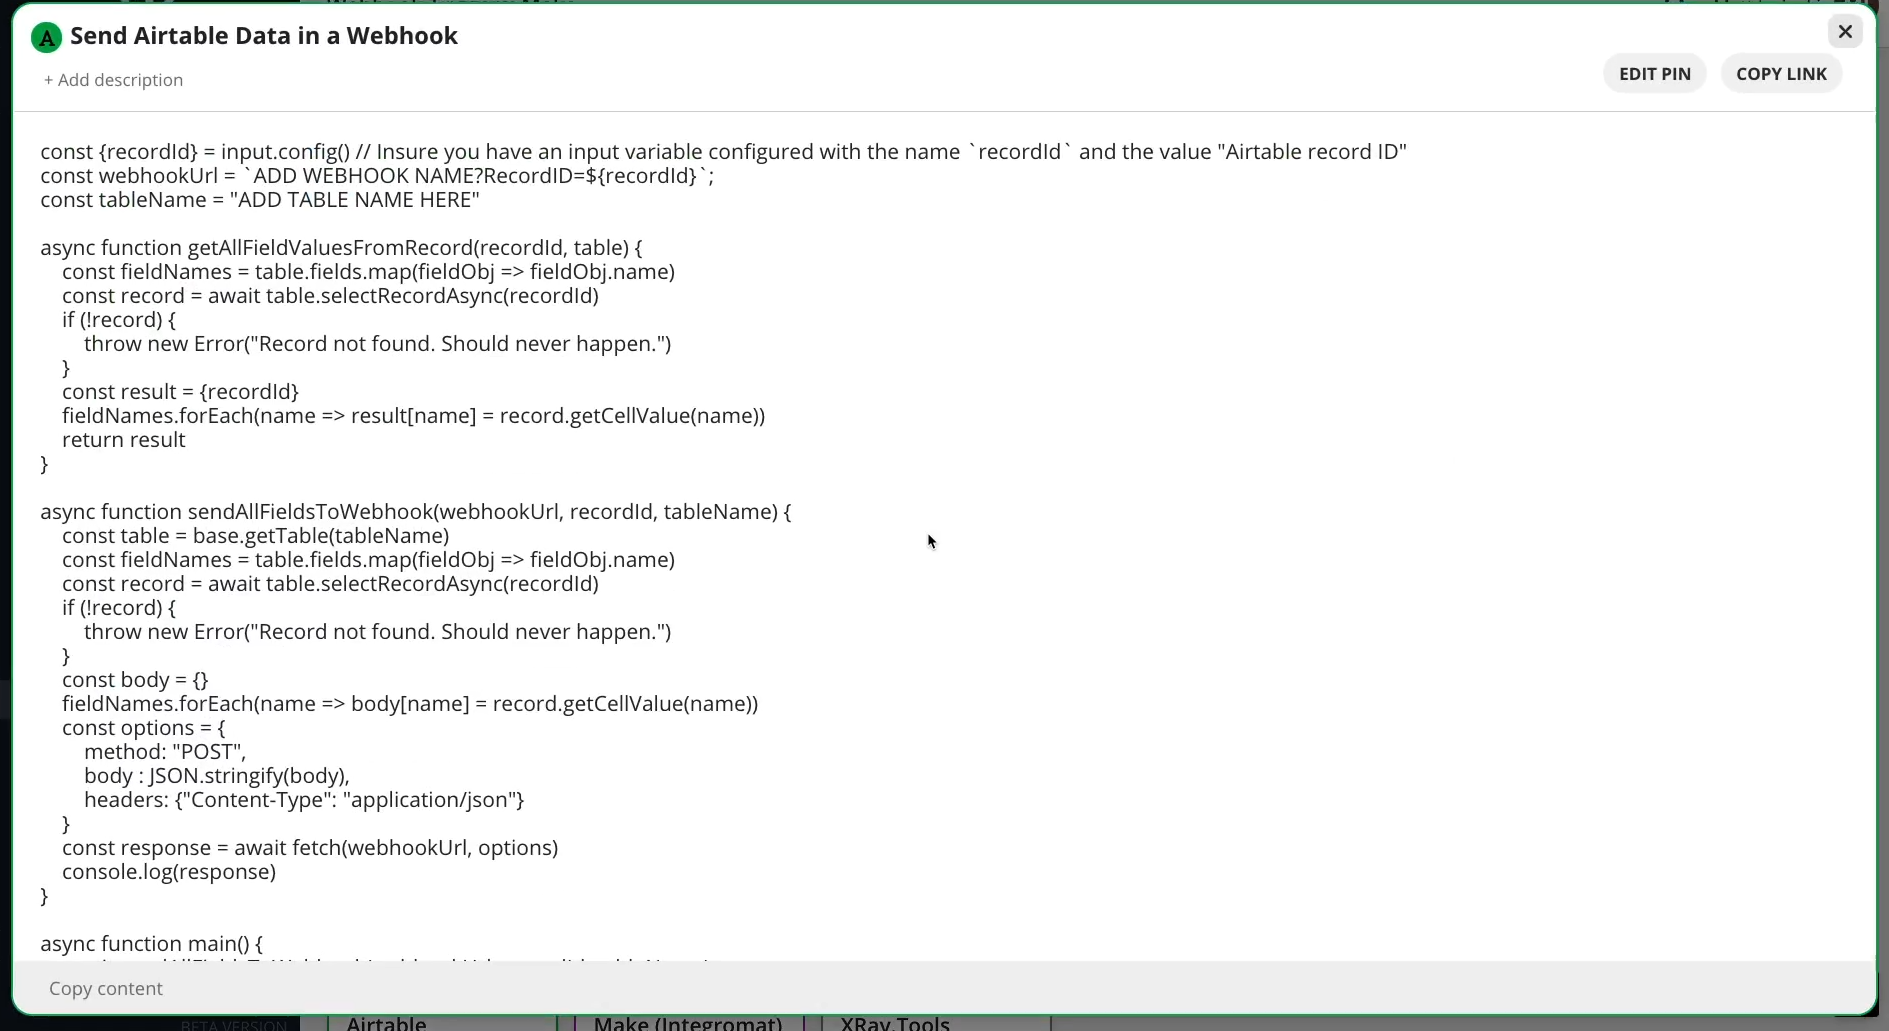
This script will get the record ID of each new record, the name and value of each field associated with that record, and then send all of that data over to our Webhook.
Replace everything up to the question mark in “webhookUrl” with your webhook’s URL that you copied earlier from Make.
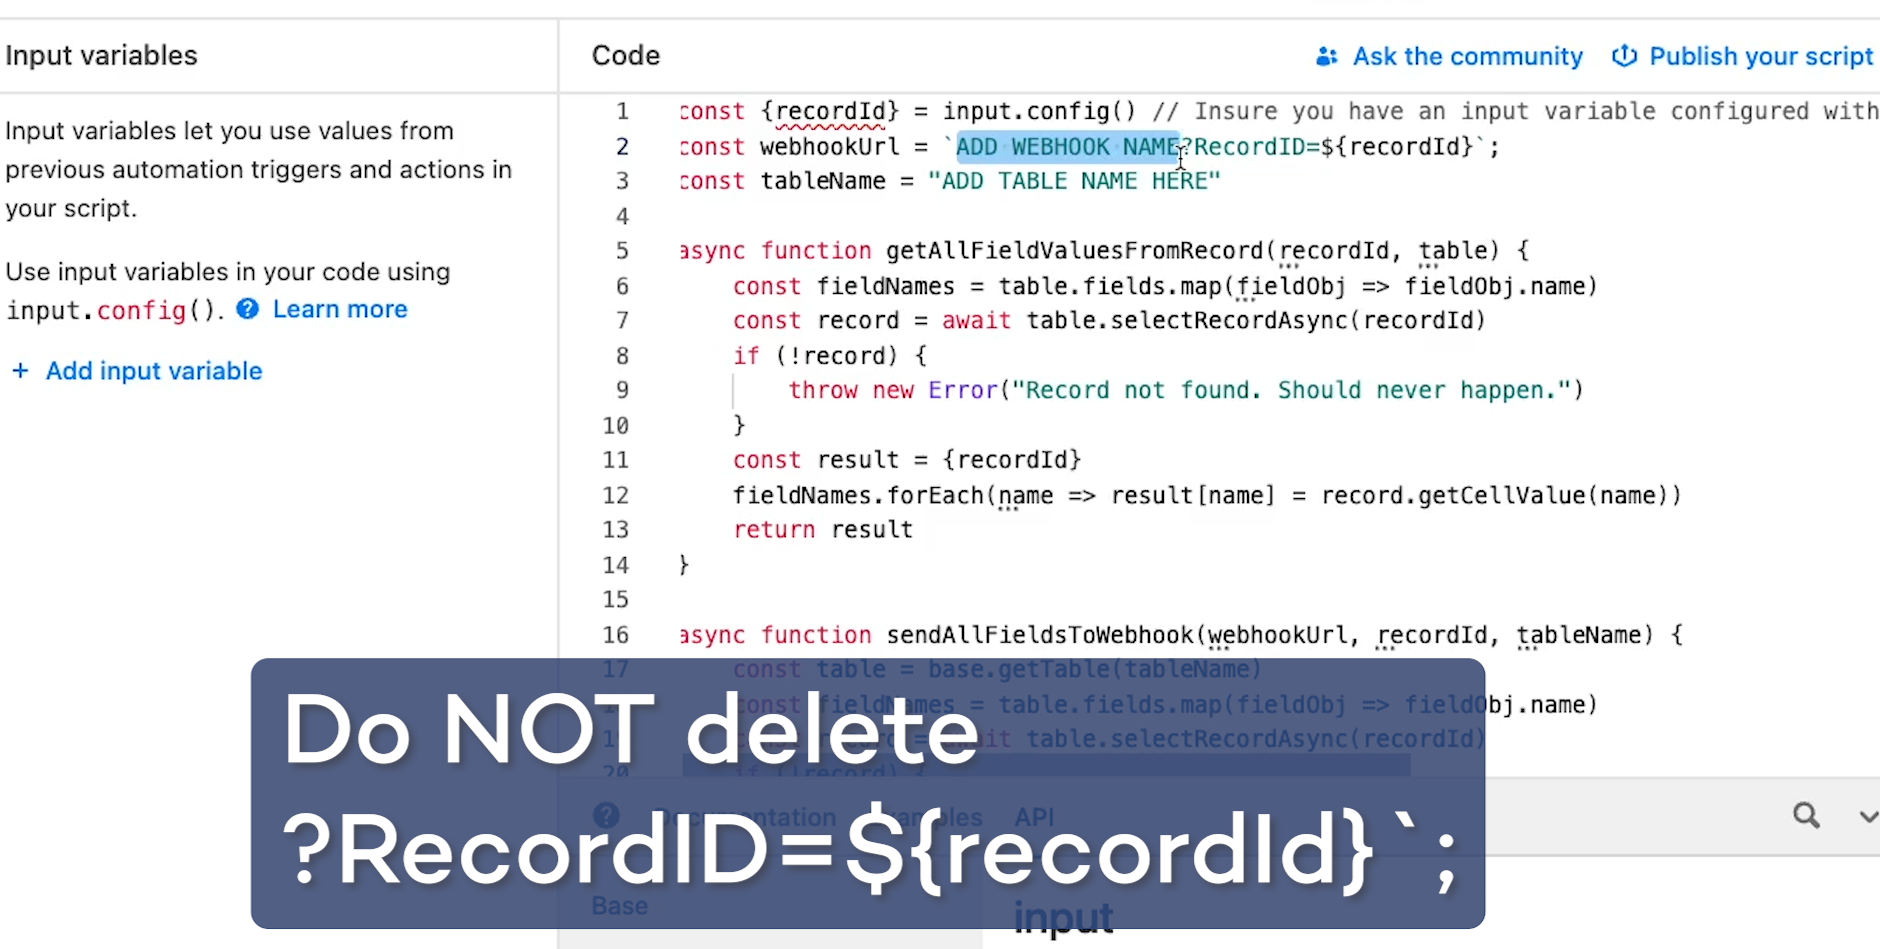
In other words, this line in the template…
const webhookUrl = `ADD WEBHOOK NAME?RecordID=${recordId}`;
Becomes something like…
const webhookUrl = `https://hook.us1.make.com/abcd123def456fghi789abcd123def456fgh?RecordID=${recordId}`;
In our snippet, the value for this variable should already be enclosed in backticks, but make sure to add them back if they were accidentally deleted.
Replace the value for the “tableName” variable with your table’s name or ID, once again enclosed in quotes or backticks. Write the name exactly as it appears in Airtable.
In our example below, we’ve updated the table name to “Employee Onboarding”
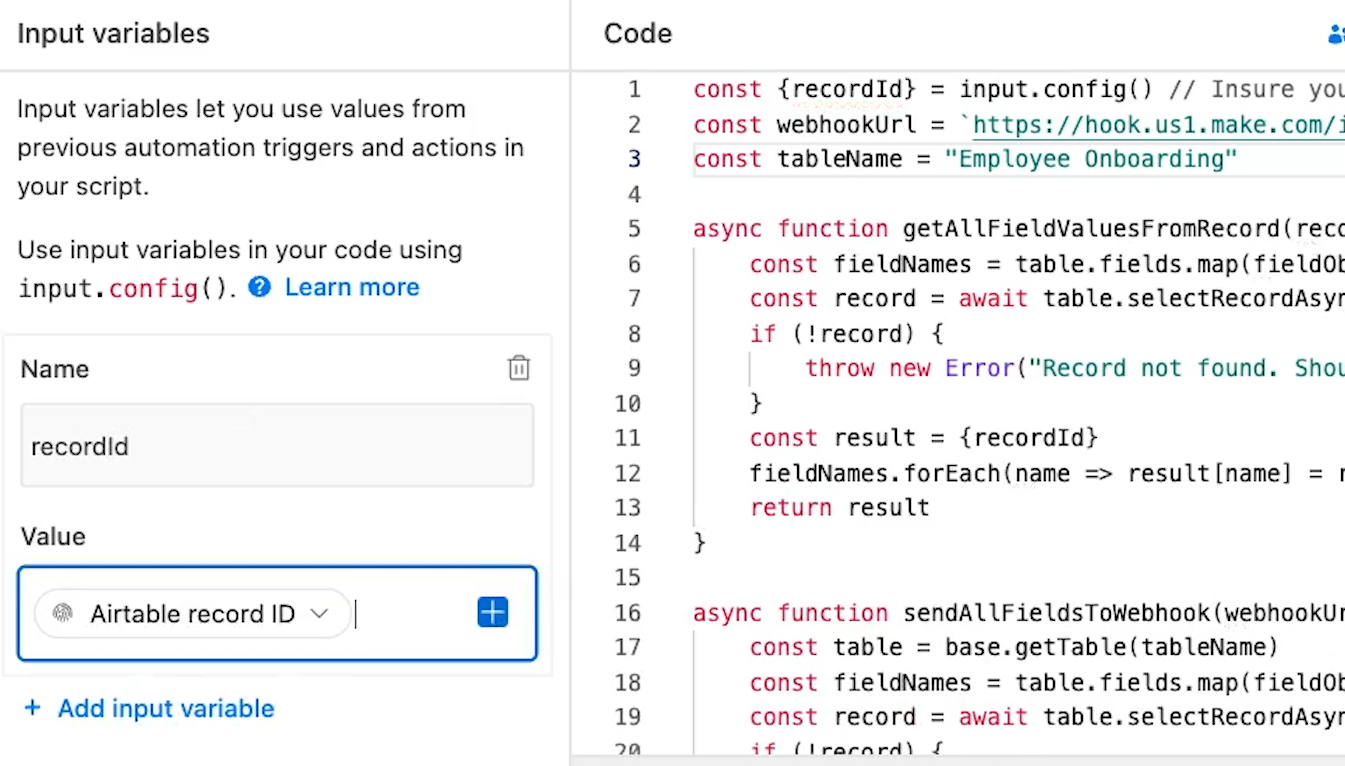
On the left hand panel, add an input variable. Name the input variable “recordId”, and set the value to “Airtable record ID”.
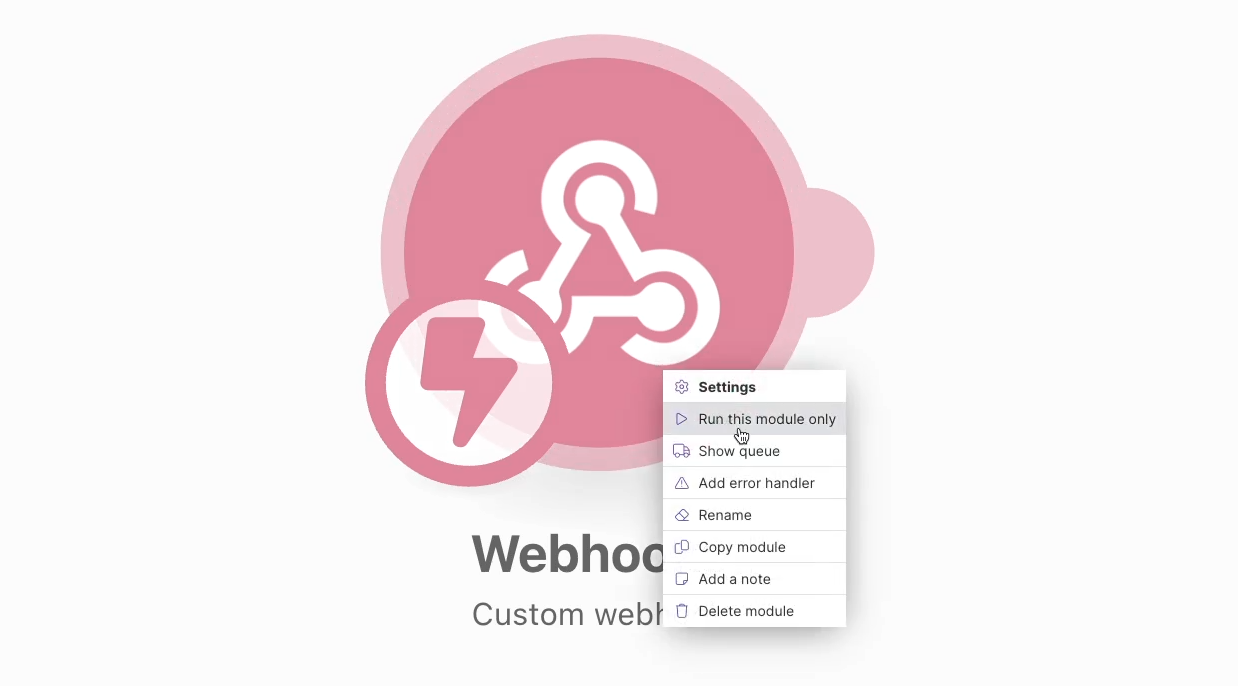
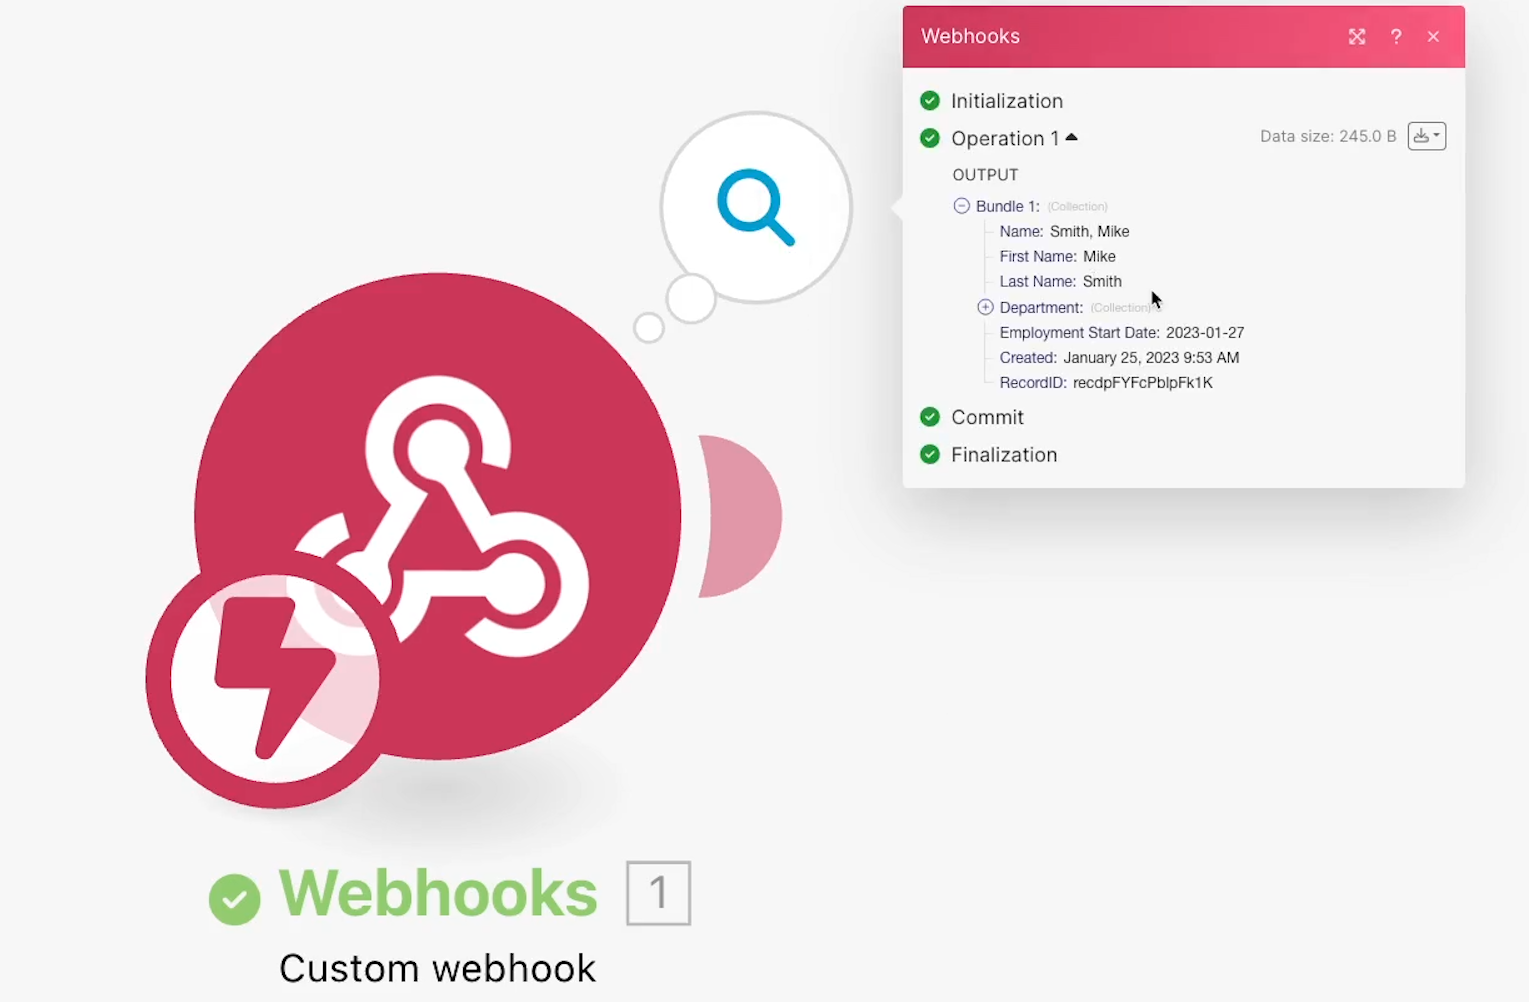
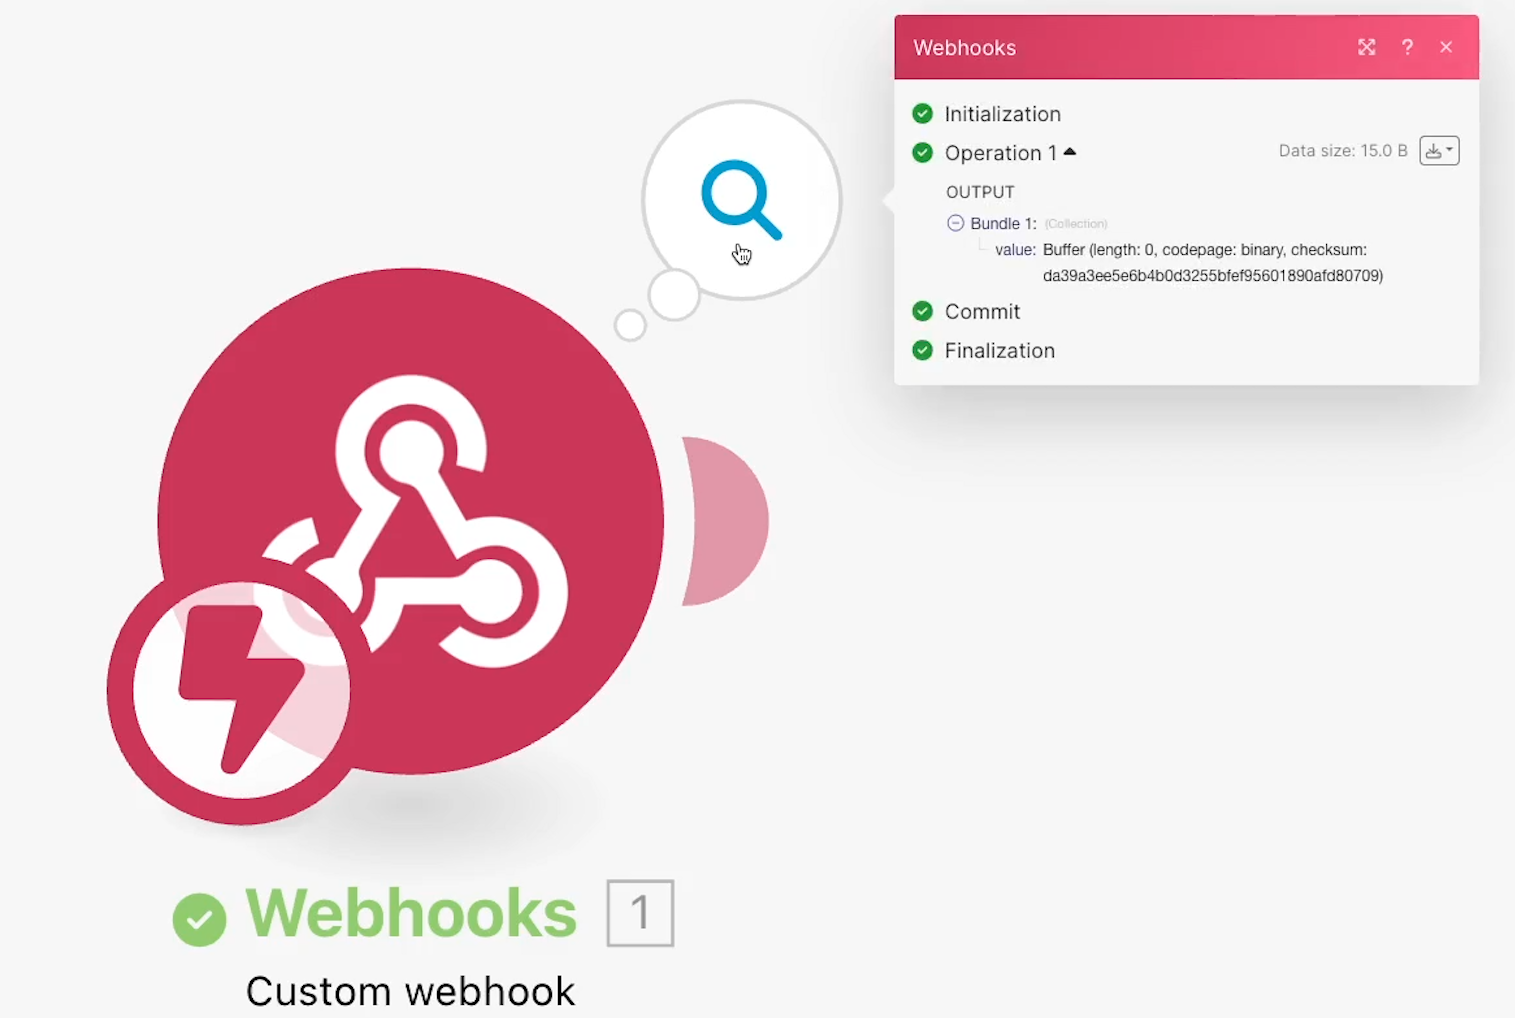
Return to your Make and run your scenario to make sure it’s listening for new data.
Then, back in Airtable, go ahead and click on “Test” to run your automation’s script.
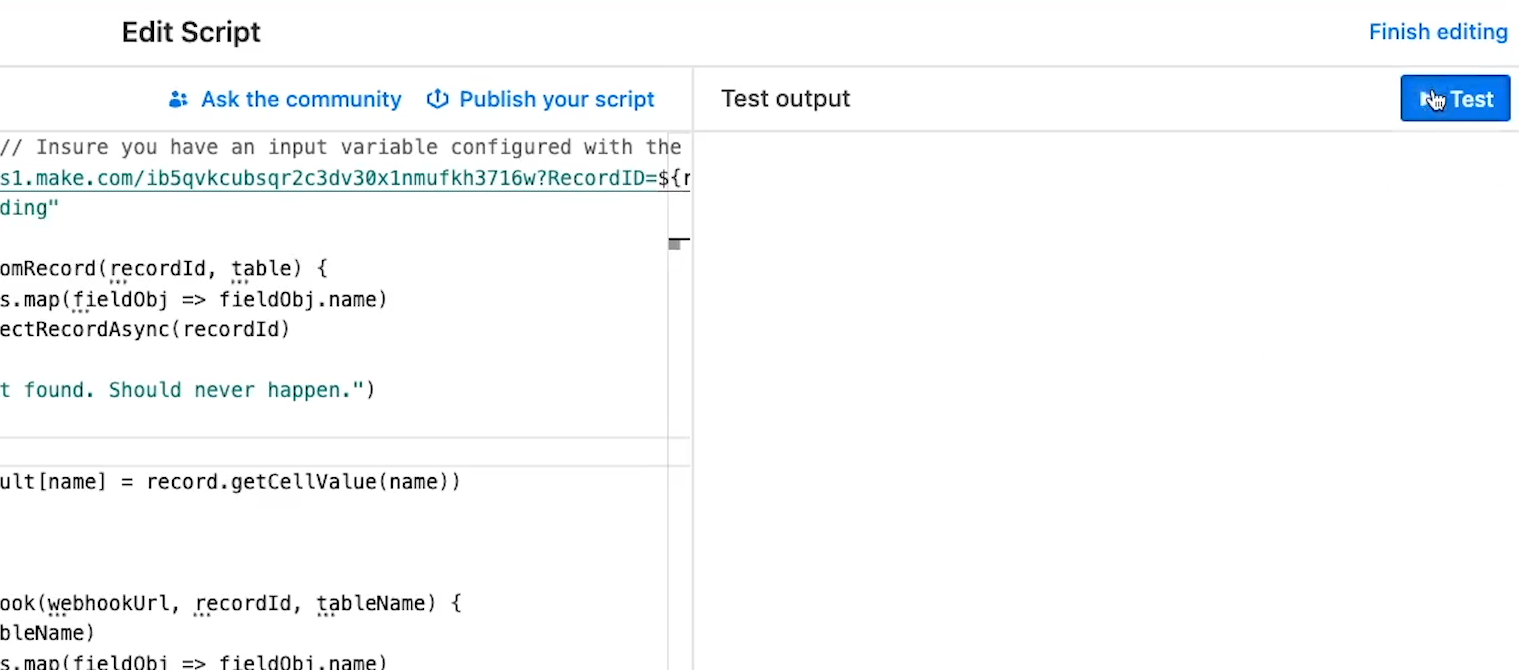
You should see a success message in Airtable (Status 200).
In Make, your trigger module should have retrieved some data from your Airtable script. Confirm that all of the data you need is present, then configure the rest of your scenario in Make.
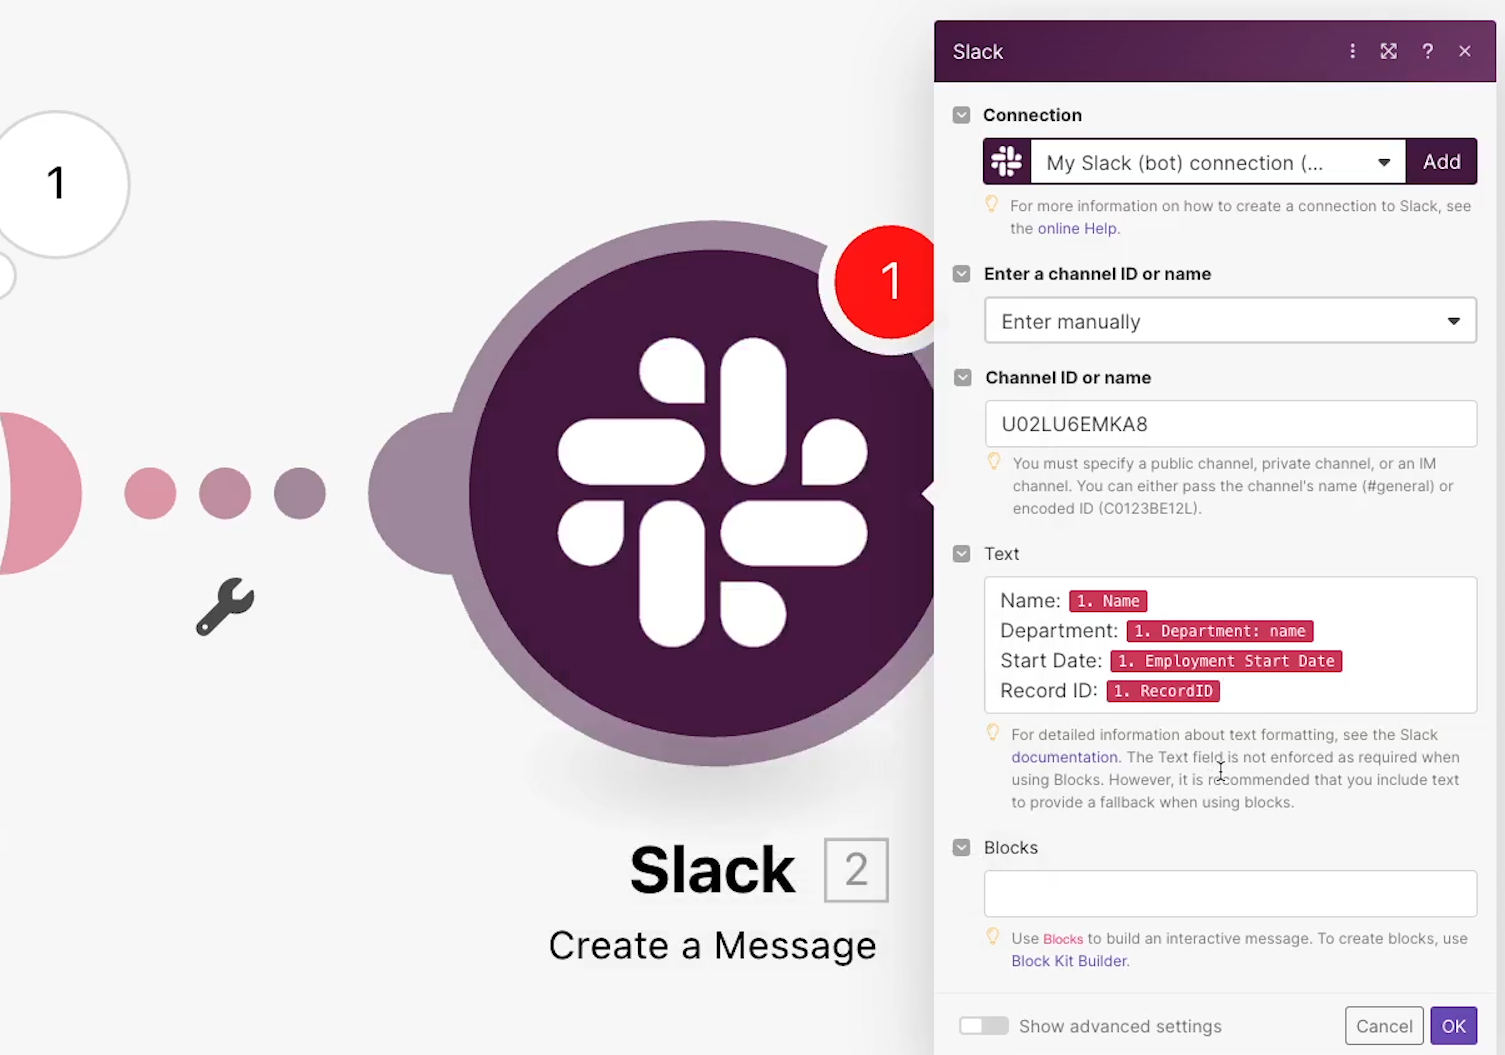
In our example, we’ll just add a simple Slack step that will demonstrate that Make received data for every field in our Airtable base. The automation will send a quick DM that includes the record name and a couple of other fields.
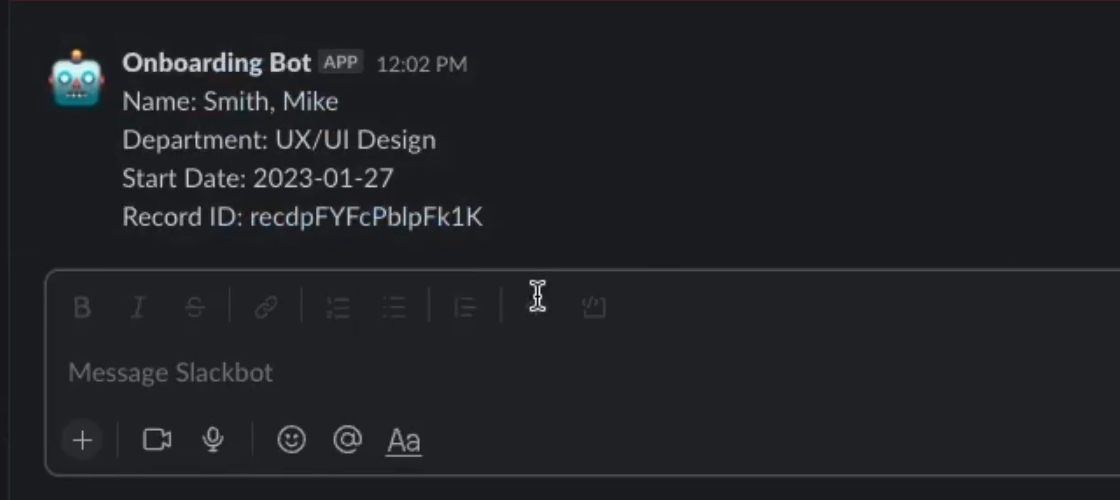
When we test the automation again by running the Make scenario followed by the Airtable script, we see a new message appear in Slack.
With a webhook trigger, the scenario runs instantly when the webhook receives data, but doesn’t use any operations while it’s waiting.
Now let’s take a look at using webhooks with XRAY Workflow.
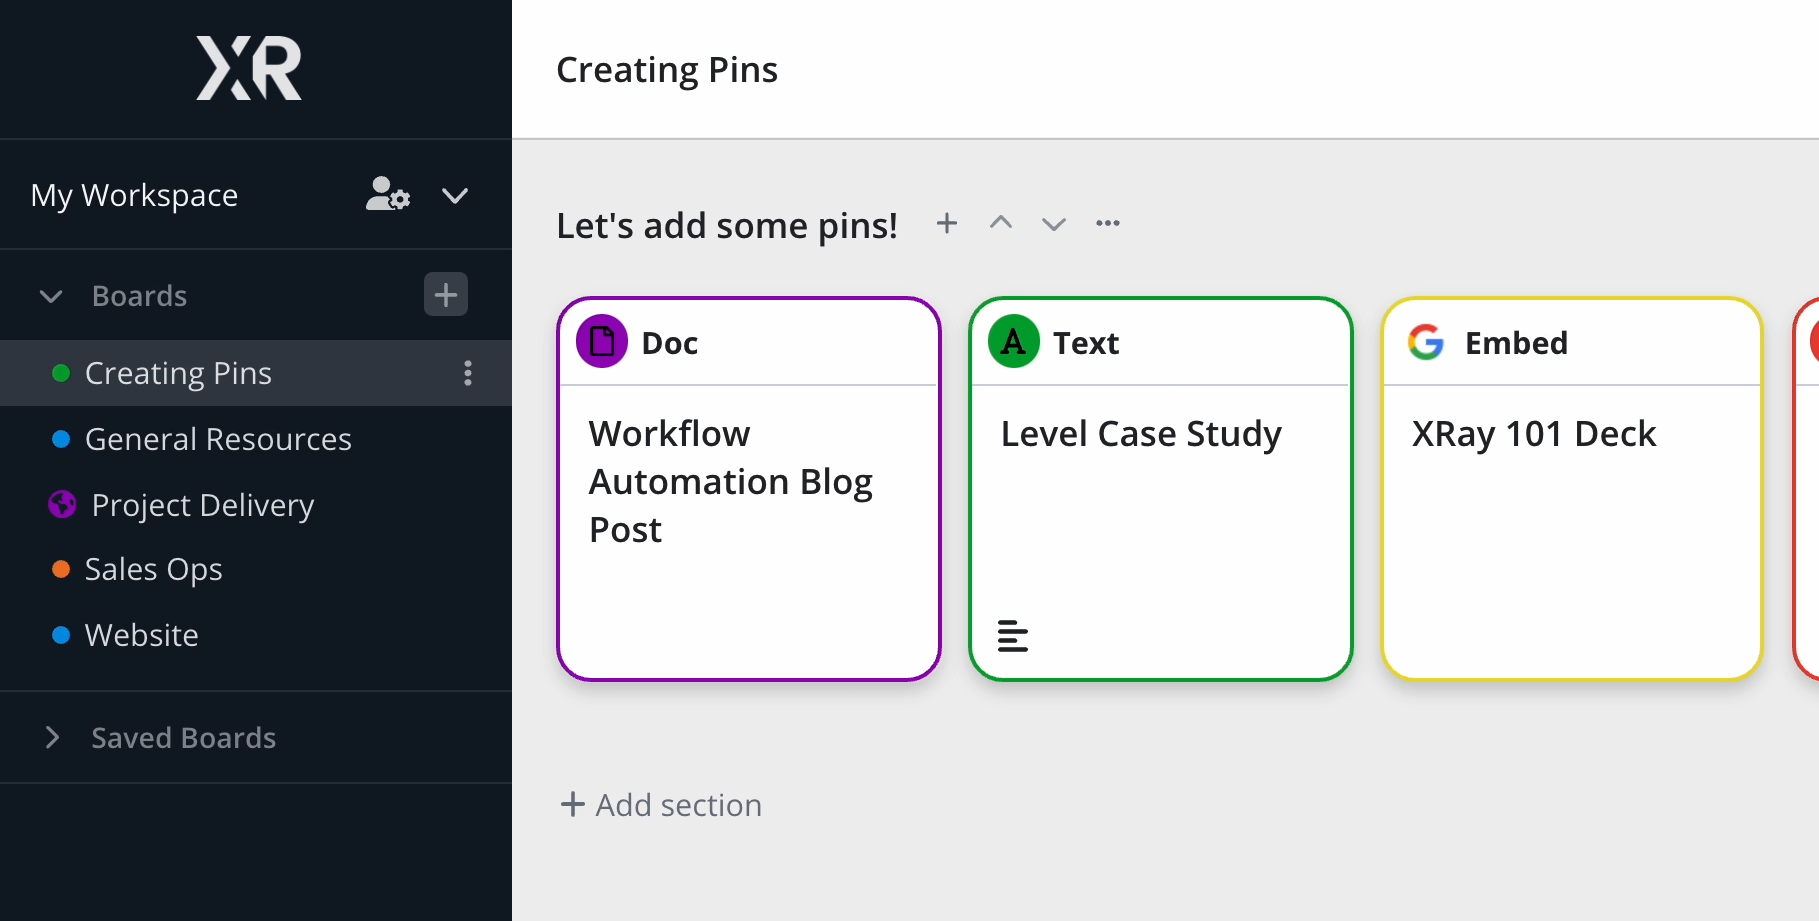
XRAY Workflow is an app we’ve developed that lets users gather resources from around the web into simple, contextualized boards.

XRAY Workflow includes several different ways to “pin” content from anywhere on the web:
• Doc pins, which feature real-time editing and collaboration on rich text documents;
• Text pins, which let you copy and paste snippets of text with a single click;
• Embed pins, which allow you to embed nearly any web app or web page;
• Link pins, which let you save and quickly open any URL or local file path;
• And push pins, which let you send URL-encoded data on demand with a single click.
Push pins are a great method for setting up automations with webhook triggers, and launching them whenever you’d like them to run.
In this section, we’ll show you how to configure a push pin in XRAY Workflow to trigger an automated scenario in Make.
To get started, go to xrayworkflow.com to download XRAY Workflow. Right now, the app is in beta and totally free to use on Mac, PC, and mobile devices.
If you use a webhook from XRAY Workflow to trigger your automation, your initial Make module will essentially be the same as before.
Once again, you’ll create a Webhooks module, choose “Custom Webhooks”, and add a new hook with a descriptive name.
You can prompt the webhook to start listening for data by running the module.
To provide that data, just copy the webhook URL, and open up XRAY Workflow.
In XRAY Workflow, you can view all of your boards on the left hand panel. You can click on the + symbol to create a new board.
Each board is divided into sections, which hold pins. You can add as many sections as you’d like to each board, and provide an optional description to give some more context for each section.
Then, click on the + symbol in any section to create a new pin. In our example, we’ll add a new pin in the “Webhook Demo” section of our board.

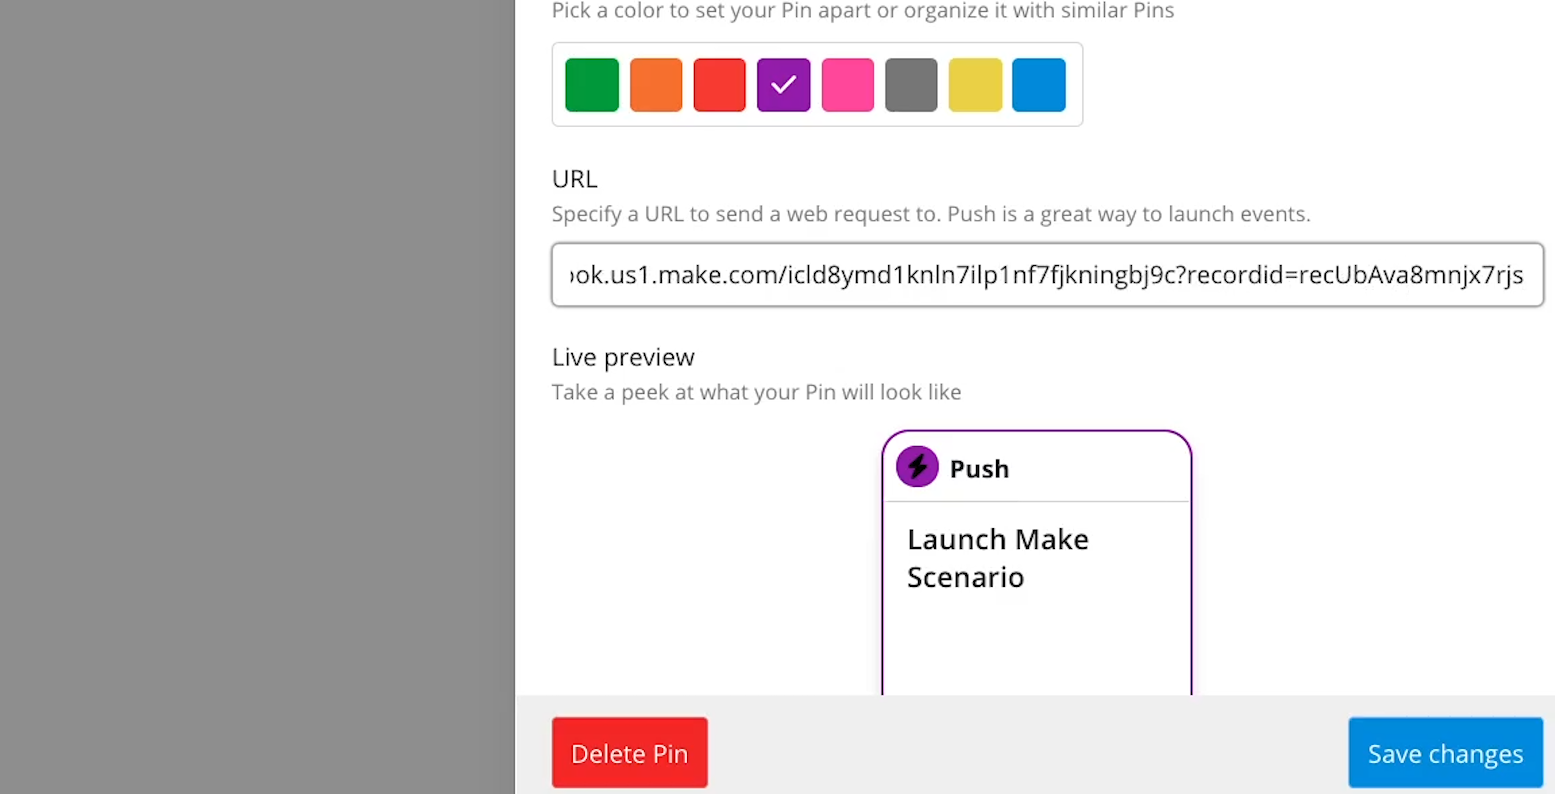
Give your new pin a name and a color, and choose “Push Pin” as the type.
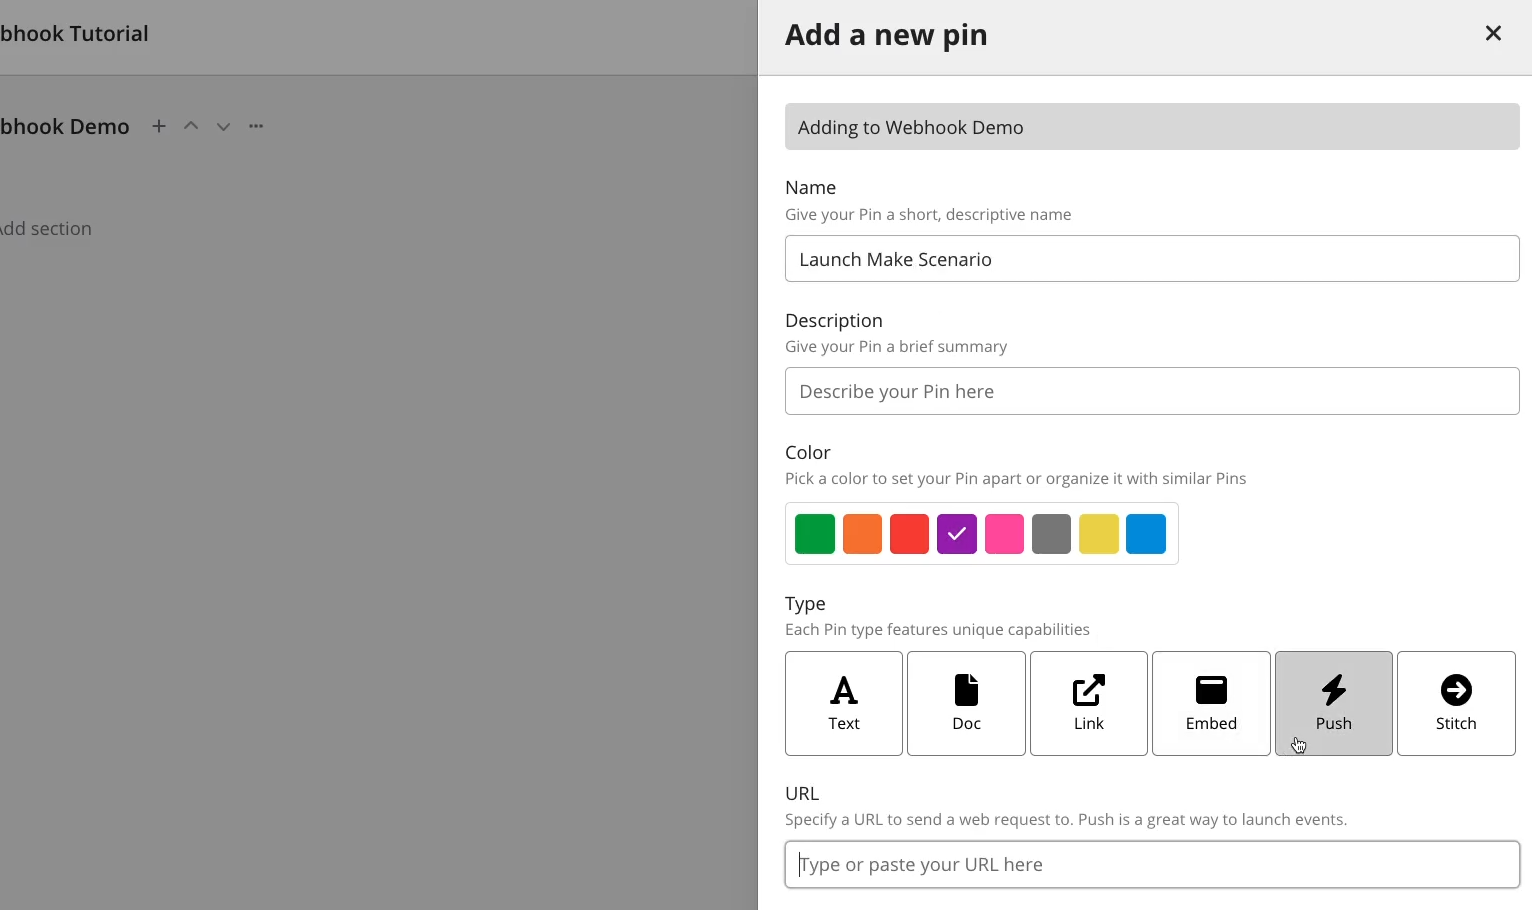
Now, it will ask for a URL. Paste in the URL that you copied earlier from Make.
Click on “Add Pin” to save this pin to your board.

Now, you can click on the pin to send data to the webhook trigger in Make. Clicking on a push pin will trigger a 3-second countdown before actually sending the data.
If you want to cancel your request, just click on the pin again to stop the countdown, and no data will be sent.
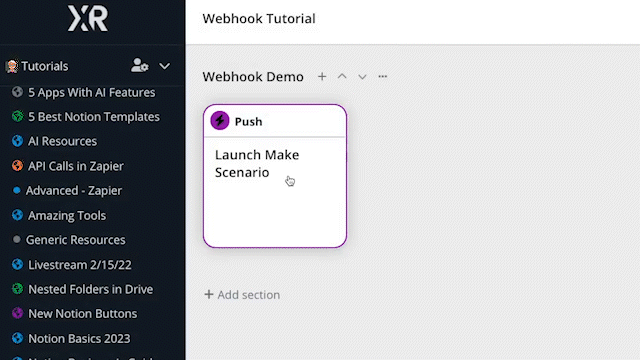
If you let the countdown finish, you’ll see a brief confirmation that your data was sent.

When you go back to Make, you should see that your webhook module has received data.
Currently, XRAY Workflow doesn’t support sending dynamic data through webhooks. You can add URL-encoded variables to the pin’s URL, but they’ll always have the same values.
However, if you want to supplement your automation with additional information, you can always add a search step to your scenario in Make to find data in Airtable, Smartsuite, or any other app you can see in XRAY.Tools that has a Find or Search Step.
Building your Make automations with webhook triggers can help to reduce your operations usage and keep your monthly charges in check. It also makes it easier to maintain and update your automations as you look to build more complex workflows.
If you’d like to learn more about building no-code and low-code workflow automations, be sure to check out our blog or our YouTube channel. You can also follow XRAY on Twitter, Facebook, or LinkedIn.

.pptx.png)

