As most in the automation space already know, Zapier is a great no-code automation tool for any skill level. It’s easy to get started with, but under the surface, it offers more robust features that advanced users can leverage to build complex automated workflows.
In this post, we’ll share some tips and best practices that will help intermediate to advanced users to navigate some of Zapier’s more technical features, and we’ll give you some of XRAY’s own strategies for managing an automated infrastructure.
When you put the concepts in this post into practice, you’ll be on your way to building automations that can effectively automate work for your entire department - or even your entire company.
Filters are an underused feature on Zapier that can give you much more control over your Zaps. To use a Filter, add a new action step in any of your Zaps and search for “Filter by Zapier”.
The filter step will stop the Zap from continuing unless it meets certain criteria, which you can set under “Only continue if...:”.
For instance, if you’re setting up a Zap to handle your clients database, you can use a filtering step to only keep going if the client’s status is “Active”. You could use your first steps before the filter to update the client’s record with relevant Google Drive folders and links, and then send a kickoff email only to your active clients that pass the filter.
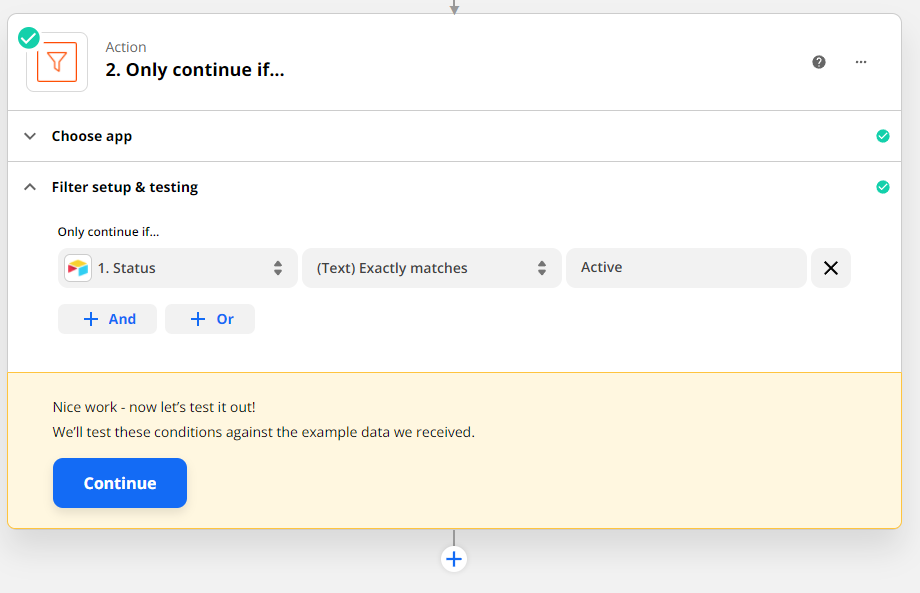
As you’re building your filter step, Zapier will indicate whether or not your test data would have passed the filter. To get the most accurate results while building and testing, make sure to use at least two sets of data: one that should pass the filter, and one that should fail it.
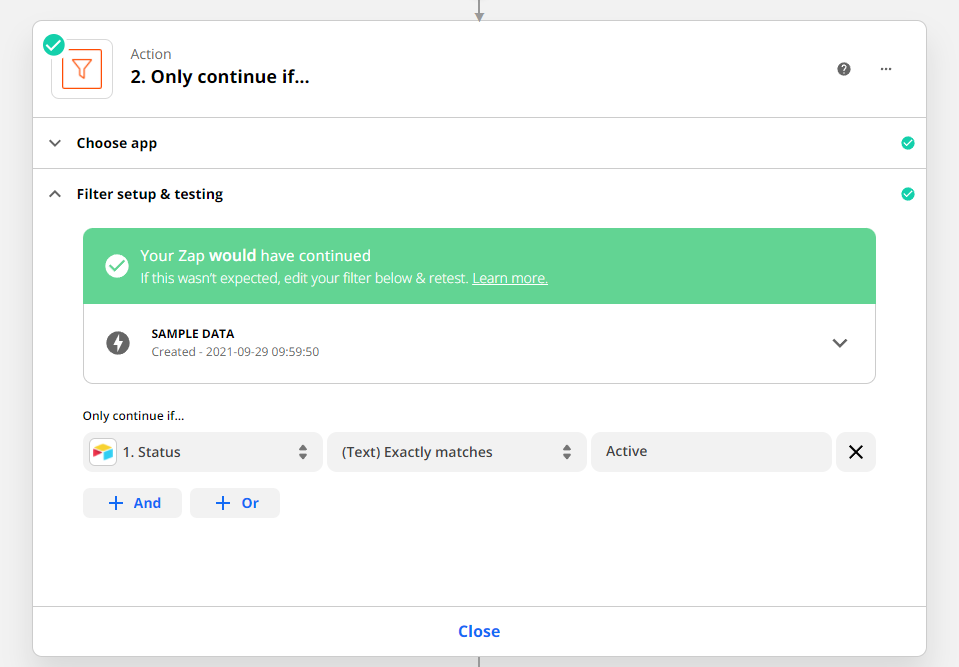
By using filters in your automations, you can cover multiple scenarios with a single Zap instead of making one for each situation, making your automations more flexible and efficient.
As you start creating more automations, it becomes more important to stay aware of what they’re doing and the assets they’re creating. Automations running invisibly in the background can easily create problems as your goals and circumstances change.
Additionally, you’ll likely want to gather metrics on how much time your automations are saving for your team and how your overall output changes over time.
While chat notifications can help you to keep up with your automations on an immediate basis, the best way to gather more meaningful data on your automations is with an activity log.
An activity log is a database that records data each time any of your automations runs. You can build an activity log in any spreadsheet software you prefer, but we’d recommend using Airtable for its views and other features that support automation.
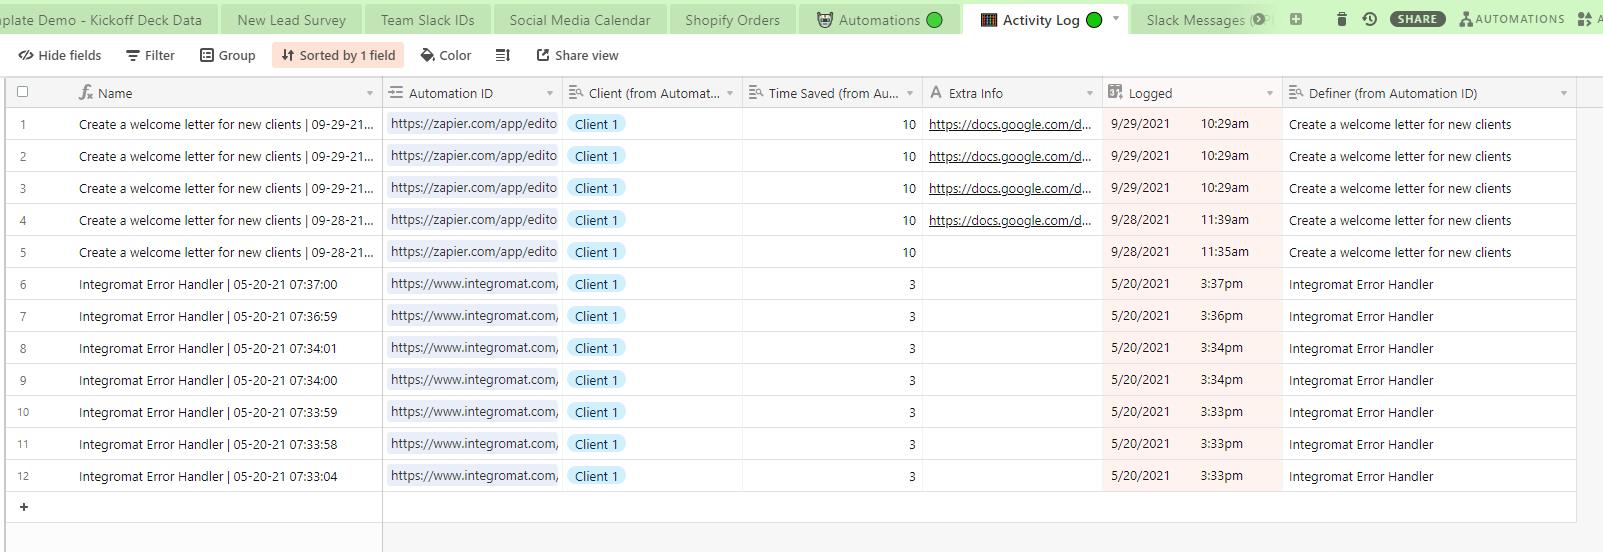
At a minimum, your Activity log should include the automation’s name, a URL where it can be edited, an estimate of the time it saves each time it runs, and a link to any document(s) it created.
To populate your activity log, just add a step at the end of each automation that creates a new record with all of the relevant data.
As your automations run, your activity log will become a useful resource for measuring the efficacy of your Zaps, as well as your automations on other platforms like Integromat.
No matter your skill level, you're bound to encounter errors in your Zaps from time to time. When you do, you should try to answer three questions to quickly debug your Zap and find the issues causing errors or unexpected results:
Check your activity log or the Zap history on Zapier. Is there a record of the Zap running when you expected it to? If not, the problem is likely in your Zap’s trigger. If it did run, continue on to Question 2.
Did your Zap run with the right dataset, and did it include all of the data needed for your Zap to work? If the trigger event alone doesn’t provide you with all of the data you need, you may need to connect to an Operational Database to provide additional information.
Did you set up your Zap to work with the data it ran with? This is often an issue when dealing with user-generated data, which can change substantially based on who’s creating it. You may have built your Zap assuming that all of your users would include a subject in their email, or that they would provide a full name in your contact form.
If your Zap doesn’t work with the data it’s encountering, you’ll need to use filters, paths, or other steps to accommodate the real-world scenarios you’re running into.
More often than not, answering these three questions will lead you to the heart of the problem. If you’re still running into issues, you can always reach out to XRAY or other Zapier Experts for support.
“Round-tripping” is our term for saving or referencing any new documents or resources created by your automation. It’s a simple way to ensure that the output of your automations doesn’t get lost, and can be accessed whenever you need it.
When an automation creates a new asset, be sure to save it (or a link to it) in a relevant database. For instance, if your automation creates a templated Weekly Meeting Agenda for you and your clients, you’ll likely want to save those agendas (or at least the latest one) in your Clients database. That way, you can have a record of everything you’ve discussed with the client week-to-week, and you can send them the agenda in case they’ve lost track of it.

Round-tripping is a simple step, but it’s something that will help to keep you organized as you build an extensive automated infrastructure. When your automations are generating documents, presentations, and reports every hour, it can be easy to lose track of them if they aren’t being immediately saved for reference.
Our last tip for this article might sound very simplistic, but it’s an extremely useful way to enhance your Airtable databases for Zapier automation.
As you’re using Airtable in your automations, you’ll notice that Zapier doesn’t always give you much info about your Airtable fields. For instance, if you make a formula field in Airtable, Zapier won’t indicate that it’s a formula field in any way.

In fact, It will appear to let you add data into it as you build your Zap, but the formula field will reject any attempt to directly enter data, whether it’s through manual typing or automation.
Adding emojis to your Airtable column titles is a great way to indicate the field type and how you should handle it as you’re building your automation.
As you can see in the screenshot, we use a 🚫 prohibited emoji for formula fields to indicate that nothing should be entered there, a 🤖 robot face for fields that should be filled in by the automation, and 🙌 raised hands for fields that should be filled in manually later.

All of these emojis show up in Zapier as well, making it easy for you to know what to do with each field. This might not seem very important when you’re building the Zap, but it will be very helpful when you come back to fix a new issue in the automation several months later. When the Zap’s structure is no longer fresh in your mind, reminders like this can be crucial to fixing up a broken Zap.

Zapier is a versatile no-code tool for building automated workflows. As you go beyond building simple automations for yourself and start creating automated workflows to support your team or your entire company, you’ll face many challenges that come with automating at a larger scale.
Staying organized and using all of the tools at your disposal will help you to overcome those challenges and save time for your team.
If you’d like to learn more about building an automated infrastructure, be sure to check out our blog or our YouTube channel. You can also follow XRAY on Twitter, Facebook, or LinkedIn.