
If you’ve ever tried to add a long pause to one of your Zaps, you’ve probably run into the frustrating 30-day limit in Zapier’s “delay” action.
Fortunately, there’s a very easy way to get around this limit and delay your automated actions for as long as you’d like.
All you have to do is split your automation into two Zaps and use an Airtable base to send data between them.
It’s very a simple process, and we’ve even prepared an Airtable template you can copy to quickly get started.
First, we’ll quickly explain what the finished workflow looks like. Then, we'll break it down for you step by step.
Delaying a Zap for more than 30 days involves three main steps:
To kick off the workflow, you’ll have a Zap that triggers under whatever conditions you want. It can also perform any actions that you want to run right away.
To finish off the Zap, add a “Create Record” step in Airtable and store some key data in a table based on our template. You’ll need to include some date/time data to calculate your desired delay, as well as any other information you want to use when your automation resumes.
With the data sent over by your first Zap, your customized Airtable base can easily calculate any delay that you want.
Our template includes a preconfigured formula field you can use to get started. It defaults to a 60-day delay, but can be easily adjusted to your own parameters.

When a record’s calculated date matches the current date, the record will enter the “Launch 2nd Zap” view. For example, with our 60-day delay, a record with an original date of 04/19/24 would enter the “Launch 2nd Zap” view on 06/18/24.
Your workflow will conclude with a second Zap that runs whenever a new record enters your specified view. Then, you can add any automated actions that you want to perform after the delay.
Next, let’s take a look at setting up this workflow in more detail. We’ll demonstrate the process with this example workflow:
• The first Zap will run when we add a new label to an email in Gmail
• After we add the label, we want to send an automated email to the original sender 60 days later
Even though your finished workflow will start with Zapier, the easiest way to construct the automations will be to start with the Airtable base.
If you’ve never used Airtable before, you can check out XRAY’s beginner’s guide to learn the basics. However, it’s a very intuitive spreadsheet and database app, and you’ll likely be able to follow along even if you’re new to the app.
Note that you can use a free Airtable plan for all of the techniques demonstrated in this tutorial.
To begin setting up your Airtable base, copy our template to your workspace.
The template consists of one table with a couple custom views and several useful fields. Let’s take a closer look at them now.
First, the primary field is set to “Name”. This field creates a title or label for each record in the base. We’ve set it up as a formula that combines the contents of the next two fields.

Using a formula for your primary field makes it easy to keep all of your records’ names consistent, and lets you easily update them en masse whenever you want.
You can leave this field as-is or customize it to give your records any label you want.
Next, we’ve included a couple of placeholders for any data that you want to include. These are just single-line text fields called “Data 1” and “Data 2”.
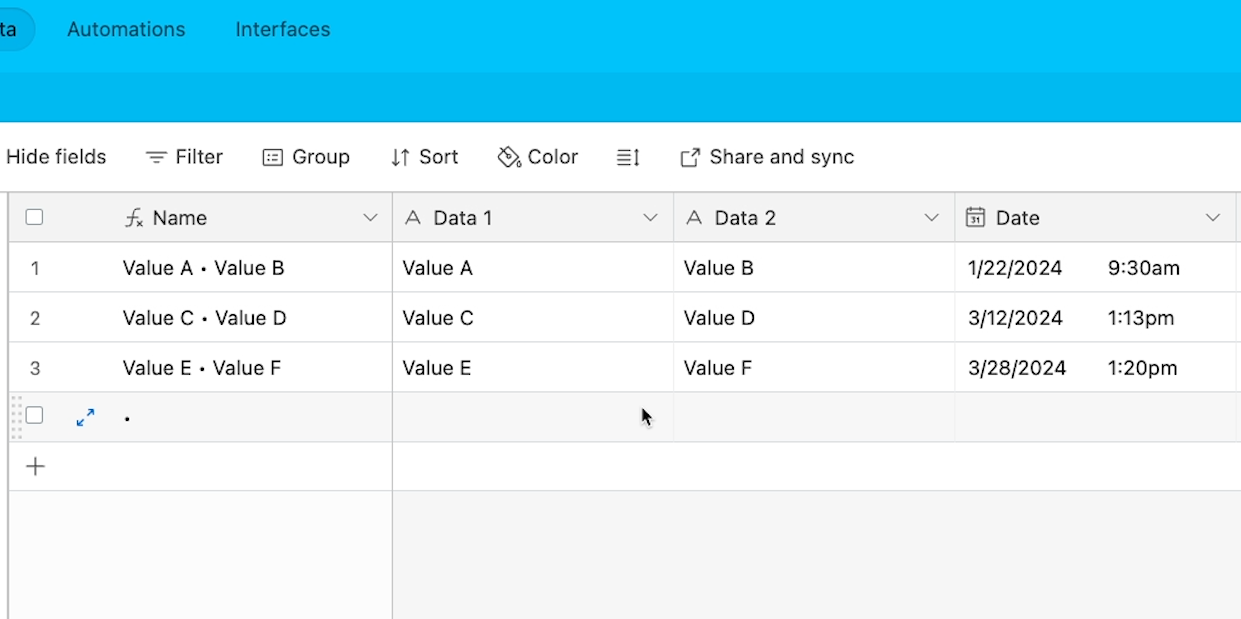
Any data that you want to collect from your first Zap and send to your second Zap will need to be stored in Airtable with fields like these.
For our example, we’ll edit these into fields for “Email Address” and “Full Name”.

To accommodate your Zap’s data, you can edit these placeholders, add more fields, or delete the ones you don’t need.
Now let’s look at the fields that will let us calculate a delay for any length of time that we want.
First, there’s this simple “Date” field. You’ll need to include a Date field for any dates that are involved in the final calculation.

For our example, we just need one date field to indicate when the email was originally received. You may need additional date fields for your use case.
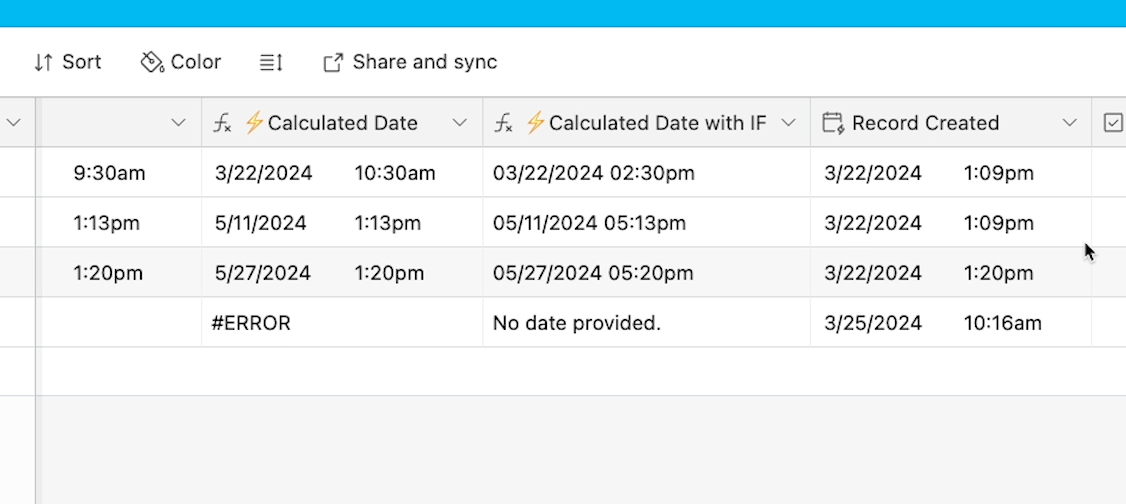
Note that we’ve also included a “Record Created” field. This is a unique field that displays the date the Airtable record was created.
This field is populated automatically, and is not editable.
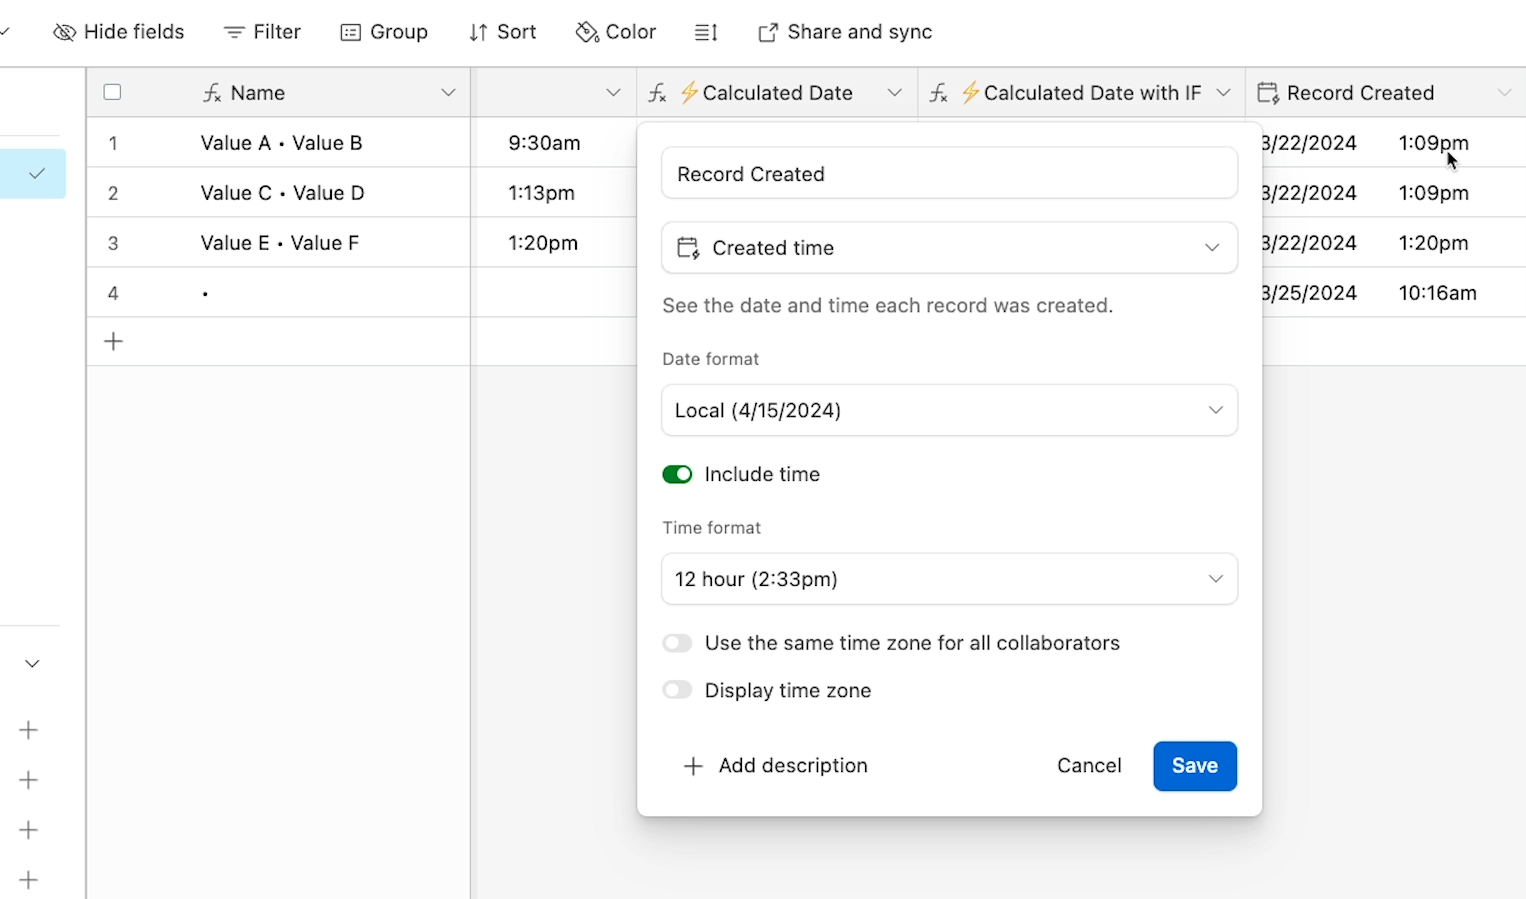
In some cases, you may want to use this date in your formula instead of referring to a date sent from Zapier.
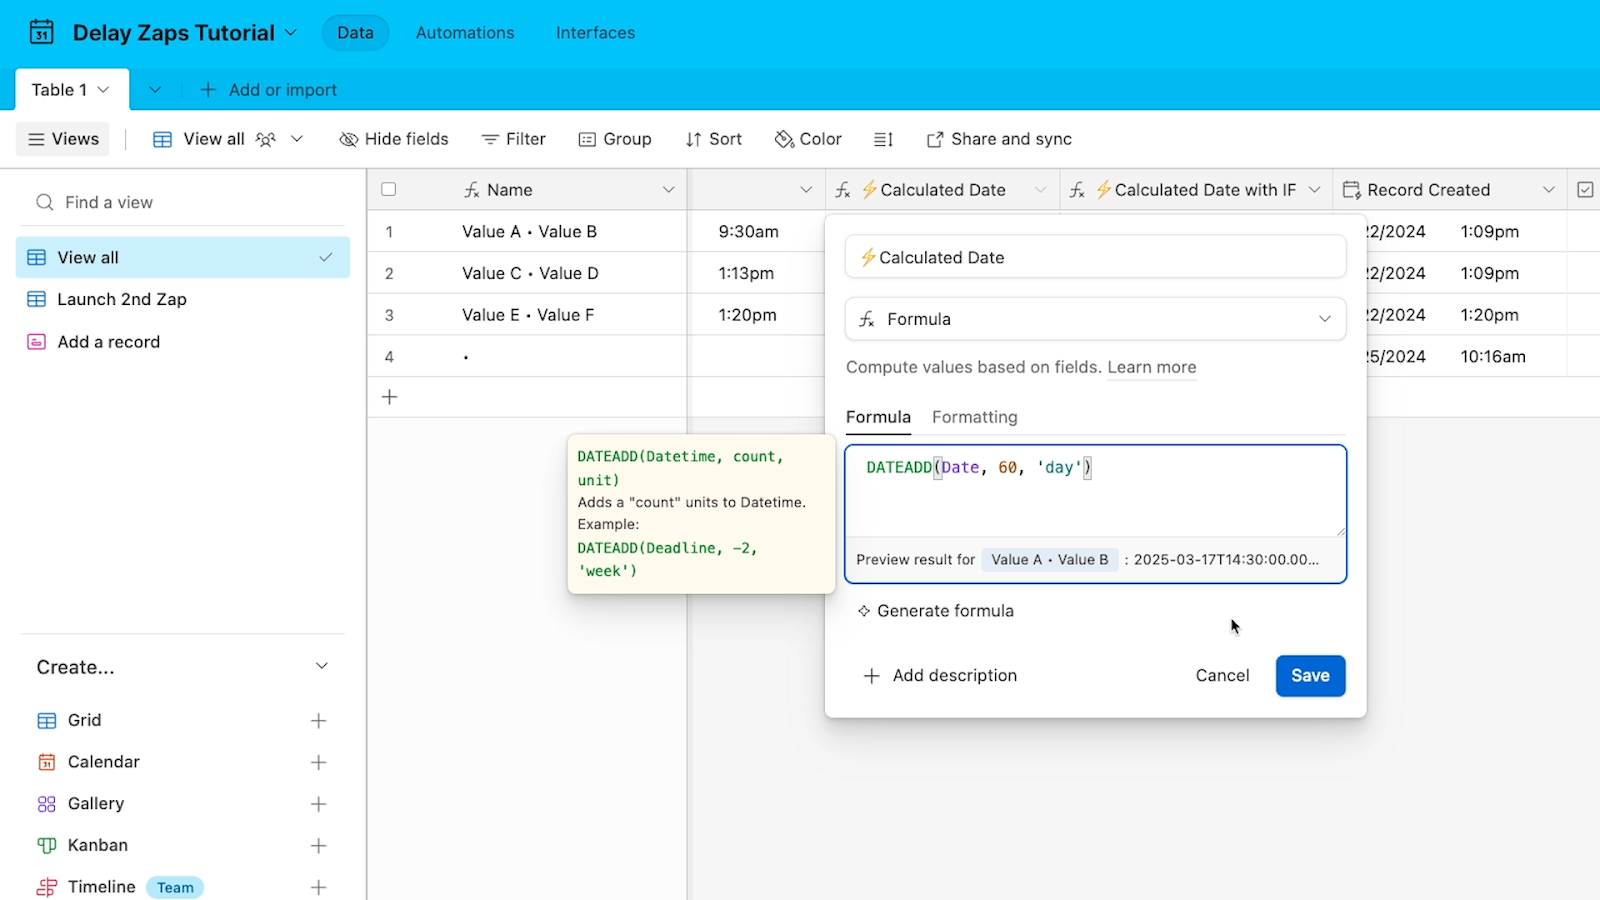
This field is the most important one in the template. In this “Calculated Date” field, you can calculate the date when your second Zap will run.
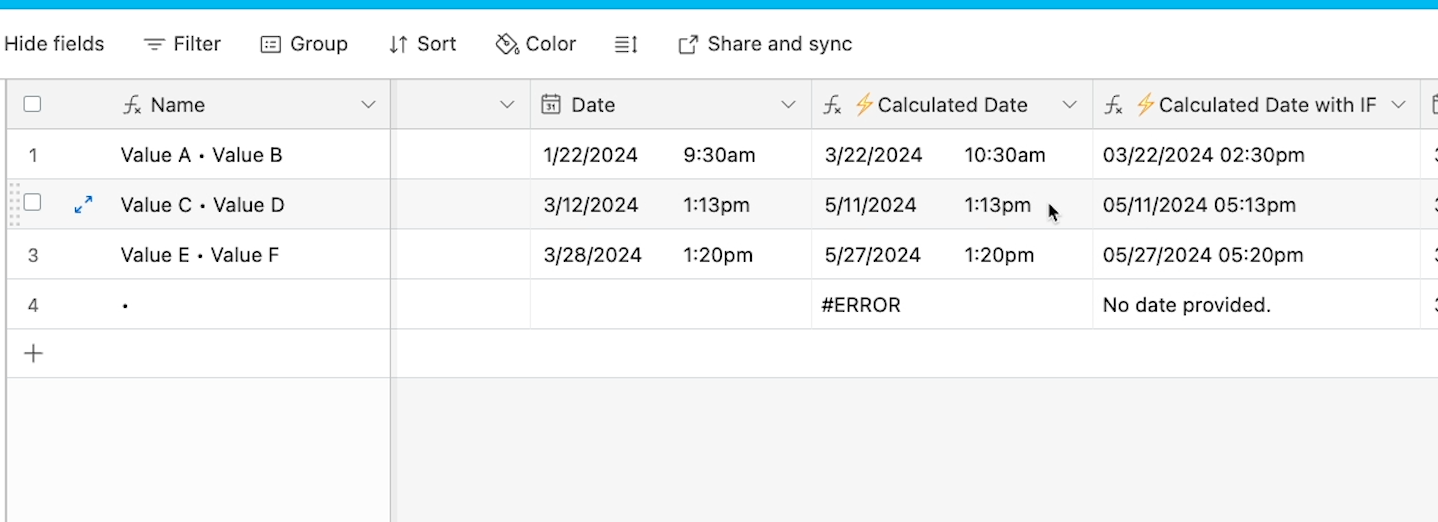
For our example, we’ve written a formula that adds 60 days to the original “Date” field. However, you can easily edit this formula to add any amount of time that you want.
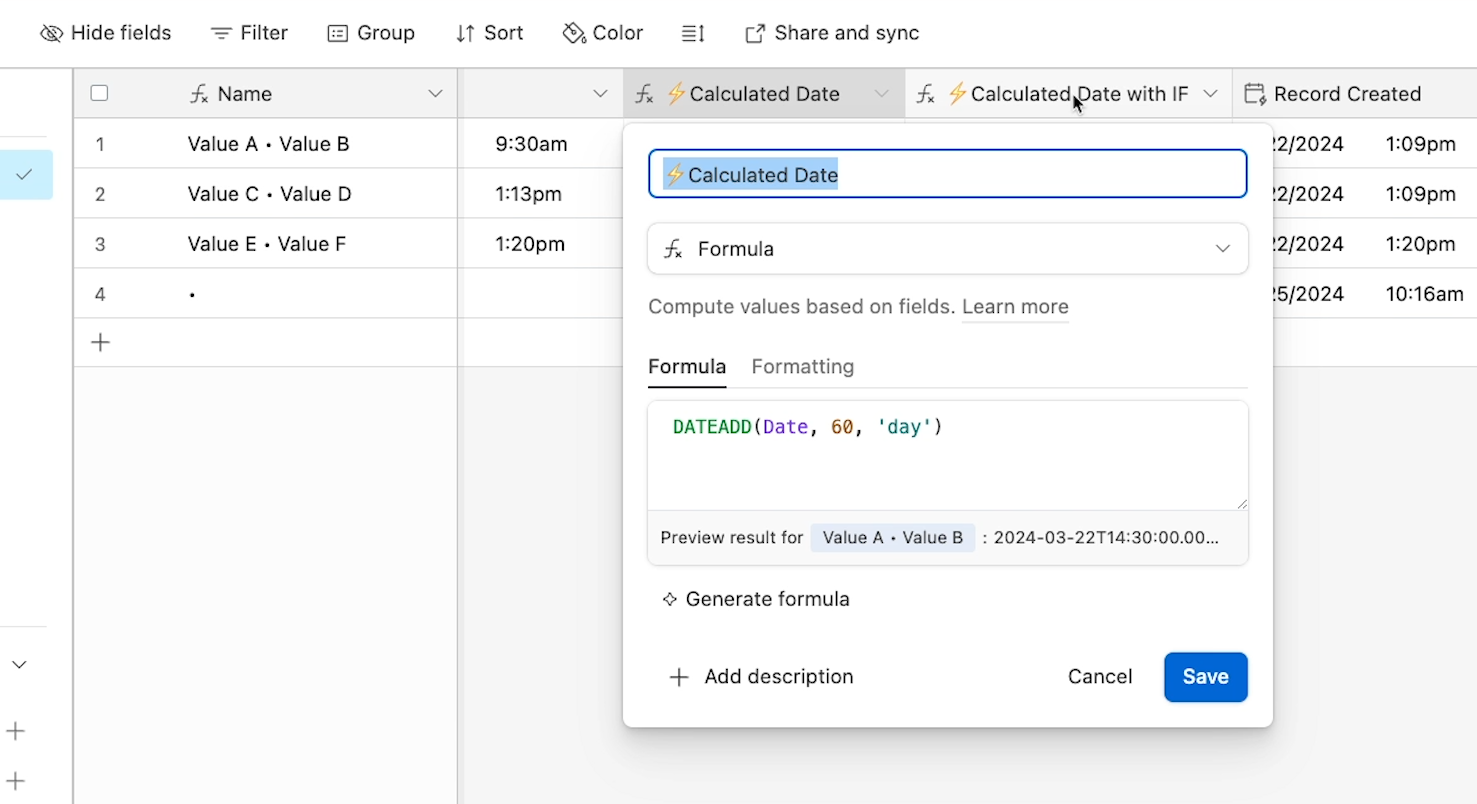
Just replace ‘day’ with something like ‘week’ or ‘year’, and replace ‘60’ with the interval you want to use. You can explore Airtable’s help docs for more information about using this formula.
When you’re done editing your formula, click “Save” to commit your changes.
When a record’s “calculated date” is equal to today’s date, then that record will enter the view called “Launch 2nd Zap”.
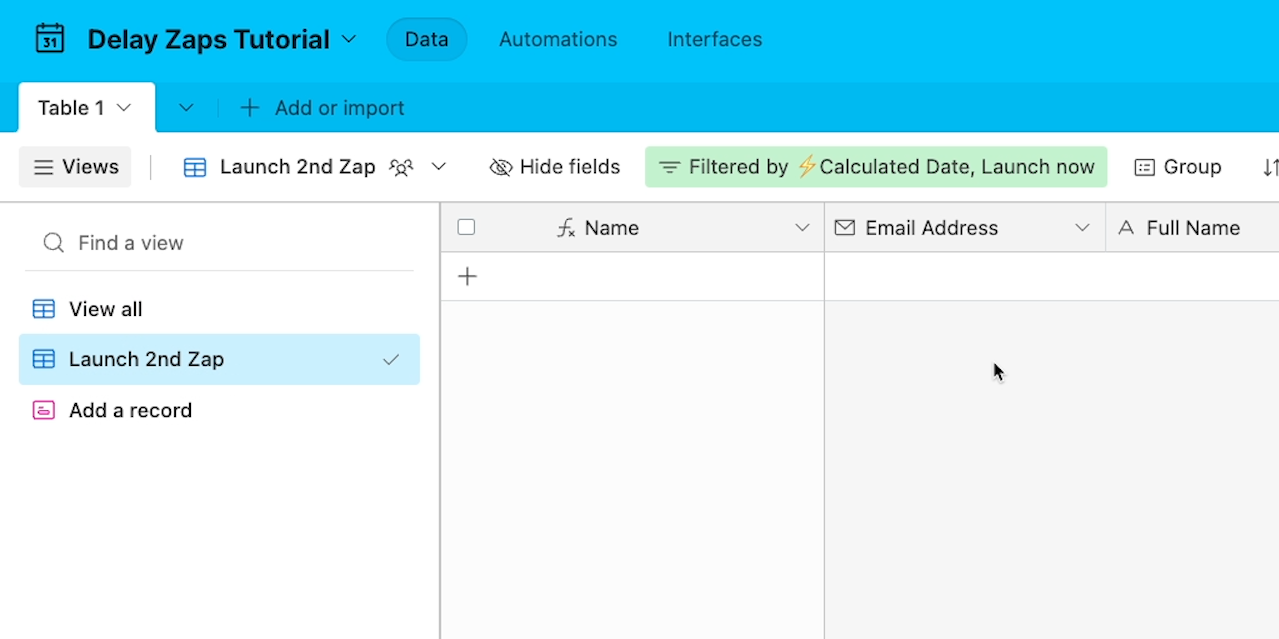
That’s because the view’s filter is set to “Calculated Date is today”.
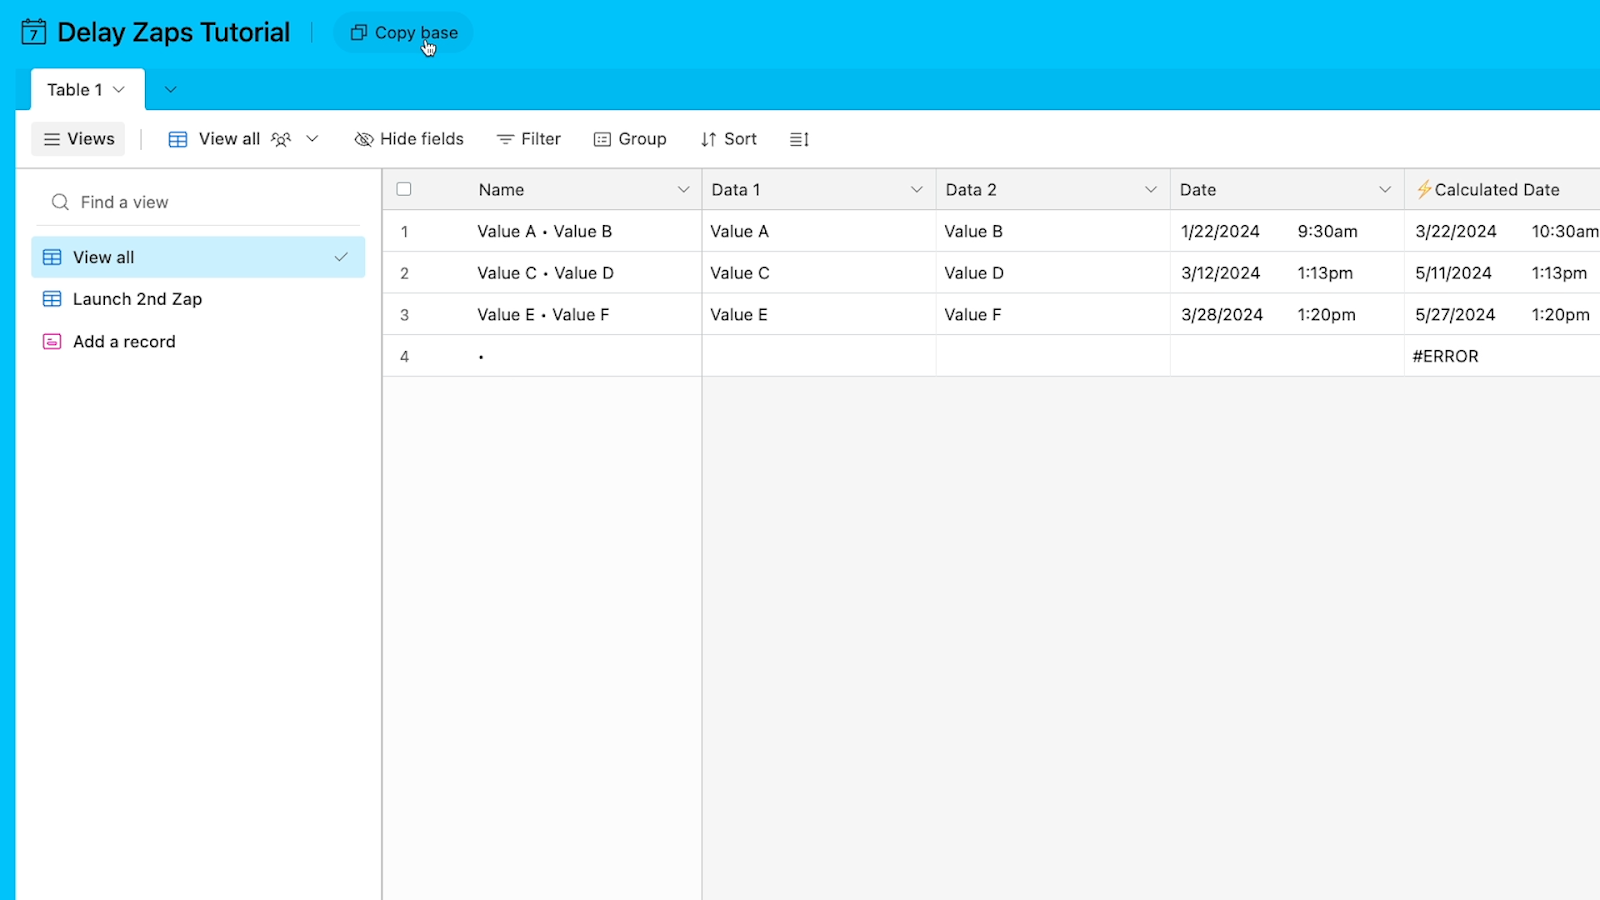
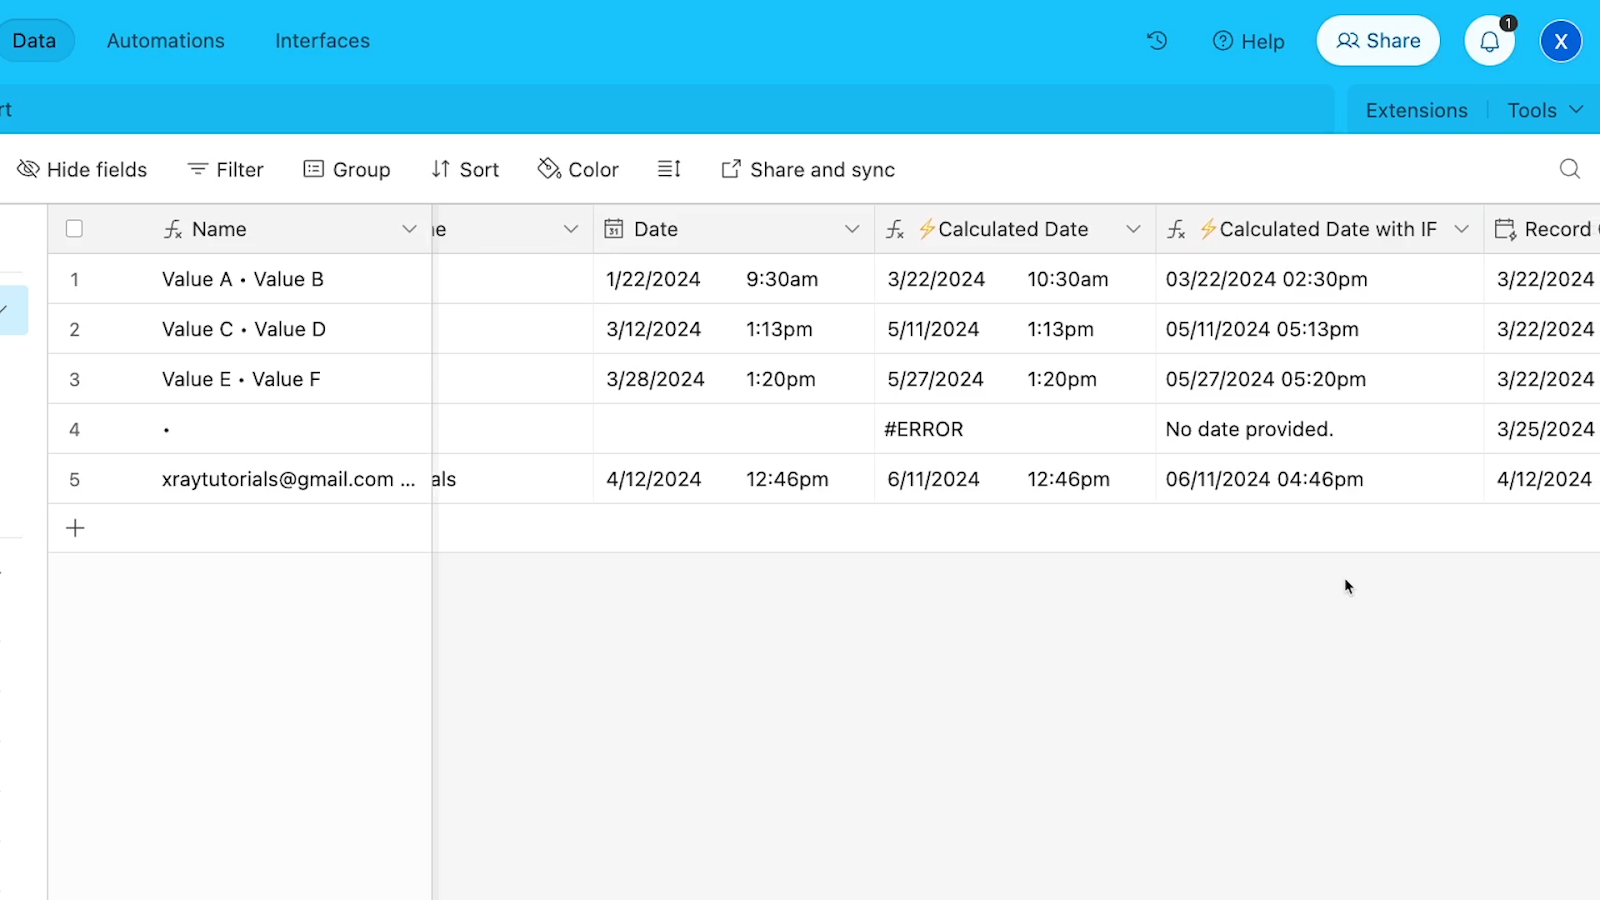
You may have noticed that any record without a “Date” entry has this big obnoxious “#ERROR” text in the “Calculated date” field.
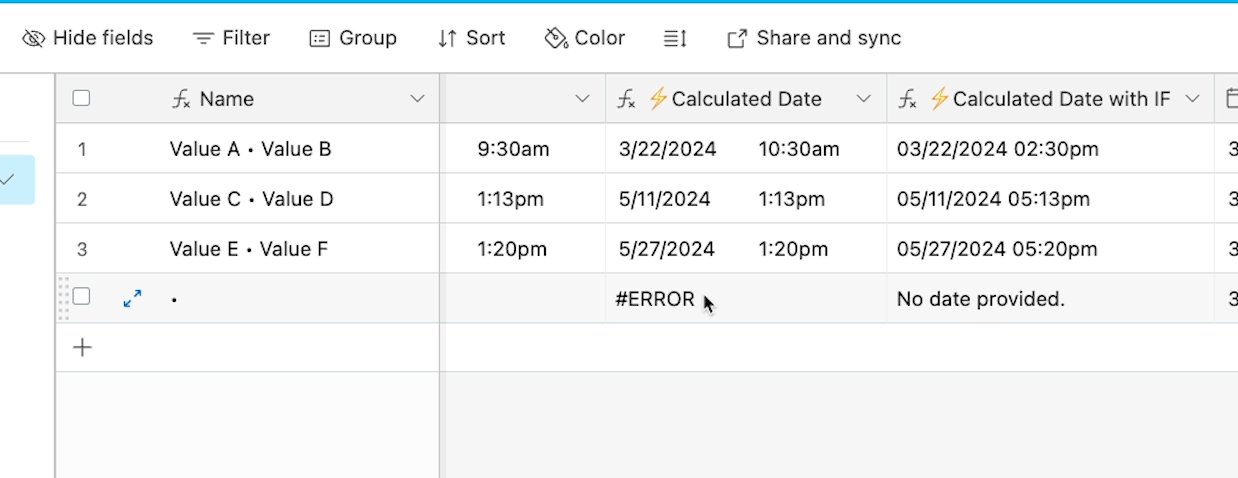
Since there’s no date to add 60 days to, the formula doesn’t work, and just displays this error text.
If that bugs you and you’d like to replace this error text with a less obtrusive message, you can use the second version of our formula instead. You’ll find that version in the field called “Calculated Date with IF”.
This formula is a bit more complicated.
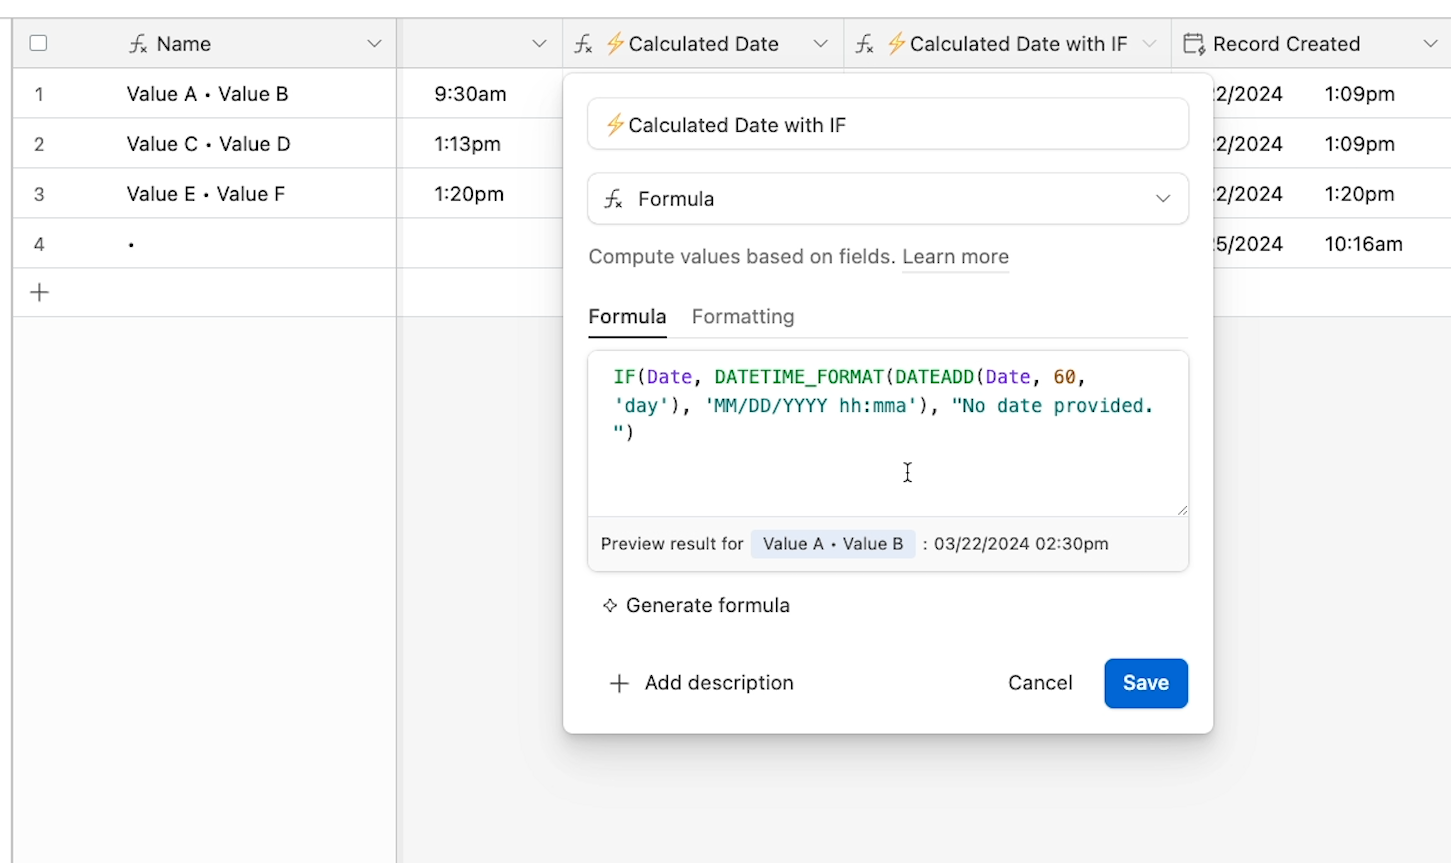
You can see that we still have the same “DateAdd” formula at the heart of it, but there’s also a DateTimeFormat expression, as well as an “IF” statement that checks whether or not there’s a date to work with.
Ultimately, if you’re new to Airtable, you’ll probably prefer the simpler version. But we’ve added both to the template so you can pick for yourself. Then, you can just hide the field that you don’t want to use.
Note that we’ve marked both formula fields with a lightning bolt emoji. Using emoji labels like this will make things much easier when you start working with this Airtable base in Zapier.
These formula fields won’t accept direct input, but Zapier will still give you the option of entering data into the “Calculated Date” fields.
The emoji, which we’ll see in Zapier too, lets us know that these fields are populated by a formula and should be left alone.
The “Add a record” form view is a simple way to add complete records to your base. Adding records one field at a time can lead to issues with automations, since they may run when a field is still missing data.
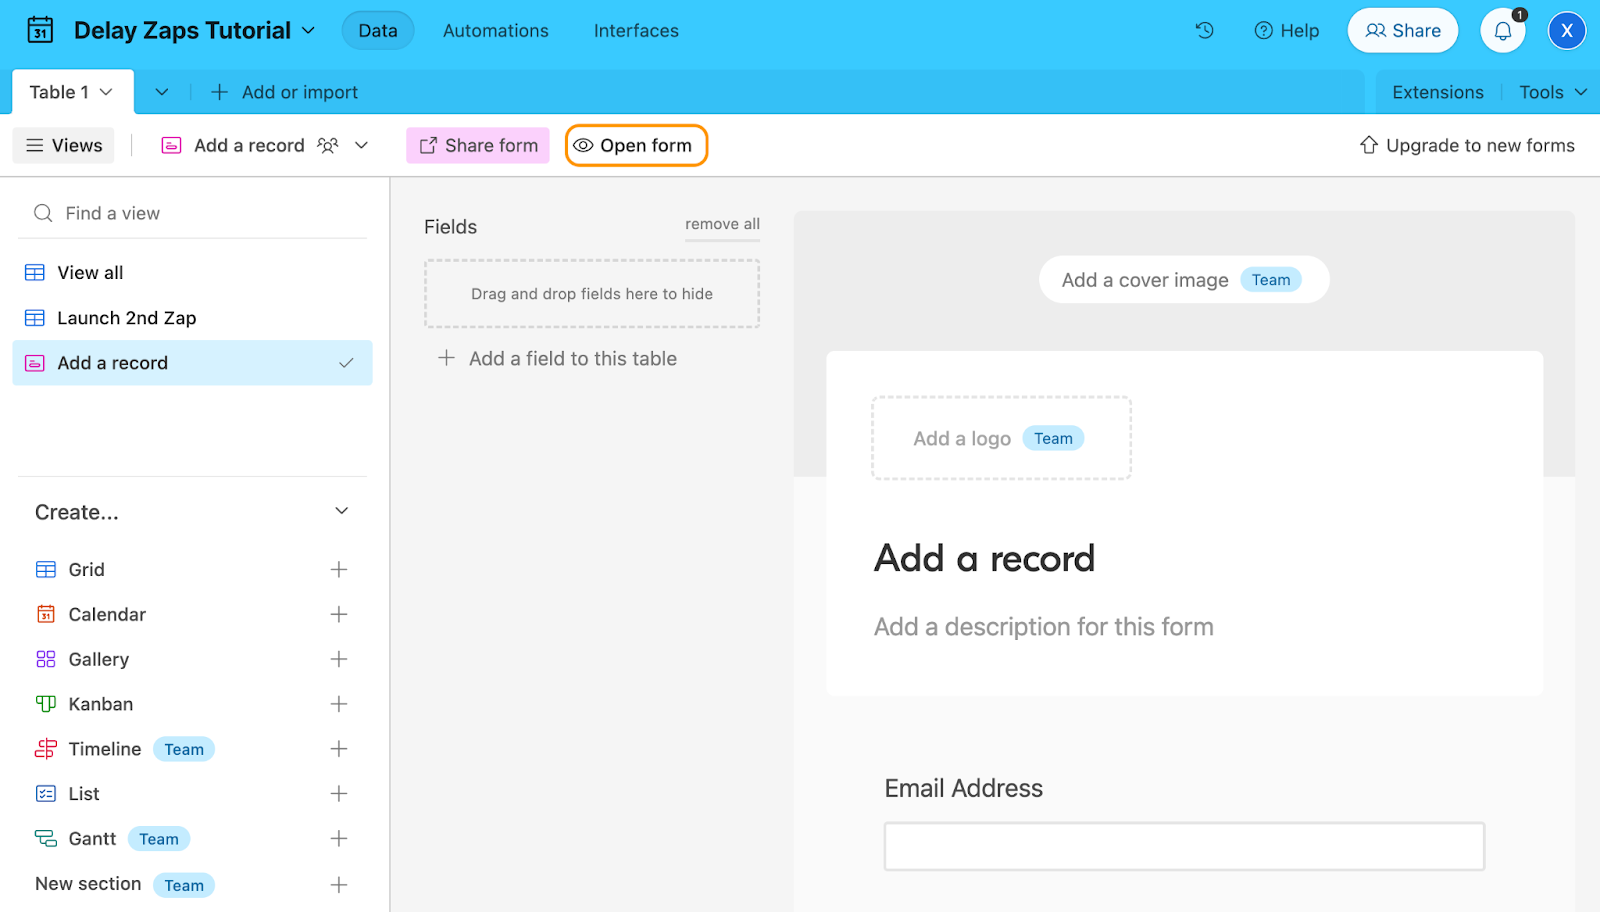
The view itself will let you configure the form, but not enter data. To submit a record, just click on “open form” to access the published survey.
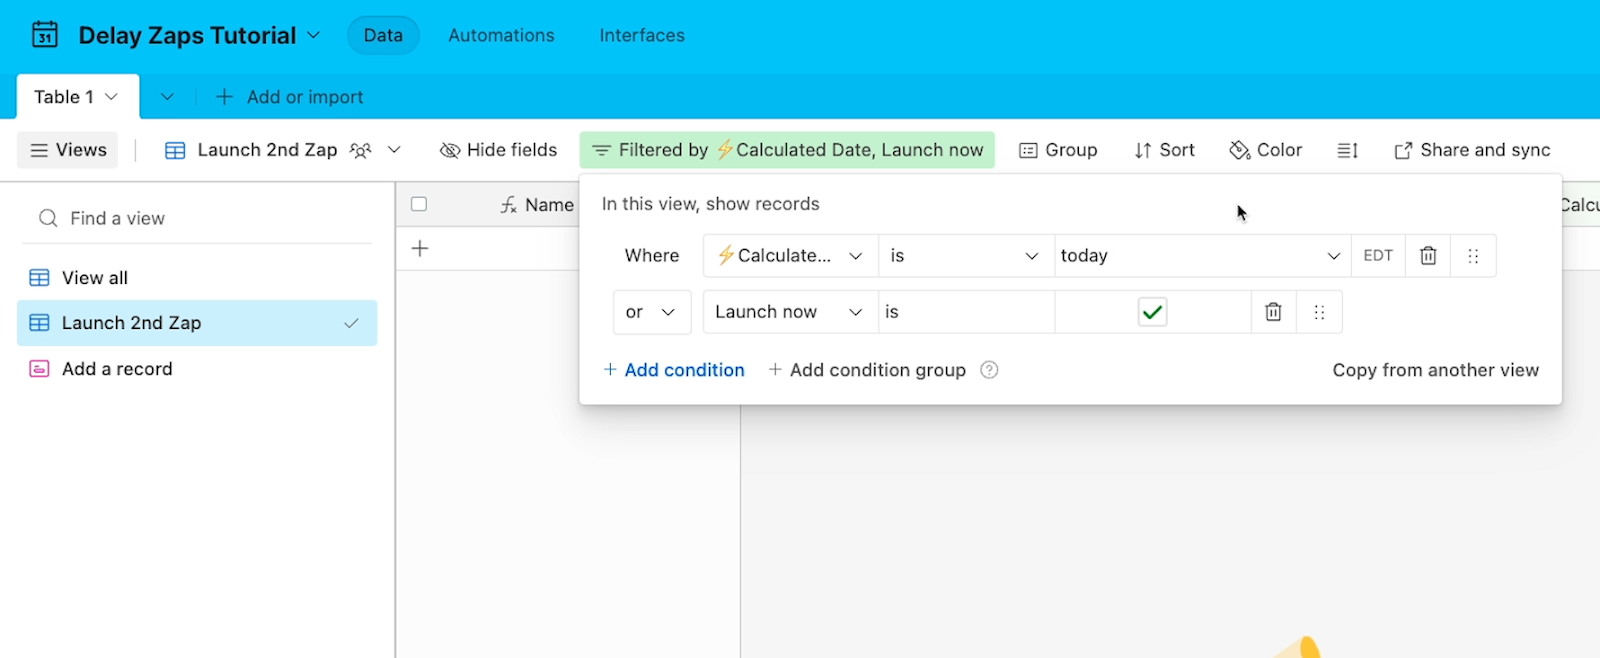
Finally, the last field in this template table is a checkbox field called “Launch now”.
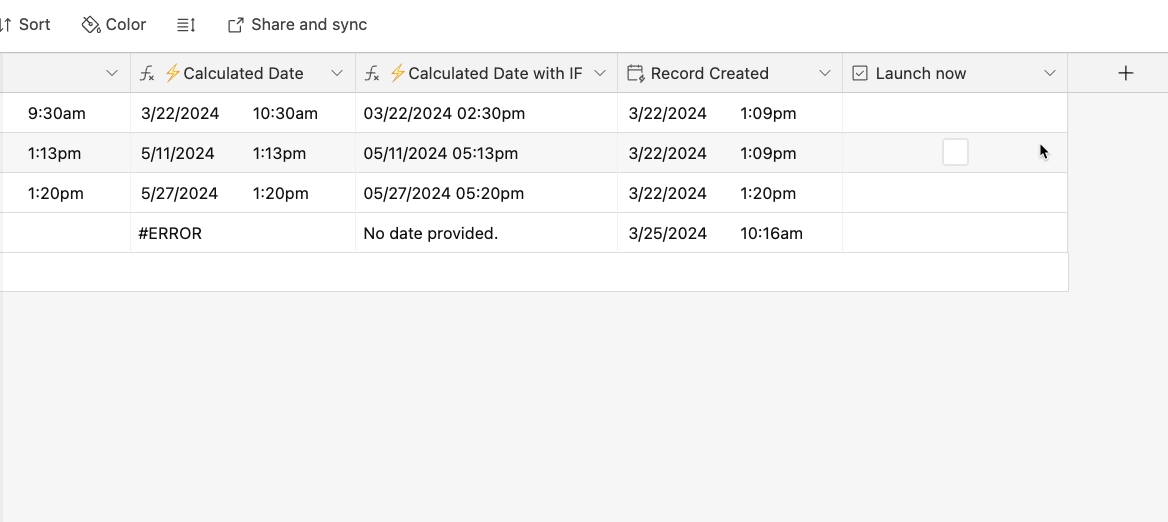
This field is optional, but it's a good example of why we like to use Airtable to skirt around Zapier’s delay limit, instead of something like Google Calendar.
If you change your mind and want to launch the second Zap immediately instead of waiting 60 days, you can just check this box.
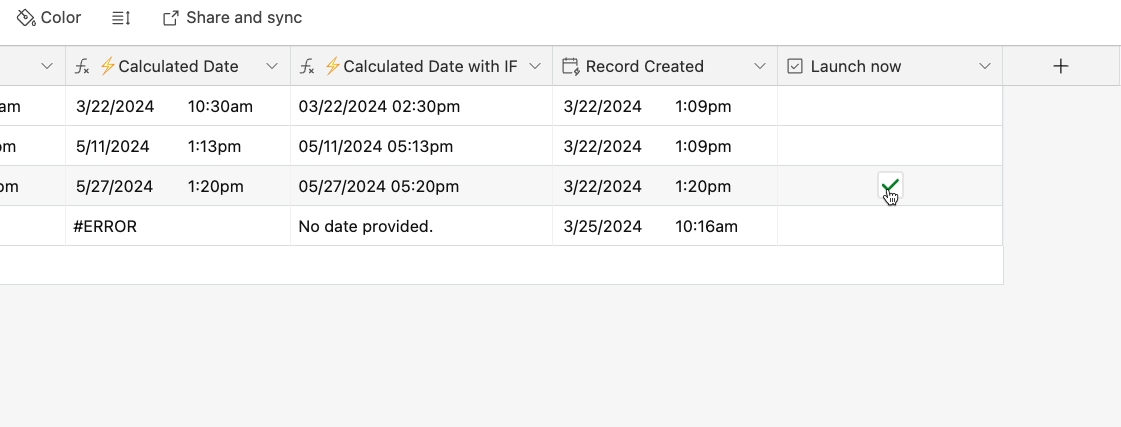
The second condition on the “Launch 2nd Zap” view’s filter will also allow any records that have been manually checked off.
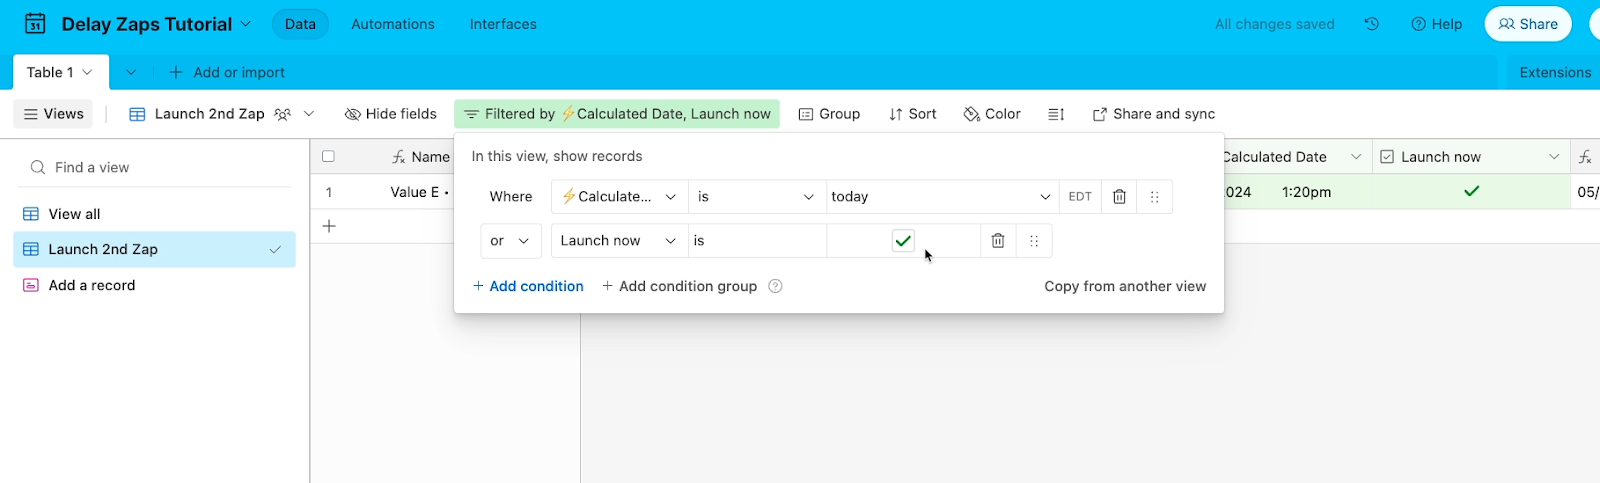
With Airtable you can easily set up multiple filter conditions for a record to enter a specific view.
—
That covers basic setup, but you should feel free to customize all of these fields to fit your specific use case.
In general, just remember that any data you want to send to your second Zap needs to be saved or calculated here in Airtable first.
Once your base is set up to your liking, it’s time to build the Zaps for this automated workflow.
Now that our Airtable base is all set, let’s build the first Zap in this workflow.
The first Zap can trigger under whatever conditions you’d like. In our example, this Zap will run whenever we add a custom label to an email in Gmail.
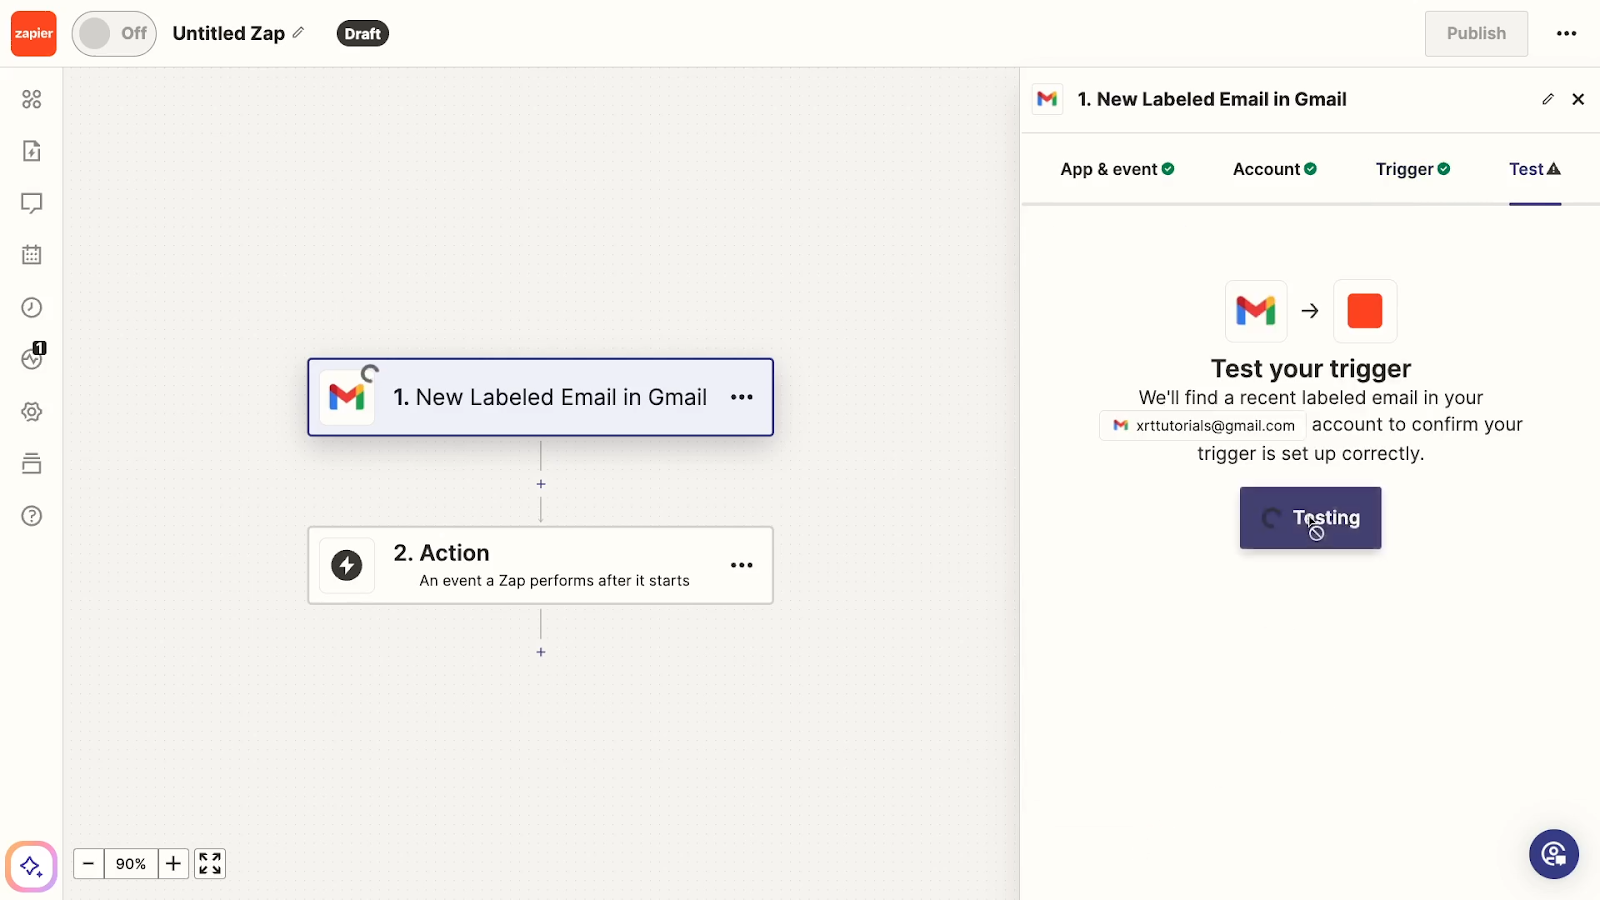
Once your trigger is configured, give it a test to load in some test data.

Next, you can add any other actions that you want your Zap to perform before the pause.
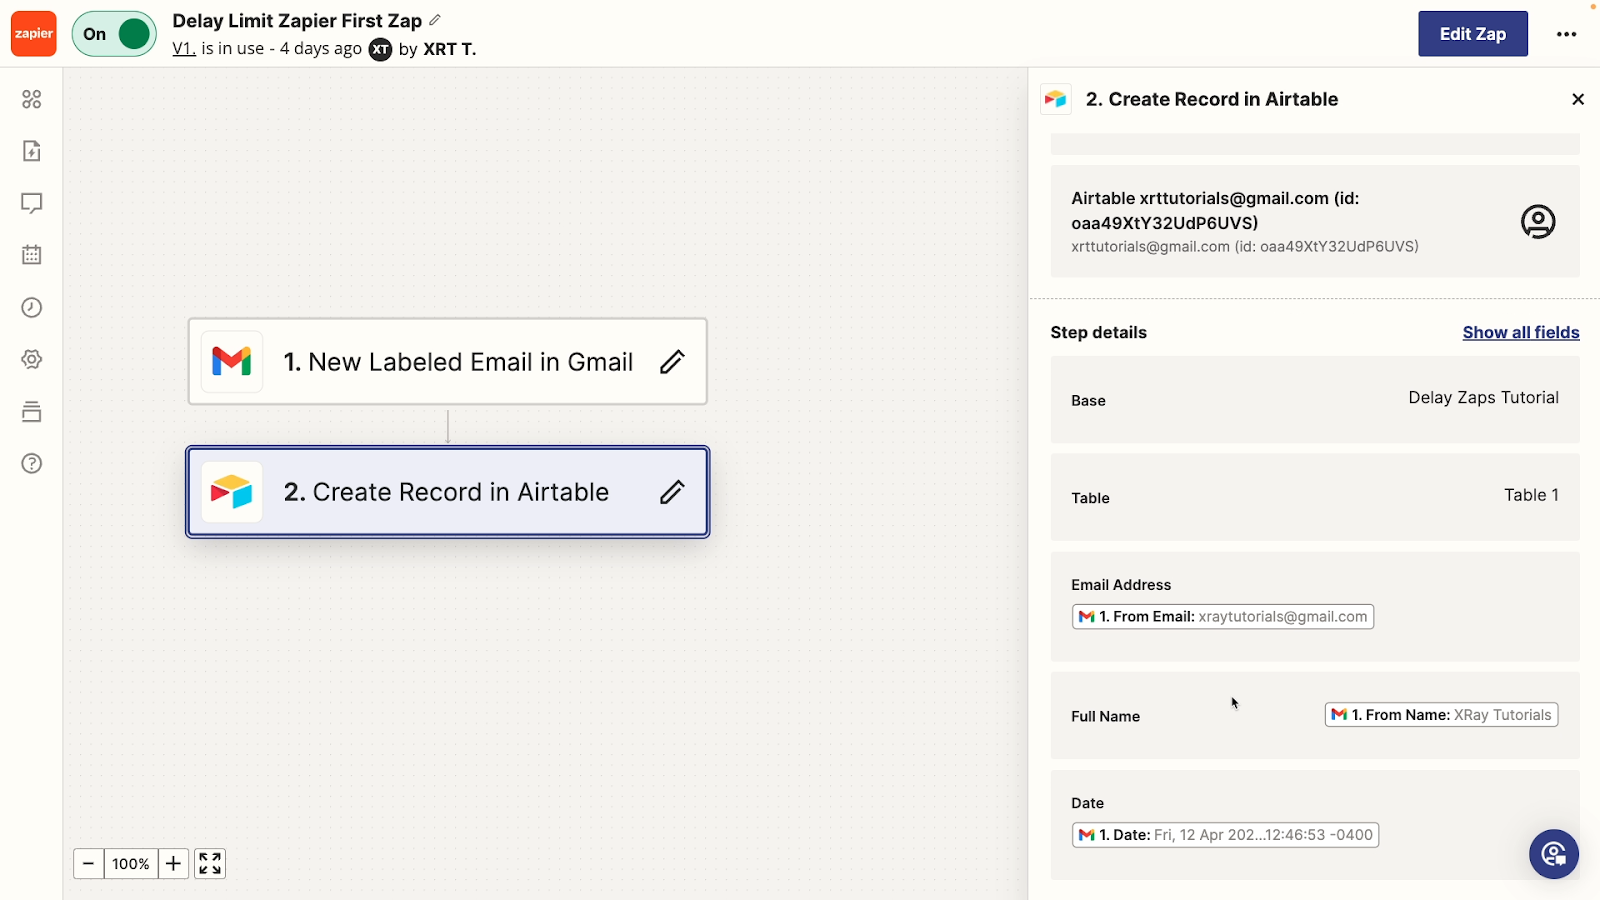
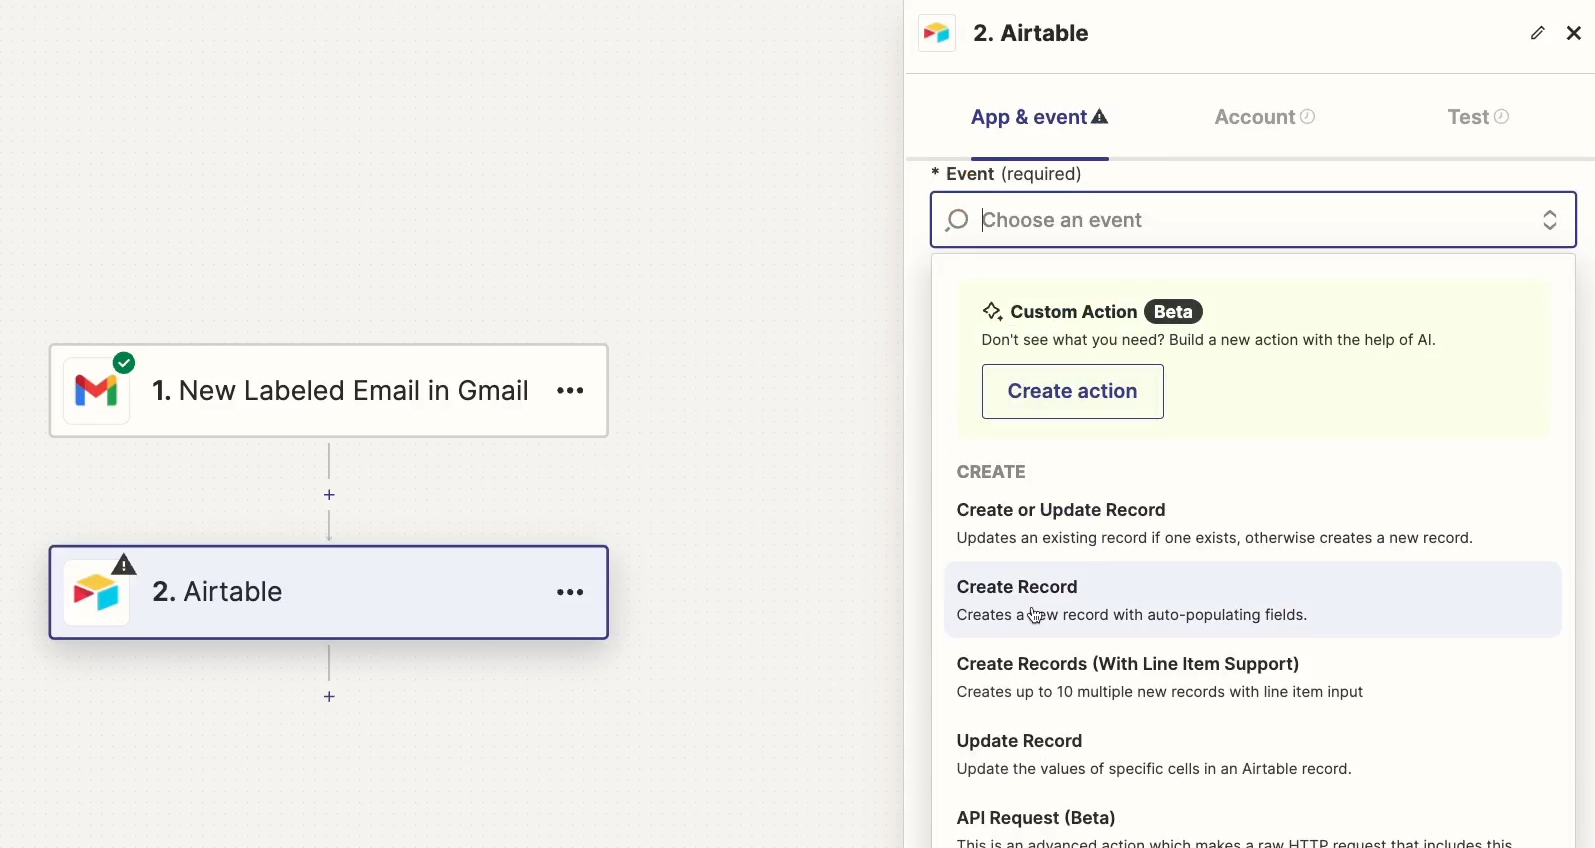
Once you’ve added all of the additional actions that you want, finish the Zap with an Airtable step.
Select “Create record” as the action.
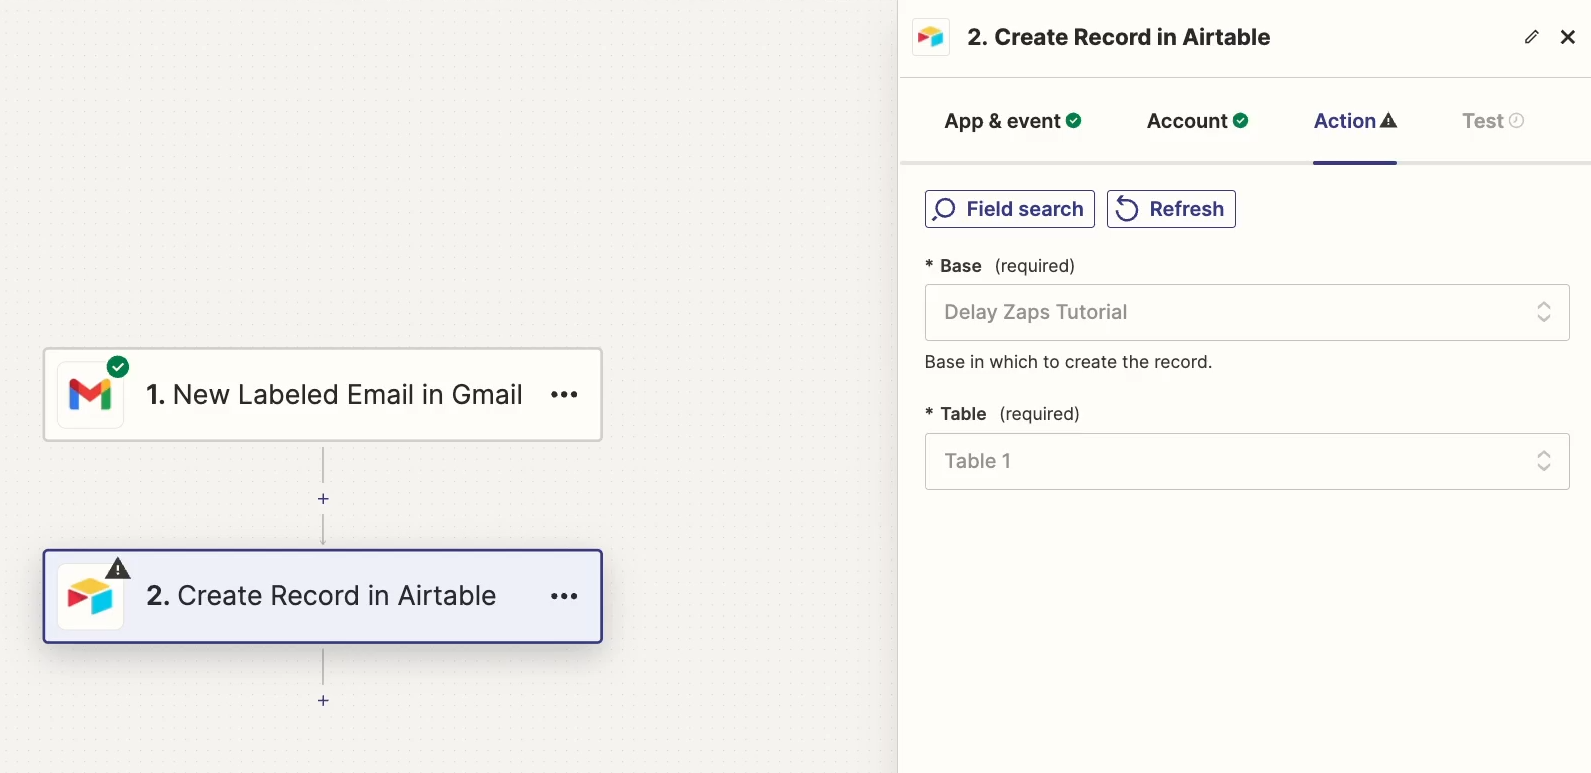
Sign in to your Airtable account to authorize Zapier to act on your behalf. Then, choose the base and table that the new record should be created in.
This will be the template base that you copied earlier and configured to your liking.
Once you’ve selected the right table, you can map data retrieved from earlier steps to your Airtable fields.

In our example, we’ll fill in data for the sender’s name, their email address, and the date the email was received.
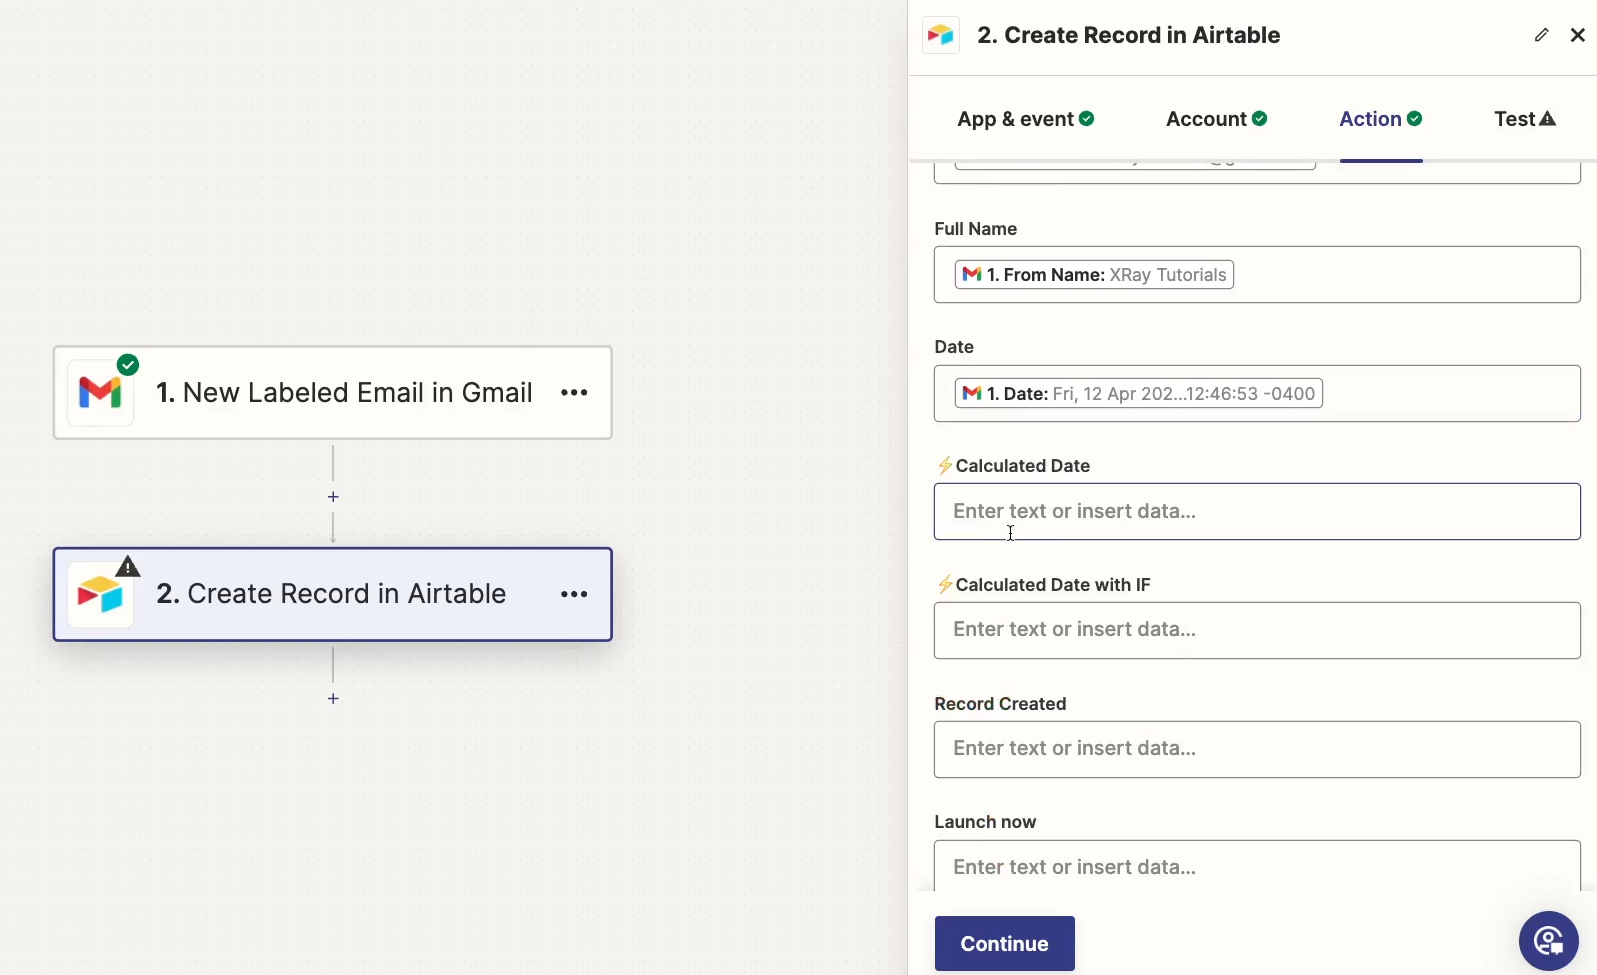
Note that we can see those lightning emojis for the formula fields, so we know not to map anything to them.
Once you’ve mapped all the data you need to each appropriate Airtable field, give the step a test.

After a few moments, you should see a success message in Zapier.
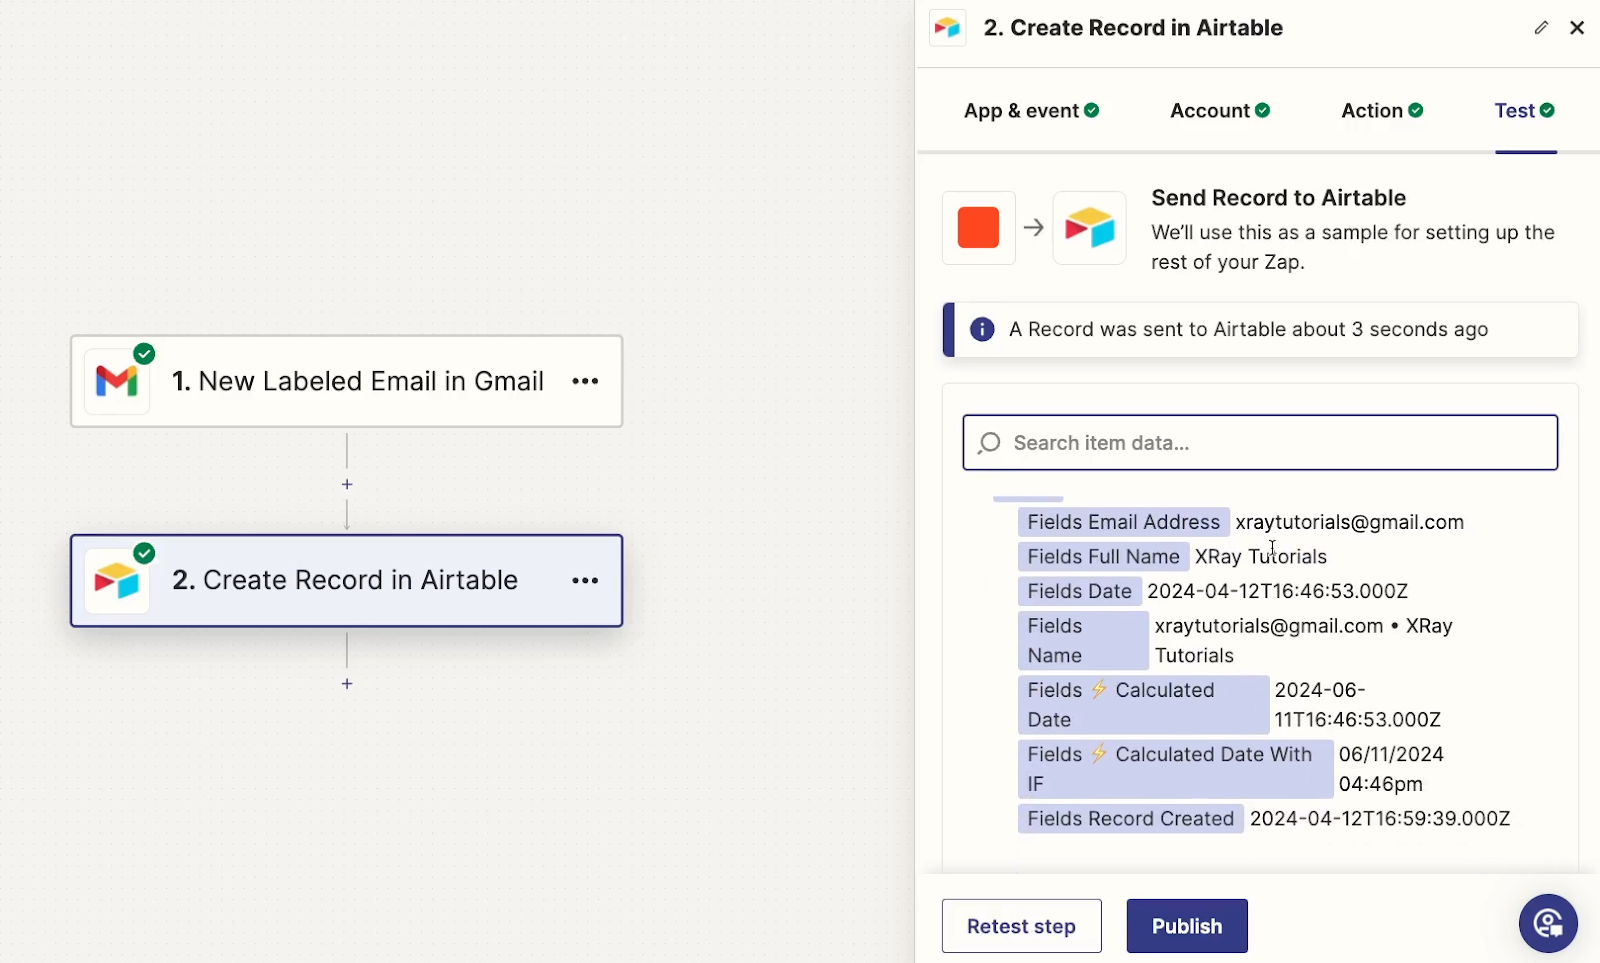
Just make sure to check Airtable as well to confirm that the data all looks correct. You’ll especially want to make sure that the calculated date is what you expected.
Ours is 60 days after the original date, just like we wanted. This first Zap has been successfully set up to send data to Airtable.
Now let’s build the second Zap, which will run after your specified delay.
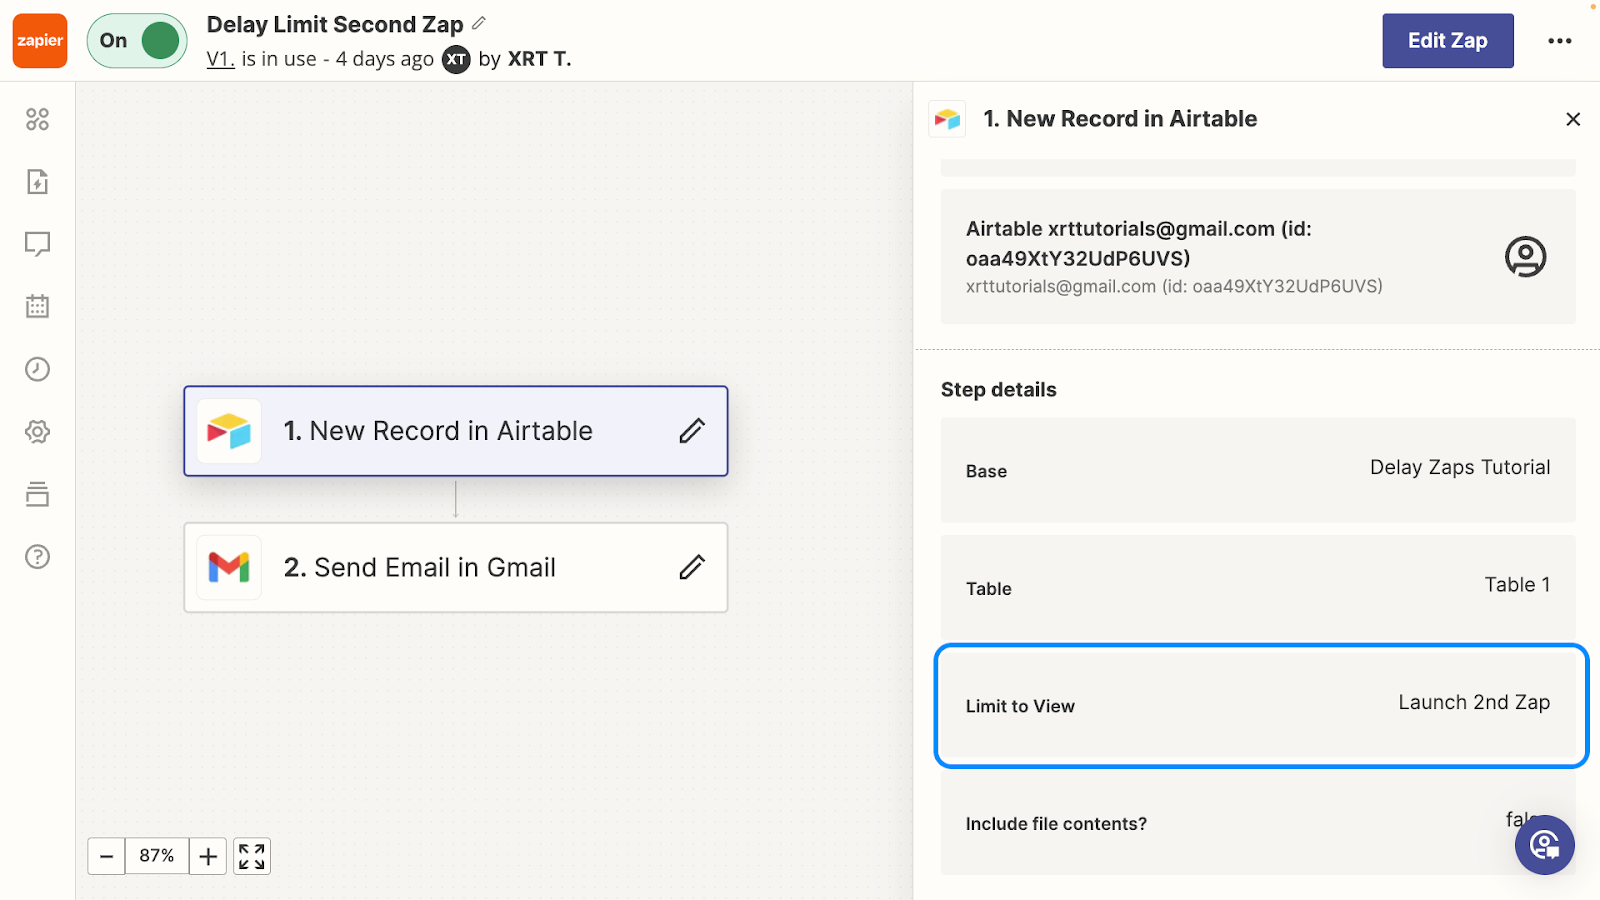
To begin, configure the Zap’s trigger. Choose Airtable as the app, and select “New Record” as the event.
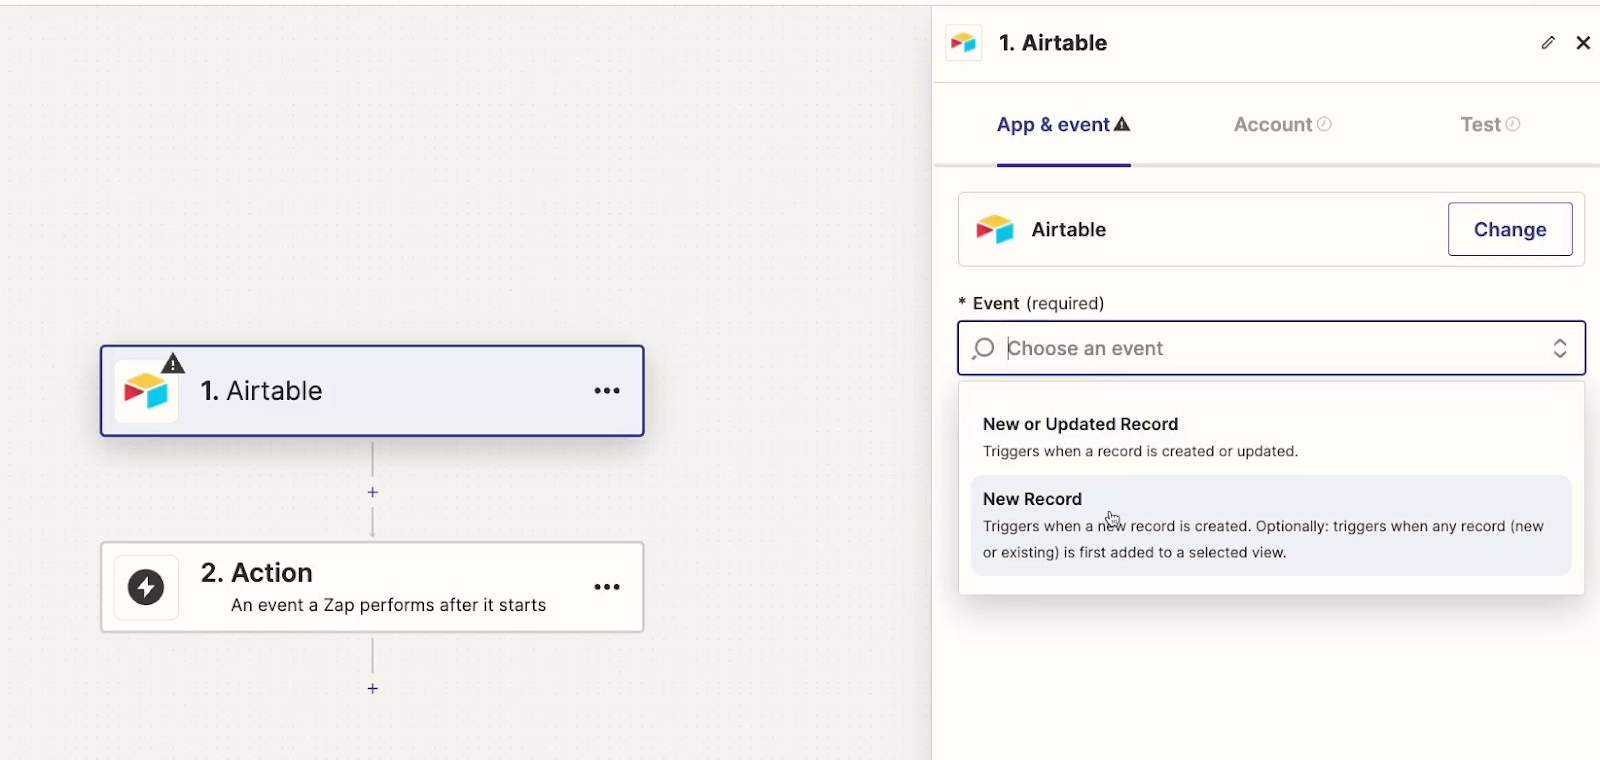
Sign in to the same Airtable account as before, and choose the correct table and base.

You’ll also want to limit this trigger to only watch a specific view. Select the “Launch 2nd Zap” view (or whatever you’ve renamed it to).
Next, you need to test this trigger. But to do that, you need to have a record in the “Launch 2nd Zap view”.
Ultimately, there’s no perfect way to test a months-long delay in a couple minutes, but you have a couple good options.
First, you can just check a record manually to add it to the view. This will confirm that the second Zap runs the way you want, and uses real data created by your apps.
On the other hand, it doesn’t technically confirm that the formula works.
Your second option is to create a record with its original date set in the past. For our example, that would mean making a record with its original date set to 60 days ago.
That will confirm that the formula works, but you may need to create fake test data if you don’t have data created at exactly the right time.
Just to be safe, we’d recommend testing this Zap with both methods.
To test it both ways, begin by checking the box on one of your test records. That will instantly make it appear in the “Launch 2nd Zap” view.

Next, use the form view to add a new record to the table. For our example, we’ll set the date to be 60 days in the past. Set your record’s date appropriately based on your desired delay.

Once you’ve filled out every field, submit the form to add the record to Airtable.
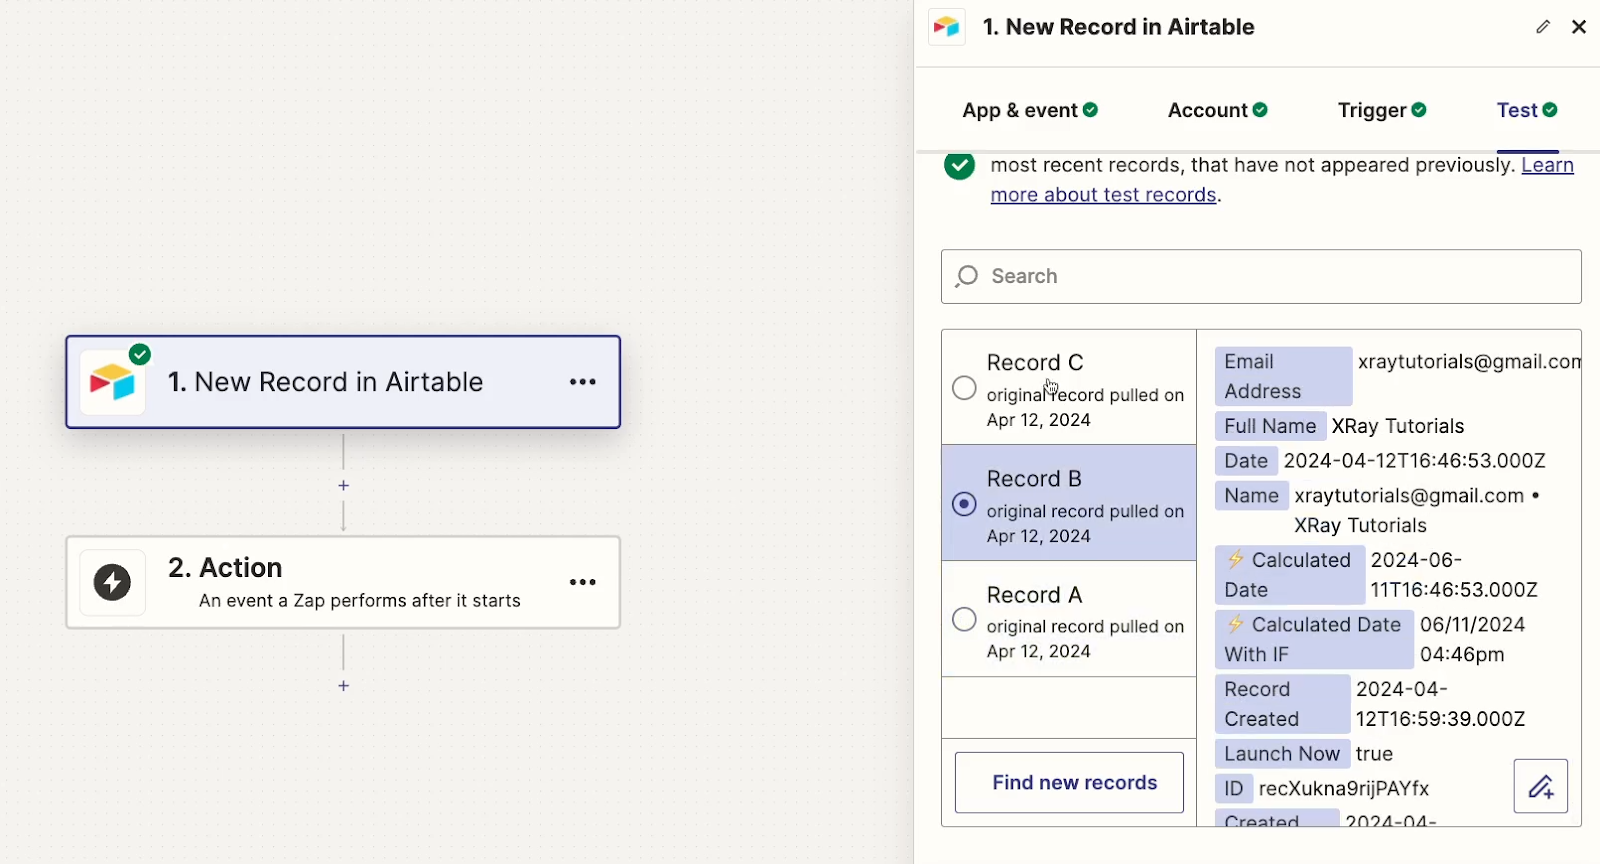
With both test records ready, switch back over to Zapier, and test the second Zap’s trigger again.
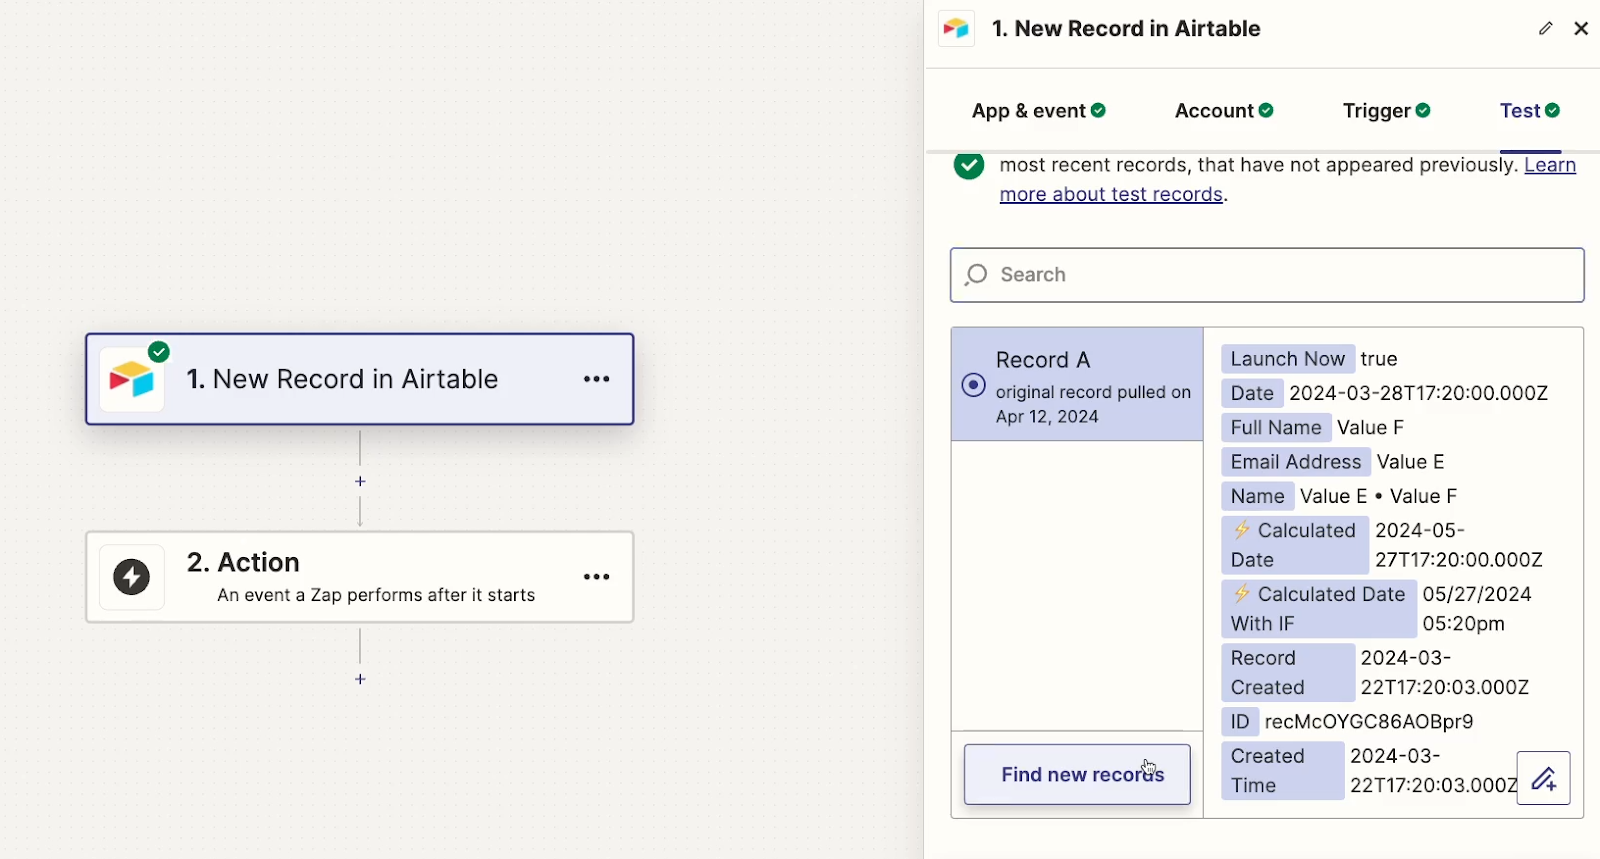
The test pulls in both records: the record you just checked off, and the record you submitted with a form.
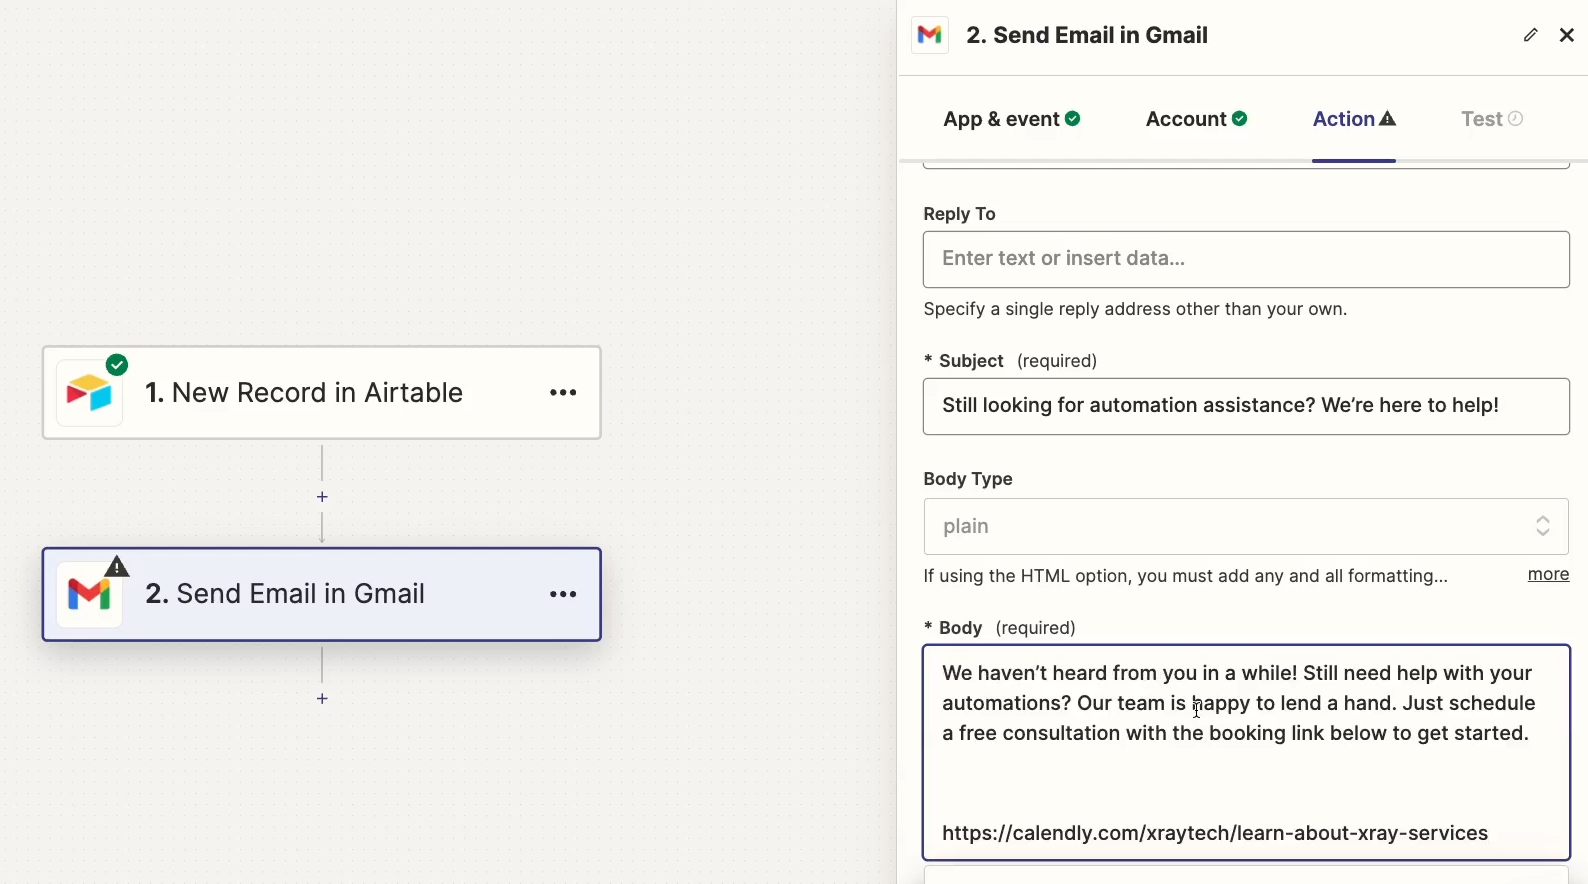
Now, you can finish this Zap by adding any additional actions that you want the automation to perform after the delay.
For our example, we just need to add a Gmail step that sends an automated message.
Once you’ve added and tested all the actions you want, your second Zap will be all set. Just make sure both of your Zaps are published and turned on before you start using them.

Now, your first Zap will trigger as usual, then send data to Airtable. Then, the second Zap will run after your desired delay, using the data you stored in the Airtable base.
Like any platform, Zapier has its share of technical limitations. But with a simple database in Airtable, you can easily get around their 30-day limit in the delay step, and pause your automated workflows for as long as you want.
If you’d like to learn more about building automated workflows in Zapier in Airtable, be sure to check out our blog or our YouTube channel. You can also follow XRAY on Twitter, Facebook, or LinkedIn.

.pptx.png)
.pptx.png)
