
Social media managers like Buffer and Hootsuite make it easy to schedule your company’s social media posts across several different channels, but they can get pricey for a small team trying to build a big presence online.
If you're already using Airtable and Zapier, building an automation to schedule your social media posts can be a cheaper and more convenient way to manage all of your channels.
In this post and in our video tutorial on YouTube, we’ll show you how you can use Airtable and a Zapier automation to build an automated social media calendar.
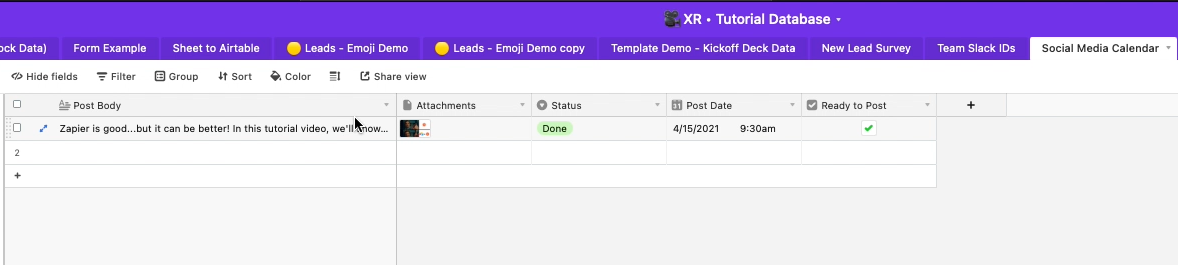
The first thing you’ll need to do is create a new base and table in Airtable. This is where you’ll write and schedule all of your posts.
You can add any columns you’d like to log data or organize your database (like the “Status” column in our example below), but the only strictly necessary columns will be:
You’ll also need a single-select “Platform” column if you want to post to multiple platforms with your calendar. We’ll cover this in more detail later.
Make sure that your post date column is a date/time field, and make sure to upload your images directly to Airtable. Just posting a link to the image may not work correctly.
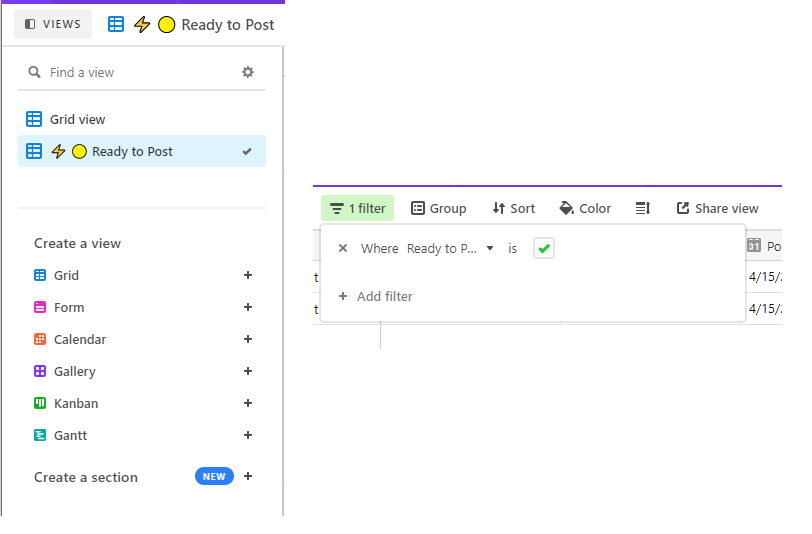
Once all of your columns are set up, create a new view called “Ready to Post”, and filter the view to only display records with a checked box in the “Ready to Post” column.
Once your base is all set up, add a record to use as a test post, and check the “Ready to Post” box.
Note: Zapier will publish your post to your Facebook page when you test the Zap, so make sure it’s something you really do want to share on your page.
Next, switch over to Zapier and create a new Zap. To set up the trigger, choose Airtable as the app and “New Record in View'' as the event. Then, select your new base, the Social Media Calendar table, and the “Ready to Post” view.
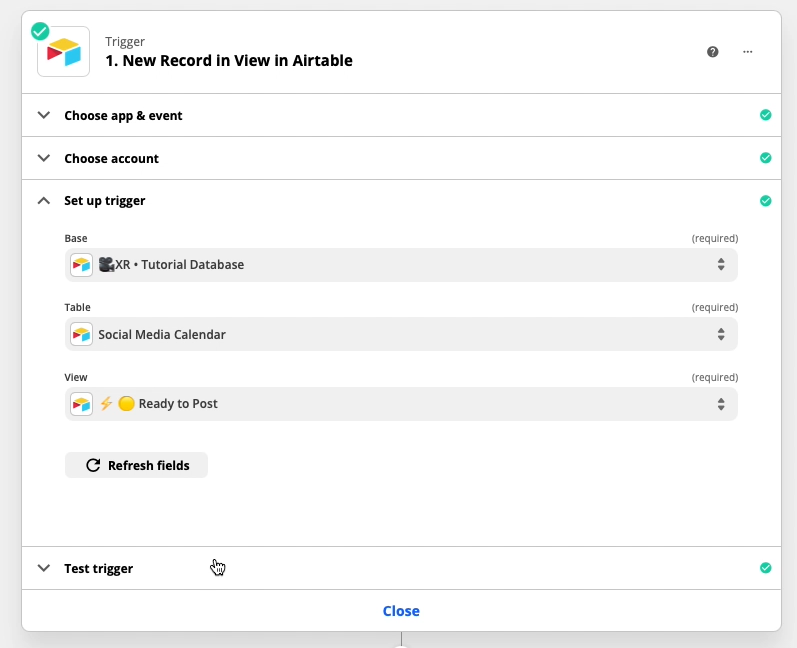
Now you need to test your trigger. You might need to refresh the fields to get Zapier to find your record.
Once the test is successful, you should see lots of data from the Airtable record. If everything looks right, click “Continue” and add a new step.
The next step in your Zap will use the “Delay by Zapier” app. This step is the key to scheduling your posts whenever you want rather than just publishing them immediately.
Select “Delay until”, and use the posting date pulled in from Airtable in the previous step. When your Zap is on, all of the steps after the delay won’t run until that exact date and time.
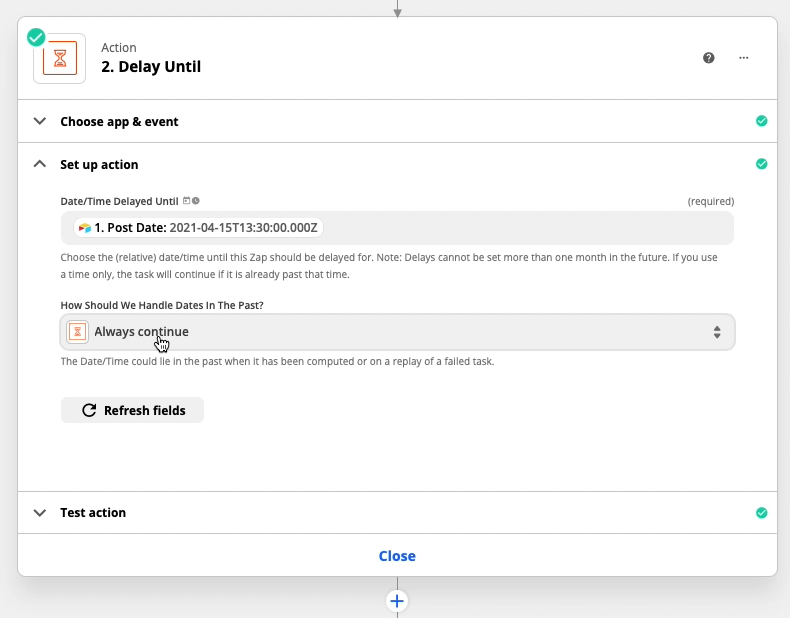
Where Zapier asks “How Should We Handle Dates in the Past?”, it’s generally best to select “Always continue” to ensure that your posts will always get published.
The only limitation to keep in mind with the delay step is that you can only delay for up to 30 days. If you’re planning your posts over a month in advance, you can check out our post and video for how to circumvent this limit.
Now that your post is properly scheduled, it’s time to set up a step in Zapier that will actually publish your post when the time comes.
We’ll show you how it works with Facebook, but you can use just about any social media platform that you want; the steps will be very similar.
Create a new step, and choose “Facebook Pages” as your app to post to your company’s page on Facebook, and select “Create a Page Photo”. You’ll need to sign in with a Facebook account that has access to your company’s page to continue.
Then, just fill out each field with the appropriate data pulled from Airtable (see the screenshot below).
For the photo field, be sure to use the variable called “1. Attachments File: hydrate”. This is the image itself, rather than a link to the image or other metadata, and it’s what you need to use to post an image.

Now you can test the step to make sure that it’s set up correctly. Just remember, testing the Zap will publish your post to Facebook.
That’s all you need to get started. If you’d like to use several social media apps with your calendar, you’ll just need one more optional step.
To set up a social media calendar for multiple apps, you’ll first need to jump back into airtable and a new single-select column called “Platform”. Add each platform that you’ll be using as an option.
Rename your Ready to Post view to “Ready to Post - Facebook” and add a new filter to it to only include posts where the Platform = Facebook.

Then, copy the “Ready to Post - Facebook” view for each additional platform you want to use, and update the name and filter on each copy. For instance, a view for Twitter would look like this:

Finally, you can just make a separate duplicated Zap for each channel, and update the “New Record in View” trigger step to match each platform. You could also build it as one Zap with multiple paths if you’re comfortable using that feature, but simply creating multiple Zaps will be simpler if you’re less experienced with Zapier.
Now, you can schedule all of your social media posts in one place without having to use an app like Buffer or Hootsuite.
If you'd like to learn more about no-code automation, check out our blog or our YouTube channel. You can also follow XRAY on Twitter, Facebook, or LinkedIn.

.pptx.png)
.pptx.png)
