Airtable is an amazingly versatile tool for organizing and automating your data. However, it’s not limited to just creating basic spreadsheets.
With Airtable, you can build nearly any system that you want. And if you’re not satisfied with off-the-shelf task management apps, like Monday.com or Asana, you may want to build your own in Airtable.
In this post, we’re going to show you how to start tracking tasks and projects with a simple Airtable base.
We’ll walk you through setting up an Airtable base for task management step by step. Then, we’ll show you some helpful data views you can add to your task management base to track your team’s progress.
Next, we’ll take a look at building interfaces that your team can use to add new tasks and update their status without needing to edit the database itself.
Finally, we’ll demonstrate a simple automation that you can add to your base to create automatic alerts for urgent, incomplete tasks.
Let’s get started!
Overview: what the finished base looks like
First, let’s take a quick look at the finished base. After a brief overview, we’ll walk through each component in more detail so you can set it up for yourself.
Note that the base that we’re going to show you today is just an example of the kind of setup you might use for tracking tasks in Airtable.
Ideally, it should be a great starting point, but we’d encourage you to customize the fields, views, and interfaces to match you and your team’s preferences.
Customize your task management base to your liking
One of the key advantages of using Airtable for task management instead of an out-of-the-box solution like Asana or Monday is that you have precise control over the format of your interface as well as any workflow optimizations you want to include.
You can make the system you want to use, instead of being stuck with someone else’s design.
With this article, we just want to give you a solid jumping-off point, and show you some of the key options you have for customizing your base.
Additionally, if you’re not familiar with basic Airtable functionality, like creating and modifying fields, then you should check out our Airtable beginner’s guide before following this tutorial.
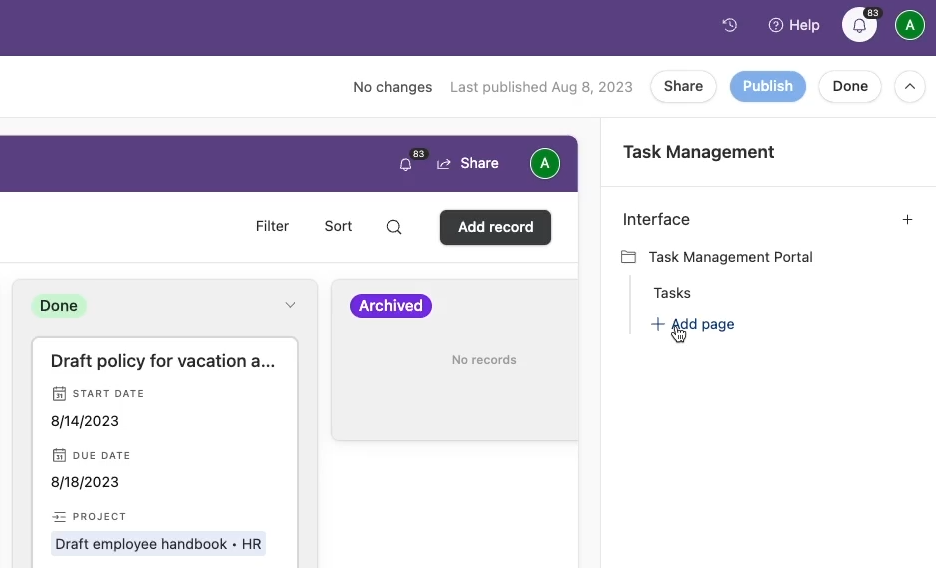
Basic setup for the “Tasks” table
With all of that in mind, let’s go through the full base that we’ve set up here.
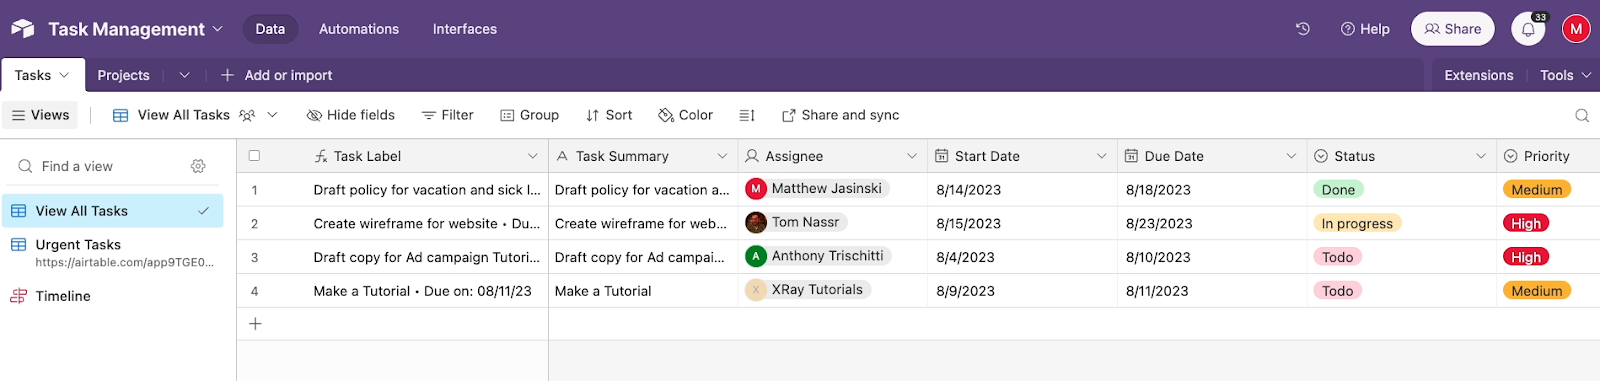
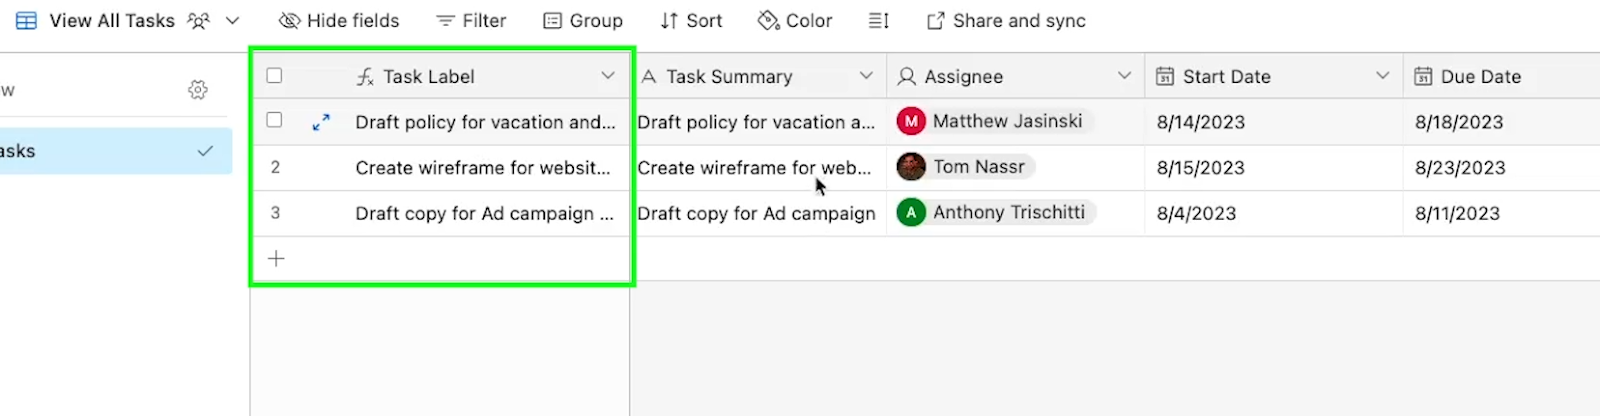
In the grid view of our “Tasks” table, you can see all of the fields and every task that we’ve created. As you can see, every key piece of information is covered here: Task summary, project, due date and other attributes like that.
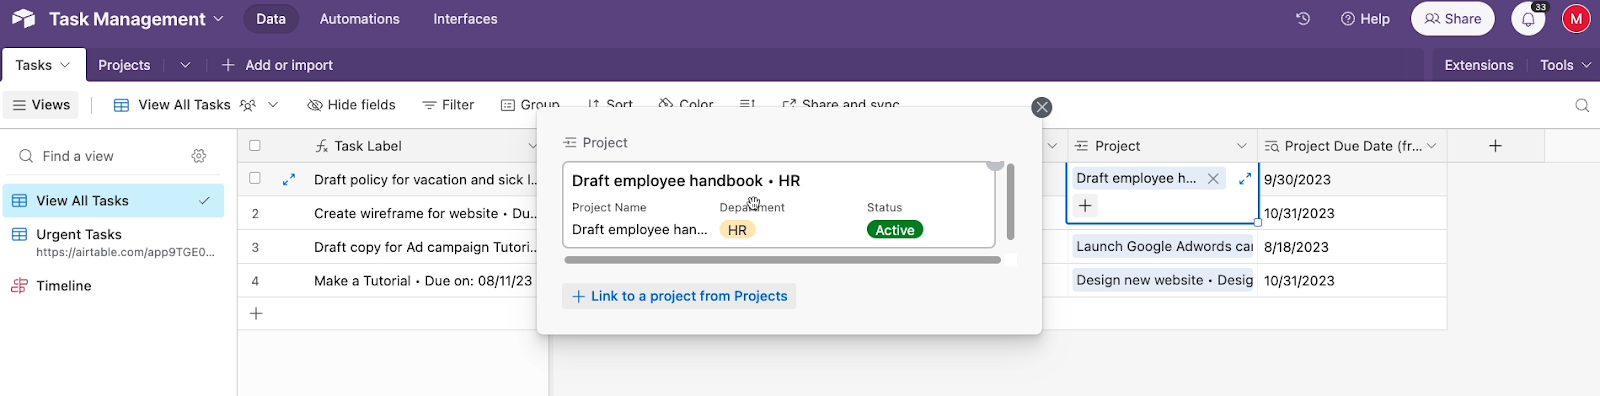
The project field is actually a linked record, which refers to our “Projects” table in the same base.
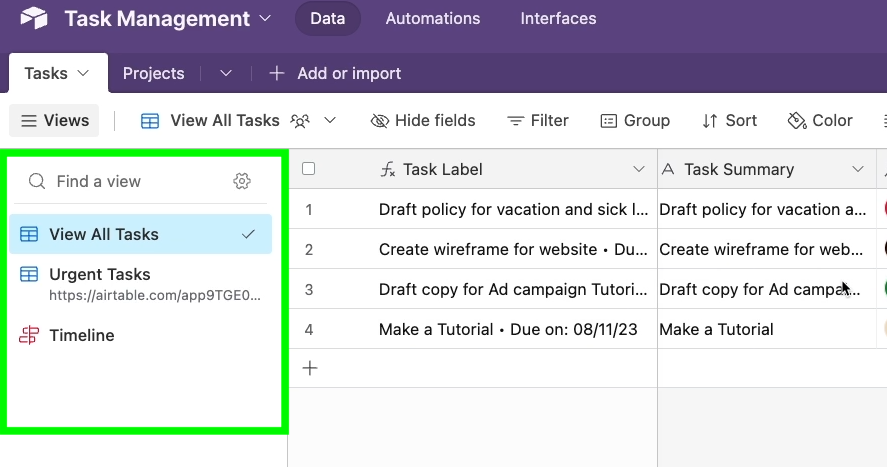
On the left of the main “Tasks” table, you can see a list with a few different views.
Every view is based on the same data, but each one has different filters and sorts to make the most relevant information visible easily.
The “View all tasks” view is a basic grid view that has all of the information you need for your tasks, but it’s a lot of data to look at all at once. To make it a little easier to get some key takeaways at a glance, we’ve added a few custom views.
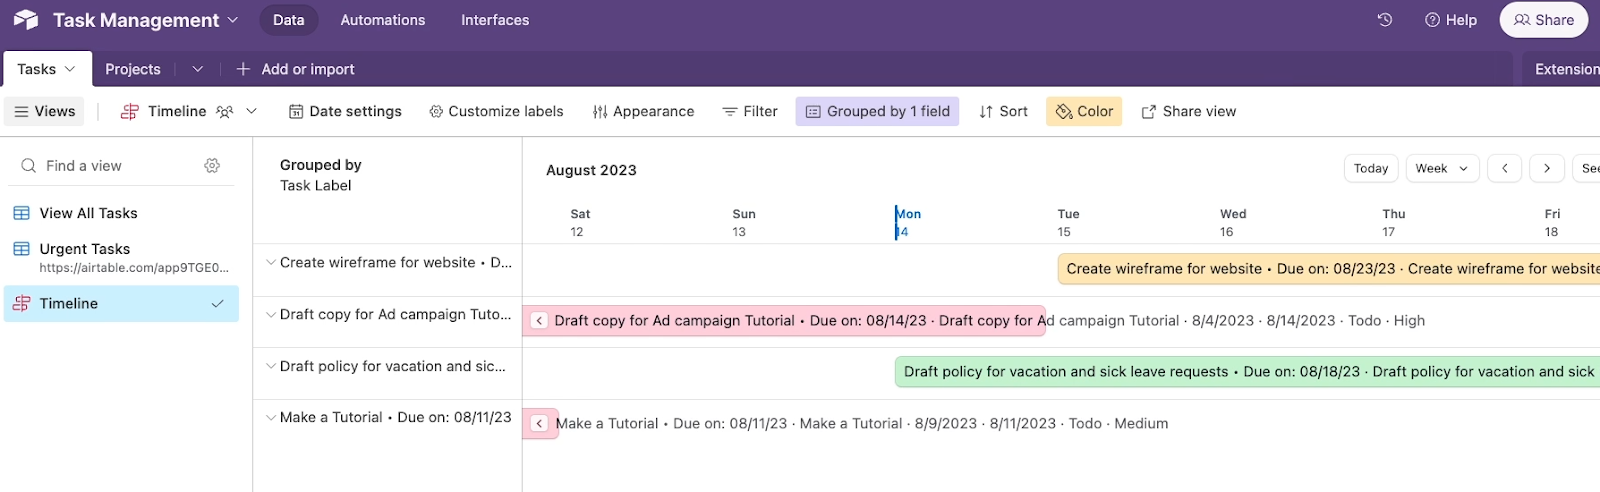
The timeline will give you a high-level overview of your team’s progress.
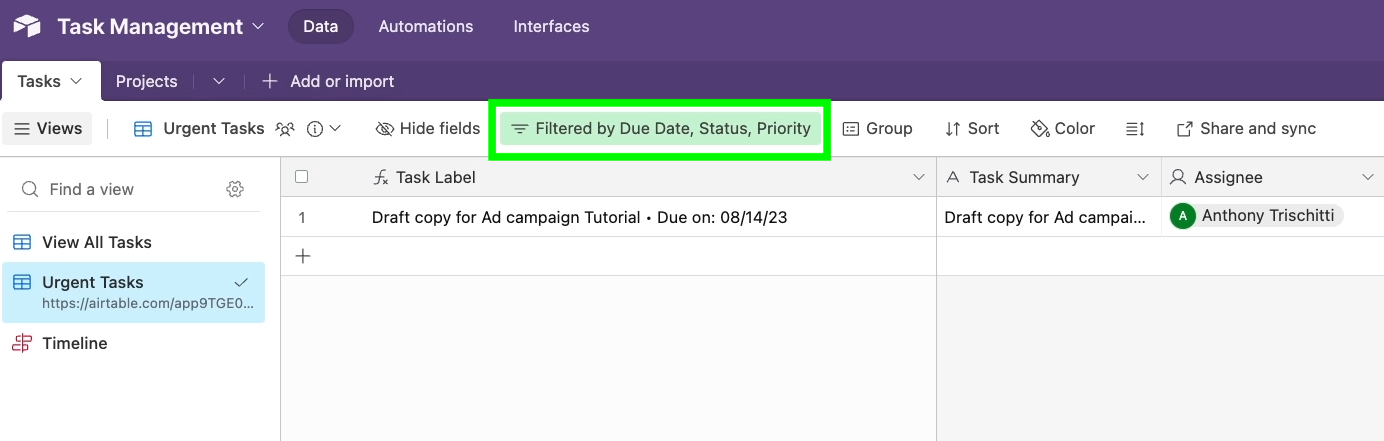
The “urgent tasks” view lets you see any outstanding to-dos approaching their due date.
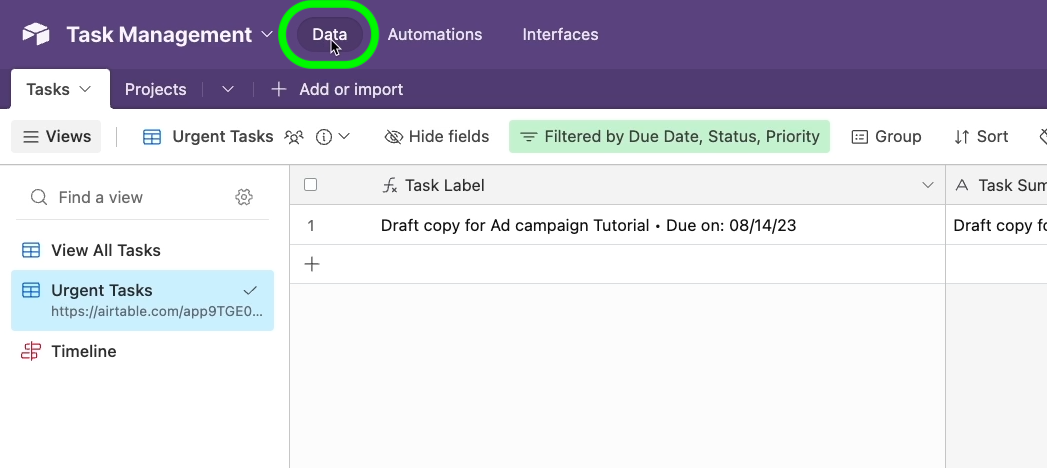
When you’re accessing your base under the “Data” tab in Airtable, you can manage your entire tasks database. This is where you’ll be able to edit or update any fields, but it’s probably not what you want to share with your whole team.
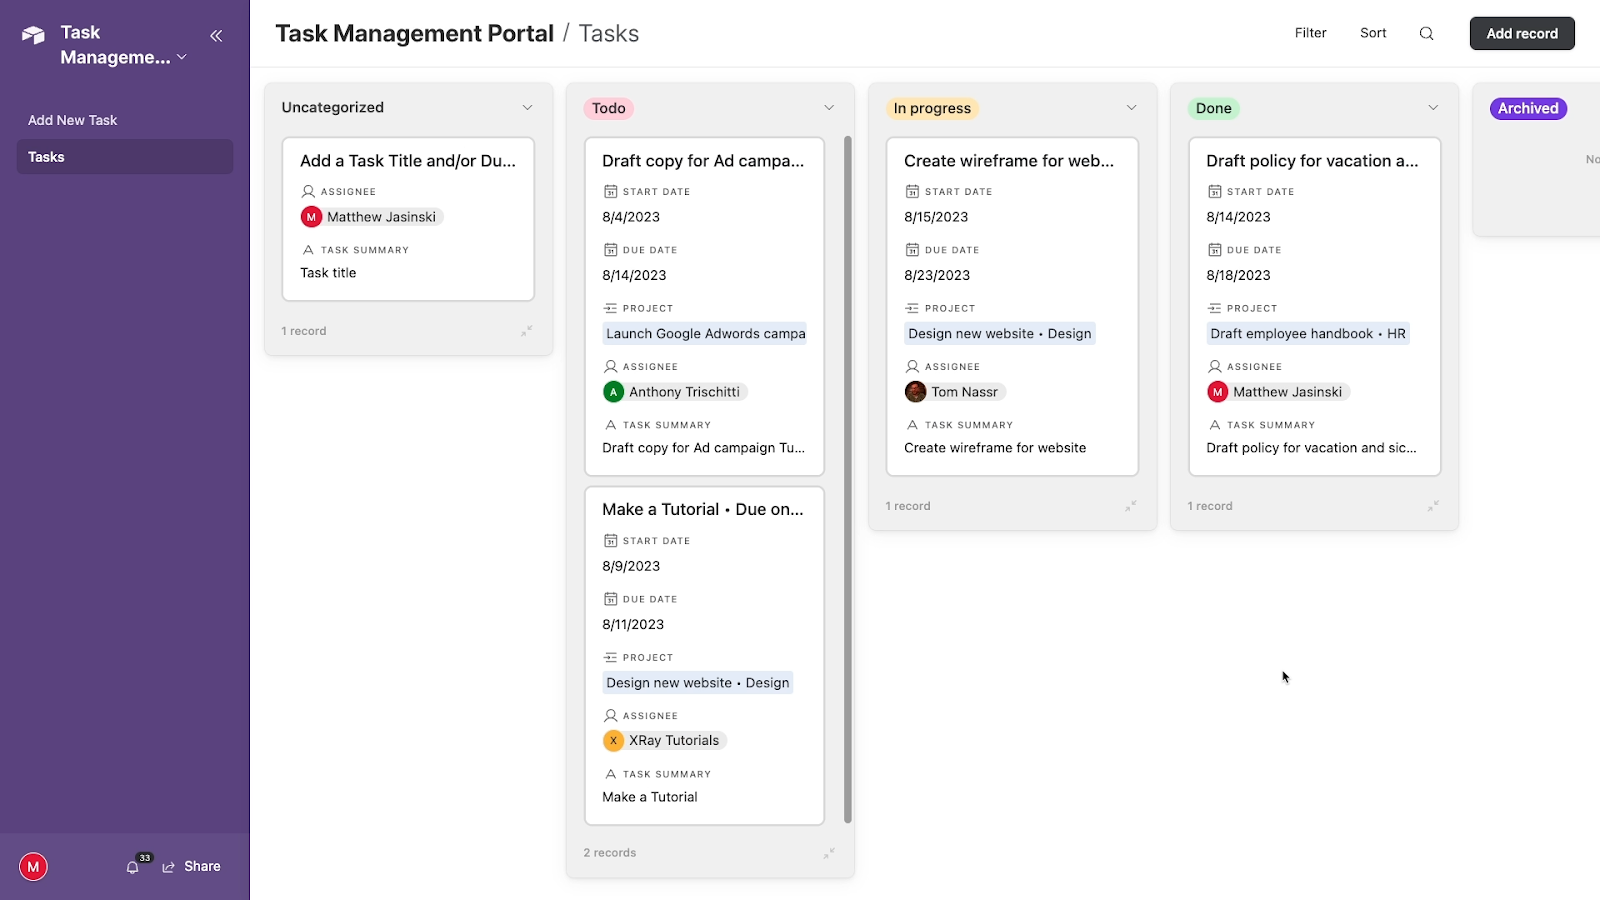
Instead, we’ll show you how to create a simple interface where your team can add new tasks with a form, and update each task’s status on a Kanban board.
To start automating these task management workflows, we’ve configured a quick automation that just sends an email alert whenever a task enters the “urgent tasks” view that we highlighted earlier. At the end of this tutorial, we’ll also show you how to set up that automation.
If you’d like to copy this entire finished base, just check out the template base that we’ve prepared here.
If you’d prefer to build the base yourself and customize as you go, you can follow along as we break this base down step by step.
Create your base and customize your fields
Create a new base, or copy our base to your workspace.
In the “Tasks” table, we’ve added several fields that will be useful for creating and managing tasks.
There’s a primary field which creates a name for each task by combining the contents of a couple of other fields. We’ll explain this field more in a moment, but let’s go over the other fields first.
Fields in the “Tasks” table:
• Task summary | Single-line text
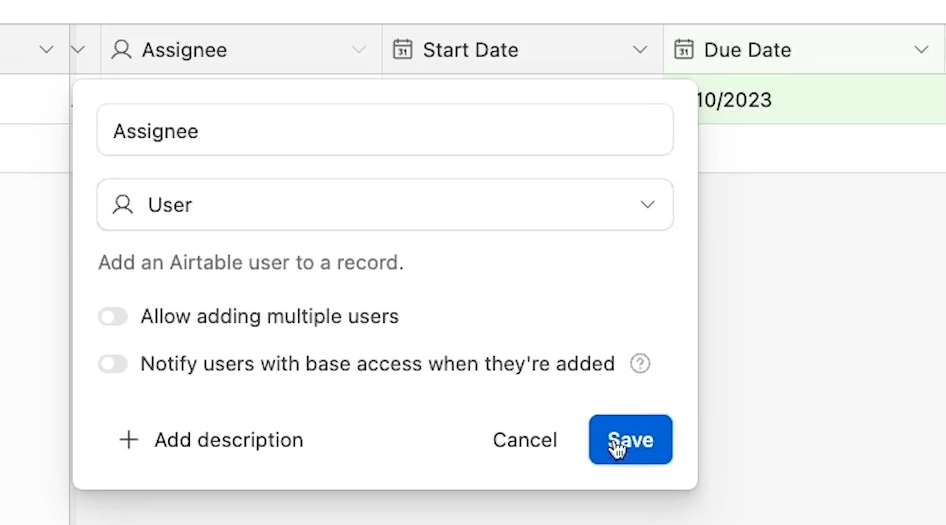
• Assignee | “User” field type
• NOTE: the “User” field type is necessary for the automation at the end of this guide.
• Start Date, Due Date | Date fields
• NOTE: You’ll need both to use a timeline view
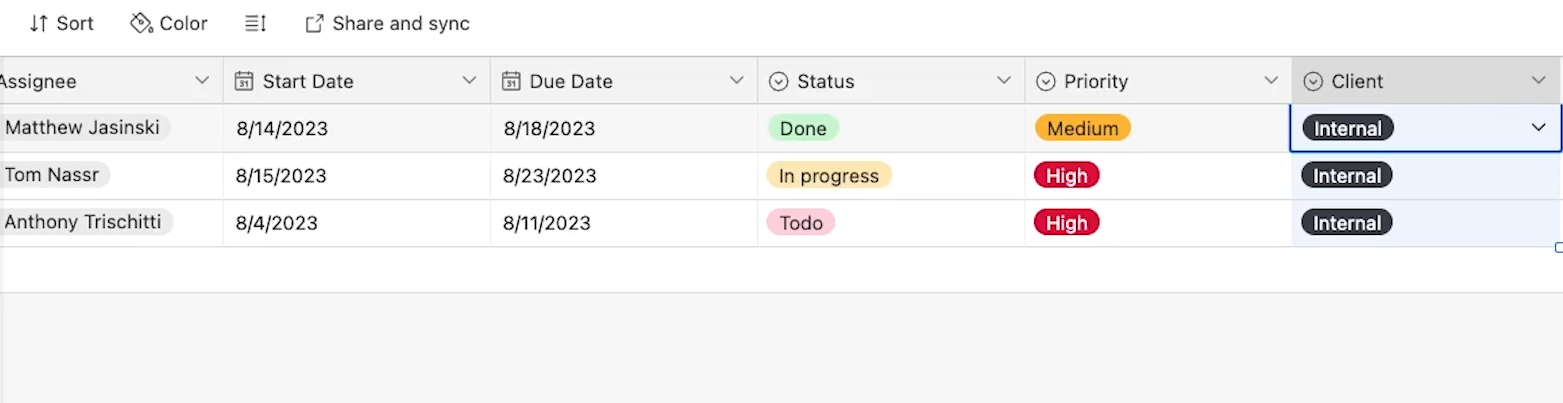
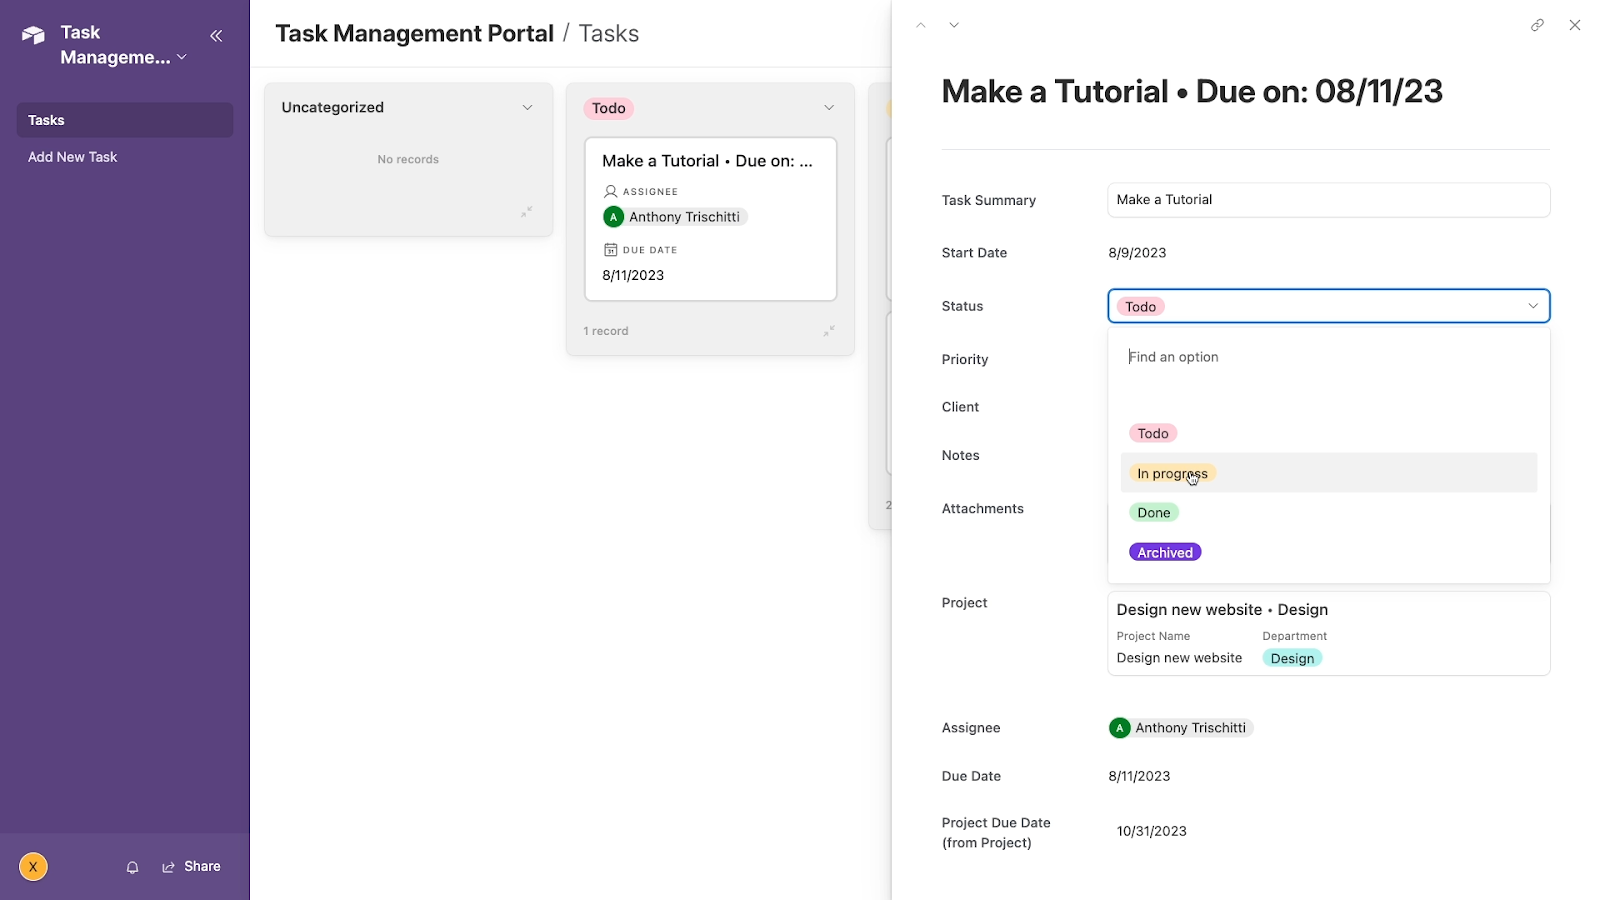
• Status | Single-select
• Options: To-do, In progress, Done, Archived
• Priority | Single-select
• Options: High, Medium, Low
• Client | Single-select
• Options: add clients as needed.
• Notes | Long text
• Rich text formatting enabled
• Attachments | Attachment field type
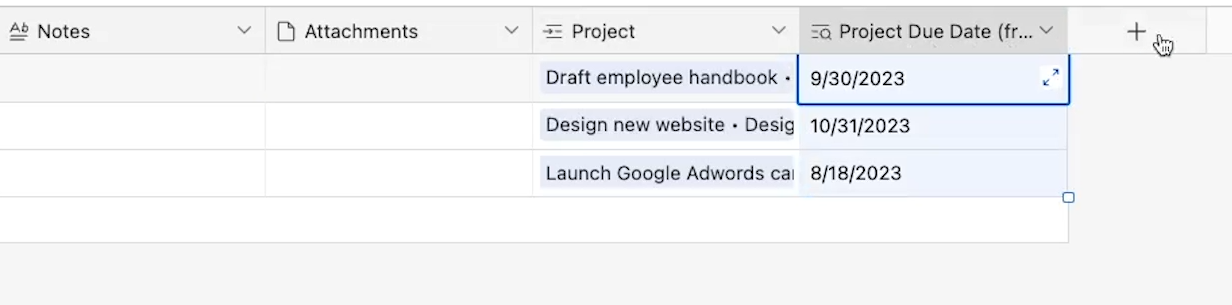
• Project | Linked record
• Links to the “Projects” table
• Project Due Date | Lookup
• Retrieves due date field from “Projects”
Using a formula in the primary field
In any Airtable base, the primary field acts as the title or label for every record. You can use any field type you’d like, but at XRay, we always prefer to generate the primary field’s content with a formula.
Typically, we just use a simple “concatenate” function that combines the text of a “name” or “title” or “summary” field with another piece of important data, like the due date.
For this table’s primary field, we’ve also added a “DateFormat” function to set an easily readable format for the date. A simple “if” statement also ensures the field displays some help text when either dependent field is empty, rather than just showing an “ERROR” message.
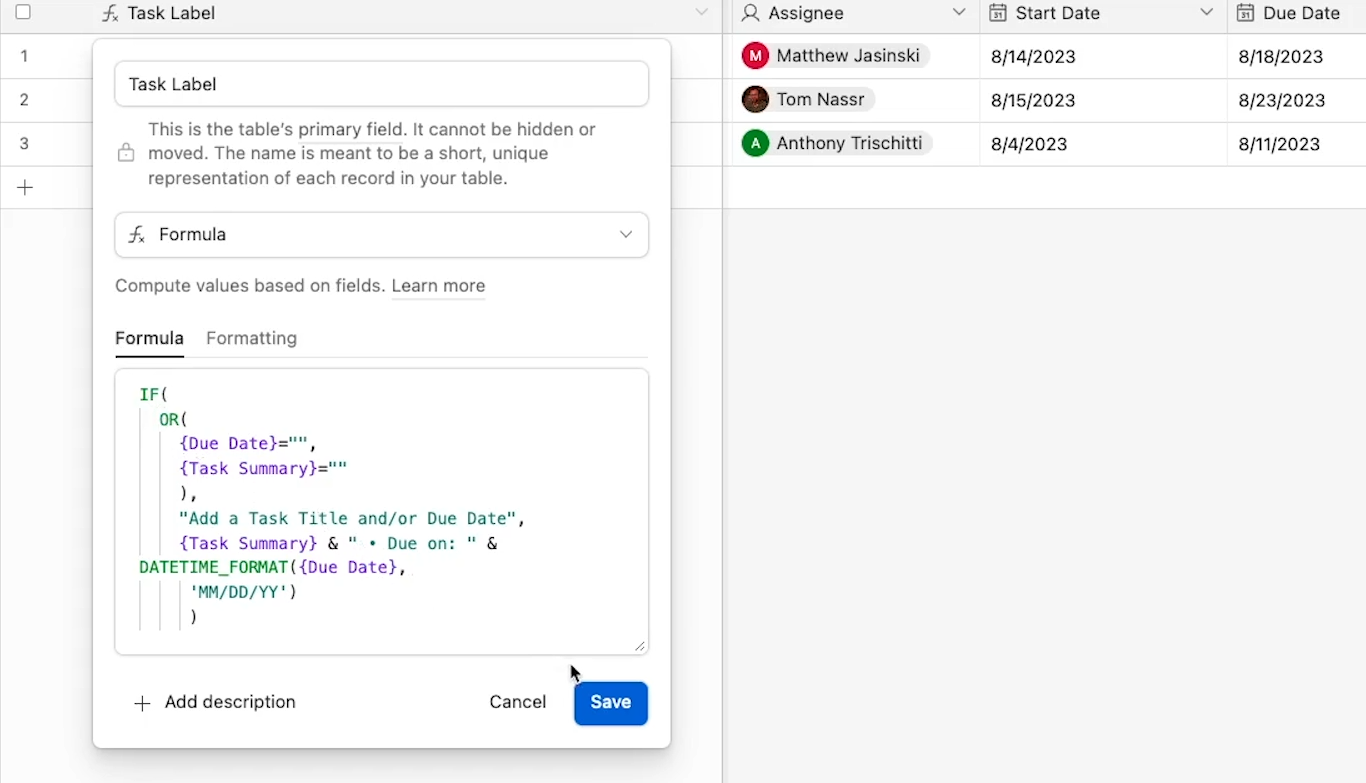
By using a formula field, you can ensure that every single task uses the exact same format for its label. We won’t have some tasks that start with a date, and others that start with a summary. And you won’t see any other inconsistencies from human error when people create tasks.
Plus, if you ever want to change this primary field, we can just update the formula once, and all of the records will instantly use the new format. Ultimately, it’s your choice, but we’d really recommend using formulas in your primary field whenever you’re building a new base.
That covers our basic table setup. Next, we’ll show you how to add some additional views to get more utility out of the task management base.
NOTE: The views and interface are already complete in the template that we shared. We’ll describe how to build them step-by-step if you’d like to start from scratch instead.
The automation can’t be included in the shared base, so you will need to build the automation from scratch if you’d like to use it. Don’t worry; we’ll include a detailed tutorial for that, too!
Adding custom views and filters
In Airtable, every table can include several different customized views. Views let you arrange the same data in different ways.
The default grid view that every table starts with is useful for seeing all of your records, and for managing all of your fields in a familiar spreadsheet format.
If you want to add or edit fields, you’ll probably want to do that in a grid view that displays all of your table’s records. We’ve titled that default grid view “View All Tasks”.
However, many of the other available view types are often better suited to quickly surfacing important data and helping people get work done. Views can also be extremely useful for managing automations, since you can trigger automations in Airtable, Zapier, or Make whenever a new record enters a specific view.
To create a new view, just click on the view type you want to use from this menu in the bottom left.
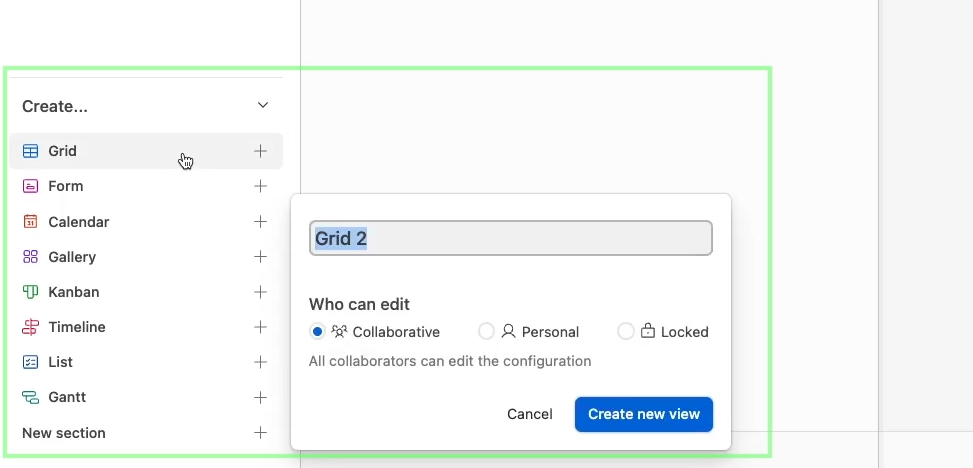
First, try creating a new grid view that only displays urgent tasks. To do that, click on “Filter” at the top of the table, and configure 3 conditions:
• Priority is “High”
• Due Date is within the next 3 days
• Status is not “Done” or “Archived”

This will let you see urgent and incomplete work at a glance, and will be the basis for an automation we’ll build later on.
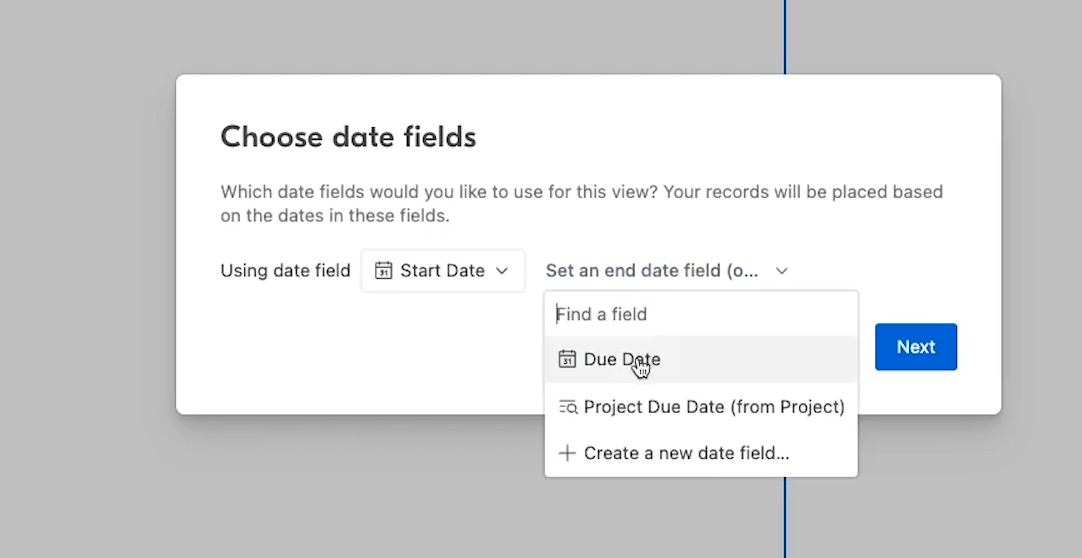
Next, let’s take a quick look at adding a timeline view. A timeline view will create a timeline with your records. For this view to work, you’ll need to have two dates that you can use as a “Start” and “End” date.
Once the Timeline view is set up, you can see all of your tasks on a timeline. Timeline views are a great way to get a bird’s eye view of your tasks, and see how your progress is stacking up against your project’s calendar.
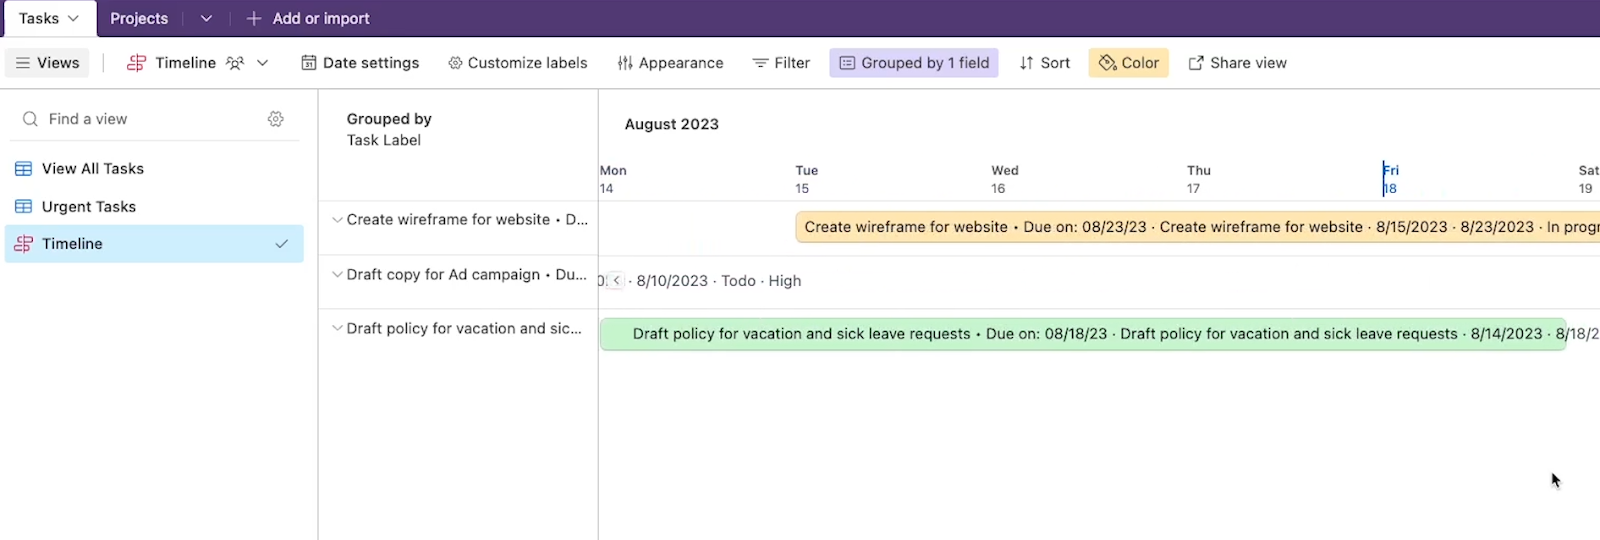
However, timeline views do require a Pro account, which currently costs $20 per seat per month.
The views that we’ve covered here are a great starting point, but they’re just a sample of the views that Airtable offers. You can check out our Airtable beginner’s guide for more info, or just add views to your table and try them out for yourself. There are tons of options that can completely transform the way you view and edit your data.
Sharing your base
With all of these fields and views set up, you’re almost ready to start using your task management base with your team.
There are two main ways you can share this base with your team. You can either invite them as collaborators on the base, or you can create an interface for everyone to use.
To allow team members to access and edit your base directly, click on the “Share” button in the top right of the screen. Invite everyone on your team that you want to include in your Task Management system. Just make sure they’re part of your organization in Airtable.
For each person or group that you invite, you can set a unique permission level: Creator, Editor, Commenter, or Read Only. A “Creator” has full edit access to the entire base. An “Editor” can create or edit new records and views, but can’t edit the base’s fields. A “Commenter” can only comment, while a read-only user can’t edit the base or records at all.
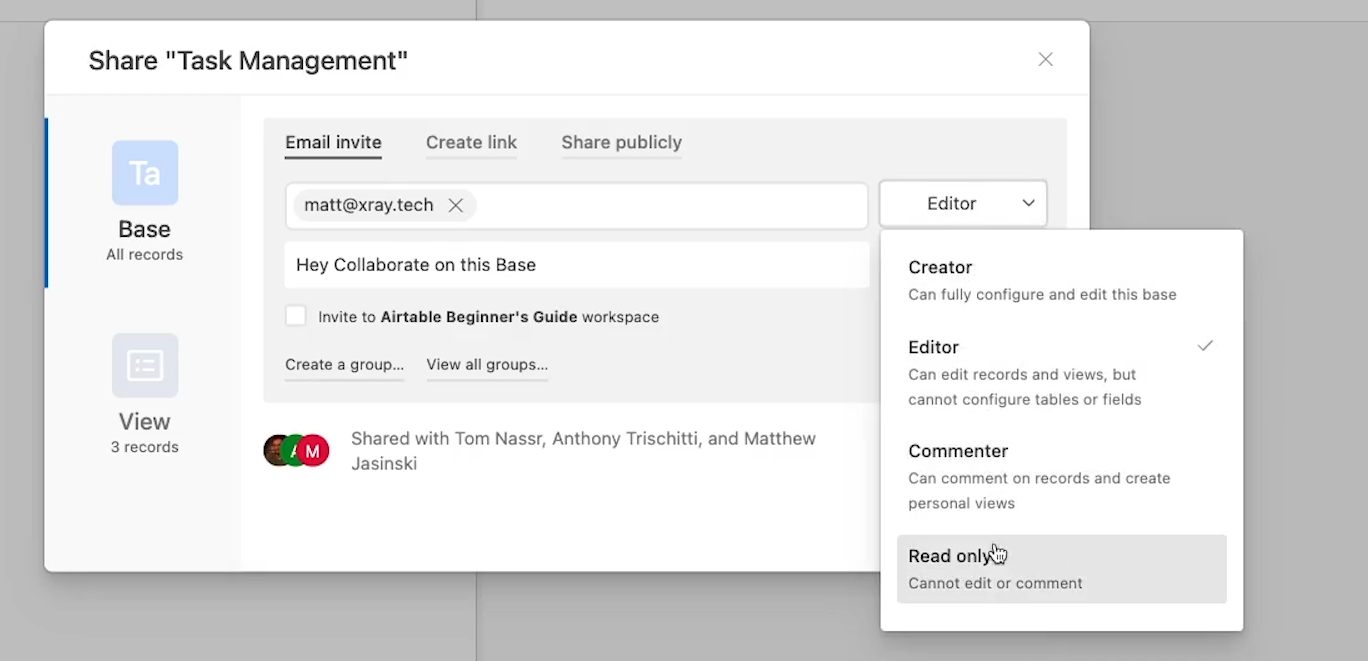
For this task management system, you may want to make some of your team “editors”. That way, they’ll be able to add and update tasks, but they won’t be able to add or delete fields.
However, there is another way to let users access your base which can keep things much simpler for your team: interfaces.
Build a custom interface for your tasks
With interfaces, you can create simple layouts that allow your team to view selected data and edit specific records or fields without accessing the entire base. That way, your team can see the limited, relevant fields that they need access to, without feeling overwhelmed by detailed data views that they don’t really need to see.
You also don’t need to worry about them editing your table’s configuration or going through the tedium of adding permissions to every field in your data. Interface users also won’t count as “collaborators” in your Airtable subscription.
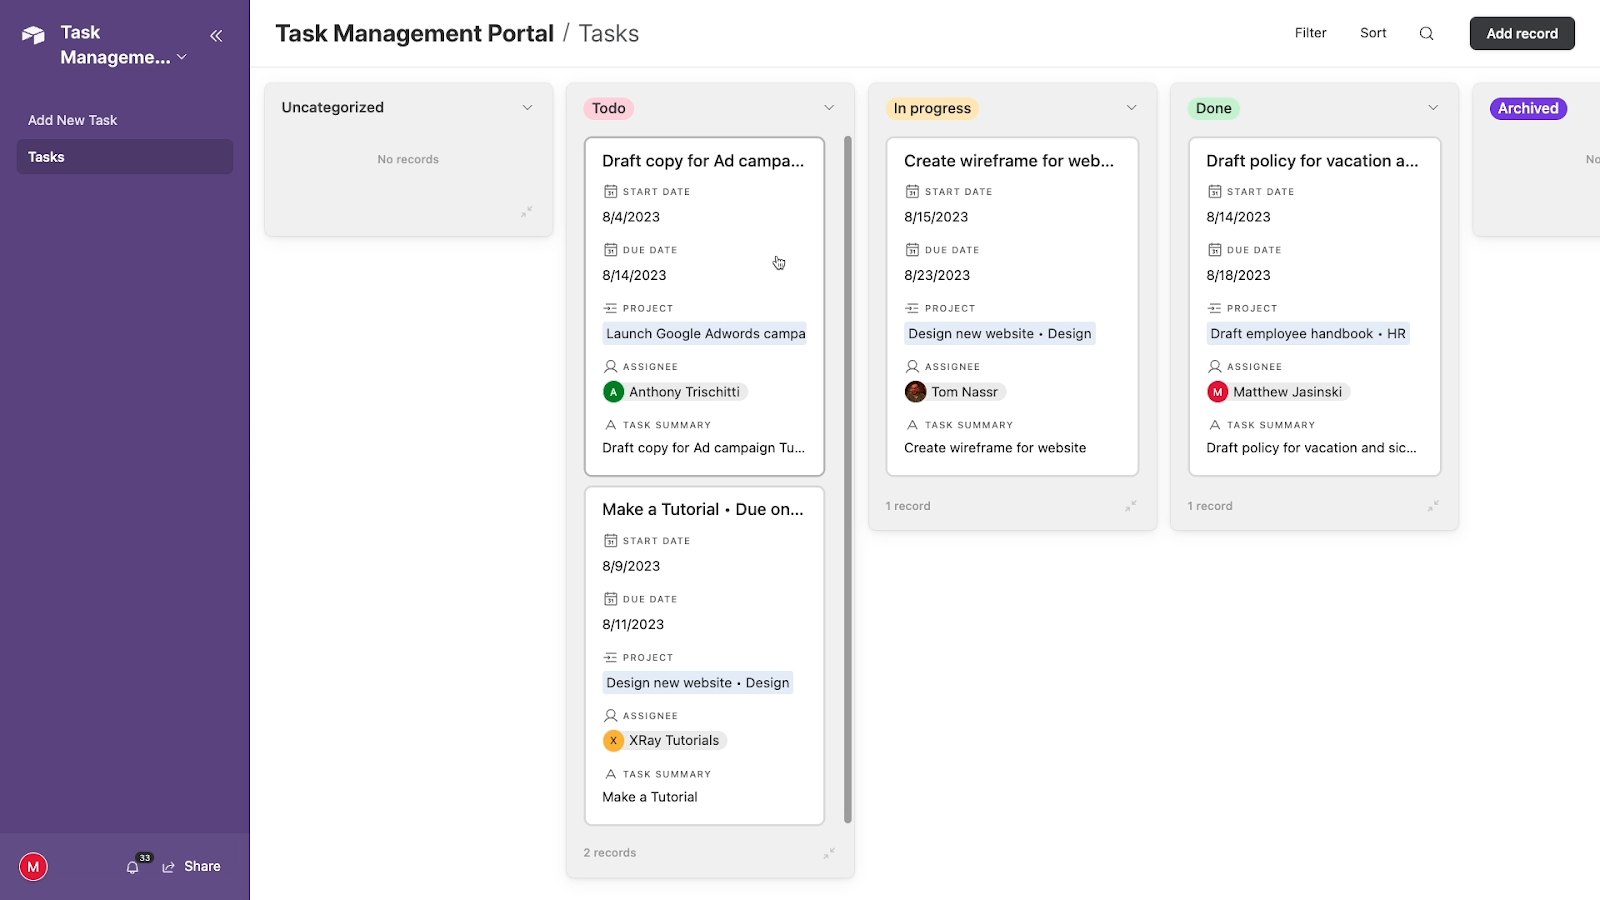
We’ll show you how to create an interface with two useful pages: a form view where your team can create tasks, and a Kanban board where they can view tasks sorted by status and update a few key fields.
This might seem like a bit of an unconventional approach, but there’s a reason we want to employ this setup. One of the biggest challenges in using a task management system with your team is making sure that everyone uses the system consistently and correctly.
Giving everyone a massive database with a ton of customized views will often just be confusing. Additionally, if you just grant your team access to the base directly, they may often accidentally create incomplete tasks, missing key fields like a due date.
Instead, by using the streamlined pages in this interface, your team can quickly accomplish what they need to do. And by using a form view, you can ensure that every new task has all of the required fields filled in.
Of course, if you’d like to use a different approach, you can customize your drag and drop interface however you’d like.
Creating an interface
To get started, just click on “Interfaces” at the top of your base. Then, click on “Start Building” to create a new interface.
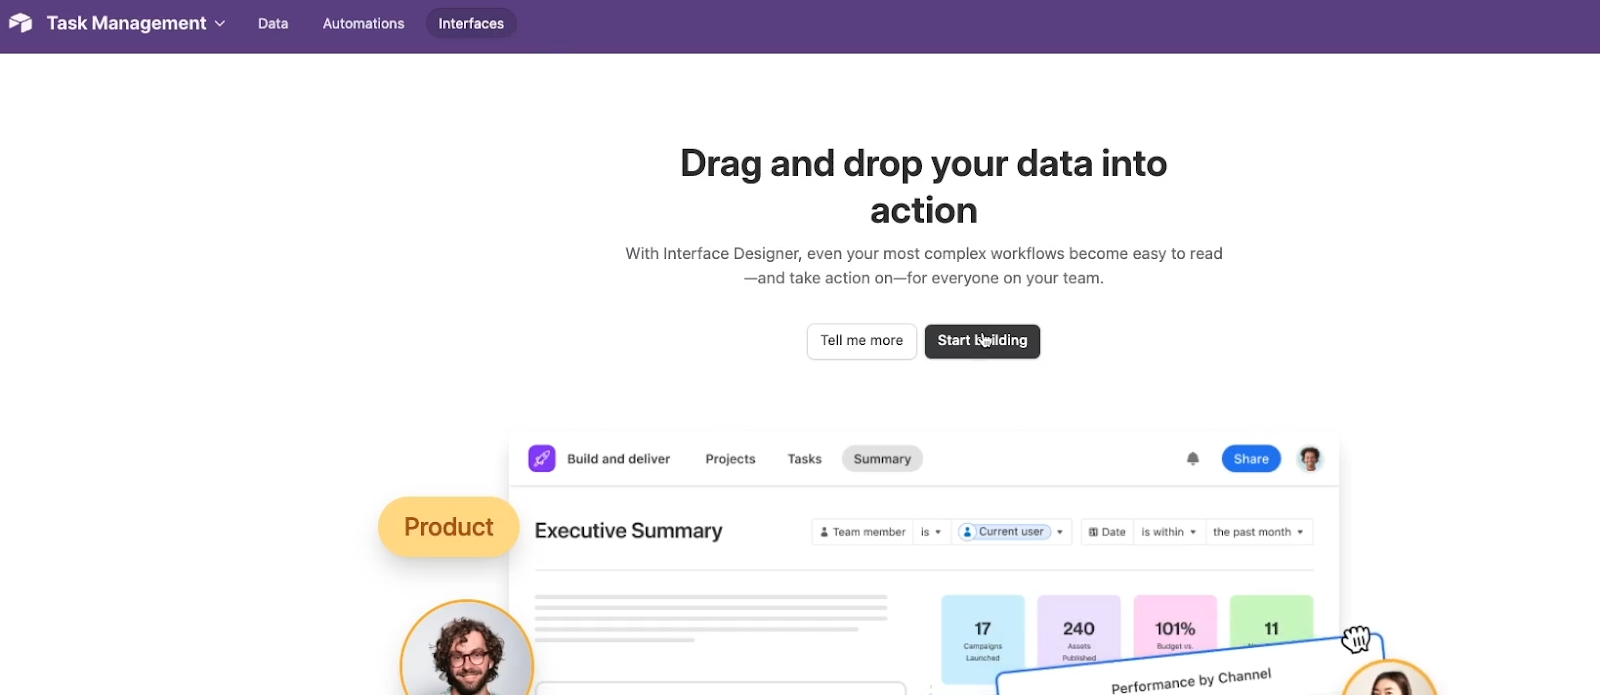
Give your interface a name. For instance, we’ll call ours “Task Management Portal”.
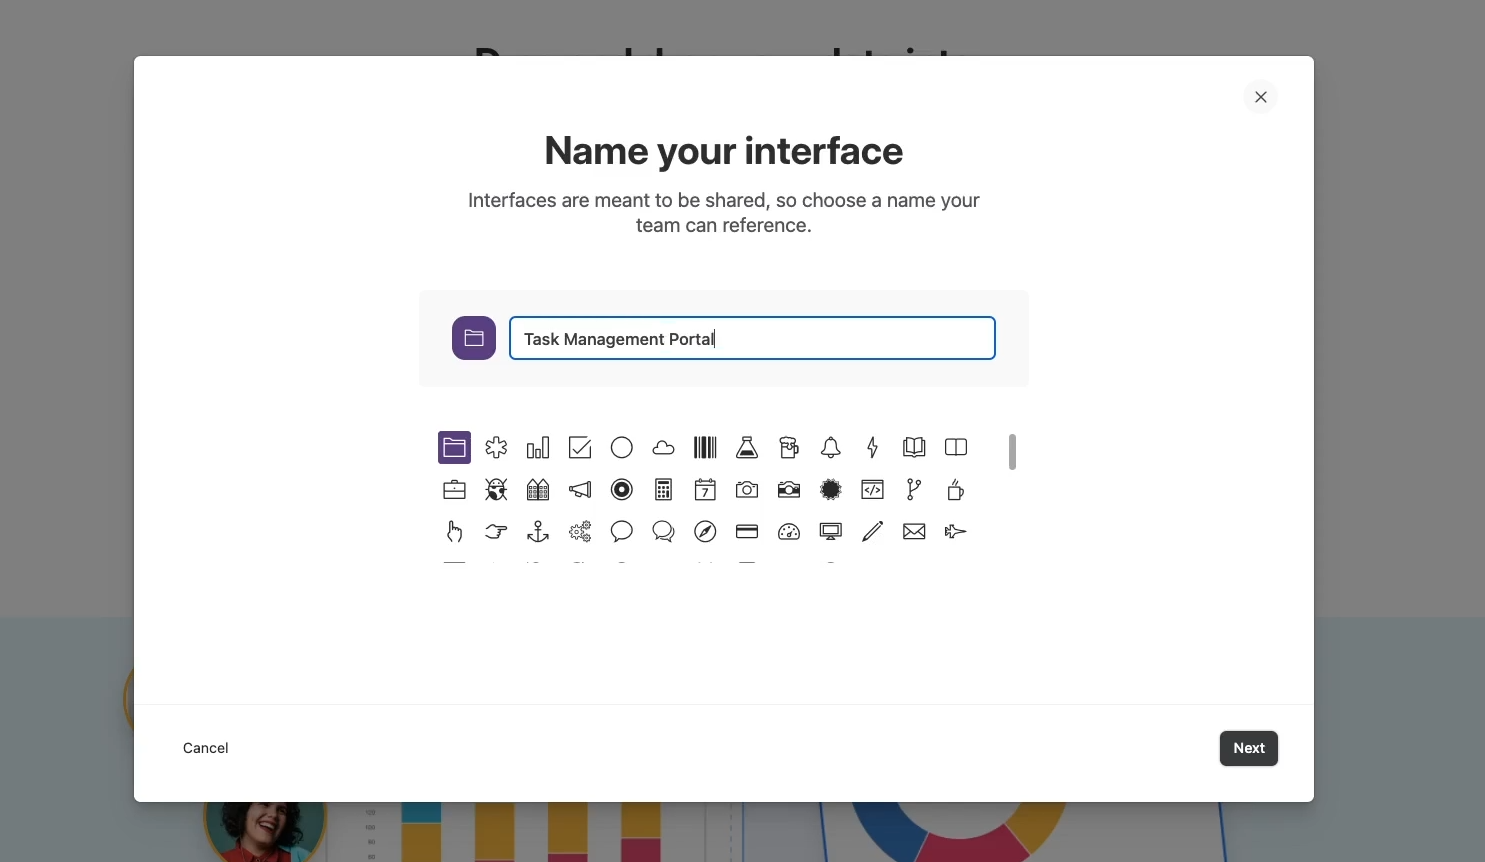
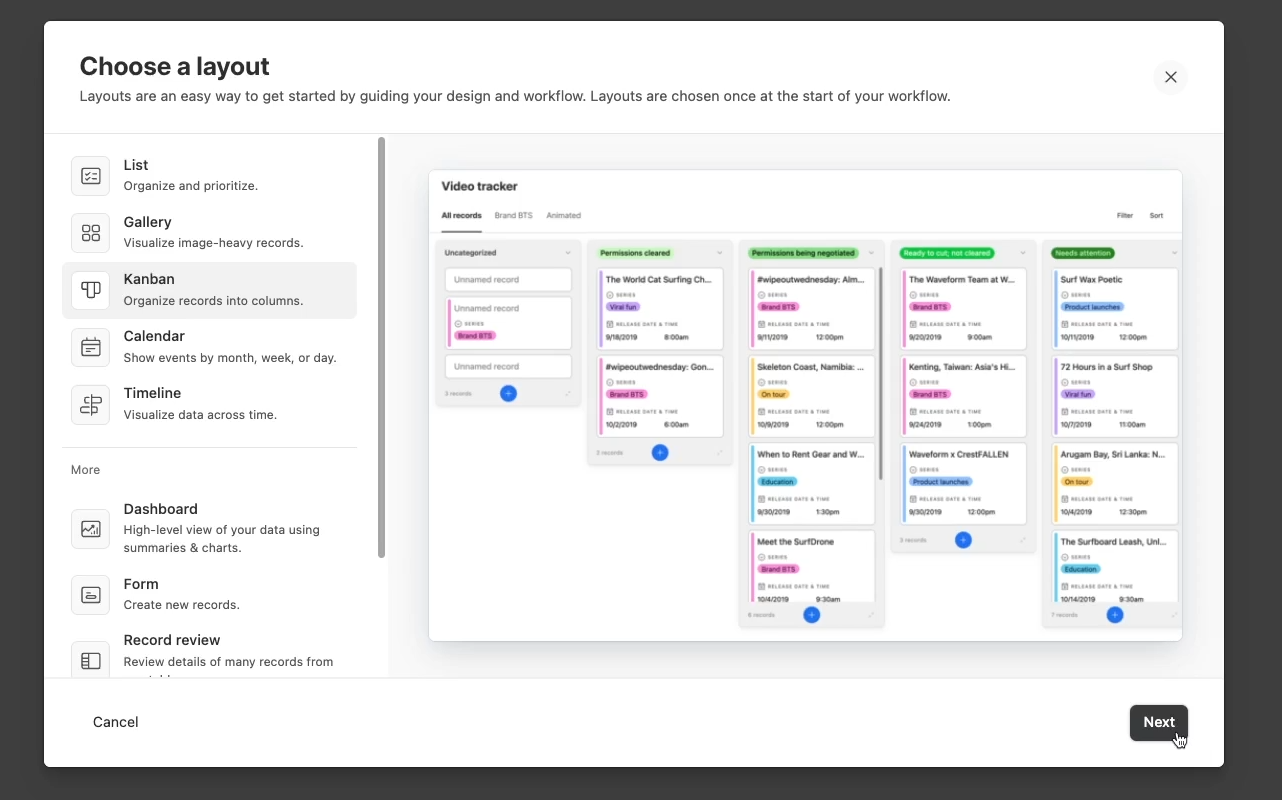
Then, choose a layout. You’ll see several choices that are pretty much identical to views that you can use in the data tab. However, there are a few that are unique to interfaces, like dashboard and record review.
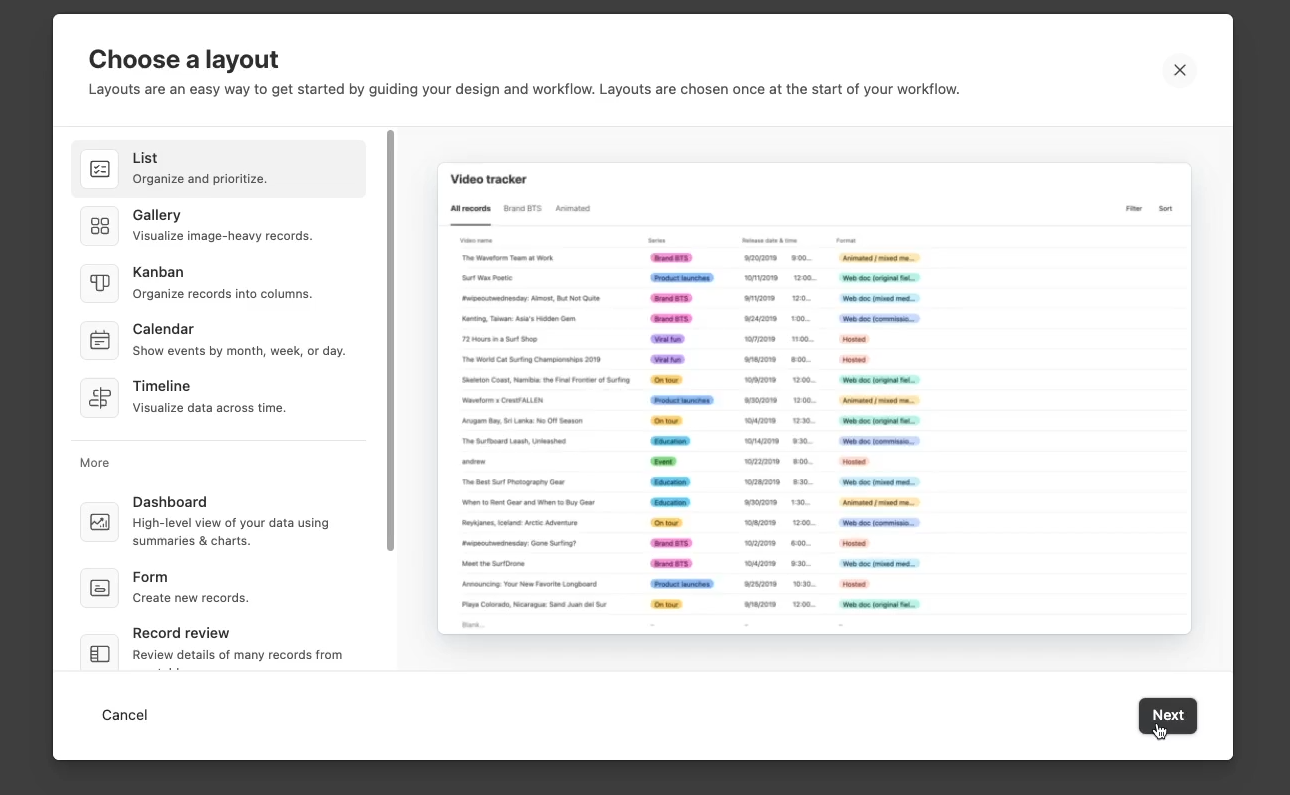
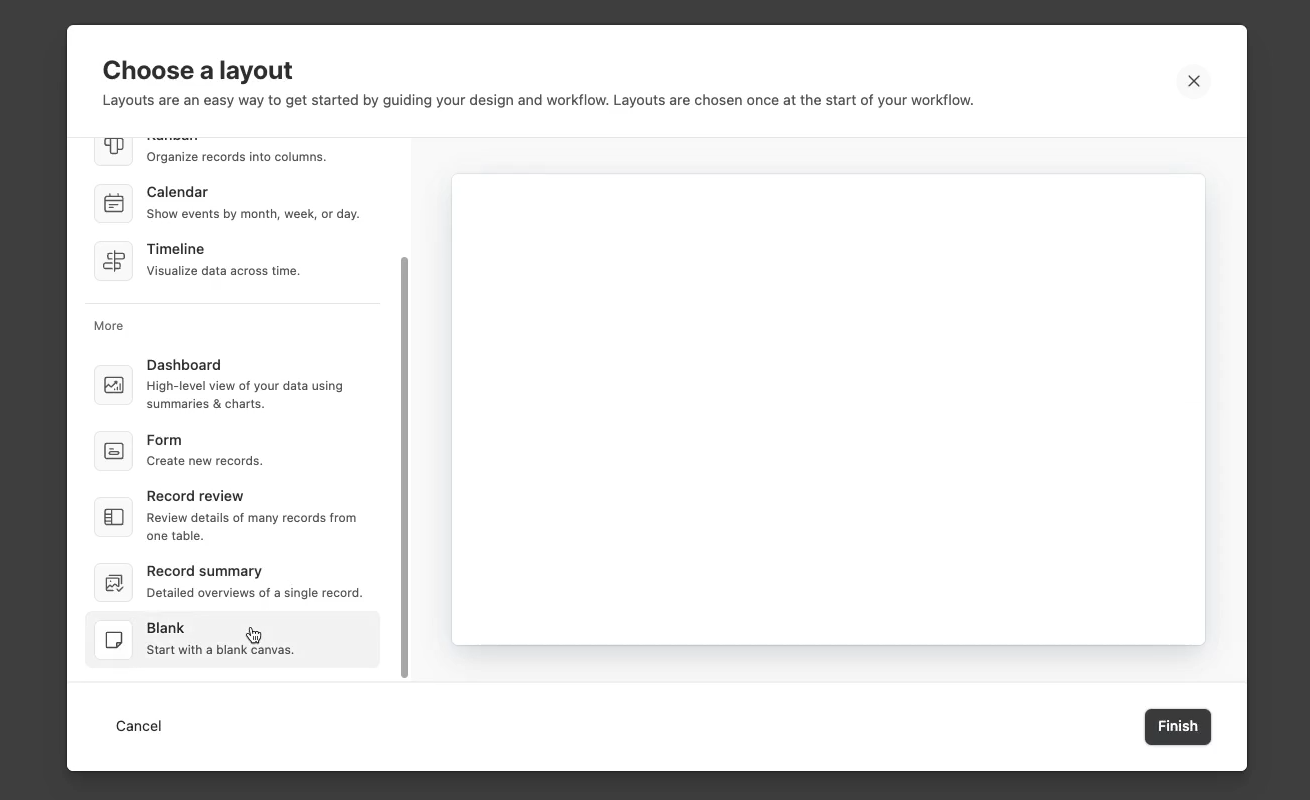
You’ll also see “blank” as an option down at the bottom. If you choose “Blank”, you can add any view option that you’d like to your page. You’ll also be able to add additional elements to the page.
So, for instance, you could customize your blank page to include both a Kanban view element and a grid view element.
If you just choose a pre-made configuration like “Kanban”, you either won’t be able to add any additional elements at all, or will only be able to add limited elements like a text field. Different layouts have different limitations regarding the other elements you can add to the page.
It's a little unintuitive, but we expect this functionality to change and be more consistent across different page types soon.
To start, choose a preconfigured Kanban view to keep things simple. Then click on “next”.
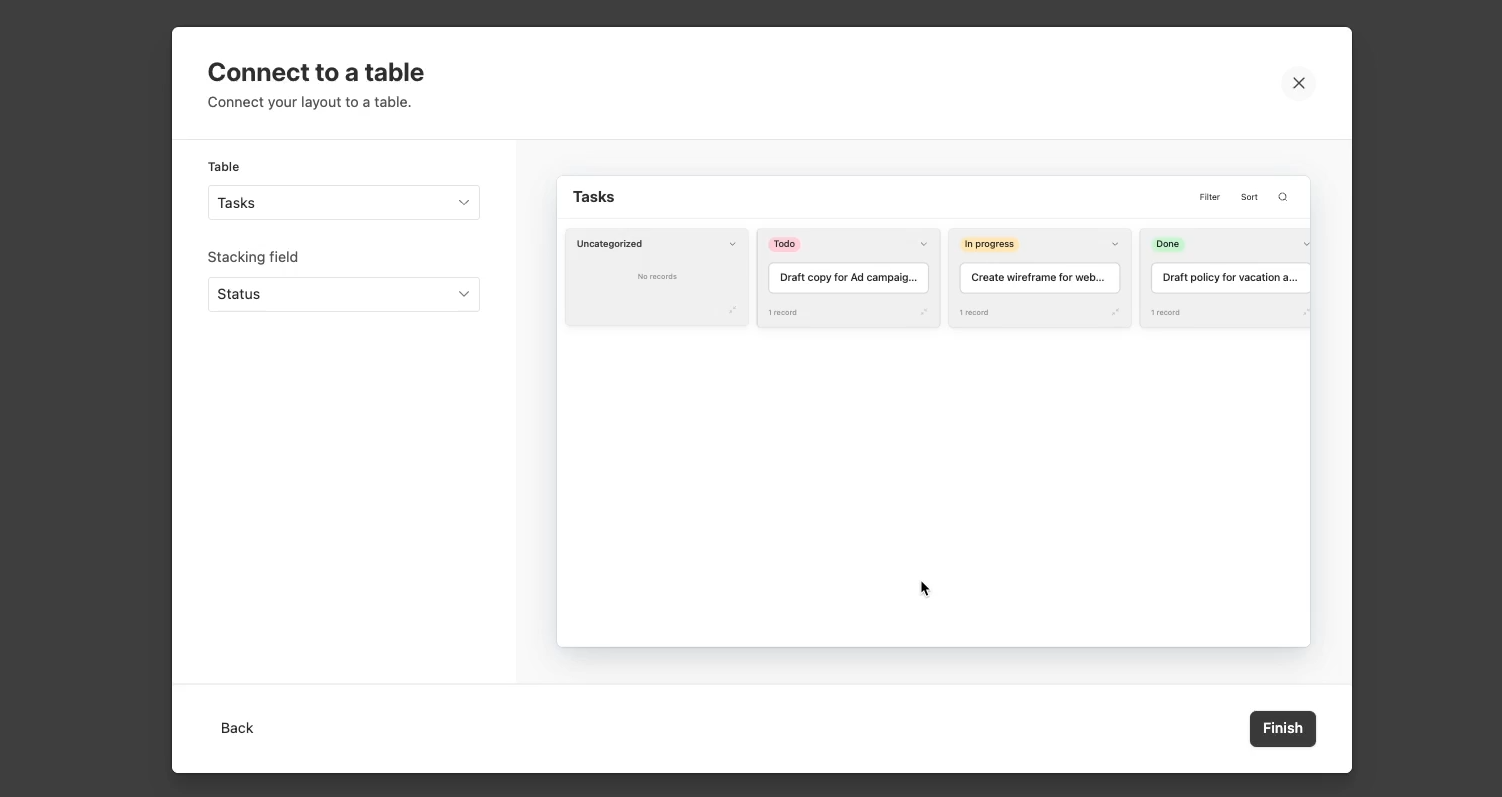
Now, you’ll need to pick the table that you want to get data from, and the stacking field you want to sort by. In this case, you’ll probably want to sort by “Status”. Click “Finish” to create a new interface with a single page for your Kanban layout.
You can configure this page in the menu on the right. Here, you can add filters, change the view into a different layout, edit visible fields and sort options, or modify permissions. For instance, you can control whether or not users can edit records.
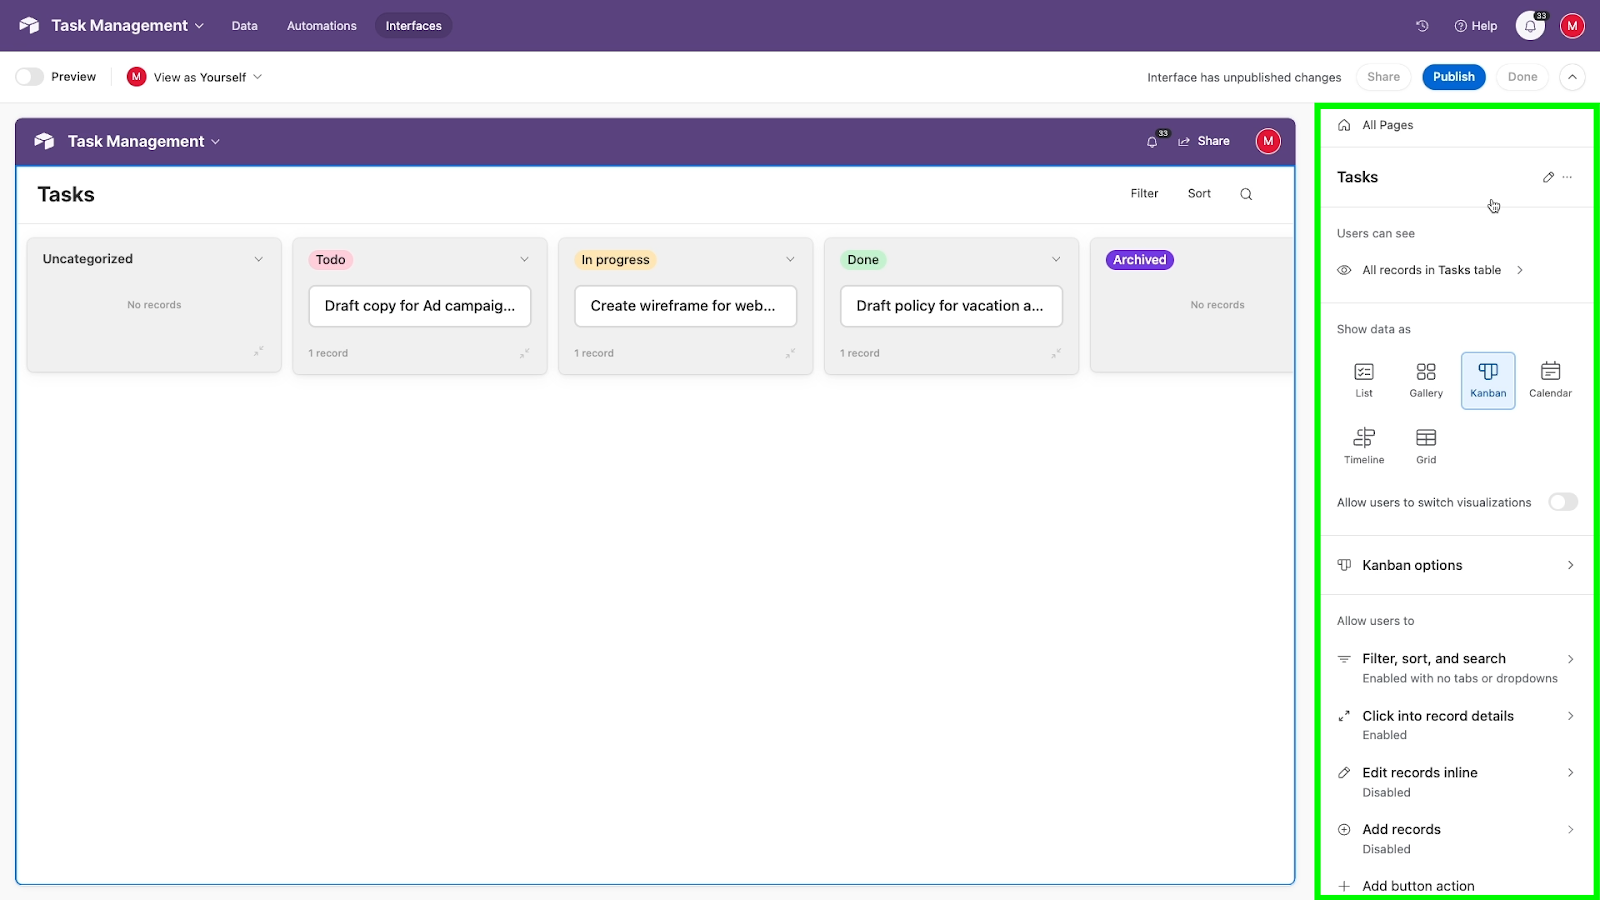
You can even click on a record to set permission for each individual field. From there, you can make each field view-only or editable. Note that every field in an interface page will default to view-only.
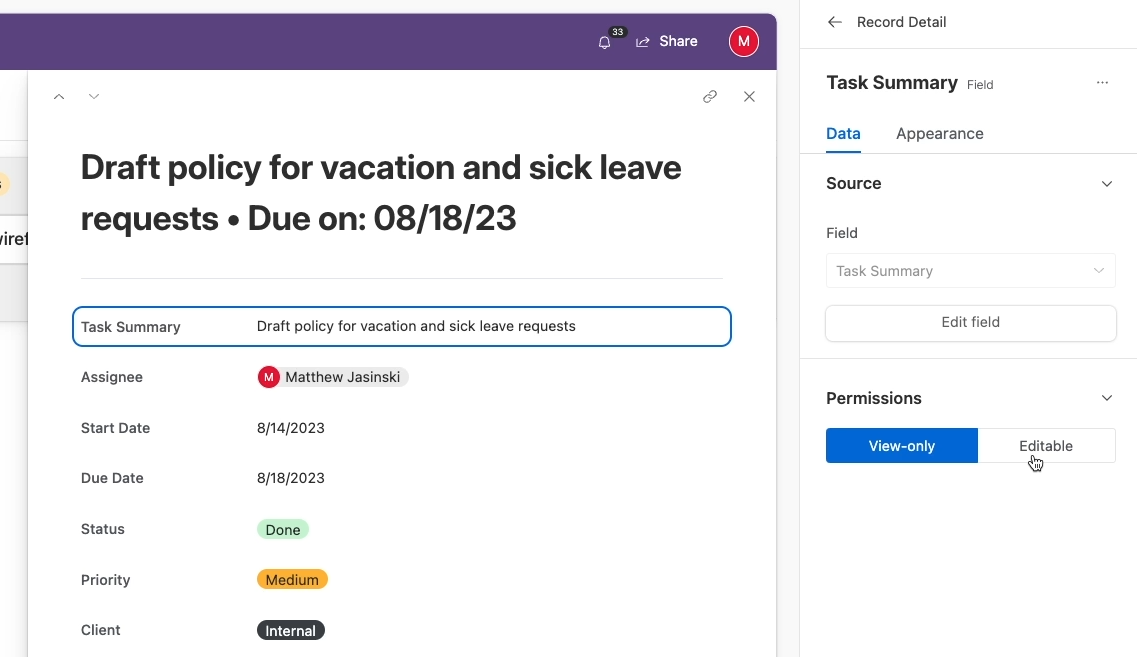
For our example, we’ll change the “Status”, “assignee”, “summary”, “due date”, and “attachment” fields to “Editable”. We’ll leave everything else as “Read-only”.
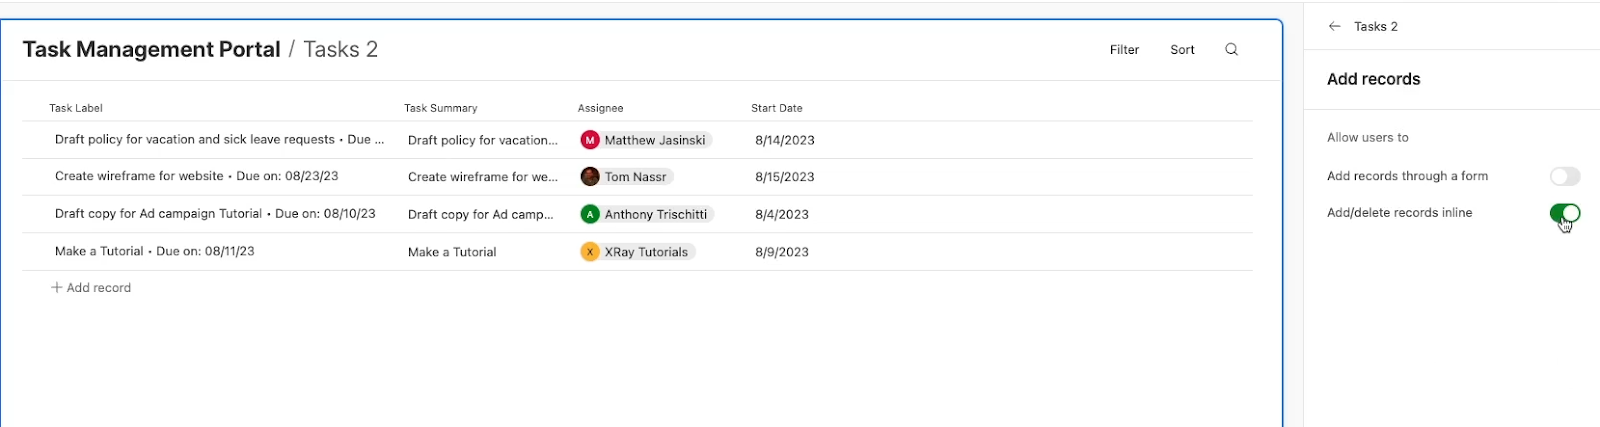
There’s an option to allow users to add records, but we’ll leave that disabled. You’ll want to encourage a single method for creating tasks, and that method will be the form that we create next.
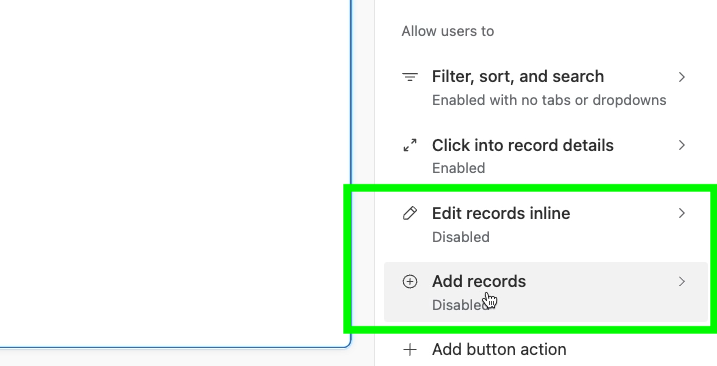
To stick with our system, you should also keep “Edit inline” disabled. Unfortunately, that will disable editing status by dragging and dropping the Kanban cards, but enabling it would allow users to create records here. Instead, we want to have users create tasks strictly with the form.
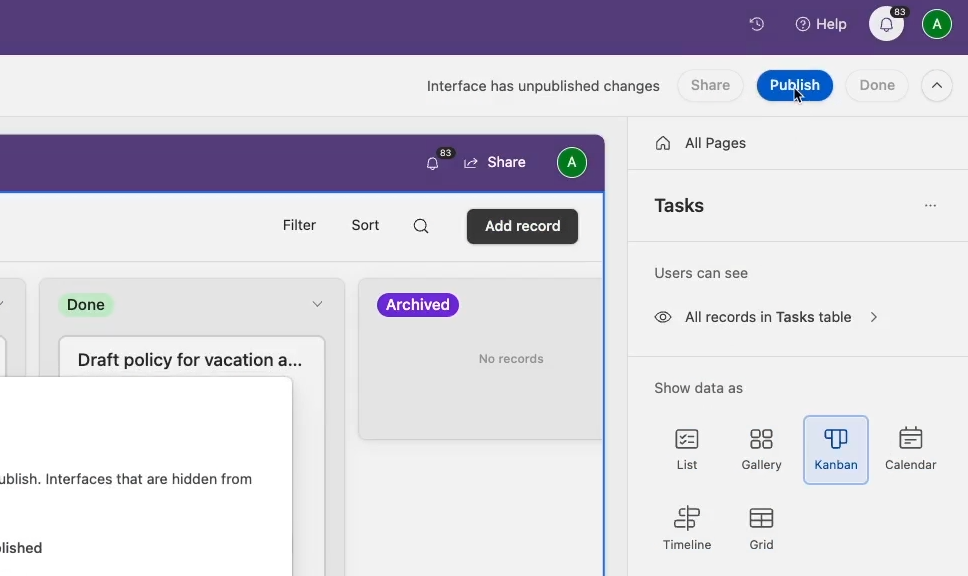
Once your page is all set, click on “Publish” to commit your changes and create a shareable interface.
Sharing your interface
To share the interface with your team, click on “Share”, then invite users by email or with a link.
With either option, you can set your invited users to “Editor”, “Commenter”, or “Read-only”.
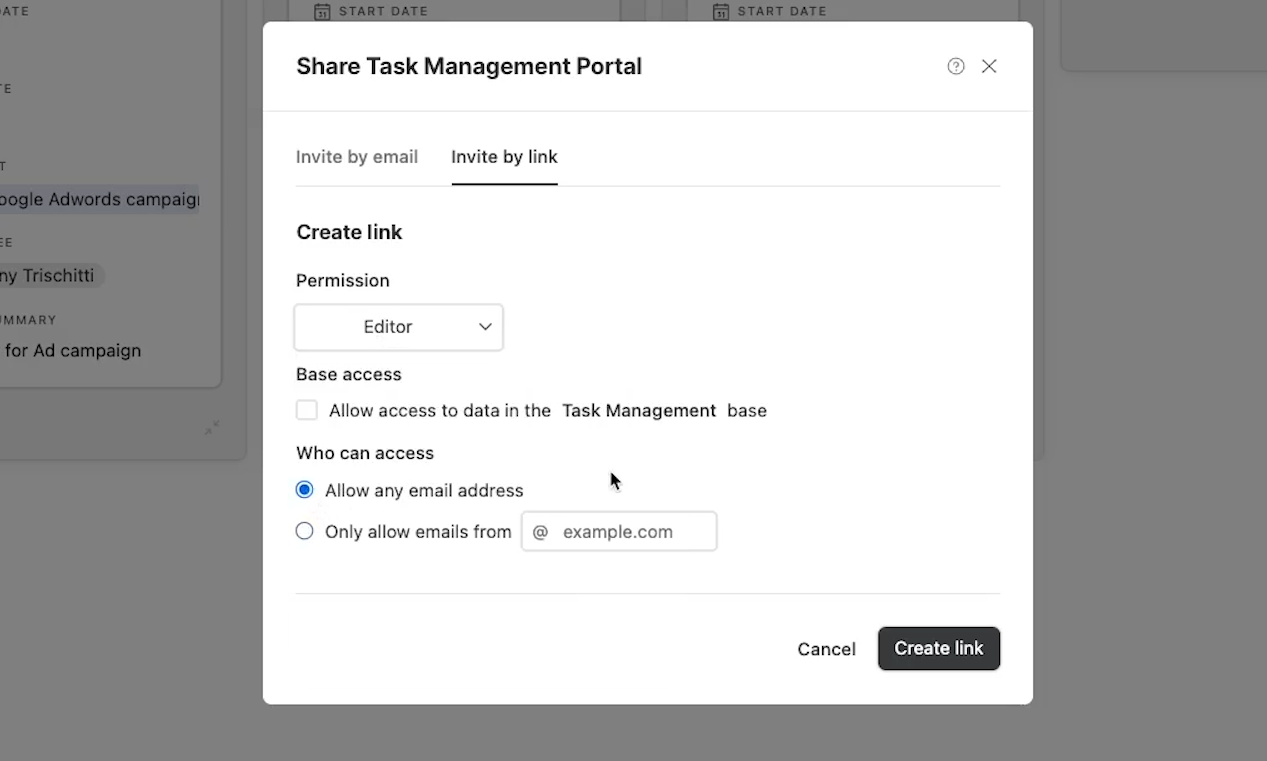
If you create an invite link set to “Editor”, anyone you share this link with can access the interface and edit the fields that you’ve specifically configured to be editable. Granting users “Editor” access will not allow them to edit any fields that you’ve set to “Read Only”.
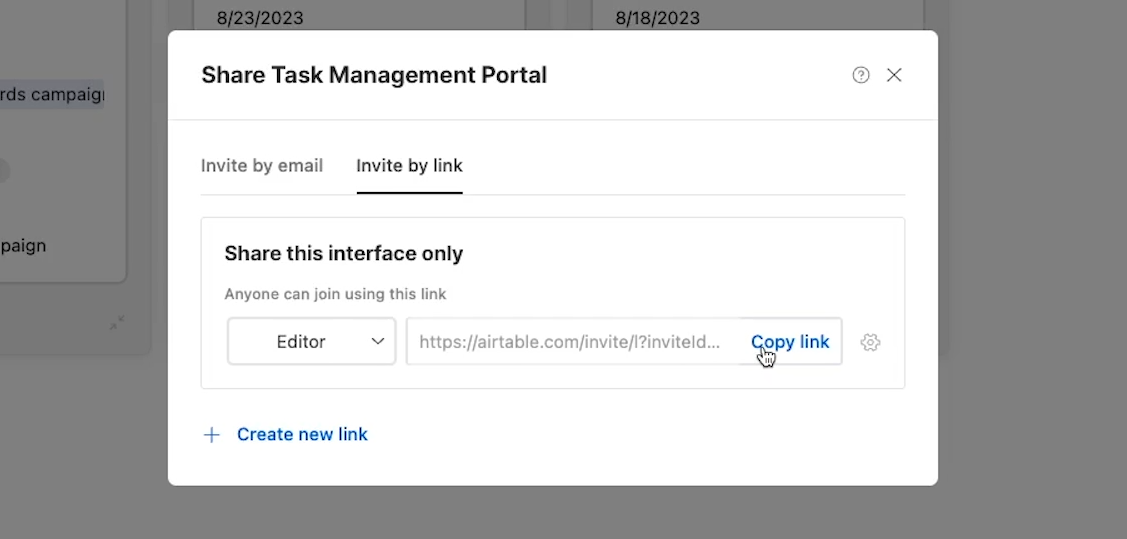
Note that you can also restrict access to users with an email address from your organization. Once you’ve configured your settings, copy the sharing link and open it up while signed into another account.
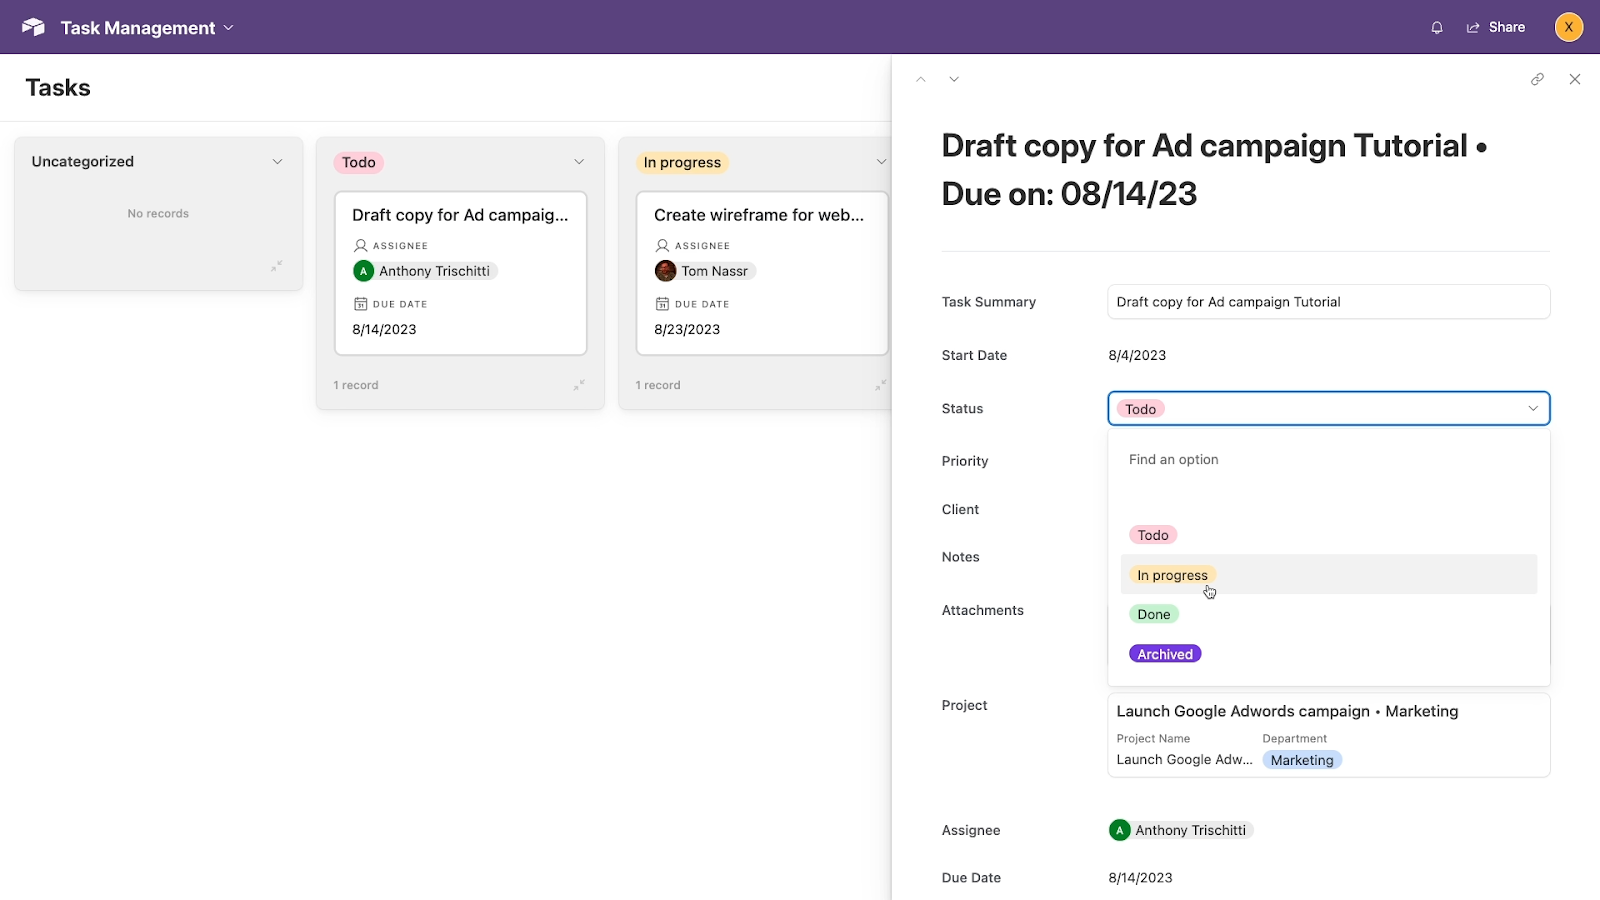
You should be able to view every task that’s already been created, and can click on any of them to edit the fields selected earlier. You should also see that there’s no way to create new tasks on this page, just as intended.
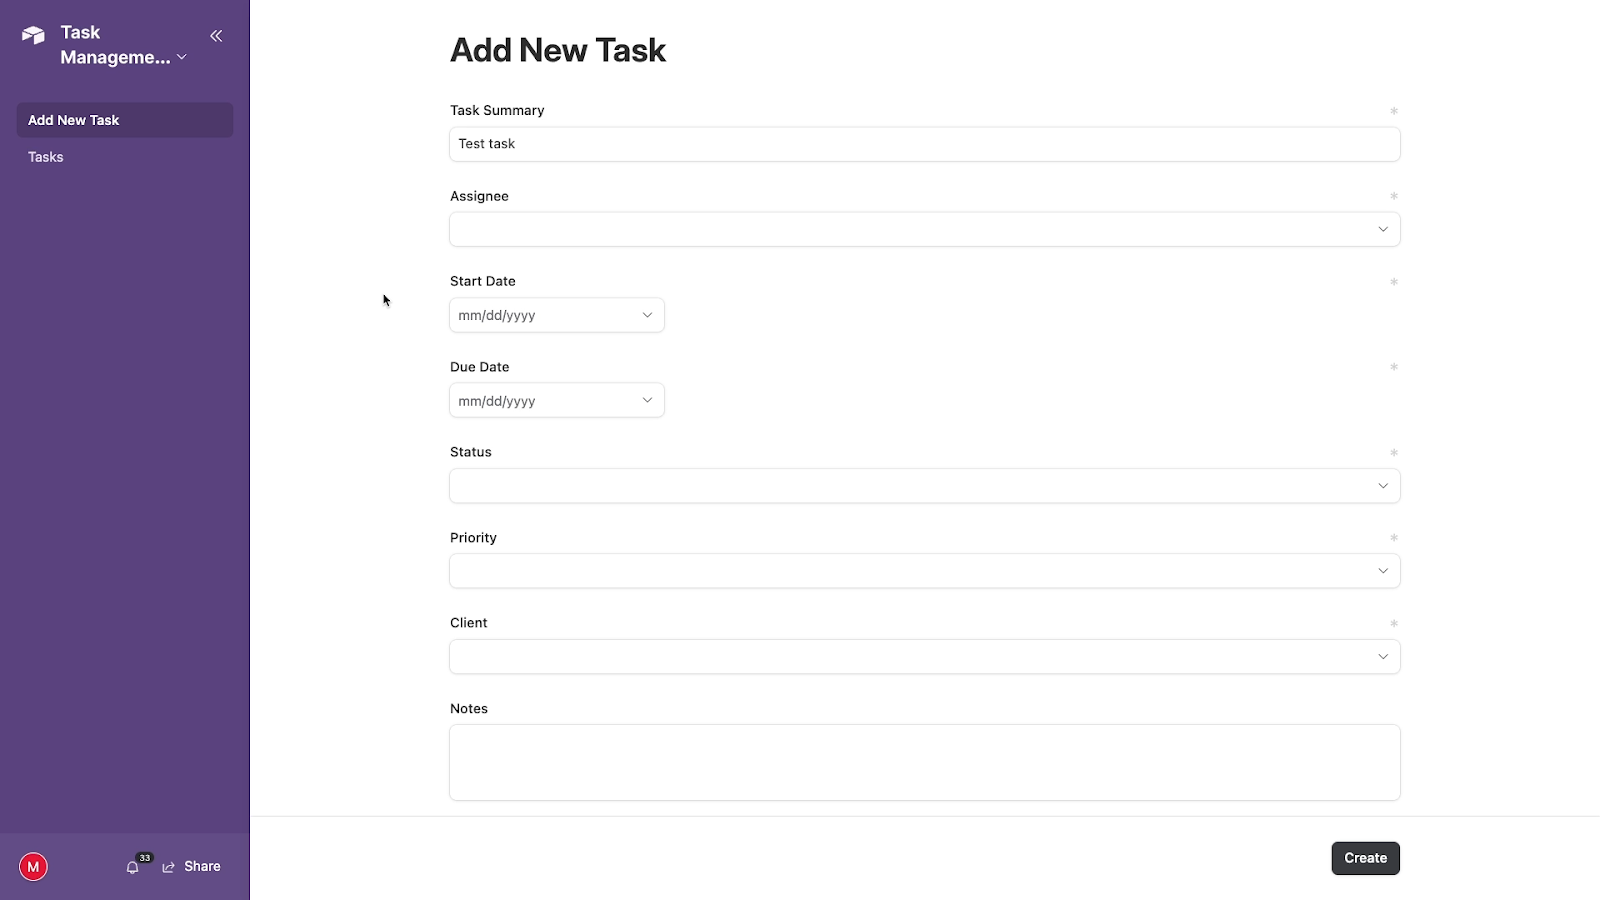
Create a form to let users add tasks
To give our users a way to add new tasks, let’s go back to the interface and add a form.
Open up the interface on your own account again. To edit the published interface, click on the interface’s name at the top of the left hand panel, and select “Edit”. Alternatively, you can use the keyboard shortcut “option 1” on Mac or “Alt 1” on windows to return to the editing view.
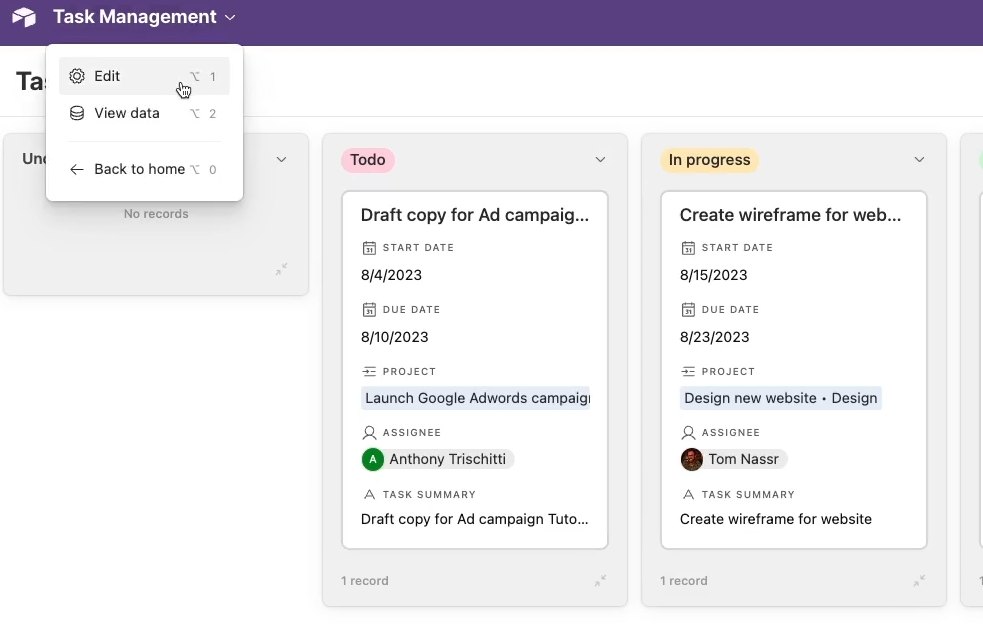
Now you’ll need to add another page to contain your form view. You can do that in the right hand panel by clicking on “Add Page”. If you don’t see “Add Page”, just click on “All Pages” first.
Choose “Form” as the view type. Then, click next and choose the table you want to use. You’ll then be able to select all the fields you want to include in the form. Just uncheck any field to leave it out of the form. Once you’ve made all your selections, click “next”.
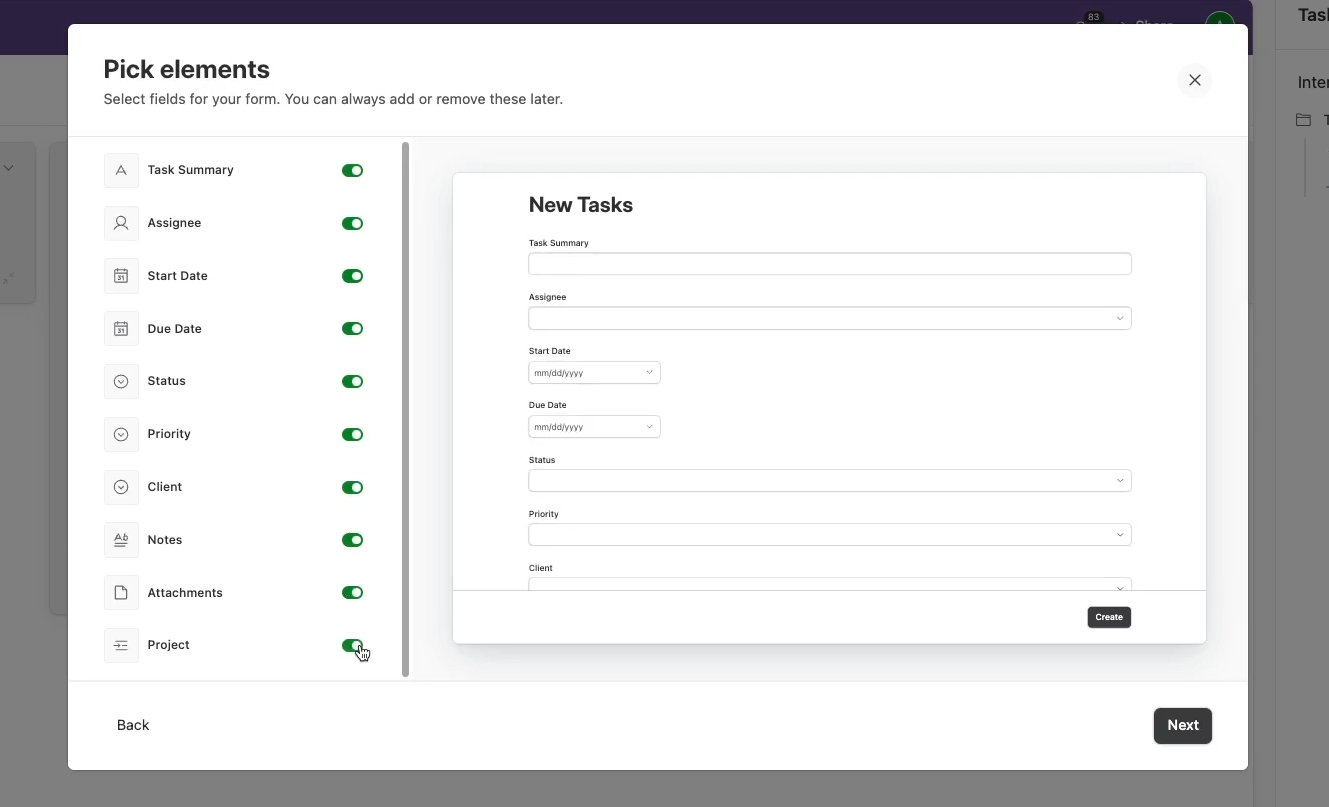
Give the form a name and a description, and click “Finish”.
Now your interface has two pages: one with the kanban view, and one with the form. You can reorder your pages in the panel on the right.
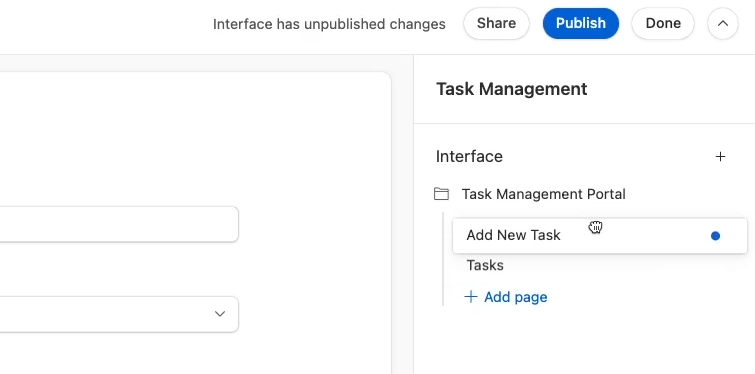
Once your form is all set, click on “Publish” to commit your changes. Once again, open the same sharing link from before with another account.
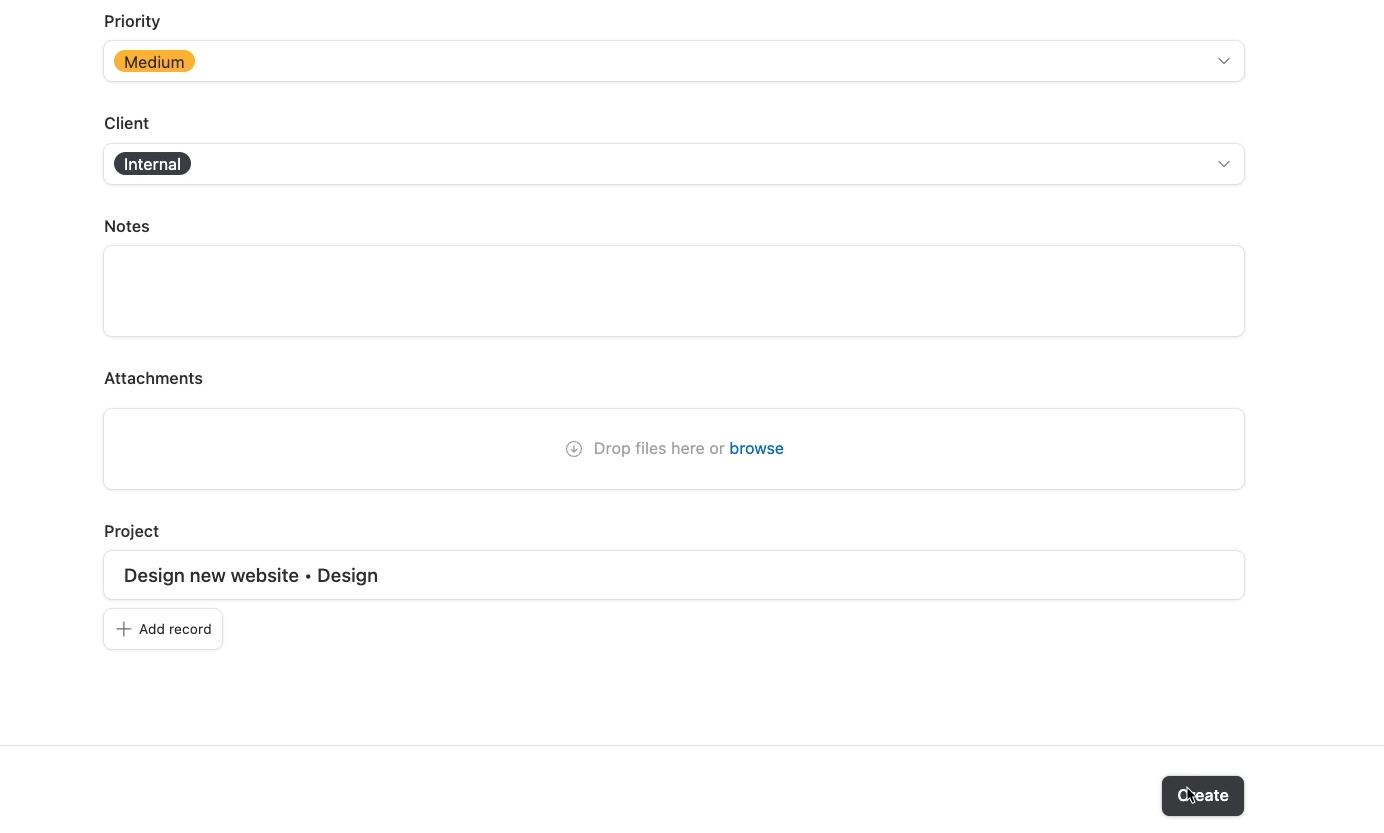
Submit a task in the form. Then, when you open up the Kanban page, you should see the new task on the board. When you open up the task, you can edit all of the fields that you set to “editable”.
Now, with this interface, your team has two clearly defined pages to use; one for adding tasks and one for editing tasks.
If you’d prefer to let your team add and edit tasks in a more conventional layout, you can always add list or grid view elements to a blank page. Then enable the “Edit records inline” and “Add records” settings.
Why we recommend separate pages for adding and editing tasks
However, by splitting the actions of adding tasks and editing tasks, you can ensure that everyone creates complete tasks with the form, and only edits the data you want them to edit. Ultimately, it’s up to you.
Again, one of the main benefits of using Airtable for task management is that you can use any format that you’d like - whether that’s a Kanban, a form, a list, a timeline, or something else.
You can also add filters to any view in an interface to create views that are specific to each department, or specific to each project.
This base is just a starting point, and everything can be customized to your liking. Try out a few different views and settings and see what works best for you.
Automating your tasks table
Finally, to wrap up the task management base, let’s take a quick look at enhancing your task management system with no-code automation.
Airtable is an ideal app to use as an operational database for your automations. You can build useful automations with Airtable’s native automation builder, or you can use third-party providers like Zapier and Make to integrate Airtable with thousands of other apps.
The possibilities with Airtable automation are endless, so we won’t be able to give you a comprehensive guide to everything you can automate.
Instead, we’re just going to give you a simple example to show you how you can start building automations in your task management base.
Create a new automation
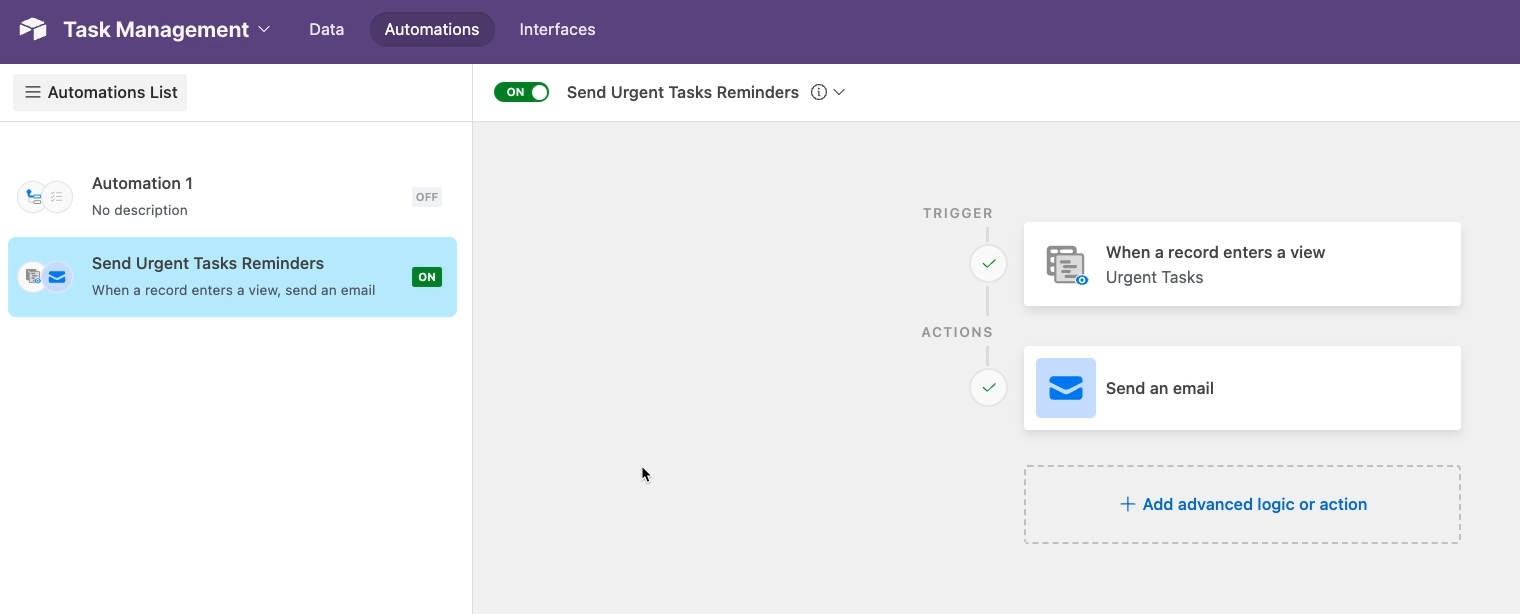
In this example, we will show you how to build an automation that sends an email alert to the assignee of any incomplete and urgent task.
As noted before, this automation will only work if you’re using the “User” field type for assignee. That’s how you’ll get the user’s email address.
Alternatively, you could use a Linked Record if you want to set up an additional “team” table, and include each user’s email address in that table. You could also include other contact info there, like Slack IDs.
However, using the “User” field type will be much faster for this example.
To create a new automation, click on the “automations” tab. If you haven’t added any automations to your base, this will immediately create a new automation and prompt you to pick a trigger.
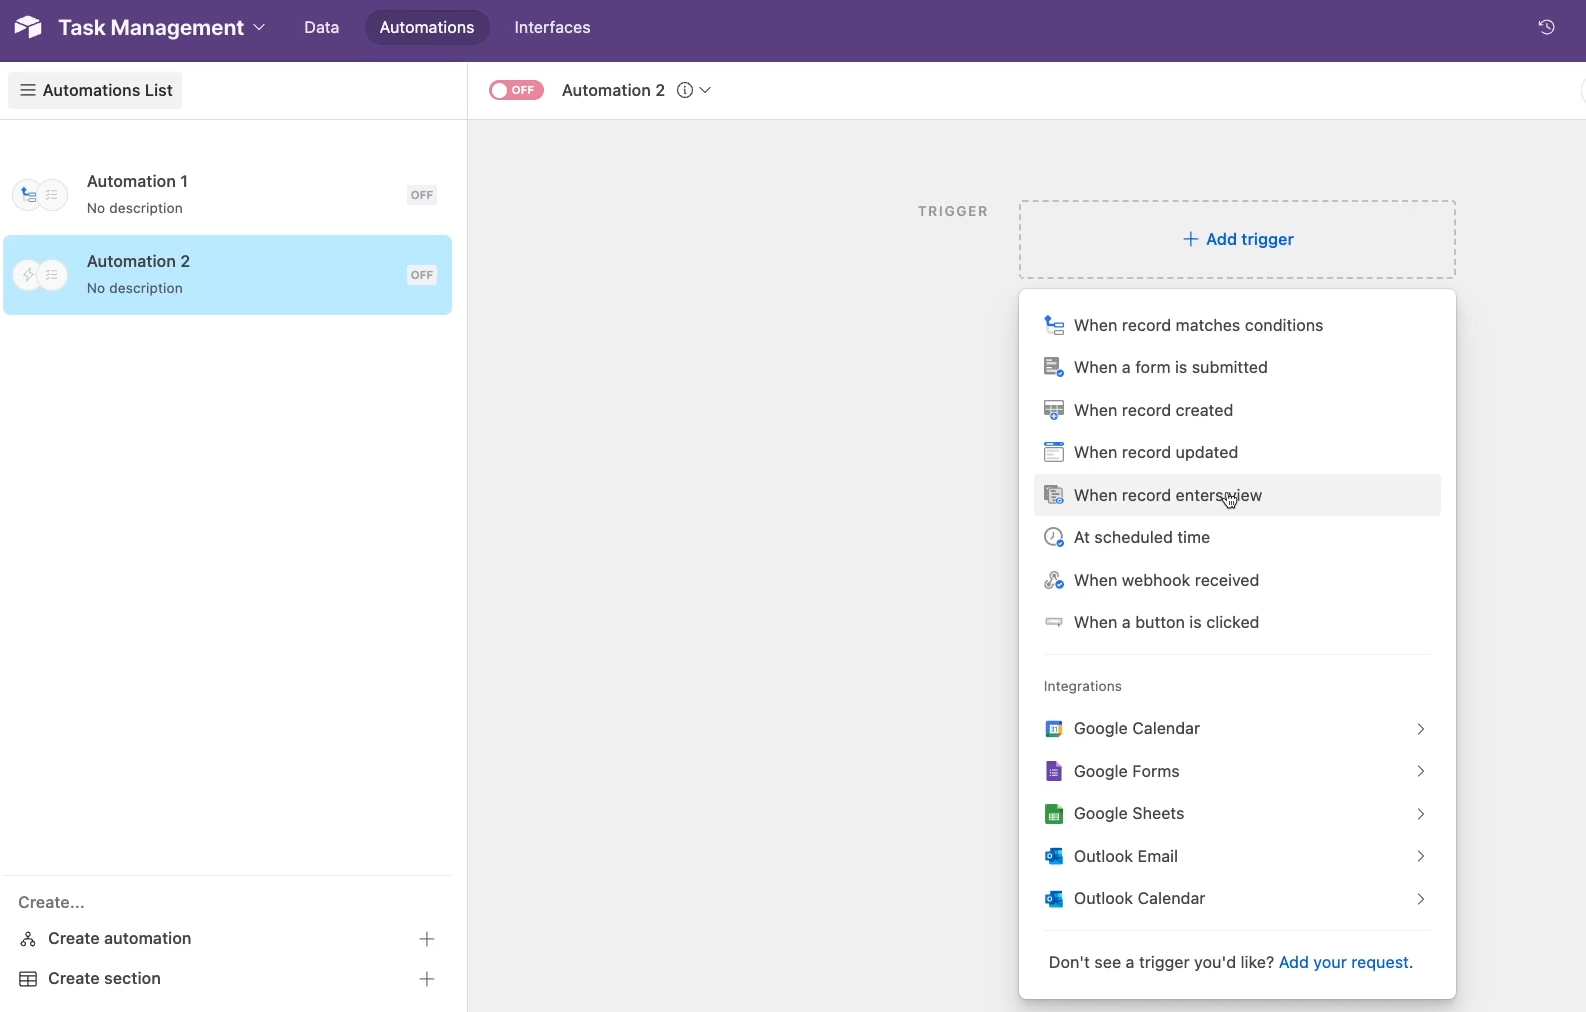
If you already have an automation in the base, click on “Create automation” to add a new one, then choose a trigger.
Whenever your trigger event occurs, your automation will run.
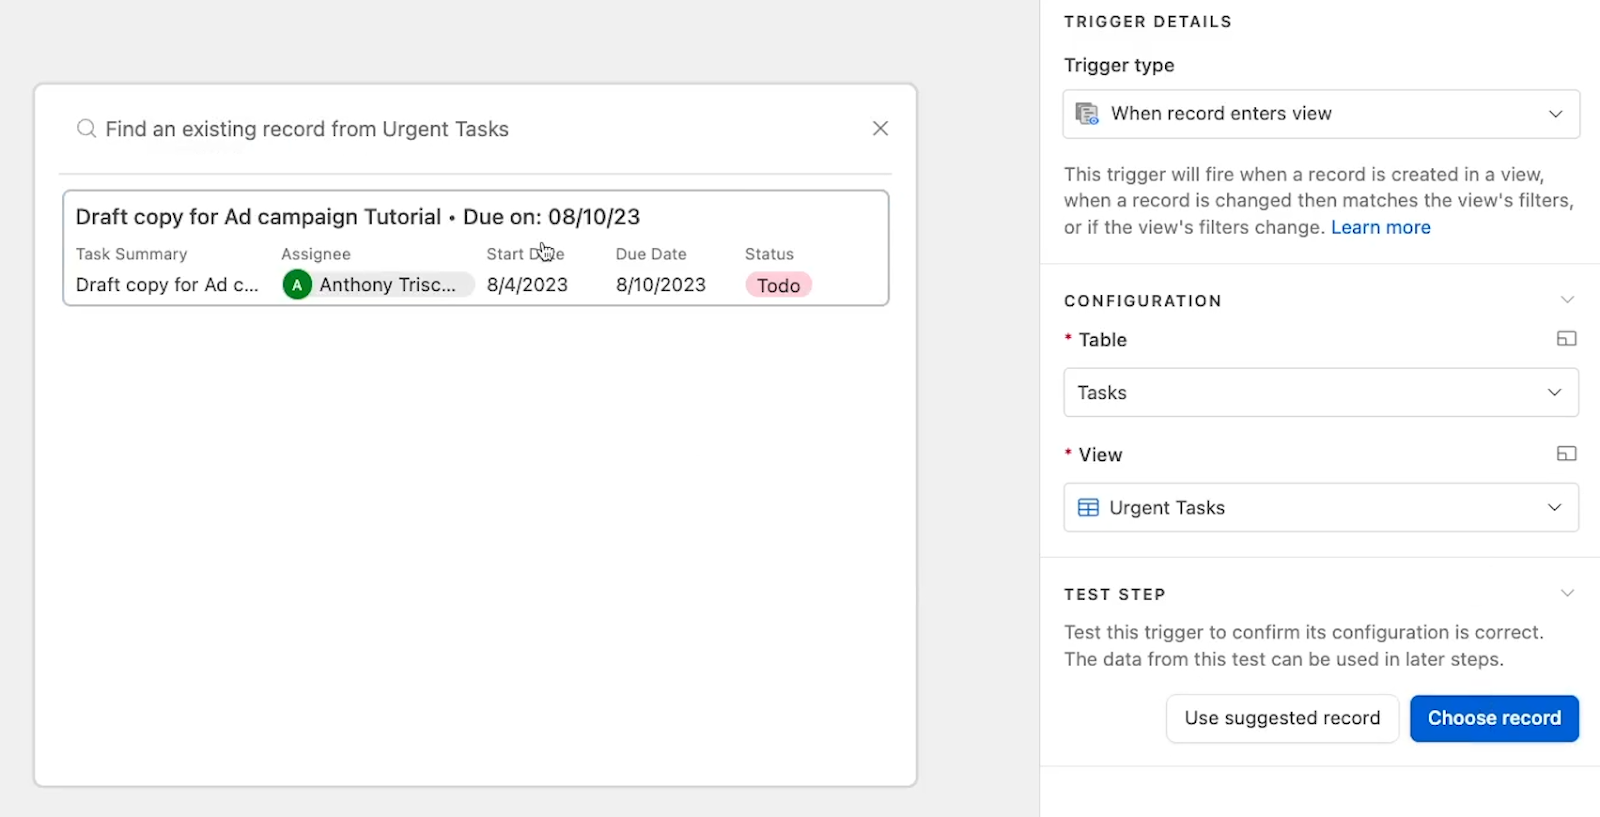
For this automation, choose “When a record enters a view”, so that the automation will only run when a record enters the “Urgent Tasks” view that we created earlier. Just as a reminder, that view has a filter that checks for tasks that are incomplete, high priority, and due within 3 days.
Next, you’ll need to identify the table and view that you want to use for this automation.

Then, test the trigger by choosing a record.
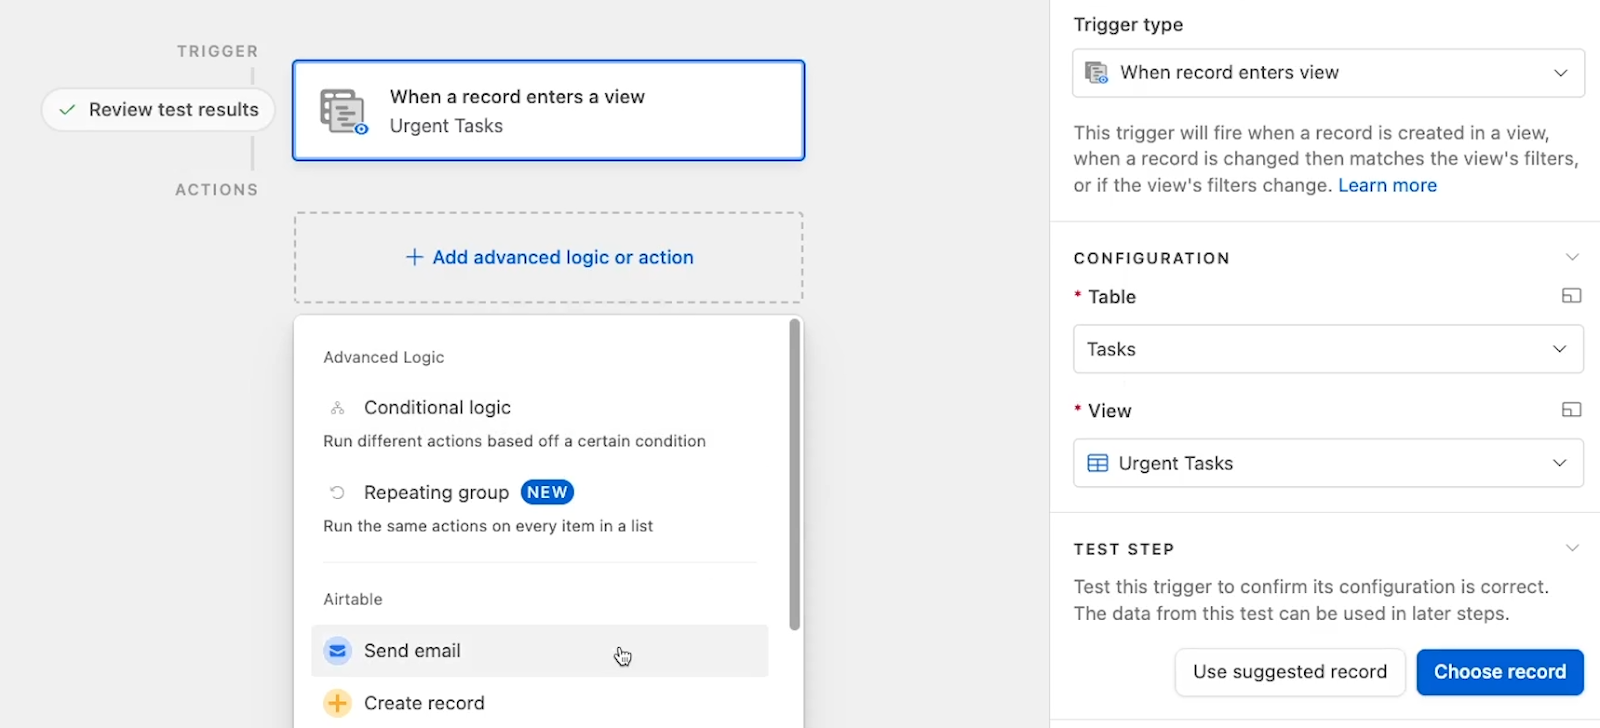
If the test is successful, you can now add an automated action. Click on “Add advanced logic or action”, and choose the “Send email” action.
To populate the “to” field, use the “Assignee” field from your Tasks table. To use dynamic data from your Airtable base in an automation, click on the blue plus sign in the field you’re configuring.
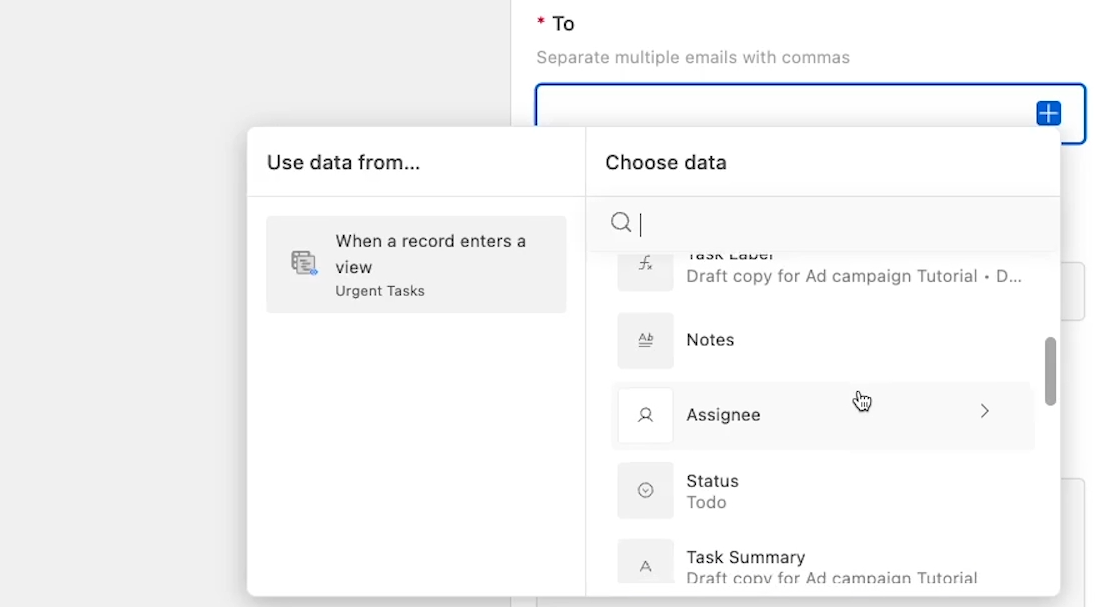
In the window that pops up, you can see that we’re using data retrieved by the automation’s trigger, so we have access to every field that’s part of that record. Select “assignee”.
Since “Assignee” is a “User” field, it has several pieces of data: ID, email, name, and profile picture. In this case, you’ll just want to select the email address.
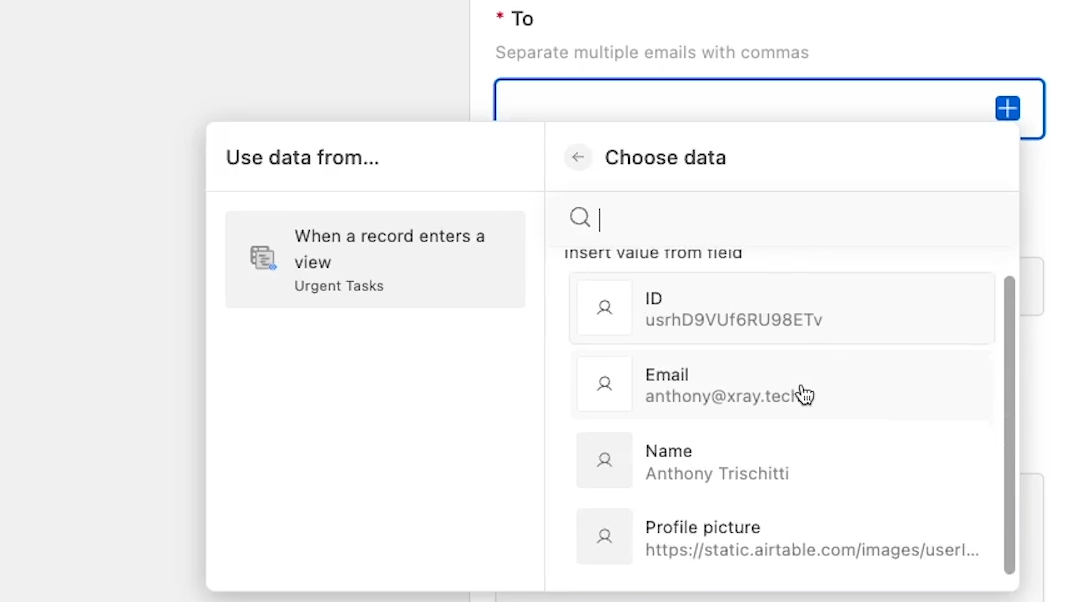
Now, your automation is set to send an email to whoever the assignee is on any task that enters the “Urgent Tasks” view.
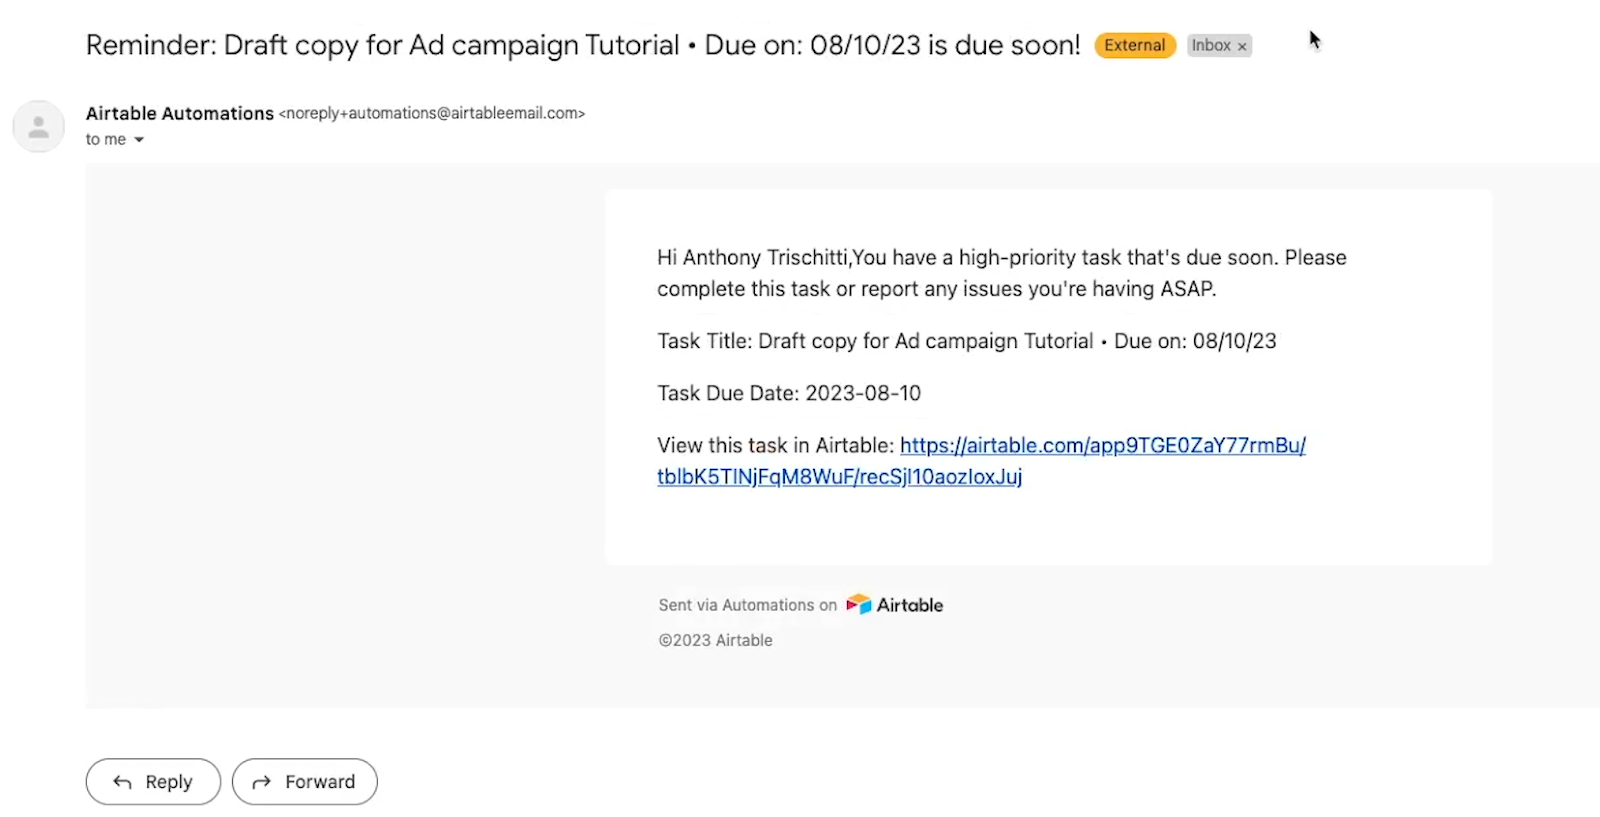
Next, add a generic subject line for the email, such as “Reminder: {task Name} is due soon!”. You can also use some dynamic data here to insert the actual task’s name.
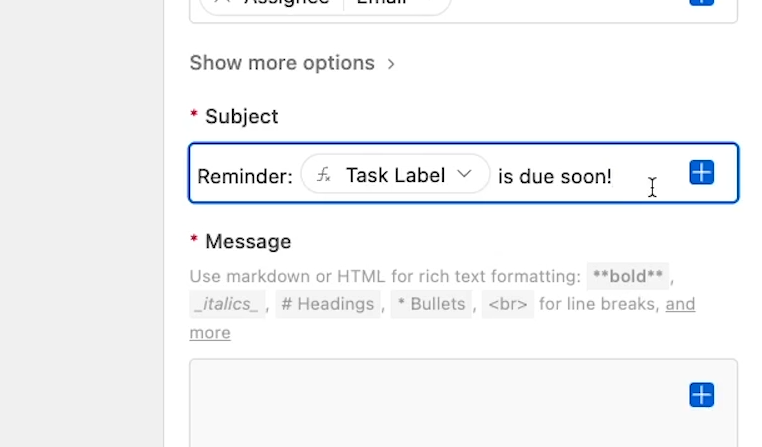
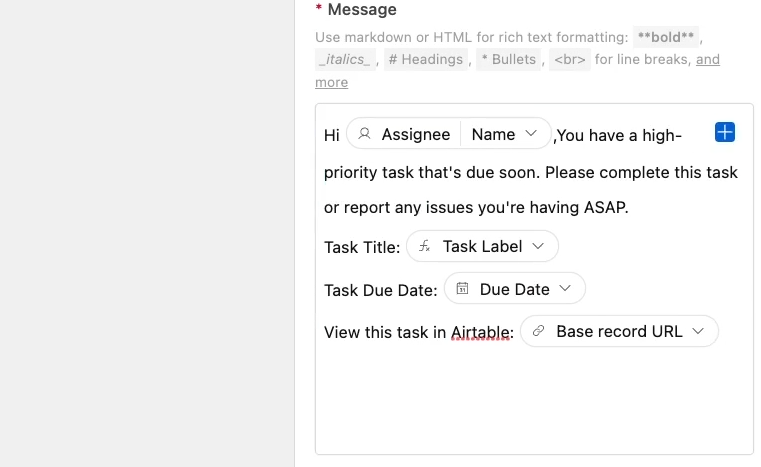
Then, you can fill out the email body with more static and dynamic detail. For instance, you’ll probably want to use the “name” from the “Assignee” field to personalize the message, and add a title and link for the task for easy reference.
To test the step, start by generating a preview. This will show you what the finished message will look like, but won’t actually send an email.
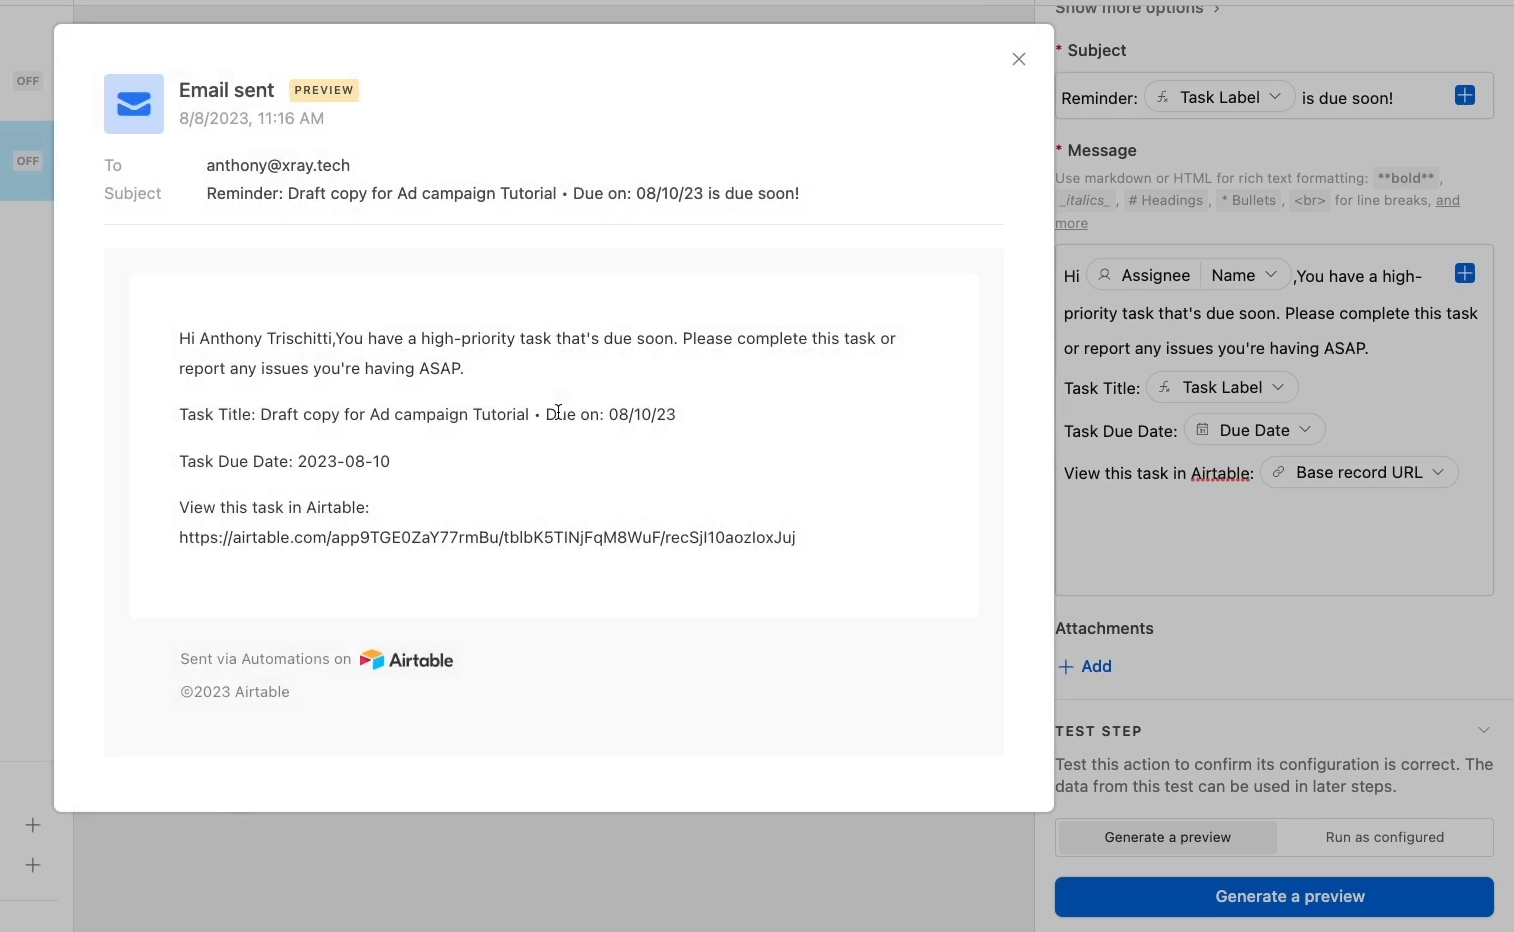
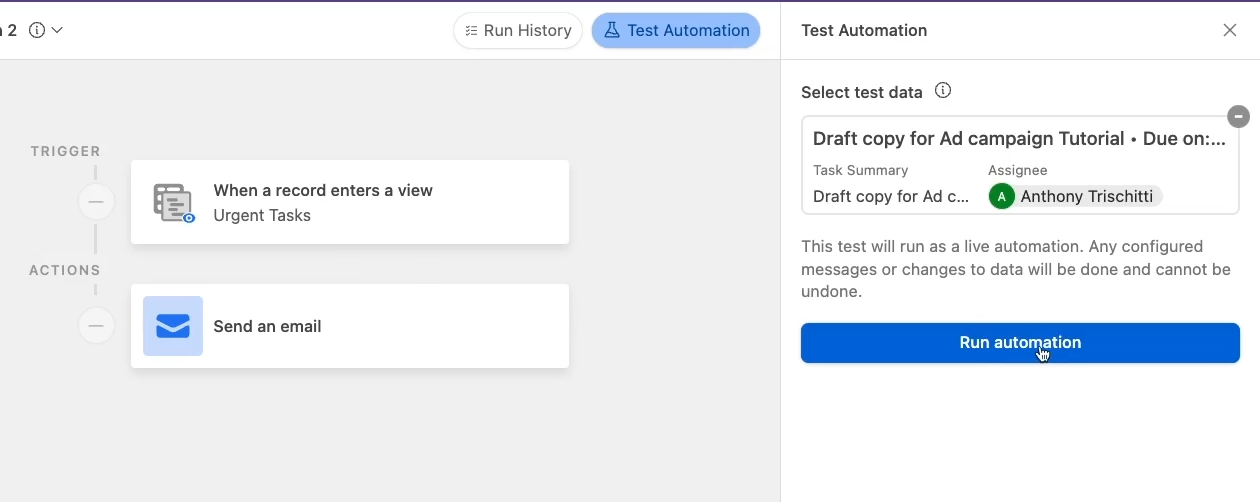
If the message looks good, click on test automation. Then, select a record, and click on “run automation”.
When you check your inbox, you should see a new email from Airtable Automations, complete with the message you configured.
Finally, give the automation a descriptive name and turn it on, so it will run whenever a task enters the “Urgent Tasks” view.
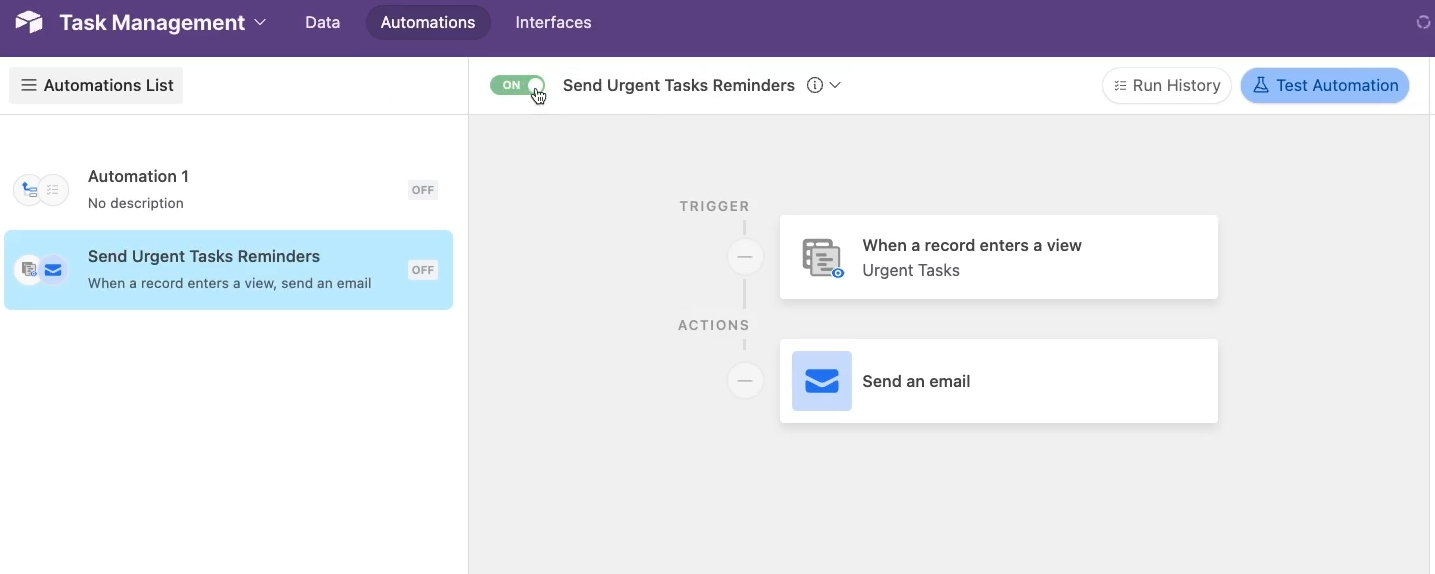
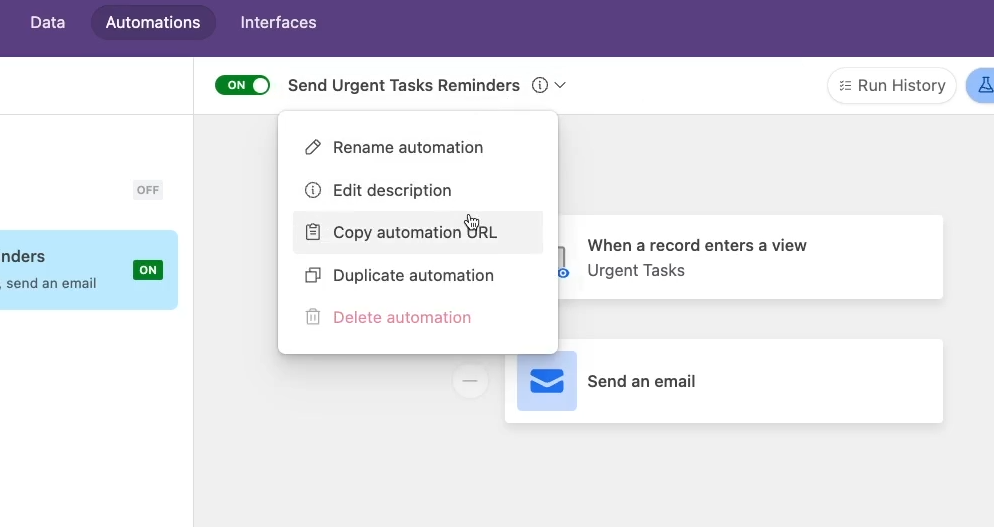
We’d also recommend copying the automation’s URL and adding it to the description of the Urgent Tasks View so everyone can see that there’s an associated automation.
More automation possibilities
Again, this is just an example of the sort of automation you could build with your tasks. You could also configure additional alerts for any newly created task, or configure automations to create specific onboarding tasks whenever a new deal is marked as closed/won in your CRM.
You could even set up an automation to create a task by simply responding to a message in Slack with a custom emoji. We’ve built a Slack task maker for our team at XRay, and we use it every day to quickly create tasks right alongside our key conversations.
Every channel is mapped to a project, and every team member has their own emoji. Note that the specific apps used in this automation could always be changed. For instance, you could swap Slack for Teams or any other messaging software.
The beauty of low-code automation is that the pieces are usually interchangeable. Any SaaS tool can usually be swapped out for a similar alternative.
If you’re interested in building a Slack Task Maker automation for your team, just reach out to XRay for a free consultation, and we’ll explore your options. And if you’d like to learn more about automating with Airtable, be sure to check out some of the other blogs on our website.
Craft your own task management system in Airtable
Airtable is an excellent tool for no-code builders. Using Airtable’s customizable fields, views, interfaces and automations, you can create any system you’d like for managing your tasks and projects. Copy our base or build your own to get started today.
If you’d like to learn more about no-code tools like Airtable, Notion, Zapier, and more, be sure to check out our blog or our YouTube channel. You can also follow XRay on Twitter, Facebook, or LinkedIn.